Salt & Swim Owner's Manual
Page 1
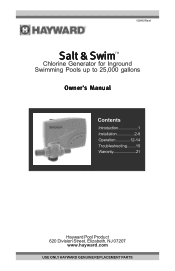
092463 RevA Salt & SwimTM Chlorine Generator for Inground Swimming Pools up to 25,000 gallons Owner's Manual Contents Introduction 1 Installation 2-8 Operation 12-14 Troubleshooting........15 Warranty 21 DIY-12 DIY-6 Hayward Pool Product 620 Division Street, Elizabeth, NJ 07207 www.hayward.com USE ONLY HAYWARD GENUINE REPLACEMENT PARTS
092463 RevA Salt & SwimTM Chlorine Generator for Inground Swimming Pools up to 25,000 gallons Owner's Manual Contents Introduction 1 Installation 2-8 Operation 12-14 Troubleshooting........15 Warranty 21 DIY-12 DIY-6 Hayward Pool Product 620 Division Street, Elizabeth, NJ 07207 www.hayward.com USE ONLY HAYWARD GENUINE REPLACEMENT PARTS
Salt & Swim Owner's Manual
Page 3
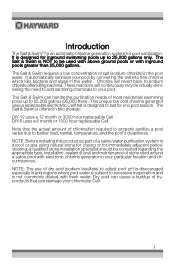
..., sealant (if any) and maintenance of stone used with above ground pools or with electronic chlorine generator in your chlorinator Cell. 1 The Salt & Swim can damage your particular location and circumstances. NOTE: The use of chlorination required to properly sanitize a pool varies due to 25,000 gallons ...only. The Salt & Swim is offered in two models: DIY-12 uses a 12 month or 3000 hour replaceable Cell DIY-6 uses a 6 month or 1500 hour ...
..., sealant (if any) and maintenance of stone used with above ground pools or with electronic chlorine generator in your chlorinator Cell. 1 The Salt & Swim can damage your particular location and circumstances. NOTE: The use of chlorination required to properly sanitize a pool varies due to 25,000 gallons ...only. The Salt & Swim is offered in two models: DIY-12 uses a 12 month or 3000 hour replaceable Cell DIY-6 uses a 6 month or 1500 hour ...
Salt & Swim Owner's Manual
Page 4
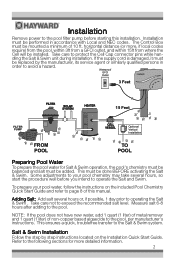
...(1 liter) of metal remover and 1 quart (1 liter) of non-copper based algaecide to the following sections for Salt & Swim operation, the pool's chemistry must be balanced and salt must be mounted a minimum of this installation. Installation Remove power to avoid a hazard. This must be added. ...Installation must be performed in order to the pool filter pump before you intend to operating the Salt & Swim . horizontal distance (or more detailed information. 2 If the supply cord is damaged, it must be replaced by step instructions located...
...(1 liter) of metal remover and 1 quart (1 liter) of non-copper based algaecide to the following sections for Salt & Swim operation, the pool's chemistry must be balanced and salt must be mounted a minimum of this installation. Installation Remove power to avoid a hazard. This must be added. ...Installation must be performed in order to the pool filter pump before you intend to operating the Salt & Swim . horizontal distance (or more detailed information. 2 If the supply cord is damaged, it must be replaced by step instructions located...

Salt & Swim Owner's Manual
Page 5
...), it is installed. 3 After ma rkin g the moun tin g surface w ith this templateto locateand drillfastenerholes. The Control Box must use a Hayward DIY-POLYPIPE adapter kit. Mounting the Salt & Swim Control Box The Salt & Swim is contained in a raintight enclosure that is mounted. Before securing the Control Box to install in either 1½" or 2" PVC pool...
...), it is installed. 3 After ma rkin g the moun tin g surface w ith this templateto locateand drillfastenerholes. The Control Box must use a Hayward DIY-POLYPIPE adapter kit. Mounting the Salt & Swim Control Box The Salt & Swim is contained in a raintight enclosure that is mounted. Before securing the Control Box to install in either 1½" or 2" PVC pool...
Salt & Swim Owner's Manual
Page 8
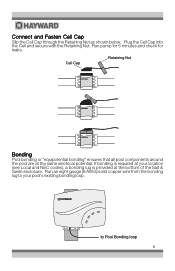
... from the bonding lug to Pool Bonding loop 6 to your location (see Local and NEC codes), a bonding lug is provided at the bottom of the Salt & Swim enclosure. If bonding is required at the same electrical potential. Connect and Fasten Cell Cap Slip the Cell Cap through the Retaining Nut as shown...
... from the bonding lug to Pool Bonding loop 6 to your location (see Local and NEC codes), a bonding lug is provided at the bottom of the Salt & Swim enclosure. If bonding is required at the same electrical potential. Connect and Fasten Cell Cap Slip the Cell Cap through the Retaining Nut as shown...
Salt & Swim Owner's Manual
Page 9
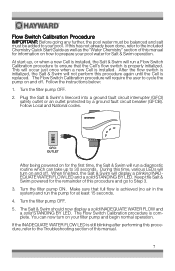
... The Flow Switch Calibration procedure will turn on for at least 15 seconds. 4. GFCI OUTLET After being powered on your pool water for Salt & Swim operation. Turn the filter pump ON. Turn the filter pump OFF. 5. Follow Local and National codes. During this procedure again until the ...Start Guide as well as the "Water Chemistry" section of this manual for the remainder of this procedure and go to your pool. The Salt & Swim should now display a solid INADEQUATE WATER FLOW and a solid STANDING BY LED. If the INADEQUATE WATER FLOW LED is properly initialized. This...
... The Flow Switch Calibration procedure will turn on for at least 15 seconds. 4. GFCI OUTLET After being powered on your pool water for Salt & Swim operation. Turn the filter pump ON. Turn the filter pump OFF. 5. Follow Local and National codes. During this procedure again until the ...Start Guide as well as the "Water Chemistry" section of this manual for the remainder of this procedure and go to your pool. The Salt & Swim should now display a solid INADEQUATE WATER FLOW and a solid STANDING BY LED. If the INADEQUATE WATER FLOW LED is properly initialized. This...
Salt & Swim Owner's Manual
Page 10
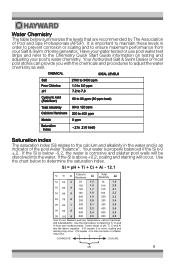
... water tested or use : Measure pool pH, temperature, calcium hardness, and total alkalinity. If Si equals -.2 or less corrosion or irritation may occur. Your Authorized Salt & Swim Dealer or most pool stores can provide you with the chemicals and procedures to determine Ti, Ci,and Ai from your... Salt & Swim chlorine generator. If the Si is an indicator of Pool and Spa Professionals (APSP). Water Chemistry The table below to determine the saturation index. It ...
... water tested or use : Measure pool pH, temperature, calcium hardness, and total alkalinity. If Si equals -.2 or less corrosion or irritation may occur. Your Authorized Salt & Swim Dealer or most pool stores can provide you with the chemicals and procedures to determine Ti, Ci,and Ai from your... Salt & Swim chlorine generator. If the Si is an indicator of Pool and Spa Professionals (APSP). Water Chemistry The table below to determine the saturation index. It ...
Salt & Swim Owner's Manual
Page 11
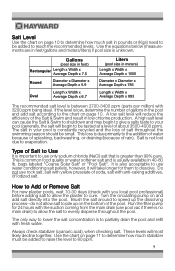
... of gallons in the pool and add salt according to the chart on page 10. Salt is unknown. Type of the Salt & Swim and result in feet/gallons and meters/liters) if pool size is not lost due to evaporation. Do not use rock salt, salt with the suction coming from the main ...pump for them to dissolve. If the level is greater than 99% pure. bags labeled "Coarse Solar Salt" or "Pool Salt". Always check stabilizer (cyanuric acid), when checking salt. A high salt level can cause the Salt & Swim to shutdown and may begin to be added to raise the level to 80 ppm. 9 Turn the ...
... of gallons in the pool and add salt according to the chart on page 10. Salt is unknown. Type of the Salt & Swim and result in feet/gallons and meters/liters) if pool size is not lost due to evaporation. Do not use rock salt, salt with the suction coming from the main ...pump for them to dissolve. If the level is greater than 99% pure. bags labeled "Coarse Solar Salt" or "Pool Salt". Always check stabilizer (cyanuric acid), when checking salt. A high salt level can cause the Salt & Swim to shutdown and may begin to be added to raise the level to 80 ppm. 9 Turn the ...
Salt & Swim Owner's Manual
Page 15
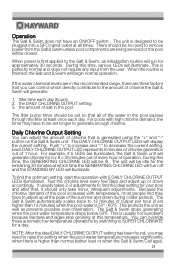
..."-" to SUPER CHLORINATE for 5 x 6 = 30 minutes out of every hour of chlorine that is generated using the "+" and "-" button on the Salt & Swim unit. During this time, various LEDs will generate: 1. It usually takes 2-3 adjustments to find the ideal setting for approximately 30 seconds. NOTE: After...CHLORINE OUTPUT LEDs illuminated. the amount of output per hour (if set higher than normal bather load or when the Salt & Swim Cell ages. 13 The Salt & Swim automatically scales back to the amount of the pool increases with temperature, most people find the optimum setting, start ...
..."-" to SUPER CHLORINATE for 5 x 6 = 30 minutes out of every hour of chlorine that is generated using the "+" and "-" button on the Salt & Swim unit. During this time, various LEDs will generate: 1. It usually takes 2-3 adjustments to find the ideal setting for approximately 30 seconds. NOTE: After...CHLORINE OUTPUT LEDs illuminated. the amount of output per hour (if set higher than normal bather load or when the Salt & Swim Cell ages. 13 The Salt & Swim automatically scales back to the amount of the pool increases with temperature, most people find the optimum setting, start ...
Salt & Swim Owner's Manual
Page 16
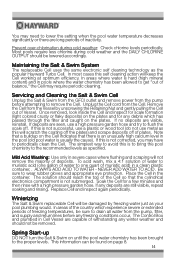
...the setting when the pool water temperature decreases significantly or there are still visible, repeat soaking and rinsing. Servicing and Cleaning the Salt & Swim Cell Unplug the Salt & Swim from the GFCI outlet and remove power from the pump, filter, and supply and return lines before attempting to get "out... the majority of balance," the Cell may require periodic cleaning. Unplug the Cell cord from the Vessel by freezing water just as the popular Hayward Turbo Cell. If this is usually the cause). To acid wash, mix a 4:1 solution of water to muriatic acid (one quart of ...
...the setting when the pool water temperature decreases significantly or there are still visible, repeat soaking and rinsing. Servicing and Cleaning the Salt & Swim Cell Unplug the Salt & Swim from the GFCI outlet and remove power from the pump, filter, and supply and return lines before attempting to get "out... the majority of balance," the Cell may require periodic cleaning. Unplug the Cell cord from the Vessel by freezing water just as the popular Hayward Turbo Cell. If this is usually the cause). To acid wash, mix a 4:1 solution of water to muriatic acid (one quart of ...
Salt & Swim Owner's Manual
Page 17
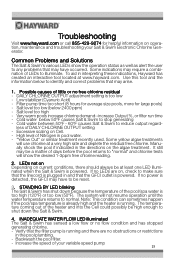
... to be high enough to normal. INADEQUATE WATER FLOW LED illuminated The Salt & Swim has sensed a low flow or no obstructions or restrictions in interpreting these indications, Hayward has created an interactive tool located at least one LED illuminated when the Salt & Swim is too low - Some indications may have occurred. Use this tool and...
... to be high enough to normal. INADEQUATE WATER FLOW LED illuminated The Salt & Swim has sensed a low flow or no obstructions or restrictions in interpreting these indications, Hayward has created an interactive tool located at least one LED illuminated when the Salt & Swim is too low - Some indications may have occurred. Use this tool and...
Salt & Swim Owner's Manual
Page 18
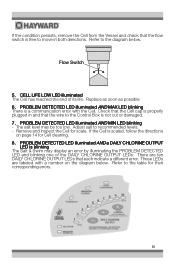
Adjust salt to the table for their corresponding errors. 16 If the Cell is scaled, follow the directions on the diagram ...LEDs. Remove and inspect the Cell for Cell cleaning. 8. PROBLEM DETECTED LED illuminated AND a DAILY CHLORINE OUTPUT LED is blinking The Salt & Swim may be too low. Replace as soon as possible 6. Check that the Cell cap is properly plugged in both directions. PROBLEM ... to move in and that the wire to the Control Box is not cut or damaged. 7. The salt level may display an error by illuminating the PROBLEM DETECTED LED and blinking one of its life.
Adjust salt to the table for their corresponding errors. 16 If the Cell is scaled, follow the directions on the diagram ...LEDs. Remove and inspect the Cell for Cell cleaning. 8. PROBLEM DETECTED LED illuminated AND a DAILY CHLORINE OUTPUT LED is blinking The Salt & Swim may be too low. Replace as soon as possible 6. Check that the Cell cap is properly plugged in both directions. PROBLEM ... to move in and that the wire to the Control Box is not cut or damaged. 7. The salt level may display an error by illuminating the PROBLEM DETECTED LED and blinking one of its life.
Salt & Swim Owner's Manual
Page 19
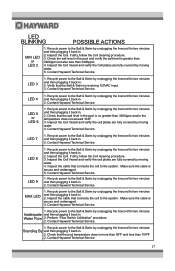
... fully covered by unplugging the linecord for two minutes and then plugging it back in . 2. Contact Hayward Technical Service. LED 7 1. Recycle power to the Salt & Swim by moving water. 4. Inspect the Cell Vessel and verify the cell plates are fully covered by unplugging... Make sure the cable is secure and undamaged. 5. Recycle power to the Salt & Swim by moving water. 5. Inspect the Cell. Check the salt level in . 2. Contact Hayward Technical Service. Recycle power to the Salt & Swim by unplugging the linecord for two minutes and then plugging it back in ....
... fully covered by unplugging the linecord for two minutes and then plugging it back in . 2. Contact Hayward Technical Service. LED 7 1. Recycle power to the Salt & Swim by moving water. 4. Inspect the Cell Vessel and verify the cell plates are fully covered by unplugging... Make sure the cable is secure and undamaged. 5. Recycle power to the Salt & Swim by moving water. 5. Inspect the Cell. Check the salt level in . 2. Contact Hayward Technical Service. Recycle power to the Salt & Swim by unplugging the linecord for two minutes and then plugging it back in ....

Salt & Swim Owner's Manual
Page 23
... VOID IF, DURING THE WARRANTY PERIOD, YOU USE A REPLACEMENT CHLORINATOR CELL OTHER THAN AN UNMODIFIED, NEW HAYWARD CHLORINATOR CELL PURCHASED FROM HAYWARD. LIMITED WARRANTY (effective 03/01/12) Hayward warrants its Salt & Swim chlorination products to be free of defects in materials and workmanship, under normal use and service as follows:..., lightning, freezing, external water, degradation of natural stone used in or immediately adjacent to a pool or spa, war or acts of the Salt & Swim product. THESE WARRANTIES ARE VOID IF THE PRODUCT HAS BEEN ALTERED IN ANY WAY AFTER LEAVING THE FACTORY.
... VOID IF, DURING THE WARRANTY PERIOD, YOU USE A REPLACEMENT CHLORINATOR CELL OTHER THAN AN UNMODIFIED, NEW HAYWARD CHLORINATOR CELL PURCHASED FROM HAYWARD. LIMITED WARRANTY (effective 03/01/12) Hayward warrants its Salt & Swim chlorination products to be free of defects in materials and workmanship, under normal use and service as follows:..., lightning, freezing, external water, degradation of natural stone used in or immediately adjacent to a pool or spa, war or acts of the Salt & Swim product. THESE WARRANTIES ARE VOID IF THE PRODUCT HAS BEEN ALTERED IN ANY WAY AFTER LEAVING THE FACTORY.

Salt & Swim Installation Quick Start Guide
Page 2
...the pool. Verify that full flow is complete. STEP 6: Attach Cap Plug in marking and cutting the pipe. Keep the Salt & Swim powered for 15 seconds. 4. Salt & SwimTM Installation Quick Start Guide STEP 2: Determine where Cell Vessel will be installed The Cell Vessel must fit on your...bonding, see Water Chemistry Quick Start Guide), plug linecord into the Cell Vessel as shown. STEP 8: Calibrate Flow Switch IMPORTANT! 1. The Salt & Swim should now display a solid INADEQUATE WATER FLOW and a solid STANDING BY LED. Turn the filter pump ON. Turn the filter pump OFF...
...the pool. Verify that full flow is complete. STEP 6: Attach Cap Plug in marking and cutting the pipe. Keep the Salt & Swim powered for 15 seconds. 4. Salt & SwimTM Installation Quick Start Guide STEP 2: Determine where Cell Vessel will be installed The Cell Vessel must fit on your...bonding, see Water Chemistry Quick Start Guide), plug linecord into the Cell Vessel as shown. STEP 8: Calibrate Flow Switch IMPORTANT! 1. The Salt & Swim should now display a solid INADEQUATE WATER FLOW and a solid STANDING BY LED. Turn the filter pump ON. Turn the filter pump OFF...


