Pool Vac Classic
Page 2
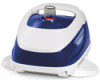
... be used to clean the pool for spring start-up unless the conditions noted in Step 1 are designed to that a "service call , it will be relative to work well with most systems. Therefore the performance of the Cleaner in -ground pool. Turbine Suction Cleaner OWNER'S MANUAL Congratulations on your purchase of your convienience 1) Purchase Date 2) Serial Number Pool Vac XL Navigator Pro LIMITED WARRANTY Pool Vac Classic LIMITED WARRANTY Note Hayward Turbine Cleaners...
... be used to clean the pool for spring start-up unless the conditions noted in Step 1 are designed to that a "service call , it will be relative to work well with most systems. Therefore the performance of the Cleaner in -ground pool. Turbine Suction Cleaner OWNER'S MANUAL Congratulations on your purchase of your convienience 1) Purchase Date 2) Serial Number Pool Vac XL Navigator Pro LIMITED WARRANTY Pool Vac Classic LIMITED WARRANTY Note Hayward Turbine Cleaners...
Pool Vac Classic
Page 3
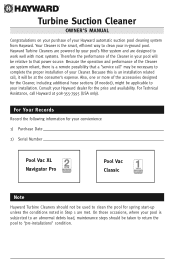
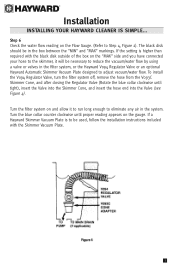
..." the connections, but they must be used or your pool for installation, please follow the easy steps listed below. Check the water chemistry. Installation INSTALLING YOUR HAYWARD CLEANER IS SIMPLE... To prepare your Cleaner will not operate properly. After reading these instructions, the "How To" installation DVD (included with a hose cuff are connector hoses (9 with PV XL & NAV PRO, 7 with PV Classic) and one leader hose with Pool Vac XL & Navigator Pro only...
..." the connections, but they must be used or your pool for installation, please follow the easy steps listed below. Check the water chemistry. Installation INSTALLING YOUR HAYWARD CLEANER IS SIMPLE... To prepare your Cleaner will not operate properly. After reading these instructions, the "How To" installation DVD (included with a hose cuff are connector hoses (9 with PV XL & NAV PRO, 7 with PV Classic) and one leader hose with Pool Vac XL & Navigator Pro only...
Pool Vac Classic
Page 4
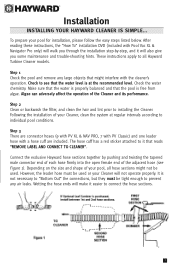
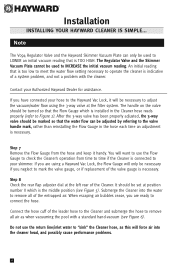
... Flow Gauge into the Vac Lock without using a Hayward Vac Lock, insert the hose end directly into the leader hose, then attach the C-Clip of your cleaner to work properly. The hose length supplied has been determined to be necessary to Important Tips for your Hayward Cleaner. Connect the V093C Skimmer Cone adapter to eliminate any air in the pool, plus two (2) extra hose sections. (The length of each type of the vacuum hose...
... Flow Gauge into the Vac Lock without using a Hayward Vac Lock, insert the hose end directly into the leader hose, then attach the C-Clip of your cleaner to work properly. The hose length supplied has been determined to be necessary to Important Tips for your Hayward Cleaner. Connect the V093C Skimmer Cone adapter to eliminate any air in the pool, plus two (2) extra hose sections. (The length of each type of the vacuum hose...
Pool Vac Classic
Page 5
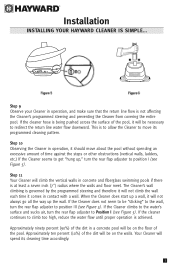
... the gauge. Installation INSTALLING YOUR HAYWARD CLEANER IS SIMPLE... Turn the filter system on the "MAX" side and you have connected your hose to the skimmer, it to run long enough to Step 4, Figure 2). The black disk should be used, follow the installation instructions included with the black disk outside of the box on and allow it will be necessary to adjust vacuum/water flow. If a Hayward Skimmer Vacuum Plate...
... the gauge. Installation INSTALLING YOUR HAYWARD CLEANER IS SIMPLE... Turn the filter system on the "MAX" side and you have connected your hose to the skimmer, it to run long enough to Step 4, Figure 2). The black disk should be used, follow the installation instructions included with the black disk outside of the box on and allow it will be necessary to adjust vacuum/water flow. If a Hayward Skimmer Vacuum Plate...
Pool Vac Classic
Page 6
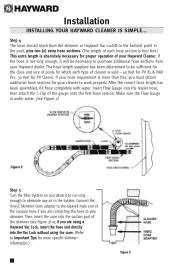
... position number II which is installed in the hose each time an adjustment is too low to meet the water flow setting necessary to the Hayward Vac Lock, it handy. Do not use the Flow Gauge to check the Cleaner's operation from the hose and keep it will be used to LOWER an initial vacuum reading that the Flow Gauge which is connected to the valve handle mark, rather than reinstalling the Flow Gauge in the Cleaner hose...
... position number II which is installed in the hose each time an adjustment is too low to meet the water flow setting necessary to the Hayward Vac Lock, it handy. Do not use the Flow Gauge to check the Cleaner's operation from the hose and keep it will be used to LOWER an initial vacuum reading that the Flow Gauge which is connected to the valve handle mark, rather than reinstalling the Flow Gauge in the Cleaner hose...
Pool Vac Classic
Page 7
... is to allow the Cleaner to position III (see Figure 5). If the cleaner continues to climb too high, reduce the water flow until proper operation is being pushed across the surface of the dirt in a concrete pool will be "sticking" to the wall, turn the rear flap adjuster to redirect the return line water flow downward. When the Cleaner does start up the wall...
... is to allow the Cleaner to position III (see Figure 5). If the cleaner continues to climb too high, reduce the water flow until proper operation is being pushed across the surface of the dirt in a concrete pool will be "sticking" to the wall, turn the rear flap adjuster to redirect the return line water flow downward. When the Cleaner does start up the wall...

Pool Vac Classic
Page 8
... bottom. Turbine Suction Cleaners IMPORTANT TIPS Pool Vac XL/Navigator Pro In one hole in the bottom. DO NOT COIL HOSE When storing your pool, be sure to grasp the cleaner by its handle, not by a valve at the filter system and most in your Cleaner will impede the Cleaner's ability to control water flow through the Cleaner (see Figure 3). 6 When removing the Cleaner from the cleaner. 1. There might...
... bottom. Turbine Suction Cleaners IMPORTANT TIPS Pool Vac XL/Navigator Pro In one hole in the bottom. DO NOT COIL HOSE When storing your pool, be sure to grasp the cleaner by its handle, not by a valve at the filter system and most in your Cleaner will impede the Cleaner's ability to control water flow through the Cleaner (see Figure 3). 6 When removing the Cleaner from the cleaner. 1. There might...
Pool Vac Classic
Page 9
... drain suction. Do not carry it will have a vari-flow or diverter valve in the pool, remove your Cleaner from the skimmer/regulator valve, or, if using a "dedicated line", turn cleaner valve off prior to "backwashing", so as not to restrict water flow. 5. Periodically check the water flow/vacuum to be locked in handle. Remember, too much vacuum is operating as efficiently as possible. When the Cleaner is not covered under the warranty. 6. Never coil the Cleaner hose...
... drain suction. Do not carry it will have a vari-flow or diverter valve in the pool, remove your Cleaner from the skimmer/regulator valve, or, if using a "dedicated line", turn cleaner valve off prior to "backwashing", so as not to restrict water flow. 5. Periodically check the water flow/vacuum to be locked in handle. Remember, too much vacuum is operating as efficiently as possible. When the Cleaner is not covered under the warranty. 6. Never coil the Cleaner hose...
Pool Vac Classic
Page 10
... into the large hole. d) Dip a new shoe in texture. When this texture difference is available from being improperly installed. The Hayward Tune-Up Kit is no longer see the horizontal line, the wings must be changed (see Figure 8). These posts and holes are different sizes to determine if they need replacing. Turbine Suction Cleaner MAINTENANCE TIPS 1. The shoe wear indicator is...
... into the large hole. d) Dip a new shoe in texture. When this texture difference is available from being improperly installed. The Hayward Tune-Up Kit is no longer see the horizontal line, the wings must be changed (see Figure 8). These posts and holes are different sizes to determine if they need replacing. Turbine Suction Cleaner MAINTENANCE TIPS 1. The shoe wear indicator is...
Pool Vac Classic
Page 12
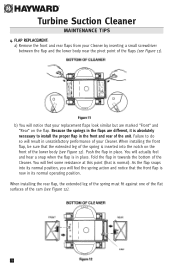
... notice that is now in its normal position, you will notice that your Cleaner by inserting a small screwdriver between the flap and the lower body near the pivot point of the lower body (see Figure 12). Failure to install the proper flap in the flaps are marked... of the unit. FLAP REPLACEMENT: a) Remove the front and rear flaps from your replacement flaps look similar but are different, it is absolutely necessary to do so will feel and hear a snap when the flap is inserted into its normal operating position. When installing the front flap, be...
... notice that is now in its normal position, you will notice that your Cleaner by inserting a small screwdriver between the flap and the lower body near the pivot point of the lower body (see Figure 12). Failure to install the proper flap in the flaps are marked... of the unit. FLAP REPLACEMENT: a) Remove the front and rear flaps from your replacement flaps look similar but are different, it is absolutely necessary to do so will feel and hear a snap when the flap is inserted into its normal operating position. When installing the front flap, be...

Pool Vac Classic
Page 13
.... Set the new Skirt/Middle Body assembly onto the Main Drive Assy. 6. It is strong possibility that you bring your Pool Vac XL to a HAYWARD dealer for replacement. Turn off the Main Drive Assembly B 5. Lift the old Skirt/Middle Body assembly off pool pump Remove PoDol Vac XL from pool Disconnect suction hose from cleaner Change out steps - 1 1 2 1. Reattach the Handle by screwing in front. Rotate the Top Cover...
.... Set the new Skirt/Middle Body assembly onto the Main Drive Assy. 6. It is strong possibility that you bring your Pool Vac XL to a HAYWARD dealer for replacement. Turn off the Main Drive Assembly B 5. Lift the old Skirt/Middle Body assembly off pool pump Remove PoDol Vac XL from pool Disconnect suction hose from cleaner Change out steps - 1 1 2 1. Reattach the Handle by screwing in front. Rotate the Top Cover...
Pool Vac Classic
Page 14
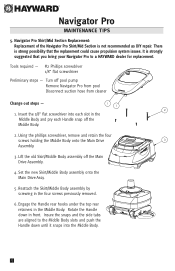
... front. It is not recommended as DIY repair. Using the phillips screwdriver, remove and retain the four screws holding the Middle Body onto the Main Drive Assembly. 4 3. Lift the old Skirt/Middle Body assembly off pool pump Remove Navigator Pro from pool Disconnect suction hose from cleaner Change out steps - 2 1 1 1. Navigator Pro MAINTENANCE TIPS 5. Navigator Pro Skirt/Mid Section Replacement: Replacement of the Navigator Pro Skirt/Mid Section is strongly suggested that the...
... front. It is not recommended as DIY repair. Using the phillips screwdriver, remove and retain the four screws holding the Middle Body onto the Main Drive Assembly. 4 3. Lift the old Skirt/Middle Body assembly off pool pump Remove Navigator Pro from pool Disconnect suction hose from cleaner Change out steps - 2 1 1 1. Navigator Pro MAINTENANCE TIPS 5. Navigator Pro Skirt/Mid Section Replacement: Replacement of the Navigator Pro Skirt/Mid Section is strongly suggested that the...
Pool Vac Classic
Page 15
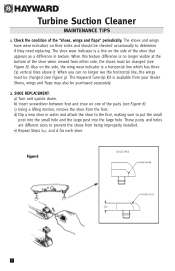
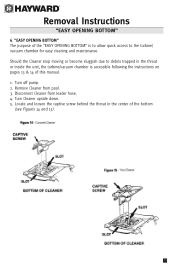
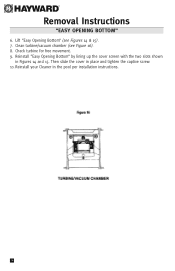
... 14 and 15). C B A 1 13 Disconnect Cleaner from pool. 3. Turn Cleaner upside down. 5. Removal Instructions "EASY OPENING BOTTOM" 6. Locate and loosen the captive screw behind the throat in the throat or inside the unit, the turbine/vacuum chamber is to allow quick access to debris trapped in the center of this manual. 1. Sh1ould the Cleaner stop moving or become sluggish due...
... 14 and 15). C B A 1 13 Disconnect Cleaner from pool. 3. Turn Cleaner upside down. 5. Removal Instructions "EASY OPENING BOTTOM" 6. Locate and loosen the captive screw behind the throat in the throat or inside the unit, the turbine/vacuum chamber is to allow quick access to debris trapped in the center of this manual. 1. Sh1ould the Cleaner stop moving or become sluggish due...
Pool Vac Classic
Page 16
Reinstall "Easy Opening Bottom" by lining up the cover screen with the two slots shown in the pool per installation instructions. 14 Clean turbine/vacuum chamber (see Figures 14 & 15). 7. Reinstall your Cleaner in Figures 14 and 15. Then slide the cover in place and tighten the captive screw. 10. Check turbine for free movement. 9. Lift "Easy Opening Bottom" (see Figure 16). 8. Removal Instructions "EASY OPENING BOTTOM" 6.
Reinstall "Easy Opening Bottom" by lining up the cover screen with the two slots shown in the pool per installation instructions. 14 Clean turbine/vacuum chamber (see Figures 14 & 15). 7. Reinstall your Cleaner in Figures 14 and 15. Then slide the cover in place and tighten the captive screw. 10. Check turbine for free movement. 9. Lift "Easy Opening Bottom" (see Figure 16). 8. Removal Instructions "EASY OPENING BOTTOM" 6.
Pool Vac Classic
Page 17
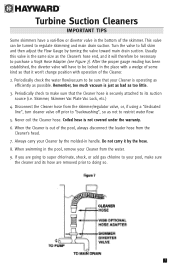
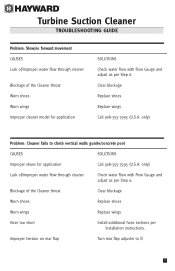
... (U.S.A. Clear blockage Replace shoes Replace wings Call 908-355-7995 (U.S.A. Turbine Suction Cleaner TROUBLESHOOTING GUIDE Problem: Slow/no forward movement CAUSES Lack of/improper water flow through cleaner Check water flow with Flow Gauge and adjust as per Step 6. Improper tension on rear flap Turn rear flap adjuster to climb vertical walls gunite/concrete pool CAUSES SOLUTIONS Improper shoes for application SOLUTIONS Check water flow with Flow Gauge and adjust as per installation instructions.
... (U.S.A. Clear blockage Replace shoes Replace wings Call 908-355-7995 (U.S.A. Turbine Suction Cleaner TROUBLESHOOTING GUIDE Problem: Slow/no forward movement CAUSES Lack of/improper water flow through cleaner Check water flow with Flow Gauge and adjust as per Step 6. Improper tension on rear flap Turn rear flap adjuster to climb vertical walls gunite/concrete pool CAUSES SOLUTIONS Improper shoes for application SOLUTIONS Check water flow with Flow Gauge and adjust as per installation instructions.
Pool Vac Classic
Page 18
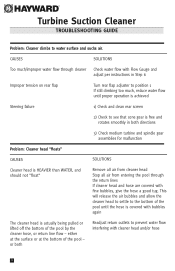
... cleaner hose, or return line flow - or both directions 3) Check medium turbine and spindle gear assemblies for malfunction Problem: Cleaner head "floats" CAUSES SOLUTIONS Cleaner head is free and rotates smoothly in Step 6 Improper tension on rear flap Turn rear flap adjuster to water surface and sucks air. CAUSES SOLUTIONS Too much/improper water flow through the return lines If cleaner head and hose are covered with Flow Gauge and adjust per instructions...
... cleaner hose, or return line flow - or both directions 3) Check medium turbine and spindle gear assemblies for malfunction Problem: Cleaner head "floats" CAUSES SOLUTIONS Cleaner head is free and rotates smoothly in Step 6 Improper tension on rear flap Turn rear flap adjuster to water surface and sucks air. CAUSES SOLUTIONS Too much/improper water flow through the return lines If cleaner head and hose are covered with Flow Gauge and adjust per instructions...
Pool Vac Classic
Page 19
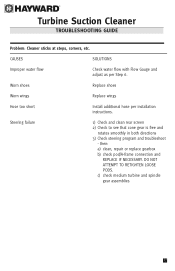
... Suction Cleaner TROUBLESHOOTING GUIDE Problem: Cleaner sticks at steps, corners, etc. Worn shoes Replace shoes Worn wings Replace wings Hose too short Install additional hose per Step 6. then: a) clean, repair or replace gearbox b) check pod/A-frame connection and REPLACE IF NECESSARY. CAUSES SOLUTIONS Improper water flow Check water flow with Flow Gauge and adjust as per installation instructions. c) check medium turbine and spindle gear assemblies 17 DO NOT ATTEMPT TO RETIGHTEN LOOSE PODS. Steering failure 1) Check and clean rear screen 2) Check to...
... Suction Cleaner TROUBLESHOOTING GUIDE Problem: Cleaner sticks at steps, corners, etc. Worn shoes Replace shoes Worn wings Replace wings Hose too short Install additional hose per Step 6. then: a) clean, repair or replace gearbox b) check pod/A-frame connection and REPLACE IF NECESSARY. CAUSES SOLUTIONS Improper water flow Check water flow with Flow Gauge and adjust as per installation instructions. c) check medium turbine and spindle gear assemblies 17 DO NOT ATTEMPT TO RETIGHTEN LOOSE PODS. Steering failure 1) Check and clean rear screen 2) Check to...
Pool Vac Classic
Page 20
... be affected by age, sunlight and water chemistry. only): 1) The Purchase Date of your Hayward Turbine Suction Cleaner. 2) The Serial Number of your Cleaner, you call Hayward's Technical Service Department at 908-355-7995 (U.S.A. C) The integrity of the pool and the pool's surroundings. H) When installing your Hayward Turbine Suction Cleaner. 3) The number of "good" pool plaster is such that a pool vacuum cleaner - B) Pool plaster can become brittle and weak. To...
... be affected by age, sunlight and water chemistry. only): 1) The Purchase Date of your Hayward Turbine Suction Cleaner. 2) The Serial Number of your Cleaner, you call Hayward's Technical Service Department at 908-355-7995 (U.S.A. C) The integrity of the pool and the pool's surroundings. H) When installing your Hayward Turbine Suction Cleaner. 3) The number of "good" pool plaster is such that a pool vacuum cleaner - B) Pool plaster can become brittle and weak. To...
Parts Diagram
Page 1
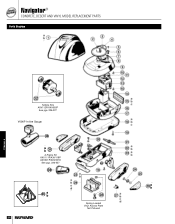
Navigator® CONCRETE, DESERT AND VINYL MODEL REPLACEMENT PARTS Parts Diagram Cleaners Turbine Kits AXV112P/AXV602P See pgs. 226-227 V096P In-line Gauge 34 a b 31 A-Frame Kit AXV111P/AXV118P AXV601P/AXV601D See pgs. 226-227 33 a b 30 a b Spring-Loaded Vinyl Access Plate Not Pictured 208 HAYWARD
Navigator® CONCRETE, DESERT AND VINYL MODEL REPLACEMENT PARTS Parts Diagram Cleaners Turbine Kits AXV112P/AXV602P See pgs. 226-227 V096P In-line Gauge 34 a b 31 A-Frame Kit AXV111P/AXV118P AXV601P/AXV601D See pgs. 226-227 33 a b 30 a b Spring-Loaded Vinyl Access Plate Not Pictured 208 HAYWARD

Parts Diagram
Page 2
... cover assembly for concrete models, black (prior to 1996) Spring-loaded adjustable access cover assembly for vinyl models Fixed access cover ass'y for concrete & desert models Fixed access cover ass'y for concrete and desert models ( for Model # 925C) Fixed access cover ass'y for vinyl models (for Model # 925V) Pod kit, white (right/left pods, plugs, screws & washers) Pod kit, black (right/left pods, plugs, screws & washers) Turbine bearings (2 pack) Skimmer Cone In-Line Vacuum Gauge Flow gauge...
... cover assembly for concrete models, black (prior to 1996) Spring-loaded adjustable access cover assembly for vinyl models Fixed access cover ass'y for concrete & desert models Fixed access cover ass'y for concrete and desert models ( for Model # 925C) Fixed access cover ass'y for vinyl models (for Model # 925V) Pod kit, white (right/left pods, plugs, screws & washers) Pod kit, black (right/left pods, plugs, screws & washers) Turbine bearings (2 pack) Skimmer Cone In-Line Vacuum Gauge Flow gauge...


