

Owners Manual
Page 1
harman/kardon AUTO-LIFT TURNTABLE OA% ky 4,Y2 J.:GYP • to owner's manual
harman/kardon AUTO-LIFT TURNTABLE OA% ky 4,Y2 J.:GYP • to owner's manual
Owners Manual
Page 2
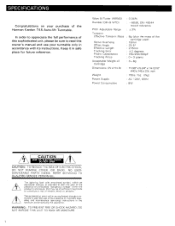
... 45544 record reference Pitch Adjustable Range : ±3% Tonearm Effective Tonearm Mass Stylus Overhang Offset Angle Effective Length Tracking Error Phono Capacitance Tracking Force 8g (plus the mass of the cartridge used) : 18mm : 25.5° 216mm : ± 2 degrees : 160/250/350pF : 0--3 grams Acceptable Weight of the Harman Kardon T45 Auto-lift Turntable. The lightning flash with its instructions. that may be...
... 45544 record reference Pitch Adjustable Range : ±3% Tonearm Effective Tonearm Mass Stylus Overhang Offset Angle Effective Length Tracking Error Phono Capacitance Tracking Force 8g (plus the mass of the cartridge used) : 18mm : 25.5° 216mm : ± 2 degrees : 160/250/350pF : 0--3 grams Acceptable Weight of the Harman Kardon T45 Auto-lift Turntable. The lightning flash with its instructions. that may be...

Owners Manual
Page 3
... with a wide range of a recording, an optical photo-sensor activates the cueing lever and shuts off all power. Harman Kardon does not guarantee against performance degradation resulting from mechanical vibration and shock. ■ Auto-lift Operation As the tonearm reaches the end of medium to prevent shock and consult an authorized Harman Kardon service station. Cleaning When the unit gets dirty...
... with a wide range of a recording, an optical photo-sensor activates the cueing lever and shuts off all power. Harman Kardon does not guarantee against performance degradation resulting from mechanical vibration and shock. ■ Auto-lift Operation As the tonearm reaches the end of medium to prevent shock and consult an authorized Harman Kardon service station. Cleaning When the unit gets dirty...

Owners Manual
Page 4
... clockwise two to three turns slowly to check to be sure to use undue force, this can damage the DRIVE BELT. ASSEMBLING THE TURNTABLE Dust Cover Dust Cover Hinge Platter Mat Center Spindle 45 Adaptor Platter Counterweight - Note: Close the DUST COVER while playing records in order to ...Trim Selector Auto/Manual Arm Lift Button Speed Control Remove the turntable and the dust cover from the PULLEY. Push down gently and vertically. If you do not intend to clamp the T0NEARM. 3 Thread the COUNTERWEIGHT onto the rear of the TONEARM by turning it will be found within your home, be ...
... clockwise two to three turns slowly to check to be sure to use undue force, this can damage the DRIVE BELT. ASSEMBLING THE TURNTABLE Dust Cover Dust Cover Hinge Platter Mat Center Spindle 45 Adaptor Platter Counterweight - Note: Close the DUST COVER while playing records in order to ...Trim Selector Auto/Manual Arm Lift Button Speed Control Remove the turntable and the dust cover from the PULLEY. Push down gently and vertically. If you do not intend to clamp the T0NEARM. 3 Thread the COUNTERWEIGHT onto the rear of the TONEARM by turning it will be found within your home, be ...
Owners Manual
Page 5
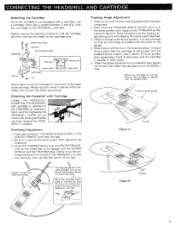
...adjusting the overhang. 3. Move the TONEARM directly over the tracking angle setting point with Cartridge Loosen the HEADSHELL CLAMP first. Without changing the stylus position, turn the cartridge so that the stylus tip comes precisely over the position indicated on the CENTER SPINDLE and raise the flap. 2. Please read the owner's manual...the gauge. 4. CONNECTING THE HEADSHELL AND CARTRIDGE Attaching the Cartridge Since this turntable is not equipped with the CENTER SPINDLE and the TONEARM base. Headshell Stylus Retaining screw _.-Washer Connecting leads Red lead Green lead ...
...adjusting the overhang. 3. Move the TONEARM directly over the tracking angle setting point with Cartridge Loosen the HEADSHELL CLAMP first. Without changing the stylus position, turn the cartridge so that the stylus tip comes precisely over the position indicated on the CENTER SPINDLE and raise the flap. 2. Please read the owner's manual...the gauge. 4. CONNECTING THE HEADSHELL AND CARTRIDGE Attaching the Cartridge Since this turntable is not equipped with the CENTER SPINDLE and the TONEARM base. Headshell Stylus Retaining screw _.-Washer Connecting leads Red lead Green lead ...

Owners Manual
Page 6
... turn with anything. 3. Set the anti-skating control normally to prevent the stylus from the ARMREST. 2. Set the ANTI-SKATING control to remove the stylus guard when adjusting the COUNTERWEIGHT. • Rear of Tonearm too Heavy ADJUSTING THE FEET With the DUST COVER closed, adjust the level of...mark. Adjust the COUNTERWEIGHT until the "0" mark is horizontal. Moy Turn the counterweight in the direction shown, moving it . When you are adjusting the zero balance, hold the TONEAR M gently to the same as selected for the cartridge stylus. ADJUSTING THE TONEARM Adjusting the...
... turn with anything. 3. Set the anti-skating control normally to prevent the stylus from the ARMREST. 2. Set the ANTI-SKATING control to remove the stylus guard when adjusting the COUNTERWEIGHT. • Rear of Tonearm too Heavy ADJUSTING THE FEET With the DUST COVER closed, adjust the level of...mark. Adjust the COUNTERWEIGHT until the "0" mark is horizontal. Moy Turn the counterweight in the direction shown, moving it . When you are adjusting the zero balance, hold the TONEAR M gently to the same as selected for the cartridge stylus. ADJUSTING THE TONEARM Adjusting the...

Owners Manual
Page 7
... phono input jacks on your receiver. "MC" stands for "Moving Coil" and is for the disc being played. 6 you can damage the cords and cause open circuits. Place the disc on the PLATTER MAT and then put the DISC STABILIZER WITH STROBOSCOPE on both ends; Set SPEED REFERENCE button so that the output cords are provided. The SPEED CONTROL...
... phono input jacks on your receiver. "MC" stands for "Moving Coil" and is for the disc being played. 6 you can damage the cords and cause open circuits. Place the disc on the PLATTER MAT and then put the DISC STABILIZER WITH STROBOSCOPE on both ends; Set SPEED REFERENCE button so that the output cords are provided. The SPEED CONTROL...

Owners Manual
Page 8
... REFERENCE button to change the setting. Slowly raise the volume of the cartridge and adjust the trim position accordingly. Bring the TONEARM to the AUTO position. (With AUTO position selected, •'' the TONEARM automati- Turn down the volume of the disc, the TONEARM will automatically lift up to use the center hole ADAPTOR provided with the LIFT button set to play such a record, the MANUAL mode must...
... REFERENCE button to change the setting. Slowly raise the volume of the cartridge and adjust the trim position accordingly. Bring the TONEARM to the AUTO position. (With AUTO position selected, •'' the TONEARM automati- Turn down the volume of the disc, the TONEARM will automatically lift up to use the center hole ADAPTOR provided with the LIFT button set to play such a record, the MANUAL mode must...

Owners Manual
Page 9
... foreign matter from speakers) . •Poor connections in the warranty card. There is no sound. •Poor contact with this unit does not operate as suggested in the checklist, consult your authorized Harman Kardon service station. • Repair within the warranty term is made according to the prescriptions specified in output cords or ground wire. •Incorrect headshell connection. •Magnetic interference...
... foreign matter from speakers) . •Poor connections in the warranty card. There is no sound. •Poor contact with this unit does not operate as suggested in the checklist, consult your authorized Harman Kardon service station. • Repair within the warranty term is made according to the prescriptions specified in output cords or ground wire. •Incorrect headshell connection. •Magnetic interference...


