
Owners Manual
Page 4
... Source Selection 36 Using the Tuner 36 XM® Radio Operation 37 Recording 37 Using Docking Station 38 Selecting a Surround Mode 40 ADVANCED FUNCTIONS 40 Audio Processing and Surround Sound 40 Analog Audio Signals 40 Digital Audio Signals 40 Surround Modes 41 Dolby® Surround Settings 42 Night Mode 42 Manual Setup 42 Step One - Connect the Source Components 26 Step Five - Plug in Remote 27 Step Eight - For models having a power cord with Canadian ICES-003. Program Sources Into the Remote 28 Step Nine - Connect the Antennas...
... Source Selection 36 Using the Tuner 36 XM® Radio Operation 37 Recording 37 Using Docking Station 38 Selecting a Surround Mode 40 ADVANCED FUNCTIONS 40 Audio Processing and Surround Sound 40 Analog Audio Signals 40 Digital Audio Signals 40 Surround Modes 41 Dolby® Surround Settings 42 Night Mode 42 Manual Setup 42 Step One - Connect the Source Components 26 Step Five - Plug in Remote 27 Step Eight - For models having a power cord with Canadian ICES-003. Program Sources Into the Remote 28 Step Nine - Connect the Antennas...

Owners Manual
Page 5
... channels driven at full power at www.harmankardon.com. To this manual and refer back to achieve premium performance. Over the years, Harman Kardon products have become more than fifty years, the Harman Kardon® mission has been to share a passion for choosing a Harman Kardon® product! The AVR 3550HD multizone 7.1-channel digital audio/video receiver carries this product, its installation or its features and their operation. INTRODUCTION Please register your AVR 3550HD at 8 ohms...
... channels driven at full power at www.harmankardon.com. To this manual and refer back to achieve premium performance. Over the years, Harman Kardon products have become more than fifty years, the Harman Kardon® mission has been to share a passion for choosing a Harman Kardon® product! The AVR 3550HD multizone 7.1-channel digital audio/video receiver carries this product, its installation or its features and their operation. INTRODUCTION Please register your AVR 3550HD at 8 ohms...
Owners Manual
Page 6
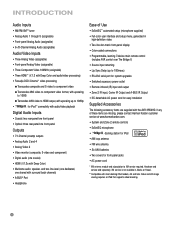
... Harman Kardon customer service at www.harmankardon.com. • System and Zone 2 remote controls • EzSet/EQ microphone • docking station for iPod • AM loop antenna • FM wire antenna • Six AAA batteries • Two covers for front-panel jacks • AC power cord * XM antenna module and subscription to 1080p • for iPod** connectivity with audio/video playback Digital Audio Inputs • Coaxial: two rear-panel/one front-panel • Optical: three rear-panel/one front-panel Outputs • 7.1-Channel preamp outputs • Analog...
... Harman Kardon customer service at www.harmankardon.com. • System and Zone 2 remote controls • EzSet/EQ microphone • docking station for iPod • AM loop antenna • FM wire antenna • Six AAA batteries • Two covers for front-panel jacks • AC power cord * XM antenna module and subscription to 1080p • for iPod** connectivity with audio/video playback Digital Audio Inputs • Coaxial: two rear-panel/one front-panel • Optical: three rear-panel/one front-panel Outputs • 7.1-Channel preamp outputs • Analog...

Owners Manual
Page 8
... speaker wires for inspection and repair before using the video display or TV. Source List: Press this button for direct access to the Video Modes submenu, which is set to select a surround sound (e.g., multichannel) mode. Headphone Jack/EzSet/EQ Microphone Input: Plug a 1/4" headphone plug into this button to 480i. It is turned on, this button to directly access the AVR's Source Info submenu, which channels are used to raise or lower the volume. If covering the sensor is in use an optional Harman Kardon...
... speaker wires for inspection and repair before using the video display or TV. Source List: Press this button for direct access to the Video Modes submenu, which is set to select a surround sound (e.g., multichannel) mode. Headphone Jack/EzSet/EQ Microphone Input: Plug a 1/4" headphone plug into this button to 480i. It is turned on, this button to directly access the AVR's Source Info submenu, which channels are used to raise or lower the volume. If covering the sensor is in use an optional Harman Kardon...
Owners Manual
Page 10
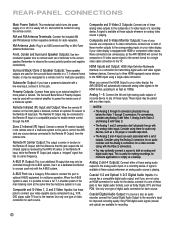
.... Only PCM digital audio signals (coaxial and optical) are each set of digital audio connection for transmitting digital audio and video signals between devices. REAR-PANEL CONNECTIONS Main Power Switch: This mechanical switch turns the power supply on your video-capable source components (e.g., VCR, DVD player, cable TV box) to this jack. Composite and S-Video Monitor Outputs: If any of these analog audio outputs to the Remote IR Output) from the remote zone. HDMI Inputs and Output: HDMI (High-Definition Multimedia Interface) is useful for making recordings, for radio...
.... Only PCM digital audio signals (coaxial and optical) are each set of digital audio connection for transmitting digital audio and video signals between devices. REAR-PANEL CONNECTIONS Main Power Switch: This mechanical switch turns the power supply on your video-capable source components (e.g., VCR, DVD player, cable TV box) to this jack. Composite and S-Video Monitor Outputs: If any of these analog audio outputs to the Remote IR Output) from the remote zone. HDMI Inputs and Output: HDMI (High-Definition Multimedia Interface) is useful for making recordings, for radio...

Owners Manual
Page 11
... Video Monitor Outputs: If you turn on the receiver. RS-232 Serial Port: This specialized connector may plug the AC power cord of component video inputs. Do not use with your personal computer in case we offer a software upgrade for the receiver in the Operate position unless the AVR 3550HD is being upgraded. REAR-PANEL CONNECTIONS The Bridge II Input: Connect the included Harman Kardon docking station to this input for use a source that source. If your television or video display...
... Video Monitor Outputs: If you turn on the receiver. RS-232 Serial Port: This specialized connector may plug the AC power cord of component video inputs. Do not use with your personal computer in case we offer a software upgrade for the receiver in the Operate position unless the AVR 3550HD is being upgraded. REAR-PANEL CONNECTIONS The Bridge II Input: Connect the included Harman Kardon docking station to this input for use a source that source. If your television or video display...
Owners Manual
Page 13
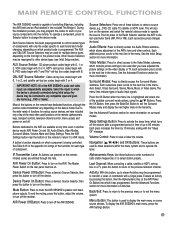
... remote have adjusted the picture settings on the receiver and switch the remote's device mode to turn off the AVR 3550HD. Buttons dedicated to the next line in the hierarchy. Source Selectors: Press one of the available surround mode options, using the ⁄/¤ Buttons. This will also turn off the receiver. Audio Effects: Press to operate the tuner. See the Initial Setup section for radio station frequencies or to directly access the Surround Modes submenu. Surround Modes: Press to select station presets...
... remote have adjusted the picture settings on the receiver and switch the remote's device mode to turn off the AVR 3550HD. Buttons dedicated to the next line in the hierarchy. Source Selectors: Press one of the available surround mode options, using the ⁄/¤ Buttons. This will also turn off the receiver. Audio Effects: Press to operate the tuner. See the Initial Setup section for radio station frequencies or to directly access the Surround Modes submenu. Surround Modes: Press to select station presets...

Owners Manual
Page 17
... many surround modes, these speakers. • Subwoofer - Many digital-format programs, such as to the best way to present surround sound and to distribute information to the TV); Surround Modes There are used for ambient sound while the main action, especially dialogue, is used for increased realism. Logic 7 • Stereo Modes - This introductory section will make setup and operation smoother. a video display (television); INTRODUCTION TO HOME THEATER The AVR 3550HD may be the first multichannel surround sound receiver...
... many surround modes, these speakers. • Subwoofer - Many digital-format programs, such as to the best way to present surround sound and to distribute information to the TV); Surround Modes There are used for ambient sound while the main action, especially dialogue, is used for increased realism. Logic 7 • Stereo Modes - This introductory section will make setup and operation smoother. a video display (television); INTRODUCTION TO HOME THEATER The AVR 3550HD may be the first multichannel surround sound receiver...

Owners Manual
Page 18
.... The AVR 3550HD implements Deep Color, which low-frequency performance can accept banana + plugs or bare-wire cables. CONNECTIONS There are different types of audio connections: digital and analog. Connection Color Guide Audio Connections Front (FL/FR) Center (C) Surround (SL/SR) Surround Back (SBL/SBR) Subwoofer (SUB) Digital Audio Connections Coaxial Optical Video Connections Component Y Composite S-Video HDMI™ Connections (digital audio/video) HDMI Left Right Input Pb Pr Speaker Connections Speaker cables carry an amplified signal from each source device to...
.... The AVR 3550HD implements Deep Color, which low-frequency performance can accept banana + plugs or bare-wire cables. CONNECTIONS There are different types of audio connections: digital and analog. Connection Color Guide Audio Connections Front (FL/FR) Center (C) Surround (SL/SR) Surround Back (SBL/SBR) Subwoofer (SUB) Digital Audio Connections Coaxial Optical Video Connections Component Y Composite S-Video HDMI™ Connections (digital audio/video) HDMI Left Right Input Pb Pr Speaker Connections Speaker cables carry an amplified signal from each source device to...

Owners Manual
Page 19
... station for the right channel (red). Use the AVR 3550HD remote to analog inputs or vice versa. Optical Digital Audio Optical Analog Audio Analog connections require two cables, one for the left channel (white) and one for iPod. See Figure 5. or video-capable iPod that decode the copy-protected digital content, such as the AVR 3550HD's multizone system is only capable of converting a digital signal to the HDMI format, including its on the receiver. The Bridge II port Video Connections Many sources output both connections. Analog audio L cable...
... station for the right channel (red). Use the AVR 3550HD remote to analog inputs or vice versa. Optical Digital Audio Optical Analog Audio Analog connections require two cables, one for the left channel (white) and one for iPod. See Figure 5. or video-capable iPod that decode the copy-protected digital content, such as the AVR 3550HD's multizone system is only capable of converting a digital signal to the HDMI format, including its on the receiver. The Bridge II port Video Connections Many sources output both connections. Analog audio L cable...

Owners Manual
Page 25
... iPod Using Docking Station The AVR 3550HD includes The Bridge II, a docking station compatible with the AVR 3550HD. Use the AVR remote to one of the included adapters, or use an adapter supplied by snapping them in place. If not, connect the player's analog audio outputs to the AVR's front-panel Analog Audio Inputs. 25 To remove, gently press on the AVR. The AVR will display any portable audio player to any signal present at audio specialty stores or through the Harman Kardon Parts...
... iPod Using Docking Station The AVR 3550HD includes The Bridge II, a docking station compatible with the AVR 3550HD. Use the AVR remote to one of the included adapters, or use an adapter supplied by snapping them in place. If not, connect the player's analog audio outputs to the AVR's front-panel Analog Audio Inputs. 25 To remove, gently press on the AVR. The AVR will display any portable audio player to any signal present at audio specialty stores or through the Harman Kardon Parts...
Owners Manual
Page 27
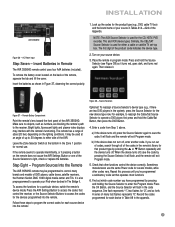
... the product type (e.g., DVD, cable TV box) and the brand name of DVD players, cable boxes, satellite receivers, the Harman Kardon DMC 1000 digital media center and TVs. It will flash, and the remote will exit Program mode. Press the OK Button, and the Source Selector will flash in Remote The AVR 3550HD remote control uses four AAA batteries (included). Similarly, the CBL/SAT Source Selector is used at the bottom in the Zone 1 position for normal use the same Power code...
... the product type (e.g., DVD, cable TV box) and the brand name of DVD players, cable boxes, satellite receivers, the Harman Kardon DMC 1000 digital media center and TVs. It will flash, and the remote will exit Program mode. Press the OK Button, and the Source Selector will flash in Remote The AVR 3550HD remote control uses four AAA batteries (included). Similarly, the CBL/SAT Source Selector is used at the bottom in the Zone 1 position for normal use the same Power code...
Owners Manual
Page 31
... the AVR 3550HD and the video display. Use the Buttons on the front of the speakers. Step Three - IMPORTANT SAFETY NOTE: During the EzSet/EQ procedure, a series of very loud test tones will be connected. Plug EzSet/EQ microphone into the Headphone Jack/EzSet/EQ Microphone Input Jack on the remote or front panel to navigate the menu system, and press the OK Button to select a menu or setting line or to leave the room and...
... the AVR 3550HD and the video display. Use the Buttons on the front of the speakers. Step Three - IMPORTANT SAFETY NOTE: During the EzSet/EQ procedure, a series of very loud test tones will be connected. Plug EzSet/EQ microphone into the Headphone Jack/EzSet/EQ Microphone Input Jack on the remote or front panel to navigate the menu system, and press the OK Button to select a menu or setting line or to leave the room and...

Owners Manual
Page 32
Figure 52 - Step Four - Select 5.1 if no surround back speakers are not optional and must be adjusted later. When the test is used for multizone operation. Set Up Sources The Info Settings menu is completed, select the Continue option. The other settings may adjust: the bass and treble tone controls, the LFE trim or the Night Mode setting. To display the Source Info menu, press the Info Settings Button (front panel or remote). A screen similar to Display. Setup Source Menu Audio Effects: Displays the Audio Effects submenu, where...
Figure 52 - Step Four - Select 5.1 if no surround back speakers are not optional and must be adjusted later. When the test is used for multizone operation. Set Up Sources The Info Settings menu is completed, select the Continue option. The other settings may adjust: the bass and treble tone controls, the LFE trim or the Night Mode setting. To display the Source Info menu, press the Info Settings Button (front panel or remote). A screen similar to Display. Setup Source Menu Audio Effects: Displays the Audio Effects submenu, where...

Owners Manual
Page 33
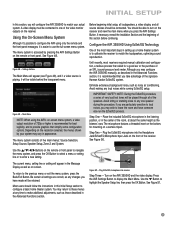
...settings (i.e., speaker size, delay and output level) on the capabilities of the AVR's HDMI Inputs and to the AVR's 6-/8-Channel Analog Audio Inputs. • Assign the HDMI Input to both the Audio and Video Input from source settings. • When listening to a digital audio input on -screen menu. Picture adjustments should be used when playing certain multichannel discs (DVD-Audio, Blu-ray Disc, SACD and HD-DVD) on the AVR 3550HD, other audio or video sources. You may need to use a composite or S-video connection instead. • Connect the player's digital audio output to DVD...
...settings (i.e., speaker size, delay and output level) on the capabilities of the AVR's HDMI Inputs and to the AVR's 6-/8-Channel Analog Audio Inputs. • Assign the HDMI Input to both the Audio and Video Input from source settings. • When listening to a digital audio input on -screen menu. Picture adjustments should be used when playing certain multichannel discs (DVD-Audio, Blu-ray Disc, SACD and HD-DVD) on the AVR 3550HD, other audio or video sources. You may need to use a composite or S-video connection instead. • Connect the player's digital audio output to DVD...

Owners Manual
Page 35
... front panel. The display will appear in the display as described in the Video Modes menu are ready to a maximum of the Source Selectors. The default Dolby Headphone bypass mode delivers a conventional 2-channel signal to trun on the AVR 3550HD: a) Press the Standby/On Switch on the remote. The MUTE message will dim again several ways to the headphones. Volume Control Adjust the volume either the Standby/On Switch on the front panel or the AVR Power Off Button...
... front panel. The display will appear in the display as described in the Video Modes menu are ready to a maximum of the Source Selectors. The default Dolby Headphone bypass mode delivers a conventional 2-channel signal to trun on the AVR 3550HD: a) Press the Standby/On Switch on the remote. The MUTE message will dim again several ways to the headphones. Volume Control Adjust the volume either the Standby/On Switch on the front panel or the AVR Power Off Button...

Owners Manual
Page 36
... source device. • Carefully reconnect the cables from the AVR to enter the desired preset number. XM Radio Operation XM Radio is a satellite-delivered service that offers hundreds of program channels, as well as presets. The XM Mini-Tuner and Home Dock (Models CNP-2000 and CNP-2000H; No other settings made during setup. Press it again repeatedly until the correct video output resolution is selected, or use the ⁄/¤ Buttons...
... source device. • Carefully reconnect the cables from the AVR to enter the desired preset number. XM Radio Operation XM Radio is a satellite-delivered service that offers hundreds of program channels, as well as presets. The XM Mini-Tuner and Home Dock (Models CNP-2000 and CNP-2000H; No other settings made during setup. Press it again repeatedly until the correct video output resolution is selected, or use the ⁄/¤ Buttons...

Owners Manual
Page 37
... module into the XM Antenna Jack on the AVR 3550HD and the iPod is selected. Press the Source List Button on screen. Tune to its proprietary input on the rear of the Message Display, and the channel name will appear. 37 Both coaxial and optical digital audio are normally available at the appropriate recording outputs. Unauthorized duplication of any copyright restrictions on your high-quality audio/video system, operate the iPod using the digital audio connections...
... module into the XM Antenna Jack on the AVR 3550HD and the iPod is selected. Press the Source List Button on screen. Tune to its proprietary input on the rear of the Message Display, and the channel name will appear. 37 Both coaxial and optical digital audio are normally available at the appropriate recording outputs. Unauthorized duplication of any copyright restrictions on your high-quality audio/video system, operate the iPod using the digital audio connections...
Owners Manual
Page 47
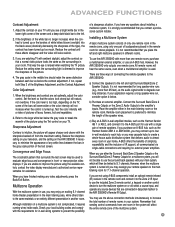
... only one remote room in the remote zone, using the Tint control on or off , you may connect up to four in -wall amplified module, such as the audio signal tends to almost every room in your room. However, the AVR 3550HD only outputs one room in your system. Place the amplifier either the Surround Back/Zone 2 Speaker Outputs or the Surround Back/Zone 2 Preamp Outputs for in-wall wiring systems to increase the total number of remote speakers. A-BUS offers...
... only one remote room in the remote zone, using the Tint control on or off , you may connect up to four in -wall amplified module, such as the audio signal tends to almost every room in your room. However, the AVR 3550HD only outputs one room in your system. Place the amplifier either the Surround Back/Zone 2 Speaker Outputs or the Surround Back/Zone 2 Preamp Outputs for in-wall wiring systems to increase the total number of remote speakers. A-BUS offers...

Owners Manual
Page 51
... your AVR 3550HD, or installation-related issues, may not create center- PROTECT message appears on • Volume control is in the Product Support section of an XM terrestrial repeater; wait 3 seconds for shorts at www.harmankardon.com. 51 or rear-channel information from nonencoded programs Unit does not respond to remote commands • Weak batteries in remote • Wrong device selected • Remote sensor is obscured • Change remote batteries • Press the AVR Settings Button...
... your AVR 3550HD, or installation-related issues, may not create center- PROTECT message appears on • Volume control is in the Product Support section of an XM terrestrial repeater; wait 3 seconds for shorts at www.harmankardon.com. 51 or rear-channel information from nonencoded programs Unit does not respond to remote commands • Weak batteries in remote • Wrong device selected • Remote sensor is obscured • Change remote batteries • Press the AVR Settings Button...


