User Manual
Page 1
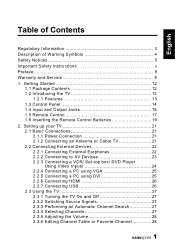
... Instructions 6 Preface 9 Warranty and Service 9 1. Getting Started 12 1.1 Package Contents 12 1.2 Introducing the TV 13 1.2.1 Features 13 1.3 Control Panel 14 1.4 Input and Output Jacks 15 1.5 Remote Control 17 1.6 Inserting the Remote Control Batteries 19 2.
... Instructions 6 Preface 9 Warranty and Service 9 1. Getting Started 12 1.1 Package Contents 12 1.2 Introducing the TV 13 1.2.1 Features 13 1.3 Control Panel 14 1.4 Input and Output Jacks 15 1.5 Remote Control 17 1.6 Inserting the Remote Control Batteries 19 2.
User Manual
Page 2
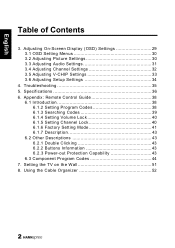
Troubleshooting 35 5. Specifications 36 6. Appendix: Remote Control Guide 38 6.1 Introduction 38 6.1.2 Setting Program Codes 38 6.1.3 Searching Codes 39 6.1.4 Setting Volume Lock 40 6.1.5 Setting Channel Lock 40 6.1.6 Factory Setting Mode 41 6.1.7 Description ...
Troubleshooting 35 5. Specifications 36 6. Appendix: Remote Control Guide 38 6.1 Introduction 38 6.1.2 Setting Program Codes 38 6.1.3 Searching Codes 39 6.1.4 Setting Volume Lock 40 6.1.5 Setting Channel Lock 40 6.1.6 Factory Setting Mode 41 6.1.7 Description ...
User Manual
Page 12
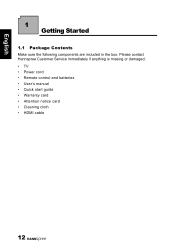
English 1 Getting Started 1.1 Package Contents Make sure the following components are included in the box. Please contact Hannspree Customer Service immediately if anything is missing or damaged. • TV • Power cord • Remote control and batteries • User's manual • Quick start guide • Warranty card • Attention notice card • Cleaning cloth • HDMI cable 12
English 1 Getting Started 1.1 Package Contents Make sure the following components are included in the box. Please contact Hannspree Customer Service immediately if anything is missing or damaged. • TV • Power cord • Remote control and batteries • User's manual • Quick start guide • Warranty card • Attention notice card • Cleaning cloth • HDMI cable 12
User Manual
Page 13
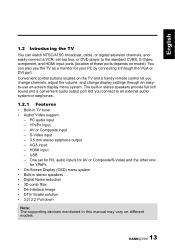
... -top box, or DVD player to an external audio system or earphones. 1.2.1 Features • Built-in this manual may vary on the TV and a handy remote control let you connect to the standard CVBS, S-Video, component, and HDMI input ports (location of these ports depends on -screen display menu system. VGA...
... -top box, or DVD player to an external audio system or earphones. 1.2.1 Features • Built-in this manual may vary on the TV and a handy remote control let you connect to the standard CVBS, S-Video, component, and HDMI input ports (location of these ports depends on -screen display menu system. VGA...
User Manual
Page 14
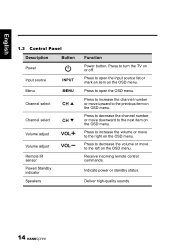
Press to increase the channel number or move to the right on the OSD menu. Receive incoming remote control commands. Press to open the input source list or mark an item on the OSD menu. Press to turn the TV on the OSD ... on the OSD menu. English 1.3 Control Panel Description Button Power Input source Menu INPUT MENU Channel select CH Channel select CH Volume adjust Volume adjust Remote IR sensor Power/ Standby indicator Speakers VOL VOL Function Power button.
Press to increase the channel number or move to the right on the OSD menu. Receive incoming remote control commands. Press to open the input source list or mark an item on the OSD menu. Press to turn the TV on the OSD ... on the OSD menu. English 1.3 Control Panel Description Button Power Input source Menu INPUT MENU Channel select CH Channel select CH Volume adjust Volume adjust Remote IR sensor Power/ Standby indicator Speakers VOL VOL Function Power button.

User Manual
Page 17
... the program numbers (press 1 and 0 for entering DTV minor channel. Press to return to increase the channel number. Press CH to the previous menu. English 1.5 Remote Control Description Icon Power Input source INPUT Keypad Function Press to turn the on-screen display (OSD) menu on -screen display menus. Press to open...
... the program numbers (press 1 and 0 for entering DTV minor channel. Press to return to increase the channel number. Press CH to the previous menu. English 1.5 Remote Control Description Icon Power Input source INPUT Keypad Function Press to turn the on-screen display (OSD) menu on -screen display menus. Press to open...

User Manual
Page 19
B 3 Close the battery compartment cover (C). English 1.6 Inserting the Remote Control Batteries 1 Open the battery compartment cover at the back of the remote control (A). C 19 A 2 Insert the batteries paying attention to the polarity markings inside the battery compartment (B).
B 3 Close the battery compartment cover (C). English 1.6 Inserting the Remote Control Batteries 1 Open the battery compartment cover at the back of the remote control (A). C 19 A 2 Insert the batteries paying attention to the polarity markings inside the battery compartment (B).
User Manual
Page 20
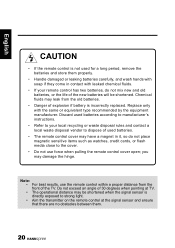
... to your local recycling or waste disposal rules and contact a local waste disposal vendor to strong light. • Aim the transmitter on the remote control at TV. • The operational distance may be shortened. Replace only with the same or equivalent type recommended by the equipment manufacturer. ... do not place magnetic sensitive items such as watches, credit cards, or flash media close to the cover. • Do not use the remote control within a proper distance from the old batteries. • Danger of explosion if battery is directly exposed to dispose of used for a long...
... to your local recycling or waste disposal rules and contact a local waste disposal vendor to strong light. • Aim the transmitter on the remote control at TV. • The operational distance may be shortened. Replace only with the same or equivalent type recommended by the equipment manufacturer. ... do not place magnetic sensitive items such as watches, credit cards, or flash media close to the cover. • Do not use the remote control within a proper distance from the old batteries. • Danger of explosion if battery is directly exposed to dispose of used for a long...
User Manual
Page 27
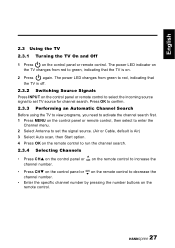
... indicator on the TV changes from green to red, indicating that the TV is Air) 3 Select Auto scan, then Start option. 4 Press OK on the remote control to run the channel search. 2.3.4 Selecting Channels • Press CHS on the control panel or CH on the... search. The power LED changes from red to green, indicating that the TV is off. 2.3.2 Switching Source Signals Press INPUT on the control panel or remote control to select the incoming source signal to decrease the channel number. • Enter the specific channel number by pressing the number buttons on the...
... indicator on the TV changes from green to red, indicating that the TV is Air) 3 Select Auto scan, then Start option. 4 Press OK on the remote control to run the channel search. 2.3.4 Selecting Channels • Press CHS on the control panel or CH on the... search. The power LED changes from red to green, indicating that the TV is off. 2.3.2 Switching Source Signals Press INPUT on the control panel or remote control to select the incoming source signal to decrease the channel number. • Enter the specific channel number by pressing the number buttons on the...

User Manual
Page 28
English 2.3.5 Adjusting the Volume 1 Press VOL+ on the control panel or VOL on the control panel or remote control, then select to enter the Channel menu. 2 Select Channel List. 3 If you want to add or remove channel from channel table, please select the ... volume buttons to restore the original volume. 2.3.6 Editing Channel Table or Favorite Channel 1 Press MENU on the remote control to increase the volume. 2 Press VOL- on the control panel or VOL on the remote control to mark "F" column. 28 If you want to add or remove favorite channel, please select the channel...
English 2.3.5 Adjusting the Volume 1 Press VOL+ on the control panel or VOL on the control panel or remote control, then select to enter the Channel menu. 2 Select Channel List. 3 If you want to add or remove channel from channel table, please select the ... volume buttons to restore the original volume. 2.3.6 Editing Channel Table or Favorite Channel 1 Press MENU on the remote control to increase the volume. 2 Press VOL- on the control panel or VOL on the remote control to mark "F" column. 28 If you want to add or remove favorite channel, please select the channel...
User Manual
Page 29
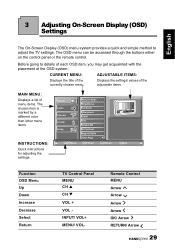
The OSD menu can be accessed through the buttons either on the control panel or the remote control. Picture Audio Channel V-CHIP Setup Move Picture Mode Brightness Contrast Sharpness Color Tint Digital NR X-Contrast Aspect Ratio Next Page OK Enter Return Return ...Menu Exit Function OSD Menu Up Down Increase Decrease Select Return TV Control Panel MENU CH S CH T VOL + VOL INPUT/ VOL+ MENU/ VOL- Remote Control MENU Arrow Arrow Arrow Arrow OK/ Arrow RETURN/ Arrow 29 Before going to adjust the TV settings. 3 Adjusting On-Screen Display (OSD) Settings English...
The OSD menu can be accessed through the buttons either on the control panel or the remote control. Picture Audio Channel V-CHIP Setup Move Picture Mode Brightness Contrast Sharpness Color Tint Digital NR X-Contrast Aspect Ratio Next Page OK Enter Return Return ...Menu Exit Function OSD Menu Up Down Increase Decrease Select Return TV Control Panel MENU CH S CH T VOL + VOL INPUT/ VOL+ MENU/ VOL- Remote Control MENU Arrow Arrow Arrow Arrow OK/ Arrow RETURN/ Arrow 29 Before going to adjust the TV settings. 3 Adjusting On-Screen Display (OSD) Settings English...
User Manual
Page 30
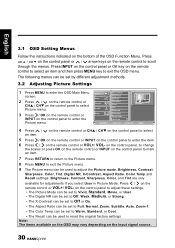
... Ratio Next Page Picture menu. Picture Audio Channel V-CHIP Picture Mode Brightness Contrast Sharpness Color Tint Digital NR 3 Press / OK on the remote control or Setup INPUT on the remote control to select an item and then press MENU key to exit the OSD menu. Press / on the control panel to mark... Tint are only available for adjustments if you select User in Picture Mode. Note: The items available on the OSD may vary depending on the remote control or VOL+/ VOL- Press CH / CH on the control panel or / arrow keys on the control panel to adjust these settings. • The Picture...
... Ratio Next Page Picture menu. Picture Audio Channel V-CHIP Picture Mode Brightness Contrast Sharpness Color Tint Digital NR 3 Press / OK on the remote control or Setup INPUT on the remote control to select an item and then press MENU key to exit the OSD menu. Press / on the control panel to mark... Tint are only available for adjustments if you select User in Picture Mode. Note: The items available on the OSD may vary depending on the remote control or VOL+/ VOL- Press CH / CH on the control panel or / arrow keys on the control panel to adjust these settings. • The Picture...

User Manual
Page 31
... and Recall settings. Picture Audio Audio Mode Equalizer Balance 2 Press / on the remote control or CHS / CHT on the control panel to change the scales or press OK on the remote control or INPUT on the remote control or VOL+/ VOL- English 3.3 Adjusting Audio Settings 1 Press MENU to reset... the original factory settings. on the control panel to select Audio menu. 3 Press / OK on the remote control or Channel V-CHIP Setup MTS Auto Volume Recall INPUT on the input signal source. 31 Equalizer is available for adjustment only if you select...
... and Recall settings. Picture Audio Audio Mode Equalizer Balance 2 Press / on the remote control or CHS / CHT on the control panel to change the scales or press OK on the remote control or INPUT on the remote control or VOL+/ VOL- English 3.3 Adjusting Audio Settings 1 Press MENU to reset... the original factory settings. on the control panel to select Audio menu. 3 Press / OK on the remote control or Channel V-CHIP Setup MTS Auto Volume Recall INPUT on the input signal source. 31 Equalizer is available for adjustment only if you select...
User Manual
Page 32
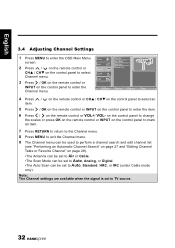
...enter the OSD Main Menu Picture screen. Audio Antenna Scan Mode Auto Scan 2 Press / on the remote control or CHS / CHT on the control panel to select Channel menu. 3 Press / OK on the remote control or Channel V-CHIP Setup Channel List INPUT on the control panel to enter the item. 6...enter the Channel menu. Move OK Enter Return Return Menu Exit 4 Press / on the remote control or CHS / CHT on the control panel to select an item. 5 Press / OK on the remote control or INPUT on the remote control or VOL+/ VOL- English 3.4 Adjusting Channel Settings 1 Press MENU to Auto, Standard...
...enter the OSD Main Menu Picture screen. Audio Antenna Scan Mode Auto Scan 2 Press / on the remote control or CHS / CHT on the control panel to select Channel menu. 3 Press / OK on the remote control or Channel V-CHIP Setup Channel List INPUT on the control panel to enter the item. 6...enter the Channel menu. Move OK Enter Return Return Menu Exit 4 Press / on the remote control or CHS / CHT on the control panel to select an item. 5 Press / OK on the remote control or INPUT on the remote control or VOL+/ VOL- English 3.4 Adjusting Channel Settings 1 Press MENU to Auto, Standard...
User Manual
Page 33
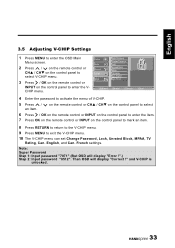
... Press / an item. and V-CHIP is unlocked. 33 English Can. English, and Can. Picture Audio Enter Password Change Password Lock 2 Press / on the remote control or CHS / CHT on the control panel to enter the OSD Main Menu screen. French settings. Note: Super Password Step 1: Input password "7071" (..., Unrated Block, MPAA, TV Rating, Can. Then OSD will display "Error !".) Step 2: Input password "8512". on the remote control or CHS / CHT on the control panel to select 6 Press / OK on the remote control or INPUT on the control panel to enter the item. 7 Press OK on the...
... Press / an item. and V-CHIP is unlocked. 33 English Can. English, and Can. Picture Audio Enter Password Change Password Lock 2 Press / on the remote control or CHS / CHT on the control panel to enter the OSD Main Menu screen. French settings. Note: Super Password Step 1: Input password "7071" (..., Unrated Block, MPAA, TV Rating, Can. Then OSD will display "Error !".) Step 2: Input password "8512". on the remote control or CHS / CHT on the control panel to select 6 Press / OK on the remote control or INPUT on the control panel to enter the item. 7 Press OK on the...

User Manual
Page 34
... item. Picture Audio Setup Wizard OSD Language OSD Time 2 Press / on the remote control or CHS / CHT on the control panel to enter the item. 6 Press / on the remote control to move the scale in the Back Light settings. • Hannspree Light can be set to adjust the Setup Wizard, OSD Language, OSD... Light, CC Mode, Analog CC, CC Style, and Hannspree Light settings. Clock Set is only available for adjustments when Clock Mode is set to Sleep Off, 15 mins, 30 mins, 45 mins, 60 mins, 90 mins, and 120 mins. • Press / on the remote control or VOL+/ VOL- Channel V-CHIP Setup Clock...
... item. Picture Audio Setup Wizard OSD Language OSD Time 2 Press / on the remote control or CHS / CHT on the control panel to enter the item. 6 Press / on the remote control to move the scale in the Back Light settings. • Hannspree Light can be set to adjust the Setup Wizard, OSD Language, OSD... Light, CC Mode, Analog CC, CC Style, and Hannspree Light settings. Clock Set is only available for adjustments when Clock Mode is set to Sleep Off, 15 mins, 30 mins, 45 mins, 60 mins, 90 mins, and 120 mins. • Press / on the remote control or VOL+/ VOL- Channel V-CHIP Setup Clock...
User Manual
Page 35
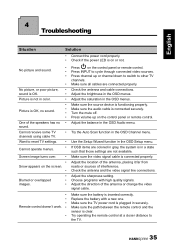
... the TV power cord is plugged in the OSD Audio menu. Make sure the source device is clear. Make sure the path between the remote control and the sensor is functioning properly. Press volume up or channel down to switch to reset TV settings. • Cannot operate menus....sure the audio cable is inserted correctly. Check the antenna and the video signal line connections. Press channel up on the control panel or remote control. Adjust the brightness in the OSD Channel menu. If OSD items are colored in gray, the system is connected properly. Press INPUT ...
... the TV power cord is plugged in the OSD Audio menu. Make sure the source device is clear. Make sure the path between the remote control and the sensor is functioning properly. Press volume up or channel down to switch to reset TV settings. • Cannot operate menus....sure the audio cable is inserted correctly. Check the antenna and the video signal line connections. Press channel up on the control panel or remote control. Adjust the brightness in the OSD Channel menu. If OSD items are colored in gray, the system is connected properly. Press INPUT ...

User Manual
Page 38
... switch to input other electronic equipment codes. 5. Press DVD button. The indicator light will be looked up in sequence. The remote control keypad matrix includes 4 electronic equipment type switch buttons (DVD, AUDIO, CABLE and TV). for TV; Hold the electronic ... showing that the setting mode has been entered. 4. Electronic equipment code setting mode has the following operating procedures: 1. English 6 Appendix: Remote Control Guide 6.1 Introduction The electronic equipment type switch buttons are 4 digits. after 3 seconds, the indicator light will come on again after...
... switch to input other electronic equipment codes. 5. Press DVD button. The indicator light will be looked up in sequence. The remote control keypad matrix includes 4 electronic equipment type switch buttons (DVD, AUDIO, CABLE and TV). for TV; Hold the electronic ... showing that the setting mode has been entered. 4. Electronic equipment code setting mode has the following operating procedures: 1. English 6 Appendix: Remote Control Guide 6.1 Introduction The electronic equipment type switch buttons are 4 digits. after 3 seconds, the indicator light will come on again after...

User Manual
Page 43
... 43 Two or more buttons simultaneously pressed do not output any code. 6.2.2 Buttons Information Except TV equipment, all the buttons on remote controls corresponding to other functions such as volume lock, channel lock and code display are operable. 6.2 Other Descriptions 6.2.1 Double Clicking At... when a single button is pressed, the corresponding code is no multi-function code setting operation under TV mode but most of those remote controls only include power control, channel control, volume control, etc. 6.2.3 Power-out Protection Capability During battery replacement, all settings are ...
... 43 Two or more buttons simultaneously pressed do not output any code. 6.2.2 Buttons Information Except TV equipment, all the buttons on remote controls corresponding to other functions such as volume lock, channel lock and code display are operable. 6.2 Other Descriptions 6.2.1 Double Clicking At... when a single button is pressed, the corresponding code is no multi-function code setting operation under TV mode but most of those remote controls only include power control, channel control, volume control, etc. 6.2.3 Power-out Protection Capability During battery replacement, all settings are ...


