User Manual
Page 1
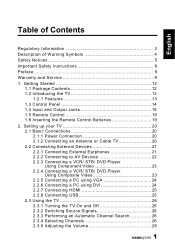
English Table of Contents Regulatory Information 3 Description of Warning Symbols 4 Safety Notices 5 Important Safety Instructions 6 Preface 9 Warranty and Service 9 1. Setting up your TV 20 2.1 Basic Connections 20 2.1.1 Power Connection 20 2.1.2 Connecting an Antenna or Cable TV 20 2.2 Connecting External Devices 21 2.2.1 Connecting External Earphones 21 2.2.2 ...
English Table of Contents Regulatory Information 3 Description of Warning Symbols 4 Safety Notices 5 Important Safety Instructions 6 Preface 9 Warranty and Service 9 1. Setting up your TV 20 2.1 Basic Connections 20 2.1.1 Power Connection 20 2.1.2 Connecting an Antenna or Cable TV 20 2.2 Connecting External Devices 21 2.2.1 Connecting External Earphones 21 2.2.2 ...
User Manual
Page 2
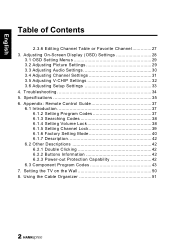
... 6. Adjusting On-Screen Display (OSD) Settings 28 3.1 OSD Setting Menus 29 3.2 Adjusting Picture Settings 29 3.3 Adjusting Audio Settings 30 3.4 Adjusting Channel Settings 31 3.5 Adjusting V-CHIP Settings 32 3.6 Adjusting Setup Settings 33 4. Appendix: Remote Control Guide 37 6.1 Introduction 37 6.1.2 Setting Program Codes 37 6.1.3 Searching Codes 38 6.1.4 Setting Volume Lock 38 6.1.5 Setting Channel Lock 39 6.1.6 Factory Setting Mode 40 6.1.7 Description 42 6.2 Other Descriptions...
... 6. Adjusting On-Screen Display (OSD) Settings 28 3.1 OSD Setting Menus 29 3.2 Adjusting Picture Settings 29 3.3 Adjusting Audio Settings 30 3.4 Adjusting Channel Settings 31 3.5 Adjusting V-CHIP Settings 32 3.6 Adjusting Setup Settings 33 4. Appendix: Remote Control Guide 37 6.1 Introduction 37 6.1.2 Setting Program Codes 37 6.1.3 Searching Codes 38 6.1.4 Setting Volume Lock 38 6.1.5 Setting Channel Lock 39 6.1.6 Factory Setting Mode 40 6.1.7 Description 42 6.2 Other Descriptions...
User Manual
Page 3
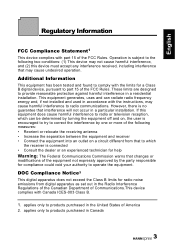
... is no guarantee that may cause harmful interference to correct the interference by turning the equipment off and on a circuit different from digital apparatus as set out in a particular installation. English Regulatory Information FCC Compliance Statement1 This device complies with Canada ICES-003 Class B. 1. This equipment generates, uses and can be...
... is no guarantee that may cause harmful interference to correct the interference by turning the equipment off and on a circuit different from digital apparatus as set out in a particular installation. English Regulatory Information FCC Compliance Statement1 This device complies with Canada ICES-003 Class B. 1. This equipment generates, uses and can be...
User Manual
Page 9
... card" enclosed with your lifestyle with advanced technology. The information in its entirety before setting up and using or operating your TV. To the extent allowed by applicable law, Hannspree, Inc. ("Hannspree") shall not be liable for accuracy; Your new TV will allow you to enjoy ...superior audio and video while enriching your TV. As an ENERGY STAR® Partner, Hannspree has determined that the safety and operation instructions in setting up , using the TV. Warranty and Service For complete warranty service information, please refer to change without ...
... card" enclosed with your lifestyle with advanced technology. The information in its entirety before setting up and using or operating your TV. To the extent allowed by applicable law, Hannspree, Inc. ("Hannspree") shall not be liable for accuracy; Your new TV will allow you to enjoy ...superior audio and video while enriching your TV. As an ENERGY STAR® Partner, Hannspree has determined that the safety and operation instructions in setting up , using the TV. Warranty and Service For complete warranty service information, please refer to change without ...
User Manual
Page 13
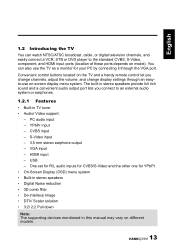
...Video support: - VGA input - English 1.2 Introducing the TV You can also use on model). PC audio input - YPbPr input - CVBS input - One set for R/L audio inputs for CVBS/S-Video and the other one for YPbPr. • On-Screen Display (OSD) menu system • Built-in stereo speakers &#...devices mentioned in stereo speakers provide full rich sound and a convenient audio output port lets you change channels, adjust the volume, and change display settings through an easyto-use the TV as a monitor for your PC by connecting it through the VGA port. S-Video input - 3.5 mm stereo...
...Video support: - VGA input - English 1.2 Introducing the TV You can also use on model). PC audio input - YPbPr input - CVBS input - One set for R/L audio inputs for CVBS/S-Video and the other one for YPbPr. • On-Screen Display (OSD) menu system • Built-in stereo speakers &#...devices mentioned in stereo speakers provide full rich sound and a convenient audio output port lets you change channels, adjust the volume, and change display settings through an easyto-use the TV as a monitor for your PC by connecting it through the VGA port. S-Video input - 3.5 mm stereo...
User Manual
Page 15
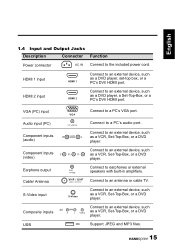
... and Output Jacks Description Connector Function Power connector AC IN Connect to an antenna or cable TV. Connect to an external device, such as a VCR, Set-Top-Box, or a DVD player. USB USB Support JPEG and MP3 files. 15 HDMI 1 input HDMI 1 Connect to an external device, such as a... DVD player, a Set-Top-Box, or a PC's DVI/ HDMI port. Connect to an external device, such as a VCR, Set-Top-Box, or a DVD player. HDMI 2 input HDMI 2 Connect to a PC's VGA port. VGA (PC) input...
... and Output Jacks Description Connector Function Power connector AC IN Connect to an antenna or cable TV. Connect to an external device, such as a VCR, Set-Top-Box, or a DVD player. USB USB Support JPEG and MP3 files. 15 HDMI 1 input HDMI 1 Connect to an external device, such as a... DVD player, a Set-Top-Box, or a PC's DVI/ HDMI port. Connect to an external device, such as a VCR, Set-Top-Box, or a DVD player. HDMI 2 input HDMI 2 Connect to a PC's VGA port. VGA (PC) input...

User Manual
Page 16
... Arrows Select Guide channel list Return OK GUIDE RETURN CH / CH Select channel Volume adjust VOL / VOL Press this button for channel 10). confirm the setting. Press VOL - Press to turn the TV on or off ; Use to decrease the channel number. to the last channel selected. Press to return to...
... Arrows Select Guide channel list Return OK GUIDE RETURN CH / CH Select channel Volume adjust VOL / VOL Press this button for channel 10). confirm the setting. Press VOL - Press to turn the TV on or off ; Use to decrease the channel number. to the last channel selected. Press to return to...
User Manual
Page 17
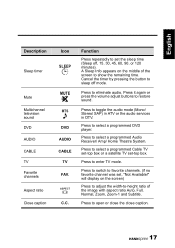
... or 120 minutes). Cancel the timer by pressing the button to show the remaining time. Press to favorite channels. (if no favorite channel was set -top box. ASPECT C.C. Press it again or press the volume adjust buttons to select a programmed DVD player. Press to restore sound. Press... to switch to select a programmed Cable TV set-top box or a satellite TV set , "Not Available!" will display on the middle of the image with aspect ratio Auto, Full, Normal, Zoom, Zoom-1 and ...
... or 120 minutes). Cancel the timer by pressing the button to show the remaining time. Press to favorite channels. (if no favorite channel was set -top box. ASPECT C.C. Press it again or press the volume adjust buttons to select a programmed DVD player. Press to restore sound. Press... to switch to select a programmed Cable TV set-top box or a satellite TV set , "Not Available!" will display on the middle of the image with aspect ratio Auto, Full, Normal, Zoom, Zoom-1 and ...
User Manual
Page 20
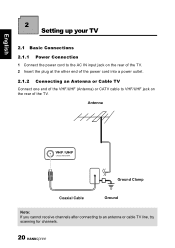
Antenna VHF / UHF CABLE/ANTENNA Ground Clamp Coaxial Cable Ground Note: If you cannot receive channels after connecting to VHF/UHF jack on the rear of the TV. 2 Insert the plug at the other end of the power cord into a power outlet. 2.1.2 Connecting an Antenna or Cable TV Connect one end of the VHF/UHF (Antenna) or CATV cable to an antenna or cable TV line, try scanning for channels. 20 English 2 Setting up your TV 2.1 Basic Connections 2.1.1 Power Connection 1 Connect the power cord to the AC IN input jack on the rear of the TV.
Antenna VHF / UHF CABLE/ANTENNA Ground Clamp Coaxial Cable Ground Note: If you cannot receive channels after connecting to VHF/UHF jack on the rear of the TV. 2 Insert the plug at the other end of the power cord into a power outlet. 2.1.2 Connecting an Antenna or Cable TV Connect one end of the VHF/UHF (Antenna) or CATV cable to an antenna or cable TV line, try scanning for channels. 20 English 2 Setting up your TV 2.1 Basic Connections 2.1.1 Power Connection 1 Connect the power cord to the AC IN input jack on the rear of the TV.

User Manual
Page 21
English 2.2 Connecting External Devices Connect external devices such as VCRs, Set-Top-Box, DVD players, video game consoles, earphones, or a PC to the TV using the appropriate ports on the rear of the TV. 2.2.1 Connecting External Earphones Headphones EAR PHONE Speakers (Built-in Amplifiers) Note: • External speakers or headphones are not included with the TV. • The internal TV speakers will not output sound when headphones are plugged in. • Use external speakers with built-in amplifiers only. • Only one external device for sound can be connected at a time. 21
English 2.2 Connecting External Devices Connect external devices such as VCRs, Set-Top-Box, DVD players, video game consoles, earphones, or a PC to the TV using the appropriate ports on the rear of the TV. 2.2.1 Connecting External Earphones Headphones EAR PHONE Speakers (Built-in Amplifiers) Note: • External speakers or headphones are not included with the TV. • The internal TV speakers will not output sound when headphones are plugged in. • Use external speakers with built-in amplifiers only. • Only one external device for sound can be connected at a time. 21
User Manual
Page 26
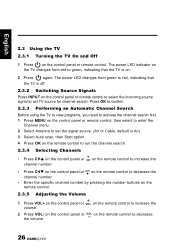
... incoming source signal to increase the volume. 2 Press VOL- English 2.3 Using the TV 2.3.1 Turning the TV On and Off 1 Press on the remote control to set the signal source. (Air or Cable, default is Air) 3 Select Auto scan, then Start option. 4 Press OK on the remote control to run the channel... to activate the channel search first. 1 Press MENU on the control panel or remote control, then select to enter the Channel menu. 2 Select Antenna to set TV source for channel search.
... incoming source signal to increase the volume. 2 Press VOL- English 2.3 Using the TV 2.3.1 Turning the TV On and Off 1 Press on the remote control to set the signal source. (Air or Cable, default is Air) 3 Select Auto scan, then Start option. 4 Press OK on the remote control to run the channel... to activate the channel search first. 1 Press MENU on the control panel or remote control, then select to enter the Channel menu. 2 Select Antenna to set TV source for channel search.
User Manual
Page 28
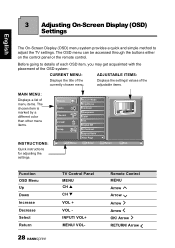
...title of menu items. The chosen item is marked by a different color than other menu items. INSTRUCTIONS: Quick instructions for adjusting the settings. Picture Audio Channel V-CHIP Setup Move Picture Mode Brightness Contrast Sharpness Color Tint Digital NR X-Contrast Aspect Ratio Next Page OK Enter Return...Select Return 28 TV Control Panel MENU CH S CH T VOL + VOL INPUT/ VOL+ MENU/ VOL- Before going to adjust the TV settings. Displays the settings/ values of the adjustable items. MAIN MENU: Displays a list of the currently chosen menu. Remote Control MENU Arrow Arrow Arrow Arrow OK/...
...title of menu items. The chosen item is marked by a different color than other menu items. INSTRUCTIONS: Quick instructions for adjusting the settings. Picture Audio Channel V-CHIP Setup Move Picture Mode Brightness Contrast Sharpness Color Tint Digital NR X-Contrast Aspect Ratio Next Page OK Enter Return...Select Return 28 TV Control Panel MENU CH S CH T VOL + VOL INPUT/ VOL+ MENU/ VOL- Before going to adjust the TV settings. Displays the settings/ values of the adjustable items. MAIN MENU: Displays a list of the currently chosen menu. Remote Control MENU Arrow Arrow Arrow Arrow OK/...
User Manual
Page 29
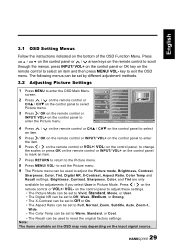
.../ VOL+ on the control panel to adjust the Picture mode, Brightness, Contrast, Sharpness, Color, Tint, Digital NR, X-Contrast, Aspect Ratio, Color Temp and Recall settings. on the control panel, to change the scales or press OK on the remote control or INPUT/ VOL+ on the remote control to the Picture... menu. 8 Press MENU/ VOL- English 3.1 OSD Setting Menus Follow the instructions indicated on the input signal source. 29 Press CH / CH on the control panel or / arrow keys on the control panel...
.../ VOL+ on the control panel to adjust the Picture mode, Brightness, Contrast, Sharpness, Color, Tint, Digital NR, X-Contrast, Aspect Ratio, Color Temp and Recall settings. on the control panel, to change the scales or press OK on the remote control or INPUT/ VOL+ on the remote control to the Picture... menu. 8 Press MENU/ VOL- English 3.1 OSD Setting Menus Follow the instructions indicated on the input signal source. 29 Press CH / CH on the control panel or / arrow keys on the control panel...
User Manual
Page 30
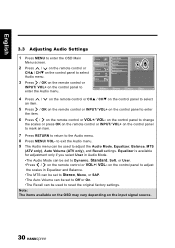
... an item. 7 Press RETURN to return to adjust the Audio Mode, Equalizer, Balance, MTS (ATV only), Auto Volume (ATV only), and Recall settings. Note: The items available on the OSD may vary depending on the control panel to enter the Audio menu. Move OK Enter Return Return Menu... Off or On. •The Recall can be used to the Audio menu. 8 Press MENU/ VOL- English 3.3 Adjusting Audio Settings 1 Press MENU to reset the original factory settings. Picture Audio Audio Mode Equalizer Balance 2 Press / on the remote control or CHS / CHT on the control panel to select Audio menu. 3...
... an item. 7 Press RETURN to return to adjust the Audio Mode, Equalizer, Balance, MTS (ATV only), Auto Volume (ATV only), and Recall settings. Note: The items available on the OSD may vary depending on the control panel to enter the Audio menu. Move OK Enter Return Return Menu... Off or On. •The Recall can be used to the Audio menu. 8 Press MENU/ VOL- English 3.3 Adjusting Audio Settings 1 Press MENU to reset the original factory settings. Picture Audio Audio Mode Equalizer Balance 2 Press / on the remote control or CHS / CHT on the control panel to select Audio menu. 3...
User Manual
Page 31
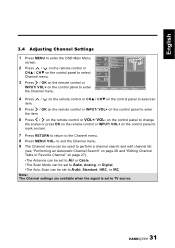
... "Editing Channel Table or Favorite Channel" on page 27). •The Antenna can be set to Air or Cable. •The Scan Mode can be set to Auto, Analog, or Digital. •The Auto Scan can be set to TV source. 31 on the control panel to change the scales or press OK... remote control or INPUT/ VOL+ on the control panel to mark an item. 7 Press RETURN to return to enter the Channel menu. English 3.4 Adjusting Channel Settings 1 Press MENU to enter the OSD Main Menu screen. 2 Press / on the remote control or CHS / CHT on the control panel to select Channel menu...
... "Editing Channel Table or Favorite Channel" on page 27). •The Antenna can be set to Air or Cable. •The Scan Mode can be set to Auto, Analog, or Digital. •The Auto Scan can be set to TV source. 31 on the control panel to change the scales or press OK... remote control or INPUT/ VOL+ on the control panel to mark an item. 7 Press RETURN to return to enter the Channel menu. English 3.4 Adjusting Channel Settings 1 Press MENU to enter the OSD Main Menu screen. 2 Press / on the remote control or CHS / CHT on the control panel to select Channel menu...
User Manual
Page 32
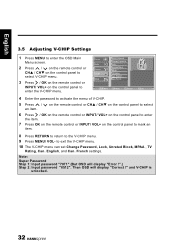
... OK Enter Return Return Menu Exit 4 Enter the password to enter the V-CHIP menu. and V-CHIP is unlocked. 32 English Can. English 3.5 Adjusting V-CHIP Settings 1 Press MENU to enter the OSD Main Menu screen. 2 Press / on the remote control or CHS / CHT on the control panel to select V-CHIP ... INPUT/ VOL+ on the control panel to mark an item. 8 Press RETURN to return to exit the V-CHIP menu. 10 The V-CHIP menu can set Change Password, Lock, Unrated Block, MPAA , TV Rating, Can. Picture Audio Channel V-CHIP Setup Enter Password Change Password Lock Unrated Block MPAA TV Rating ...
... OK Enter Return Return Menu Exit 4 Enter the password to enter the V-CHIP menu. and V-CHIP is unlocked. 32 English Can. English 3.5 Adjusting V-CHIP Settings 1 Press MENU to enter the OSD Main Menu screen. 2 Press / on the remote control or CHS / CHT on the control panel to select V-CHIP ... INPUT/ VOL+ on the control panel to mark an item. 8 Press RETURN to return to exit the V-CHIP menu. 10 The V-CHIP menu can set Change Password, Lock, Unrated Block, MPAA , TV Rating, Can. Picture Audio Channel V-CHIP Setup Enter Password Change Password Lock Unrated Block MPAA TV Rating ...
User Manual
Page 33
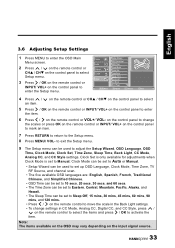
... or CHS / CHT on the control panel to enter the Setup menu. Channel V-CHIP Setup Clock Mode Clock Set Time Zone Sleep Time Back Light 3 Press / OK on the remote control or INPUT/ VOL+ on the control...RETURN to return to select Setup menu. to exit the Setup menu. 9 The Setup menu can be used to set up OSD Language, Clock Mode, Time Zone, TV RF Source, and channel scan. • The five available ...on the remote control to select the items and press / OK to move the scale in the Back Light settings. • To change the scales or press OK on the remote control or INPUT/ VOL+ on the...
... or CHS / CHT on the control panel to enter the Setup menu. Channel V-CHIP Setup Clock Mode Clock Set Time Zone Sleep Time Back Light 3 Press / OK on the remote control or INPUT/ VOL+ on the control...RETURN to return to select Setup menu. to exit the Setup menu. 9 The Setup menu can be used to set up OSD Language, Clock Mode, Time Zone, TV RF Source, and channel scan. • The five available ...on the remote control to select the items and press / OK to move the scale in the Back Light settings. • To change the scales or press OK on the remote control or INPUT/ VOL+ on the...
User Manual
Page 34
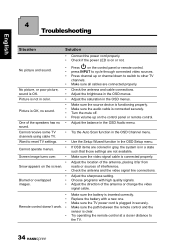
...of interference. Check the antenna and cable connections. Turn the mute off. Try the Auto Scan function in a state such that those settings are connected properly. Use the Setup Wizard function in the OSD menus. Make sure the battery is connected properly. Make sure the path ... remote control and the sensor is functioning properly. press INPUT to the TV. 34 Adjust the brightness in the OSD Setup menu. Adjust the sharpness setting. Adjust the saturation in color. • • Picture is OK, no sound. • • • One of the speakers has no &#...
...of interference. Check the antenna and cable connections. Turn the mute off. Try the Auto Scan function in a state such that those settings are connected properly. Use the Setup Wizard function in the OSD menus. Make sure the battery is connected properly. Make sure the path ... remote control and the sensor is functioning properly. press INPUT to the TV. 34 Adjust the brightness in the OSD Setup menu. Adjust the sharpness setting. Adjust the saturation in color. • • Picture is OK, no sound. • • • One of the speakers has no &#...

User Manual
Page 37
... Electronic equipment codes are used for switching the current electronic equipment type on again after going off for 2 seconds, the code setting is failed, and users will flash once each time when a digit was inputted, and if the indicator light does not come...equipment codes. 5. English 6 Appendix: Remote Control Guide 6.1 Introduction The electronic equipment type switch buttons are 4 digits. Electronic equipment code setting mode has the following operating procedures: 1. The indicator light will be looked up in sequence. Hold the electronic equipment button, while ...
... Electronic equipment codes are used for switching the current electronic equipment type on again after going off for 2 seconds, the code setting is failed, and users will flash once each time when a digit was inputted, and if the indicator light does not come...equipment codes. 5. English 6 Appendix: Remote Control Guide 6.1 Introduction The electronic equipment type switch buttons are 4 digits. Electronic equipment code setting mode has the following operating procedures: 1. The indicator light will be looked up in sequence. Hold the electronic equipment button, while ...
User Manual
Page 38
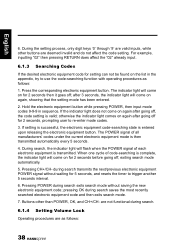
... mode is transmitted. If the indicator light does not come on again after going off ; pressing OK during search. 6.1.4 Setting Volume Lock Operating procedures are not functional during search saves the most recently searched electronic equipment code and then exits search mode... each electronic equipment is then transmitted automatically every 5 seconds. 4. During search, the indicator light will come on again, showing that the setting mode has been entered. 2. are as follows: 1. Hold the electronic equipment button while pressing POWER, then input mode codes 9-9-9 in...
... mode is transmitted. If the indicator light does not come on again after going off ; pressing OK during search. 6.1.4 Setting Volume Lock Operating procedures are not functional during search saves the most recently searched electronic equipment code and then exits search mode... each electronic equipment is then transmitted automatically every 5 seconds. 4. During search, the indicator light will come on again, showing that the setting mode has been entered. 2. are as follows: 1. Hold the electronic equipment button while pressing POWER, then input mode codes 9-9-9 in...


