Operation Manual
Page 2
...insert utensils into a grounded 3-prong outlet. 3. Inspect container and cutter assembly daily. Keep Operation Manual handy. 2. Plug into blender container while operating blender. 15. Avoid contacting moving an appliance containing hot oil or other liquid. 9. To prevent damage to repair or tighten cutter...SAFETY INSTRUCTIONS WARNING - To protect against electrical shock, do not immerse cord, plug, or blender base in any other hot liquids. 11. Keep exposed skin away from outlet when not in operation. 25. Do not use by Hamilton Beach may push lid off parts. 8.
...insert utensils into a grounded 3-prong outlet. 3. Inspect container and cutter assembly daily. Keep Operation Manual handy. 2. Plug into blender container while operating blender. 15. Avoid contacting moving an appliance containing hot oil or other liquid. 9. To prevent damage to repair or tighten cutter...SAFETY INSTRUCTIONS WARNING - To protect against electrical shock, do not immerse cord, plug, or blender base in any other hot liquids. 11. Keep exposed skin away from outlet when not in operation. 25. Do not use by Hamilton Beach may push lid off parts. 8.
Operation Manual
Page 3
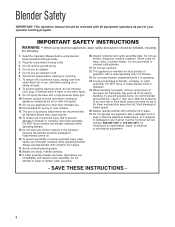
... can result in burns. Fill container with sanitizing solution, replace lid and filler cap and run on hand. Electrical Shock Hazard Disconnect power before cleaning blender base. Do not use caution when blending hot contents. Empty container. 2. Burn Hazard Always use an adapter. When ready to follow these instructions can result...
... can result in burns. Fill container with sanitizing solution, replace lid and filler cap and run on hand. Electrical Shock Hazard Disconnect power before cleaning blender base. Do not use caution when blending hot contents. Empty container. 2. Burn Hazard Always use an adapter. When ready to follow these instructions can result...
Operation Manual
Page 4
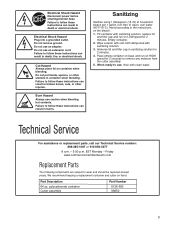
Polycarbonate Container Blender Base Reset Switch/ Circuit Breaker Control Panel Timer Knob* * = 3 Min. Your Tempest blender is designed for the Tempest blender are shown on this page. Max Stop High Speed Low Speed Jump Cycle 4 Cutter Assembly Jar Pad 5 10 15 20 STOP 25 30 35 40 POWER HIGH LOW JUMP PULSE Control Panel Jar Pad Indicator Motor Temperature Power ON (I)/OFF (O) Pulse Removable Filler Cap Lid 64 oz. Become familiar with all parts and features before using your blender. Parts and Features The parts and features for blending and mixing beverages.
Polycarbonate Container Blender Base Reset Switch/ Circuit Breaker Control Panel Timer Knob* * = 3 Min. Your Tempest blender is designed for the Tempest blender are shown on this page. Max Stop High Speed Low Speed Jump Cycle 4 Cutter Assembly Jar Pad 5 10 15 20 STOP 25 30 35 40 POWER HIGH LOW JUMP PULSE Control Panel Jar Pad Indicator Motor Temperature Power ON (I)/OFF (O) Pulse Removable Filler Cap Lid 64 oz. Become familiar with all parts and features before using your blender. Parts and Features The parts and features for blending and mixing beverages.
Operation Manual
Page 5
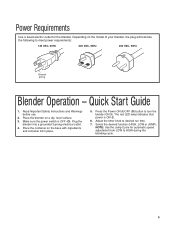
... red LED lamp indicates that power is OFF (O). Select the desired function (HIGH, LOW or JUMP). NOTE: Use the Jump Cycle for the blender. Make sure the power switch is ON (I ). Read Important Safety Instructions and Warnings before use. 2. Place the container on a dry, level... surface. 3. Quick Start Guide 1. Depending on the model of your blender, the plug will look like the following to desired run time. 7. Power Requirements Use a fused electric outlet for automatic speed adjustment from LOW...
... red LED lamp indicates that power is OFF (O). Select the desired function (HIGH, LOW or JUMP). NOTE: Use the Jump Cycle for the blender. Make sure the power switch is ON (I ). Read Important Safety Instructions and Warnings before use. 2. Place the container on a dry, level... surface. 3. Quick Start Guide 1. Depending on the model of your blender, the plug will look like the following to desired run time. 7. Power Requirements Use a fused electric outlet for automatic speed adjustment from LOW...
Operation Manual
Page 10
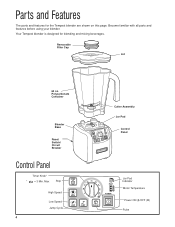
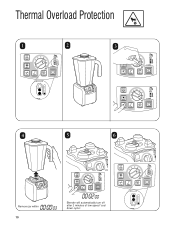
Thermal Overload Protection 1 2 3 4 5 6 00:00 Remove jar within :03 10 00:02:00 Blender will automatically turn off after 2 minutes of low-speed "cool down cycle".
Thermal Overload Protection 1 2 3 4 5 6 00:00 Remove jar within :03 10 00:02:00 Blender will automatically turn off after 2 minutes of low-speed "cool down cycle".
Operation Manual
Page 12
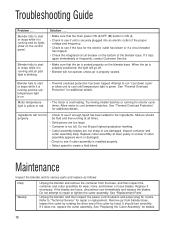
...8226; Check the integrated circuit breaker on . • Thermal overload protection has been tripped. Inspect the cutter by rotating the drive end of the blender base. Troubleshooting Guide Problem . . . If it trips again immediately or frequently, contact Customer Service. • Make sure that the main power ON...8226; Check to start or stops while it is running for cracks. If it is running and no lights show on the blender base. Blender fails to see if unit is properly seated. See "Thermal Overload Protection" for details. 12 See "Replacing the Cutter Assembly" ...
...8226; Check the integrated circuit breaker on . • Thermal overload protection has been tripped. Inspect the cutter by rotating the drive end of the blender base. Troubleshooting Guide Problem . . . If it trips again immediately or frequently, contact Customer Service. • Make sure that the main power ON...8226; Check to start or stops while it is running for cracks. If it is running and no lights show on the blender base. Blender fails to see if unit is properly seated. See "Thermal Overload Protection" for details. 12 See "Replacing the Cutter Assembly" ...


