
Operation Manual
Page 2
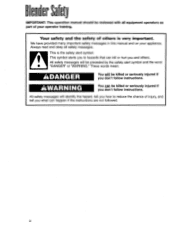
... you how to hazards that can kill or hurt you what can be preceded by the safety alert symbol and the word "DANGER" or "WARNING." Blender Safety IMPORTANT: This operation manual should be killed or seriously injured if you don't follow instructions. a This is very important. All safety messages will be...
... you how to hazards that can kill or hurt you what can be preceded by the safety alert symbol and the word "DANGER" or "WARNING." Blender Safety IMPORTANT: This operation manual should be killed or seriously injured if you don't follow instructions. a This is very important. All safety messages will be...
Operation Manual
Page 3
... THESE INSTRUCTIONS - 3 base in operation. • Inspect container and cutter assembly • Do not spray the blender base with non-foods. Check cutter assembly for wear, high-pressure spray gun. Never exceed recommended volume when blending hot contents. • Do ...not use outdoors. • Only authorized service/repair specialists • Do not use a the container since the blender would be followed, including the ...
... THESE INSTRUCTIONS - 3 base in operation. • Inspect container and cutter assembly • Do not spray the blender base with non-foods. Check cutter assembly for wear, high-pressure spray gun. Never exceed recommended volume when blending hot contents. • Do ...not use outdoors. • Only authorized service/repair specialists • Do not use a the container since the blender would be followed, including the ...
Operation Manual
Page 4
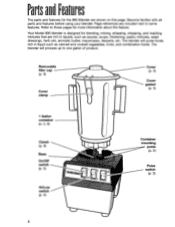
...aromatic butter, mayonnaise, desserts, etc. Your Model 990 blender is designed for more information about the feature. Page references are included next to one gallon of product. The blender will process up to some features. The blender will puree foods rich in liquids, such as canned and cooked ...vegetables, fruits, and combination foods. Refer to those pages for blending, mixing, whipping, chopping,...
...aromatic butter, mayonnaise, desserts, etc. Your Model 990 blender is designed for more information about the feature. Page references are included next to one gallon of product. The blender will process up to some features. The blender will puree foods rich in liquids, such as canned and cooked ...vegetables, fruits, and combination foods. Refer to those pages for blending, mixing, whipping, chopping,...
Operation Manual
Page 5
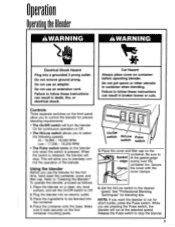
... in death, fire, or electrical shock. Failure to follow these instructions can result in container when blending. Using the blender Before you use the blender for blending tips. Place the blender on the four container mounting posts. Place the container onto the base. Make sure it rests securely on a clean,...use an extension cord. Do not put spoon or other utensils in broken bones or cuts. Controls Three separate switches on the blender only when the switch is released, the blender will allow you to select the following speeds: Hi - 18,000 - 19,500 RPM Low - 17,000 - 18,200...
... in death, fire, or electrical shock. Failure to follow these instructions can result in container when blending. Using the blender Before you use the blender for blending tips. Place the blender on the four container mounting posts. Place the container onto the base. Make sure it rests securely on a clean,...use an extension cord. Do not put spoon or other utensils in broken bones or cuts. Controls Three separate switches on the blender only when the switch is released, the blender will allow you to select the following speeds: Hi - 18,000 - 19,500 RPM Low - 17,000 - 18,200...
Operation Manual
Page 6
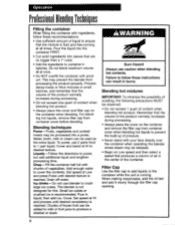
...on Low speed and then select a speed that are no bigger than a 1" cube. • Add the ingredients to desired texture. The blender is recommended. Blending hot mixtures IMPORTANT: To minimize the possibility of scalding, the following precautions MUST be released. • Begin on the ...Fill the container half full with product. Pour the liquid into the container FIRST. • Cut solid ingredients into a puree. Process dense foods or thick mixtures in small batches, and remember that the volume of the product normally increases during processing. • Always place the cover...
...on Low speed and then select a speed that are no bigger than a 1" cube. • Add the ingredients to desired texture. The blender is recommended. Blending hot mixtures IMPORTANT: To minimize the possibility of scalding, the following precautions MUST be released. • Begin on the ...Fill the container half full with product. Pour the liquid into the container FIRST. • Cut solid ingredients into a puree. Process dense foods or thick mixtures in small batches, and remember that the volume of the product normally increases during processing. • Always place the cover...
Operation Manual
Page 7
...General Cleaning." 2. Wash and rinse container and base after sanitizing. When ready to air dry. General cleaning Do not allow food residue to remove food residue. Wipe the exterior of hot water (less than 115° F/46° C) and a non-sudsing detergent. ...The following solution may be used: 1 tablespoon of detergent. Caringfor the Blender CleaningInstructions AWARNING AWARNING ter Electrical Shock Hazard Disconnect power before operating blender. ...
...General Cleaning." 2. Wash and rinse container and base after sanitizing. When ready to air dry. General cleaning Do not allow food residue to remove food residue. Wipe the exterior of hot water (less than 115° F/46° C) and a non-sudsing detergent. ...The following solution may be used: 1 tablespoon of detergent. Caringfor the Blender CleaningInstructions AWARNING AWARNING ter Electrical Shock Hazard Disconnect power before operating blender. ...
Operation Manual
Page 8
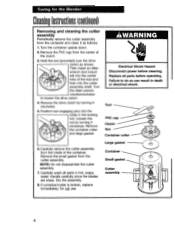
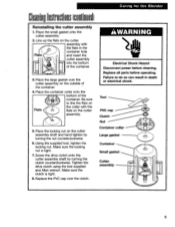
... the inside of the tool and then into the holes in hot, soapy assembly water. Then insert an Allen wrench (not includ- Caring for the Blender CleaningInstructions(continued) Removing and cleaning the cutter assembly Periodically remove the cutter assembly from the container and clean it as shown. AWARNING Electrical Shock Hazard...
... the inside of the tool and then into the holes in hot, soapy assembly water. Then insert an Allen wrench (not includ- Caring for the Blender CleaningInstructions(continued) Removing and cleaning the cutter assembly Periodically remove the cutter assembly from the container and clean it as shown. AWARNING Electrical Shock Hazard...
Operation Manual
Page 9
... the clutch. Tool PVC cap Clutch Nut Container collar Large gasket Container Small gasket Cutter assembly 9 Make sure the clutch is tight. 7. Caring for the Blender CleaningInstructions(continued) Reinstalling the cutter assembly 1. Failure to line the flats on the cutter assembly shaft and hand tighten by turning the clutch counterclockwise. cutter...
... the clutch. Tool PVC cap Clutch Nut Container collar Large gasket Container Small gasket Cutter assembly 9 Make sure the clutch is tight. 7. Caring for the Blender CleaningInstructions(continued) Reinstalling the cutter assembly 1. Failure to line the flats on the cutter assembly shaft and hand tighten by turning the clutch counterclockwise. cutter...
Operation Manual
Page 10
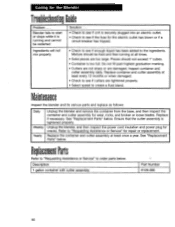
...see if cutters are tightened properly. • Select speed to "Requesting Assistance or Service" for cracks. Replace if necessary. Unplug the blender, and then inspect the power cord insulation and power plug for repair or replacement. Inspect container and cutter assembly daily. Ensure that the...damaged. Description 1 gallon container with cutter assembly Part Number 6126-990 10 Replace the container and cutter assembly at least every 12 months or when damaged. • Check to order parts below . Blender fails to start or stops while it is securely plugged into ...
...see if cutters are tightened properly. • Select speed to "Requesting Assistance or Service" for cracks. Replace if necessary. Unplug the blender, and then inspect the power cord insulation and power plug for repair or replacement. Inspect container and cutter assembly daily. Ensure that the...damaged. Description 1 gallon container with cutter assembly Part Number 6126-990 10 Replace the container and cutter assembly at least every 12 months or when damaged. • Check to order parts below . Blender fails to start or stops while it is securely plugged into ...
Operation Manual
Page 11
...Warranty does not apply in your local yellow pages for a particular purpose. Hamilton Beach/Proctor-Silex disclaims any and all claims for special and consequential damages are ... repaired or replaced, at Hamilton Beach's option, at 1-800-572-3331 or by calling your nearest Hamilton Beach Commercial Service Center or your nearest authorized Hamilton Beach Commercial Service Center. Requesting Assistance ... and telephone number. Call our toll-free customer service number 1-800-572-3331 www.commercial.hamiltonbeach.com 8 a.m. - 5:30 p.m. During the warranty period this Operation Manual. ...
...Warranty does not apply in your local yellow pages for a particular purpose. Hamilton Beach/Proctor-Silex disclaims any and all claims for special and consequential damages are ... repaired or replaced, at Hamilton Beach's option, at 1-800-572-3331 or by calling your nearest Hamilton Beach Commercial Service Center or your nearest authorized Hamilton Beach Commercial Service Center. Requesting Assistance ... and telephone number. Call our toll-free customer service number 1-800-572-3331 www.commercial.hamiltonbeach.com 8 a.m. - 5:30 p.m. During the warranty period this Operation Manual. ...


