
Operation Manual
Page 2
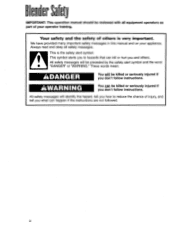
Blender Safety IMPORTANT: This operation manual should be reviewed with all safety messages. a This is very important. These words mean: ADANGER You will be killed or seriously injured if you and others is the safety alert symbol. We have provided many important safety messages in this manual and on your operator... training. Your safety and the safety of your appliance. Always read and obey all equipment operators as part of others . This symbol alerts you to reduce the chance of injury, and tell you don't follow instructions. ...
Blender Safety IMPORTANT: This operation manual should be reviewed with all safety messages. a This is very important. These words mean: ADANGER You will be killed or seriously injured if you and others is the safety alert symbol. We have provided many important safety messages in this manual and on your operator... training. Your safety and the safety of your appliance. Always read and obey all equipment operators as part of others . This symbol alerts you to reduce the chance of injury, and tell you don't follow instructions. ...
Operation Manual
Page 3
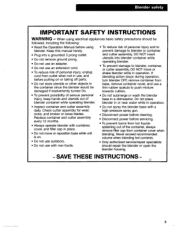
... out of personal injury and to push mixture damaged if inadvertently turned On. should be thin rubber spatula to blender. When using • To reduce risk of the container, always remove filler cap from container cover when blending. Blender safety IMPORTANT SAFETY INSTRUCTIONS WARNING - Do not place blender in or near water while in base, remove container cover, and use an extension cord. • To reduce risk of blender container while operating blender. Replace container and cutter assembly every...
... out of personal injury and to push mixture damaged if inadvertently turned On. should be thin rubber spatula to blender. When using • To reduce risk of the container, always remove filler cap from container cover when blending. Blender safety IMPORTANT SAFETY INSTRUCTIONS WARNING - Do not place blender in or near water while in base, remove container cover, and use an extension cord. • To reduce risk of blender container while operating blender. Replace container and cutter assembly every...
Operation Manual
Page 4
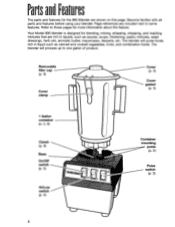
... for more information about the feature. Become familiar with all parts and features before using your blender. Refer to some features. Removable filler cap (p. 6) Cover clamp Cover (P• 5) Cover gasket (p. 5) 1 Gallon container (p. 5, 6) Clutch (p. 8) Base On/Off switch (P• 5) Hi/Low switch (P• 5) liarnebri Container mounting posts (P• 5) Pulse switch (P• 5) 4 Your Model 990 blender is designed for blending, mixing, whipping, chopping, and mashing mixtures that are shown on this page...
... for more information about the feature. Become familiar with all parts and features before using your blender. Refer to some features. Removable filler cap (p. 6) Cover clamp Cover (P• 5) Cover gasket (p. 5) 1 Gallon container (p. 5, 6) Clutch (p. 8) Base On/Off switch (P• 5) Hi/Low switch (P• 5) liarnebri Container mounting posts (P• 5) Pulse switch (P• 5) 4 Your Model 990 blender is designed for blending, mixing, whipping, chopping, and mashing mixtures that are shown on this page...
Operation Manual
Page 5
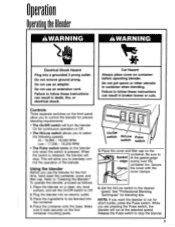
... control the blender for precise blending requirements: • The On/Off switch will run for the first time, hand wash the container, cover, and filler cap. Do not use an adapter. This will allow you to run at the selected speed. Do not remove ground prong. Using the blender Before you to Gasket fit the gasketOge edge evenly over the container rim. To operate the blender, proceed as...
... control the blender for precise blending requirements: • The On/Off switch will run for the first time, hand wash the container, cover, and filler cap. Do not use an adapter. This will allow you to run at the selected speed. Do not remove ground prong. Using the blender Before you to Gasket fit the gasketOge edge evenly over the container rim. To operate the blender, proceed as...
Operation Manual
Page 6
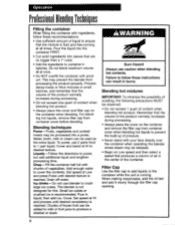
... the container half full with your face directly over the container when operating the blender where steam may prevent the blender from container cover before blending. Small ice cubes or crushed ice is running at Hi and process until desired texture is reached. To puree, use 2 parts food to crush large ice cubes. Pour in burns. Blending techniques Puree - Icy drinks - Operation ProfessionalBlendingTechniques Filling the container When filling the container with...
... the container half full with your face directly over the container when operating the blender where steam may prevent the blender from container cover before blending. Small ice cubes or crushed ice is running at Hi and process until desired texture is reached. To puree, use 2 parts food to crush large ice cubes. Pour in burns. Blending techniques Puree - Icy drinks - Operation ProfessionalBlendingTechniques Filling the container When filling the container with...
Operation Manual
Page 7
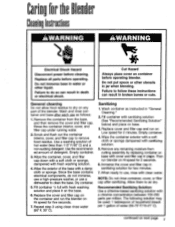
... container before operating blender. Allow them to follow these instructions can result in jar when blending. Replace all parts before cleaning. Empty container. 3. Dry container. 5.Fill container 1/2 full with a chlorine concentration between 100-200 parts per 1 gallon of the blender. When ready to dry on any remaining moisture from the base, and then remove the cover and filler cap. Wash and rinse container and base after sanitizing. Recommended Sanitizing Solution: Use a chlorine-based...
... container before operating blender. Allow them to follow these instructions can result in jar when blending. Replace all parts before cleaning. Empty container. 3. Dry container. 5.Fill container 1/2 full with a chlorine concentration between 100-200 parts per 1 gallon of the blender. When ready to dry on any remaining moisture from the base, and then remove the cover and filler cap. Wash and rinse container and base after sanitizing. Recommended Sanitizing Solution: Use a chlorine-based...
Operation Manual
Page 8
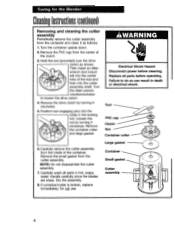
...) over the drive clutch as follows: 1.Turn the container upside down. 2. Failure to loosen the drive clutch. 4. Replace all parts in death or electrical shock. Turn the Allen wrench counterclockwise to do so can result in hot, soapy assembly water. Small gasket NOTE: Do not disassemble the cutter I- Remove the container collar and large gasket. Tool aU PVC cap Clutch Nut Container collar Large gasket 6. Carefully wash all parts before cleaning. Remove the drive clutch by turning it as shown...
...) over the drive clutch as follows: 1.Turn the container upside down. 2. Failure to loosen the drive clutch. 4. Replace all parts in death or electrical shock. Turn the Allen wrench counterclockwise to do so can result in hot, soapy assembly water. Small gasket NOTE: Do not disassemble the cutter I- Remove the container collar and large gasket. Tool aU PVC cap Clutch Nut Container collar Large gasket 6. Carefully wash all parts before cleaning. Remove the drive clutch by turning it as shown...
Operation Manual
Page 9
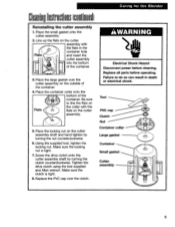
... nut counterclockwise. 6. Replace all parts before cleaning. Make sure the clutch is tight. 7. Using the supplied tool, tighten the locking nut. Place the locking nut on the cutter assembly. 5. Failure to line the flats on Flats the collar with the flats in death or electrical shock. Caring for the Blender CleaningInstructions(continued) Reinstalling the cutter assembly 1. AWARNING Electrical Shock Hazard Disconnect power before operating. cutter assembly into the bottom of the container...
... nut counterclockwise. 6. Replace all parts before cleaning. Make sure the clutch is tight. 7. Using the supplied tool, tighten the locking nut. Place the locking nut on the cutter assembly. 5. Failure to line the flats on Flats the collar with the flats in death or electrical shock. Caring for the Blender CleaningInstructions(continued) Reinstalling the cutter assembly 1. AWARNING Electrical Shock Hazard Disconnect power before operating. cutter assembly into the bottom of the container...
Operation Manual
Page 10
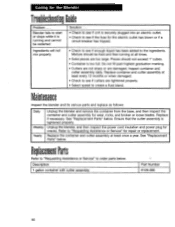
... loose blades. Unplug the blender, and then inspect the power cord insulation and power plug for the Blender TroubleshootingGuide Problem . . . Replace the container and cutter assembly at all times. • Solid pieces are too large. ReplacemenPt arts Refer to "Requesting Assistance or Service" to see if unit is running at least once a year. Description 1 gallon container with cutter assembly Part Number 6126-990 10 Caring for cracks. Pieces should be fluid and free...
... loose blades. Unplug the blender, and then inspect the power cord insulation and power plug for the Blender TroubleshootingGuide Problem . . . Replace the container and cutter assembly at all times. • Solid pieces are too large. ReplacemenPt arts Refer to "Requesting Assistance or Service" to see if unit is running at least once a year. Description 1 gallon container with cutter assembly Part Number 6126-990 10 Caring for cracks. Pieces should be fluid and free...
Operation Manual
Page 11
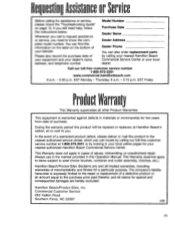
... you can also order replacement parts by looking in this product will be repaired or replaced, at Hamilton Beach's option, at no cost to you still need to wear (motor brushes, container and cutter assembly, clutches, etc.). Hamilton Beach/Proctor-Silex, Inc. Call our toll-free customer service number 1-800-572-3331 www.commercial.hamiltonbeach.com 8 a.m. - 5:30 p.m. EST Monday - EST Friday Product Warmly- During the warranty period this Operation Manual. Commercial Customer Service 263 Yadkin Road Southern Pines...
... you can also order replacement parts by looking in this product will be repaired or replaced, at Hamilton Beach's option, at no cost to you still need to wear (motor brushes, container and cutter assembly, clutches, etc.). Hamilton Beach/Proctor-Silex, Inc. Call our toll-free customer service number 1-800-572-3331 www.commercial.hamiltonbeach.com 8 a.m. - 5:30 p.m. EST Monday - EST Friday Product Warmly- During the warranty period this Operation Manual. Commercial Customer Service 263 Yadkin Road Southern Pines...

Operation Manual
Page 34
Hamilton Beach. 840065400 263 Yadkin Road Southern Pines, NC 28387 6/99
Hamilton Beach. 840065400 263 Yadkin Road Southern Pines, NC 28387 6/99


