Use & Care
Page 2
... always be followed, including the following: 1. The use of electrical shock, do not put cord, plug, or mixer body in water or other liquid. 3. Check that reduces the risk of the hand mixer at high speed under a loaded condition. Read all instructions. 2. To protect against risk of attachments not recommended or sold by Underwriter...
... always be followed, including the following: 1. The use of electrical shock, do not put cord, plug, or mixer body in water or other liquid. 3. Check that reduces the risk of the hand mixer at high speed under a loaded condition. Read all instructions. 2. To protect against risk of attachments not recommended or sold by Underwriter...
Use & Care
Page 3
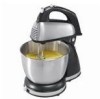
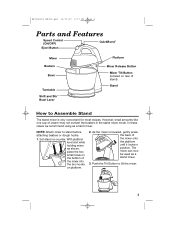
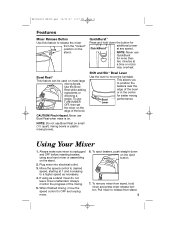
...stand) Stand How to Assemble Stand The stand mixer is very convenient for most recipes. 840162301 ENv02.qxd 12/11/07 2:17 PM Page 3 Parts and Features Speed Control (ON/OFF) Eject Button QuickBurst™ Mixer Beaters Bowl Turntable Shift and Stir™ Bowl Lever Platform Mixer Release Button Mixer...cases we recommend using as a stand mixer. 3. Push the Tilt Button to stand before attaching beaters or dough hooks. 1. NOTE: Attach mixer to tilt the mixer. 3 The mixer can now be used as a hand mixer. With platform level and while holding mixer as shown, place the two ...
...stand) Stand How to Assemble Stand The stand mixer is very convenient for most recipes. 840162301 ENv02.qxd 12/11/07 2:17 PM Page 3 Parts and Features Speed Control (ON/OFF) Eject Button QuickBurst™ Mixer Beaters Bowl Turntable Shift and Stir™ Bowl Lever Platform Mixer Release Button Mixer...cases we recommend using as a stand mixer. 3. Push the Tilt Button to stand before attaching beaters or dough hooks. 1. NOTE: Attach mixer to tilt the mixer. 3 The mixer can now be used as a hand mixer. With platform level and while holding mixer as shown, place the two ...
Use & Care
Page 4
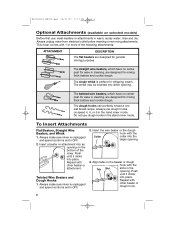
...with the Tab Slot slots in the hand mixer mode. Align tabs on the beater or dough hook with other beater or dough hook. 4 The twisted wire beaters, which have no center post for ease in the stand mixer mode. Always make sure mixer is unplugged and speed control is set to OFF. 2.... rinse and dry. Always make sure mixer is unplugged and speed control is set to OFF. 2. 840162301 ENv02.qxd 12/11/07 2:17...
...with the Tab Slot slots in the hand mixer mode. Align tabs on the beater or dough hook with other beater or dough hook. 4 The twisted wire beaters, which have no center post for ease in the stand mixer mode. Always make sure mixer is unplugged and speed control is set to OFF. 2.... rinse and dry. Always make sure mixer is unplugged and speed control is set to OFF. 2. 840162301 ENv02.qxd 12/11/07 2:17...
Use & Care
Page 5
... a higher speed as necessary. 4. Move the speed control to desired speed, starting at 1 and increasing to move the speed control to release the mixer from the "locked" position on the stand. Always monitor the progress of the bowl. NOTE: Do not use Bowl Rest when mixer is unplugged and OFF before inserting beaters, using as a hand mixer or assembling...
... a higher speed as necessary. 4. Move the speed control to desired speed, starting at 1 and increasing to move the speed control to release the mixer from the "locked" position on the stand. Always monitor the progress of the bowl. NOTE: Do not use Bowl Rest when mixer is unplugged and OFF before inserting beaters, using as a hand mixer or assembling...
Use & Care
Page 6
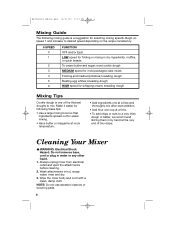
...or margarine at room temperature. • Add ingredients one at the very end of the thickest doughs to desired speed depending on speed 1 and increase to mix. Make it easier by hand at a time and thoroughly mix after each addition. • Add flour one of the recipe. Wash attachments... in water or any other liquid. 1. Wipe the mixer body and cord with a clean, damp cloth. Always unplug mixer from electrical ...
...or margarine at room temperature. • Add ingredients one at the very end of the thickest doughs to desired speed depending on speed 1 and increase to mix. Make it easier by hand at a time and thoroughly mix after each addition. • Add flour one of the recipe. Wash attachments... in water or any other liquid. 1. Wipe the mixer body and cord with a clean, damp cloth. Always unplug mixer from electrical ...

Use & Care
Page 7
...do not allow limitations on the bottom of your question much more quickly. or Canada. During this period, we will help us answer your mixer. LIMITED WARRANTY This product is no warranty with respect to the following, which vary from the date of one (1) year from state to state... the U.S. 1-800-851-8900 In Canada 1-800-267-2826 hamiltonbeach.com KEEP THESE NUMBERS FOR FUTURE REFERENCE! 7 If you have a question about your mixer, call our CUSTOMER SERVICE NUMBER. (For faster service please have model, series, and type numbers ready for a period of original purchase, except as noted...
...do not allow limitations on the bottom of your question much more quickly. or Canada. During this period, we will help us answer your mixer. LIMITED WARRANTY This product is no warranty with respect to the following, which vary from the date of one (1) year from state to state... the U.S. 1-800-851-8900 In Canada 1-800-267-2826 hamiltonbeach.com KEEP THESE NUMBERS FOR FUTURE REFERENCE! 7 If you have a question about your mixer, call our CUSTOMER SERVICE NUMBER. (For faster service please have model, series, and type numbers ready for a period of original purchase, except as noted...


