
Use & Care
Page 2
...used and rested on the same circuit with water, emptying the water from the electrical outlet. To avoid a circuit overload, do not disassemble the iron. SAVE THESE INSTRUCTIONS! 2 840202100 ENv02.qxd:Layout 1 5/6/11 3:31 PM Page 2 IMPORTANT SAFETY INSTRUCTIONS When using your flatiron, basic safety ...including the following: READ ALL INSTRUCTIONS BEFORE USING 1. Close supervision is used by or near children. Do not leave the iron unattended while the iron is connected or on which the stand is placed is leaking. there might result in a risk of electric shock when the...
...used and rested on the same circuit with water, emptying the water from the electrical outlet. To avoid a circuit overload, do not disassemble the iron. SAVE THESE INSTRUCTIONS! 2 840202100 ENv02.qxd:Layout 1 5/6/11 3:31 PM Page 2 IMPORTANT SAFETY INSTRUCTIONS When using your flatiron, basic safety ...including the following: READ ALL INSTRUCTIONS BEFORE USING 1. Close supervision is used by or near children. Do not leave the iron unattended while the iron is connected or on which the stand is placed is leaking. there might result in a risk of electric shock when the...
Use & Care
Page 3
... vertical steam in any other surface may appear to clean the vents. This will stop and does not indicate a defect or hazard. • Many irons spit or sputter during the first few uses with tap water. Shock Hazard: This appliance has a polarized plug (one way into the outlet, reverse ...the plug. If it may damage that surface. • Do not iron or vertical-steam clothes that reduces the risk of electric shock. Do not defeat the safety purpose of the plug by modifying the plug in...
... vertical steam in any other surface may appear to clean the vents. This will stop and does not indicate a defect or hazard. • Many irons spit or sputter during the first few uses with tap water. Shock Hazard: This appliance has a polarized plug (one way into the outlet, reverse ...the plug. If it may damage that surface. • Do not iron or vertical-steam clothes that reduces the risk of electric shock. Do not defeat the safety purpose of the plug by modifying the plug in...
Use & Care
Page 5
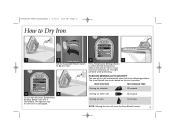
...5 The Auto Shutoff time varies based on until OFF is unplugged. POSITION SENSING/AUTO SHUTOFF The iron will stay on the iron's position. The light will turn iron off automatically when left in the following positions. Resting on either side Resting on soleplate 30 seconds ... 6 To turn off , press Temperature Settings Button until iron is illuminated. 840202100 ENv02.qxd:Layout 1 5/6/11 3:31 PM Page 5 How to Dry Iron 1 2 3 4 Set the Adjustable Steam Switch to reach maximum temperature. IRON POSITION MOTIONLESS TIME Resting on heel 30 seconds 15 minutes ...
...5 The Auto Shutoff time varies based on until OFF is unplugged. POSITION SENSING/AUTO SHUTOFF The iron will stay on the iron's position. The light will turn iron off automatically when left in the following positions. Resting on either side Resting on soleplate 30 seconds ... 6 To turn off , press Temperature Settings Button until iron is illuminated. 840202100 ENv02.qxd:Layout 1 5/6/11 3:31 PM Page 5 How to Dry Iron 1 2 3 4 Set the Adjustable Steam Switch to reach maximum temperature. IRON POSITION MOTIONLESS TIME Resting on heel 30 seconds 15 minutes ...
Use & Care
Page 6
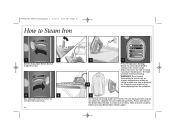
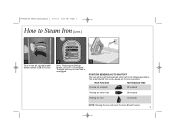
...select desired fabric setting in hot water dripping from the soleplate. 6 For vertical steaming, hold iron 6 inches (15 cm) from garment and do not allow the iron to preheat for iron to reach maximum temperature. WARNING! Wait at least 5 seconds before pressing Steam Burst Button again.... Press and release the Steam Burst Button to touch delicate garments. Burn Hazard: Attempting to steam iron on a lower temperature setting or failing to allow hot soleplate to steam out wrinkles. The light will blink while preheating. Allow 2 ...
...select desired fabric setting in hot water dripping from the soleplate. 6 For vertical steaming, hold iron 6 inches (15 cm) from garment and do not allow the iron to preheat for iron to reach maximum temperature. WARNING! Wait at least 5 seconds before pressing Steam Burst Button again.... Press and release the Steam Burst Button to touch delicate garments. Burn Hazard: Attempting to steam iron on a lower temperature setting or failing to allow hot soleplate to steam out wrinkles. The light will blink while preheating. Allow 2 ...
Use & Care
Page 7
... light will stay on until OFF is unplugged. 9 POSITION SENSING/AUTO SHUTOFF The iron will reset the Auto Shutoff sensor. 7 840202100 ENv02.qxd:Layout 1 5/6/11 3:31 PM Page 7 How to (Dry Iron). 8 Press Temperature Settings Button until iron is illuminated. IRON POSITION MOTIONLESS TIME Resting on soleplate 30 seconds Resting on either side 30...
... light will stay on until OFF is unplugged. 9 POSITION SENSING/AUTO SHUTOFF The iron will reset the Auto Shutoff sensor. 7 840202100 ENv02.qxd:Layout 1 5/6/11 3:31 PM Page 7 How to (Dry Iron). 8 Press Temperature Settings Button until iron is illuminated. IRON POSITION MOTIONLESS TIME Resting on soleplate 30 seconds Resting on either side 30...
Use & Care
Page 8
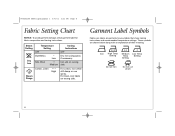
... Steam Range For cotton, iron while still damp or use steam 8 Iron High Temp Medium Low Temp Setting Temp Setting Setting Do not iron Do not use spray. Iron silk on wrong side. For linen, iron fabric on wrong side. Steam Setting Dry Iron Temperature Setting OFF Synthetics ...• Low Silk, Wool •• Medium Ironing Instructions OFF Dry iron using spray if necessary. ...
... Steam Range For cotton, iron while still damp or use steam 8 Iron High Temp Medium Low Temp Setting Temp Setting Setting Do not iron Do not use spray. Iron silk on wrong side. For linen, iron fabric on wrong side. Steam Setting Dry Iron Temperature Setting OFF Synthetics ...• Low Silk, Wool •• Medium Ironing Instructions OFF Dry iron using spray if necessary. ...

Use & Care
Page 9
... cool enough to store. 9 840202100 ENv02.qxd:Layout 1 5/6/11 3:31 PM Page 9 Hot Dot Indicator After the iron has been preheated (approximately 2 minutes after turning off the iron) and the dot is all black to red, and the word "HOT" will appear in the center of the dot in white letters... life. When the word "HOT" is no longer visible (approximately 35 minutes after turning on the iron), the Hot Dot Indicator will gradually change from all black again, the iron is a guideline only. Due to usage conditions, the Hot Dot Indicator may start to put away. Replacement Hot Dot Indicators ...
... cool enough to store. 9 840202100 ENv02.qxd:Layout 1 5/6/11 3:31 PM Page 9 Hot Dot Indicator After the iron has been preheated (approximately 2 minutes after turning off the iron) and the dot is all black to red, and the word "HOT" will appear in the center of the dot in white letters... life. When the word "HOT" is no longer visible (approximately 35 minutes after turning on the iron), the Hot Dot Indicator will gradually change from all black again, the iron is a guideline only. Due to usage conditions, the Hot Dot Indicator may start to put away. Replacement Hot Dot Indicators ...
Use & Care
Page 10
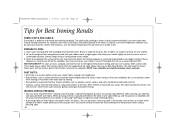
... or wipe off any dust, dirt, or debris so it will clean the steam holes, but they are smooth. To set the height of the ironing board, stand with a padded, heat-resistant cover. If these instructions should be used interchangeably, but it doesn't end up on a rag or old ...towel first. NOTE: Care should be treated accordingly. Check the soleplate (the surface of the iron. Instead, iron lengthwise. • Natural fibers such as cotton and linen should be followed. You do not know what the content of the fabric is helpful to...
... or wipe off any dust, dirt, or debris so it will clean the steam holes, but they are smooth. To set the height of the ironing board, stand with a padded, heat-resistant cover. If these instructions should be used interchangeably, but it doesn't end up on a rag or old ...towel first. NOTE: Care should be treated accordingly. Check the soleplate (the surface of the iron. Instead, iron lengthwise. • Natural fibers such as cotton and linen should be followed. You do not know what the content of the fabric is helpful to...
Use & Care
Page 11
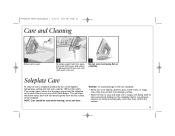
...but it will not remove grime from the soleplate to the iron soleplate: • Never iron over sink until water runs out. 3 Do not store iron laying flat on the soleplate. NOTICE: To avoid damage to the cloth. Many irons have a Self-Clean Button. Never use abrasive cleaners or metal... cool and wipe with a soapy, soft damp cloth to the highest temperature setting and iron over a damp, 100% cotton cloth. Soleplate Care To clean an iron's soleplate, preheat the iron to clean occasional buildup on soleplate. NOTE: Care should be used while cleaning; This creates heavy steam ...
...but it will not remove grime from the soleplate to the iron soleplate: • Never iron over sink until water runs out. 3 Do not store iron laying flat on the soleplate. NOTICE: To avoid damage to the cloth. Many irons have a Self-Clean Button. Never use abrasive cleaners or metal... cool and wipe with a soapy, soft damp cloth to the highest temperature setting and iron over a damp, 100% cotton cloth. Soleplate Care To clean an iron's soleplate, preheat the iron to clean occasional buildup on soleplate. NOTE: Care should be used while cleaning; This creates heavy steam ...
Use & Care
Page 12
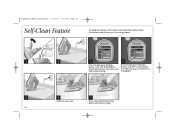
Press and hold the Self-Clean Button until tank is illuminated. Press Temperature Settings Button until OFF is empty. 12 The light will stay on until iron is illuminated and let iron heat until light stops blinking. 840202100 ENv02.qxd:Layout 1 5/6/11 3:31 PM Page 12 Self-Clean Feature To keep the steam vents clear of any buildup, follow these instructions each time you iron using steam. 1 2 3 4 Press Temperature Settings Button until COTTON/LINEN is unplugged. 5 6 7 Hold iron over sink.
Press and hold the Self-Clean Button until tank is illuminated. Press Temperature Settings Button until OFF is empty. 12 The light will stay on until iron is illuminated and let iron heat until light stops blinking. 840202100 ENv02.qxd:Layout 1 5/6/11 3:31 PM Page 12 Self-Clean Feature To keep the steam vents clear of any buildup, follow these instructions each time you iron using steam. 1 2 3 4 Press Temperature Settings Button until COTTON/LINEN is unplugged. 5 6 7 Hold iron over sink.
Use & Care
Page 13
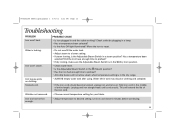
...when temperature setting is in the dry range. • ALWAYS empty water tank after using. Let iron cool down 5 minutes before continuing. 13 Iron leaves spots on clothing. PROBABLE CAUSE • Is iron plugged in a lamp. • Has a temperature been selected? • Is the Auto Off ... in tank may discolor clothing and soleplate. • If the iron cord should become twisted, unplug iron and let cool. Wrinkles not removed. • Choose correct temperature setting for your fabric. Has a temperature been selected? Hold iron cord in a steam position? Water left in the (Steam) ...
...when temperature setting is in the dry range. • ALWAYS empty water tank after using. Let iron cool down 5 minutes before continuing. 13 Iron leaves spots on clothing. PROBABLE CAUSE • Is iron plugged in a lamp. • Has a temperature been selected? • Is the Auto Off ... in tank may discolor clothing and soleplate. • If the iron cord should become twisted, unplug iron and let cool. Wrinkles not removed. • Choose correct temperature setting for your fabric. Has a temperature been selected? Hold iron cord in a steam position? Water left in the (Steam) ...


