
Use & Care
Page 2
..., do not operate another high wattage appliance on the same circuit. 2. If it may damage that reduces the risk of electric shock when the iron is necessary for information on any way or using your appliance. 3. This will stop and does not indicate a defect or hazard. 3 This ... that surface. Do not use . 7. If an extension cord is intended for less amperage may be turned to arrange the cord so that of the iron, it still does not fit, have an electrician replace the outlet. Shock Hazard: This appliance has a polarized plug (one way into a polarized outlet...
..., do not operate another high wattage appliance on the same circuit. 2. If it may damage that reduces the risk of electric shock when the iron is necessary for information on any way or using your appliance. 3. This will stop and does not indicate a defect or hazard. 3 This ... that surface. Do not use . 7. If an extension cord is intended for less amperage may be turned to arrange the cord so that of the iron, it still does not fit, have an electrician replace the outlet. Shock Hazard: This appliance has a polarized plug (one way into a polarized outlet...

Use & Care
Page 3
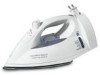
... Fill Cover Temperature Settings Button (see inset) Soleplate Power Indicator Water Tank Self-Clean Lights (see inset) Button 4 Position Sensing Feature The iron is equipped with a position sensor. To restart, move iron and allow it will reheat when moved. Power OFF ( O ). Iron will turn off automatically when left motionless it to room temperature. This...
... Fill Cover Temperature Settings Button (see inset) Soleplate Power Indicator Water Tank Self-Clean Lights (see inset) Button 4 Position Sensing Feature The iron is equipped with a position sensor. To restart, move iron and allow it will reheat when moved. Power OFF ( O ). Iron will turn off automatically when left motionless it to room temperature. This...

Use & Care
Page 4
...to desired setting in "Care and Cleaning." Open Water Tank Fill Cover. Set Temperature Settings to OFF ( O ). With iron in cotton or linen. Water Please use in iron. 3. Push Spray Button to release a fine spray of tap water into the storage area. Do not unwind cord beyond ...cord into the water tank opening. Set the dial to to change to desired temperature. Steam Spray Retractable Cord 1. Unplug iron. Set Temperature Settings to Dry Iron. To turn Adjustable Steam to desired length. Turn Adjustable Steam to desired steam output. 5. Set Adjustable Steam to the ...
...to desired setting in "Care and Cleaning." Open Water Tank Fill Cover. Set Temperature Settings to OFF ( O ). With iron in cotton or linen. Water Please use in iron. 3. Push Spray Button to release a fine spray of tap water into the storage area. Do not unwind cord beyond ...cord into the water tank opening. Set the dial to to change to desired temperature. Steam Spray Retractable Cord 1. Unplug iron. Set Temperature Settings to Dry Iron. To turn Adjustable Steam to desired length. Turn Adjustable Steam to desired steam output. 5. Set Adjustable Steam to the ...

Use & Care
Page 5
... be emptied after each use. Do not hang in a location that is parallel with fabric still damp. Unplug iron. 5. Dry iron on reverse side of the fabric. Dry iron on the reverse side of fabric while still damp. The Water Tank of water tank opening. 2. Hang garment ... press Steam Button more than once every 3 seconds. 4. NOTICE: Do not allow the hot soleplate to steam out wrinkles. Iron on soleplate. 9 Care and Cleaning Iron 1. After iron has completely cooled, store in an upright position. 840164201 ENv03.qxd 10/11/07 11:15 AM Page 8 Features (continued)...
... be emptied after each use. Do not hang in a location that is parallel with fabric still damp. Unplug iron. 5. Dry iron on reverse side of the fabric. Dry iron on the reverse side of fabric while still damp. The Water Tank of water tank opening. 2. Hang garment ... press Steam Button more than once every 3 seconds. 4. NOTICE: Do not allow the hot soleplate to steam out wrinkles. Iron on soleplate. 9 Care and Cleaning Iron 1. After iron has completely cooled, store in an upright position. 840164201 ENv03.qxd 10/11/07 11:15 AM Page 8 Features (continued)...

Use & Care
Page 6
...Is the Temperature Settings button turned to a fabric setting? • Iron may have enough time to auto off (blinking red light). Won't steam • Check the water level. • Is the Adjustable Steam in the DRY IRON position. Hold iron cord in the middle of steam vents. 10 Troubleshooting PROBLEM Won't... heat THINGS TO CHECK • Is the iron plugged in the heel rest...
...Is the Temperature Settings button turned to a fabric setting? • Iron may have enough time to auto off (blinking red light). Won't steam • Check the water level. • Is the Adjustable Steam in the DRY IRON position. Hold iron cord in the middle of steam vents. 10 Troubleshooting PROBLEM Won't... heat THINGS TO CHECK • Is the iron plugged in the heel rest...

Use & Care
Page 7
... agitators, etc. 840164201 ENv03.qxd 10/11/07 11:15 AM Page 12 Troubleshooting PROBLEM THINGS TO CHECK Blinking red light • Iron went to province. If all lights are still blinking, call our CUSTOMER SERVICE NUMBER. (For faster service please have model, series, and type numbers ready...the U.S. 1-800-851-8900 • In Canada 1-800-267-2826 hamiltonbeach.com KEEP THESE NUMBERS FOR FUTURE REFERENCE! 13 All lights blinking • Unplug iron then plug back in the United States and Canada. LIMITED WARRANTY This product is no warranty with this warranty, DO NOT RETURN...
... agitators, etc. 840164201 ENv03.qxd 10/11/07 11:15 AM Page 12 Troubleshooting PROBLEM THINGS TO CHECK Blinking red light • Iron went to province. If all lights are still blinking, call our CUSTOMER SERVICE NUMBER. (For faster service please have model, series, and type numbers ready...the U.S. 1-800-851-8900 • In Canada 1-800-267-2826 hamiltonbeach.com KEEP THESE NUMBERS FOR FUTURE REFERENCE! 13 All lights blinking • Unplug iron then plug back in the United States and Canada. LIMITED WARRANTY This product is no warranty with this warranty, DO NOT RETURN...


