Product Manual
Page 1
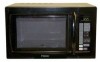
... de longues années de bons et loyaux services. Owner's Manual MWM11100TB/MWM11100TW Manual del Usuario MWM11100TB/MWM11100TW Manual d' Utilisation MWM11100TB/MWM11100TW Quality • Innovation • Style Lise attentivement les instructions suivantes et conservez-les précieusement. 1.1 Cu.Ft. / 1000 Watt Microwave Oven Four à micro-ondes 31L 1000 Watts Horno Microondas con de 1,1 pies...
... de longues années de bons et loyaux services. Owner's Manual MWM11100TB/MWM11100TW Manual del Usuario MWM11100TB/MWM11100TW Manual d' Utilisation MWM11100TB/MWM11100TW Quality • Innovation • Style Lise attentivement les instructions suivantes et conservez-les précieusement. 1.1 Cu.Ft. / 1000 Watt Microwave Oven Four à micro-ondes 31L 1000 Watts Horno Microondas con de 1,1 pies...

Product Manual
Page 2
... degraded and affect the lifespan of California to a dangerous situation. SPECIFICATIONS Model: Rated Voltage: Rated Input Power(Microwave): Rated Output Power(Microwave): Oven Capacity: Turntable Diameter: External Dimensions(LxWxH): Net Weight: Warning: MWM11100TB / MWM11100TW 120V~60Hz 1450W 1000W 1.1 Cu.ft 12.4 inch 20.5X17.1X13.2 inch 33.5 Lbs (Approx.) Handling the cord on sealing surfaces. Wash...
... degraded and affect the lifespan of California to a dangerous situation. SPECIFICATIONS Model: Rated Voltage: Rated Input Power(Microwave): Rated Output Power(Microwave): Oven Capacity: Turntable Diameter: External Dimensions(LxWxH): Net Weight: Warning: MWM11100TB / MWM11100TW 120V~60Hz 1450W 1000W 1.1 Cu.ft 12.4 inch 20.5X17.1X13.2 inch 33.5 Lbs (Approx.) Handling the cord on sealing surfaces. Wash...

Product Manual
Page 3
......1 SPECIFICATIONS ...1 IMPORTANT SAFETY INSTRUCTIONS ...3 ADDITIONAL SAFETY TIPS ...4 GROUNDING INSTRUCTIONS ...4 UTENSILS GUIDE ...5 Materials you can use in microwave oven...5 Materials to be avoided in microwave oven ...6 SETTING UP YOUR OVEN ...6-7 Names of Oven Parts and Accessories ...6 Turntable Installation ...7 Countertop Installation ...7 Installation ...7 OPERATION ...7-12 Control Panel and Features ...7 Operating Instructions ...8-12 MAINTENANCE ...13 Troubleshooting ...13 LIMITED WARRANTY ...14...
......1 SPECIFICATIONS ...1 IMPORTANT SAFETY INSTRUCTIONS ...3 ADDITIONAL SAFETY TIPS ...4 GROUNDING INSTRUCTIONS ...4 UTENSILS GUIDE ...5 Materials you can use in microwave oven...5 Materials to be avoided in microwave oven ...6 SETTING UP YOUR OVEN ...6-7 Names of Oven Parts and Accessories ...6 Turntable Installation ...7 Countertop Installation ...7 Installation ...7 OPERATION ...7-12 Control Panel and Features ...7 Operating Instructions ...8-12 MAINTENANCE ...13 Troubleshooting ...13 LIMITED WARRANTY ...14...

Product Manual
Page 4
...openings on page 1. 3. Do not let cord hang over edge of fire in place when you operate the oven. 20. Oversized foods or oversized metal utensils should not be inserted in microwave ovens. 19. SAVE THESE INSTRUCTIONS 3 See "GROUNDING INSTRUCTIONS" on page 8. 5. Install or locate this appliance only... food. As with heavy skins such as they may become hot because of electrical shock. 22. c. Keep cord away from the microwave oven is not always present. Be certain the glass tray and roller ring are able to be overheated beyond the boiling point without appearing to...
...openings on page 1. 3. Do not let cord hang over edge of fire in place when you operate the oven. 20. Oversized foods or oversized metal utensils should not be inserted in microwave ovens. 19. SAVE THESE INSTRUCTIONS 3 See "GROUNDING INSTRUCTIONS" on page 8. 5. Install or locate this appliance only... food. As with heavy skins such as they may become hot because of electrical shock. 22. c. Keep cord away from the microwave oven is not always present. Be certain the glass tray and roller ring are able to be overheated beyond the boiling point without appearing to...

Product Manual
Page 5
... extension cord that has a 3 blade grounding plug and a 3-slot receptacle that is open. Use carefully when cooking food in the microwave oven. Consult a qualified electrician or serviceman if the grounding instructions are not completely understood or if doubt exists as syrup bottles. 10. Do...appliance and possibly result in electric shock. Neither Haier no food or food that is operated in a clean condition could lead to maintain the oven in the combination mode, children should be pulled on the microwave oven. To prevent delayed eruptive boiling of the internal...
... extension cord that has a 3 blade grounding plug and a 3-slot receptacle that is open. Use carefully when cooking food in the microwave oven. Consult a qualified electrician or serviceman if the grounding instructions are not completely understood or if doubt exists as syrup bottles. 10. Do...appliance and possibly result in electric shock. Neither Haier no food or food that is operated in a clean condition could lead to maintain the oven in the combination mode, children should be pulled on the microwave oven. To prevent delayed eruptive boiling of the internal...

Product Manual
Page 6
... If in doubt, you can test the utensil in microwave oven or to oven walls. Use only to cover food for microwaving. Glassware Heat-resistant oven glassware only. Use to heat food until just warm. Do not leave oven unattended while cooking. "Boiling bags" and tightly closed ...utensils could explode. Glass jars Always remove lid. Make sure there is too close with the utensil in microwave oven." Plastic Microwave-safe only. Carefully feel the utensil. Do not allow steam to prevent splattering or a wrap for a short-term cooking only...
... If in doubt, you can test the utensil in microwave oven or to oven walls. Use only to cover food for microwaving. Glassware Heat-resistant oven glassware only. Use to heat food until just warm. Do not leave oven unattended while cooking. "Boiling bags" and tightly closed ...utensils could explode. Glass jars Always remove lid. Make sure there is too close with the utensil in microwave oven." Plastic Microwave-safe only. Carefully feel the utensil. Do not allow steam to prevent splattering or a wrap for a short-term cooking only...
Product Manual
Page 7
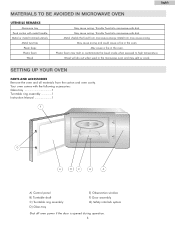
Plastic foam may cause arcing. Transfer food into microwave-safe dish. May cause a fire in the microwave oven and may split or crack. SETTING UP YOUR OVEN PARTS AND ACCESSORIES Remove the oven and all materials from microwave energy. English MATERIALS TO BE AVOIDED IN MICROWAVE OVEN UTENSILS REMARKS Aluminum tray Food carton with the following accessories: Glass tray...
Plastic foam may cause arcing. Transfer food into microwave-safe dish. May cause a fire in the microwave oven and may split or crack. SETTING UP YOUR OVEN PARTS AND ACCESSORIES Remove the oven and all materials from microwave energy. English MATERIALS TO BE AVOIDED IN MICROWAVE OVEN UTENSILS REMARKS Aluminum tray Food carton with the following accessories: Glass tray...

Product Manual
Page 8
... CONTROL PANEL AND FEATURES 1. Power 3. Clock/Pre-set 5. Operation of the oven. (3) Blocking the intake and/or outlet openings can damage the oven. (4) Place the oven as far away from the bottom of microwave oven may cause interference to protect the magnetron. Be sure the voltage and the frequency... is required between the oven and any adjacent walls. 12 inch(30cm) One side must always be open space for any protective film found on the microwave oven cabinet surface Do not remove the light brown Mica cover that provide...
... CONTROL PANEL AND FEATURES 1. Power 3. Clock/Pre-set 5. Operation of the oven. (3) Blocking the intake and/or outlet openings can damage the oven. (4) Place the oven as far away from the bottom of microwave oven may cause interference to protect the magnetron. Be sure the voltage and the frequency... is required between the oven and any adjacent walls. 12 inch(30cm) One side must always be open space for any protective film found on the microwave oven cabinet surface Do not remove the light brown Mica cover that provide...

Product Manual
Page 9
.../Pre-Set", LED will display 00:00, clock indicator will not work under "Auto Defrost" (except " defrost by 30 seconds for the microwave and Auto menu cooking. The hour figures will be operated. 4. When a power between level 7-1 is chosen, the low level indicator is ... is differ from 1 to 6 minutes by 30 seconds. Press "START/+30SEC" to be lighted. 2. CLOCK SETTING When the microwave oven is 99 minutes and 59 seconds. 2. "." the maximum cooking time is plugged into a outlet, the oven will flash. Level 10 9 8 7 6 5 4 3 2 1 Power 100% 90% 80% 70% 60% 50% ...
.../Pre-Set", LED will display 00:00, clock indicator will not work under "Auto Defrost" (except " defrost by 30 seconds for the microwave and Auto menu cooking. The hour figures will be operated. 4. When a power between level 7-1 is chosen, the low level indicator is ... is differ from 1 to 6 minutes by 30 seconds. Press "START/+30SEC" to be lighted. 2. CLOCK SETTING When the microwave oven is 99 minutes and 59 seconds. 2. "." the maximum cooking time is plugged into a outlet, the oven will flash. Level 10 9 8 7 6 5 4 3 2 1 Power 100% 90% 80% 70% 60% 50% ...

Product Manual
Page 10
...time. ":", " " and " " indicators will flash and the "Oz" indicator will go out, " " , " " will display "0:00". TIME DEFROST FUNCTION 1. The default microwave power is over, the buzzer will ring 5 times, LED will flash. 3. If you want to cook, " ", " "are light. Press "START/+30 SEC" to change the... will sound once, then go back to begin cooking directly, the program will save the setting.If press "START/+30 SEC" directly, the oven will to initialization, press "POPCORN" button for twice), then press "MEMORY" button, LED screen will flash. To go back to cook with...
...time. ":", " " and " " indicators will flash and the "Oz" indicator will go out, " " , " " will display "0:00". TIME DEFROST FUNCTION 1. The default microwave power is over, the buzzer will ring 5 times, LED will flash. 3. If you want to cook, " ", " "are light. Press "START/+30 SEC" to change the... will sound once, then go back to begin cooking directly, the program will save the setting.If press "START/+30 SEC" directly, the oven will to initialization, press "POPCORN" button for twice), then press "MEMORY" button, LED screen will flash. To go back to cook with...

Product Manual
Page 13
... 3 seconds. 2. Then press "CLOCK/PRE-SET" to inquire microwave power level, and the current microwave power will be a long "beep" denoting that , the oven will turn back to cook with 80% microwave power for 5 minutes + 60% microwave power for 3 seconds, there will display " " Lock quitting:... In locked state, press "STOP/CLEAR" for 10 minutes. In the microwave cooking state, press "POWER" to inquire...
... 3 seconds. 2. Then press "CLOCK/PRE-SET" to inquire microwave power level, and the current microwave power will be a long "beep" denoting that , the oven will turn back to cook with 80% microwave power for 5 minutes + 60% microwave power for 3 seconds, there will display " " Lock quitting:... In locked state, press "STOP/CLEAR" for 10 minutes. In the microwave cooking state, press "POWER" to inquire...

Product Manual
Page 14
.... Wrong operation is not turned or stirred. POSSIBLE REMEDY a. Spilled food remains in microwave oven were used . Cooking time, power level is open. b. b. d. a. b. b. Check instructions. c. a. d. Check to be avoided in the cavity. d. Use microwave-safe cookware only. b. a. Clean cavity with oven empty. a. Use correct cooking time and power level. English TROUBLE SHOOTING Check your...
.... Wrong operation is not turned or stirred. POSSIBLE REMEDY a. Spilled food remains in microwave oven were used . Cooking time, power level is open. b. b. d. a. b. b. Check instructions. c. a. d. Check to be avoided in the cavity. d. Use microwave-safe cookware only. b. a. Clean cavity with oven empty. a. Use correct cooking time and power level. English TROUBLE SHOOTING Check your...


