User Manual
Page 1
Instruction Manual - Please keep for future reference Bush 19/22/26in LCD TV Q41T2201672 1B 4-08
Instruction Manual - Please keep for future reference Bush 19/22/26in LCD TV Q41T2201672 1B 4-08

User Manual
Page 3
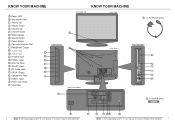
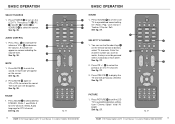
... 18 Menu Operation 22 Teletext ...32 Common Interface Module 34 Troubleshooting 36 Specifications 37 Product Guarantee 39 2 BUSH HD Ready Digital LCDTV User Manual Customer Helpline 0845 604 0105 KNOW YOUR MACHINE A POWER B VIDEO C SCART D TV E PC F Numerical Buttons G EPG H PRE PR J ASPECT K SOURCE L NICAM M SLEEP N PICTURE O PR LIST P SOUND Q VOL R MUTE...
... 18 Menu Operation 22 Teletext ...32 Common Interface Module 34 Troubleshooting 36 Specifications 37 Product Guarantee 39 2 BUSH HD Ready Digital LCDTV User Manual Customer Helpline 0845 604 0105 KNOW YOUR MACHINE A POWER B VIDEO C SCART D TV E PC F Numerical Buttons G EPG H PRE PR J ASPECT K SOURCE L NICAM M SLEEP N PICTURE O PR LIST P SOUND Q VOL R MUTE...
User Manual
Page 4
... U Component Input V HDMI 1 Input X Power Connector Y VGA Input Control Panel C D E F G H J Y 1 x LCD TV KNOW YOUR MACHINE Front View Z 1 x AC Power Cord A B Rear Connections Rear View Side Connections K L M N O P a 2 x AAA Battery X 4 BUSH HD Ready Digital LCDTV User Manual Customer Helpline 0845 604 0105 V U T SR Q BUSH HD Ready Digital LCDTV User Manual Customer Helpline 0845 604 0105 5
... U Component Input V HDMI 1 Input X Power Connector Y VGA Input Control Panel C D E F G H J Y 1 x LCD TV KNOW YOUR MACHINE Front View Z 1 x AC Power Cord A B Rear Connections Rear View Side Connections K L M N O P a 2 x AAA Battery X 4 BUSH HD Ready Digital LCDTV User Manual Customer Helpline 0845 604 0105 V U T SR Q BUSH HD Ready Digital LCDTV User Manual Customer Helpline 0845 604 0105 5
User Manual
Page 5
... the Battery Cover from your remote control, please consider the following: • Ensure there is no obstruction between remote control and TV set. • Bright sunlight may affect the remote control performance. • Always ensure that both batteries are replaced at the ...0105 REMOTE CONTROL 3. REMOTE CONTROL NOTES: - See fig. 1. 2. Thoroughly clean the battery compartment with the and marks correctly aligned. BUSH HD Ready Digital LCDTV User Manual Customer Helpline 0845 604 0105 7 fig. 1 REMOTE CONTROL 1. Battery Compartment Cover NOTE ON BATTERIES: &#...
... the Battery Cover from your remote control, please consider the following: • Ensure there is no obstruction between remote control and TV set. • Bright sunlight may affect the remote control performance. • Always ensure that both batteries are replaced at the ...0105 REMOTE CONTROL 3. REMOTE CONTROL NOTES: - See fig. 1. 2. Thoroughly clean the battery compartment with the and marks correctly aligned. BUSH HD Ready Digital LCDTV User Manual Customer Helpline 0845 604 0105 7 fig. 1 REMOTE CONTROL 1. Battery Compartment Cover NOTE ON BATTERIES: &#...
User Manual
Page 6
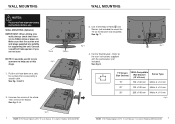
...are not sure. See fig. 4 and 5. 2. See fig. 7. Consult a qualified tradesperson if you at this stage. 1. Then remove the Stand. fig. 7 B Stand W H TV Screen VESA-Compatible Size (inches) Wall bracket (W x H mm) Screw Type 19" 100 x 100 mm Metric 4 x 10 mm 22" 100 x 100 mm Metric 4 x 10 ...mm 26" 200 x 100 mm Metric 4 x 10 mm fig. 8 fig. 6 8 BUSH HD Ready Digital LCDTV User Manual Customer Helpline 0845 604 0105 BUSH HD Ready Digital LCDTV User Manual Customer Helpline 0845 604 0105 9 WALL MOUNTING WALL MOUNTING NOTES: -
...are not sure. See fig. 4 and 5. 2. See fig. 7. Consult a qualified tradesperson if you at this stage. 1. Then remove the Stand. fig. 7 B Stand W H TV Screen VESA-Compatible Size (inches) Wall bracket (W x H mm) Screw Type 19" 100 x 100 mm Metric 4 x 10 mm 22" 100 x 100 mm Metric 4 x 10 ...mm 26" 200 x 100 mm Metric 4 x 10 mm fig. 8 fig. 6 8 BUSH HD Ready Digital LCDTV User Manual Customer Helpline 0845 604 0105 BUSH HD Ready Digital LCDTV User Manual Customer Helpline 0845 604 0105 9 WALL MOUNTING WALL MOUNTING NOTES: -

User Manual
Page 7
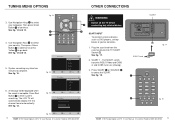
...the signal is pressed the TV will change from red to the Antenna Input Q located at the rear of the antenna. Connect the AC Power Cord Z to the Power Connector X . Mains Socket Z Antenna Plug 2. U Y a Thank you can not find this TV. Next fig. 12 10 BUSH HD Ready Digital LCDTV ...User Manual Customer Helpline 0845 604 0105 BUSH HD Ready Digital LCDTV User Manual Customer Helpline 0845 604 0105 11 Connect the AC Power Cord Z to...
...the signal is pressed the TV will change from red to the Antenna Input Q located at the rear of the antenna. Connect the AC Power Cord Z to the Power Connector X . Mains Socket Z Antenna Plug 2. U Y a Thank you can not find this TV. Next fig. 12 10 BUSH HD Ready Digital LCDTV ...User Manual Customer Helpline 0845 604 0105 BUSH HD Ready Digital LCDTV User Manual Customer Helpline 0845 604 0105 11 Connect the AC Power Cord Z to...
User Manual
Page 8
... 15 Next English Espanol Français Deutsch Italiano Nederlands Svenska Dansk Previous 1/3 Austria Belgium Czech Republic Denmark Finland France Gemary Ireland Previous 2/3 TV Installation 3/3 System searching. To connect external devices such as DVD players, set top boxes or games consoles. 1. SCART 1 - System searching... CVBS in and CVBS tuner out (Analog). 3. SCART1 R fig. 17 SCART Lead C K fig. 18 fig. 16 Exit Next 12 BUSH HD Ready Digital LCDTV User Manual Customer Helpline 0845 604 0105 BUSH HD Ready Digital LCDTV User Manual Customer Helpline 0845 604 0105 13
... 15 Next English Espanol Français Deutsch Italiano Nederlands Svenska Dansk Previous 1/3 Austria Belgium Czech Republic Denmark Finland France Gemary Ireland Previous 2/3 TV Installation 3/3 System searching. To connect external devices such as DVD players, set top boxes or games consoles. 1. SCART 1 - System searching... CVBS in and CVBS tuner out (Analog). 3. SCART1 R fig. 17 SCART Lead C K fig. 18 fig. 16 Exit Next 12 BUSH HD Ready Digital LCDTV User Manual Customer Helpline 0845 604 0105 BUSH HD Ready Digital LCDTV User Manual Customer Helpline 0845 604 0105 13
User Manual
Page 9
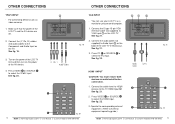
.... (Refer to external equipment operating guide.) VY S HDMI Cable to VGA Input Y on the TV. Connect the D type 15-pin VGA interface cable (not supplied) to PC B K fig. 21 E fig. 22 BUSH HD Ready Digital LCDTV User Manual Customer Helpline 0845 604 0105 15 Press VIDEO B or SOURCE K... the (Y, Pb, Pr) cables and audio cables to the TV HDMI Input V . HDMI 1 INPUT CAUTION: You must ensure both devices are off before connection. 1. U fig. 19 Pr Pb Y Audio Cables B K fig. 20 14 BUSH HD Ready Digital LCDTV User Manual Customer Helpline 0845 604 0105 VGA INPUT - Make...
.... (Refer to external equipment operating guide.) VY S HDMI Cable to VGA Input Y on the TV. Connect the D type 15-pin VGA interface cable (not supplied) to PC B K fig. 21 E fig. 22 BUSH HD Ready Digital LCDTV User Manual Customer Helpline 0845 604 0105 15 Press VIDEO B or SOURCE K... the (Y, Pb, Pr) cables and audio cables to the TV HDMI Input V . HDMI 1 INPUT CAUTION: You must ensure both devices are off before connection. 1. U fig. 19 Pr Pb Y Audio Cables B K fig. 20 14 BUSH HD Ready Digital LCDTV User Manual Customer Helpline 0845 604 0105 VGA INPUT - Make...
User Manual
Page 10
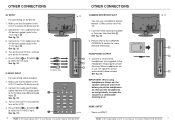
... the volume to the S-Video Input O and Audio Input N . Turn on the LCD-TV first and then turn on the VCR. 4. Please refer to the Audio Input N . fig. 25 K L P HDMI 2 INPUT - BUSH HD Ready Digital LCDTV User Manual Customer Helpline 0845 604 0105 17 Connect the Audio cables from...section for private listening. Make sure that the power of the LCD-TV and the AV device are in Common Interface Slot K . Press VIDEO B or SOURCE K to view Pay TV. 1. S-Video Cable B K fig. 23 M N O fig. 24 16 BUSH HD Ready Digital LCDTV User Manual Customer Helpline 0845 604 0105 COMMON ...
... the volume to the S-Video Input O and Audio Input N . Turn on the LCD-TV first and then turn on the VCR. 4. Please refer to the Audio Input N . fig. 25 K L P HDMI 2 INPUT - BUSH HD Ready Digital LCDTV User Manual Customer Helpline 0845 604 0105 17 Connect the Audio cables from...section for private listening. Make sure that the power of the LCD-TV and the AV device are in Common Interface Slot K . Press VIDEO B or SOURCE K to view Pay TV. 1. S-Video Cable B K fig. 23 M N O fig. 24 16 BUSH HD Ready Digital LCDTV User Manual Customer Helpline 0845 604 0105 COMMON ...
User Manual
Page 11
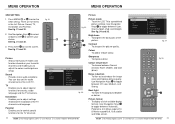
... See fig. 27. Then press TV D , PC E , SCART C , VIDEO B or B SOURCE K to a predefined picture setting. See fig. 26. PICTURE 1. See fig. 26. See fig. 27. fig. 27 18 BUSH HD Ready Digital LCDTV User Manual Customer Helpline 0845 604 0105 BUSH HD Ready Digital LCDTV User Manual ...Customer Helpline 0845 604 0105 19 See fig. 26. 2. Press NICAM L to select the previous or next TV channel. S to select MONO, STEREO, DUAL...
... See fig. 27. Then press TV D , PC E , SCART C , VIDEO B or B SOURCE K to a predefined picture setting. See fig. 26. PICTURE 1. See fig. 26. See fig. 27. fig. 27 18 BUSH HD Ready Digital LCDTV User Manual Customer Helpline 0845 604 0105 BUSH HD Ready Digital LCDTV User Manual ...Customer Helpline 0845 604 0105 19 See fig. 26. 2. Press NICAM L to select the previous or next TV channel. S to select MONO, STEREO, DUAL...

User Manual
Page 12
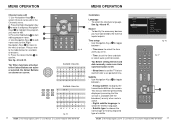
...: Removes the black bars on the remote control to be set the time (5-180 minutes.) See fig. 28. 3. Press EPG G to turn the LCD TV off after a preset time. See fig. 28. 2. Use the Navigation Keys Y to select a picture format and press OK X to 16:9. See fig...format to confirm your choice. J X Automatic Panorama 4:3 fig. 29 Y Movie expand 16:9 16:9 subtitle Wide screen fig. 30 Movie expand 14:9 BUSH HD Ready Digital LCDTV User Manual Customer Helpline 0845 604 0105 21 O DISPLAY - Automatic: DTV and HDMI input will automatically display the correct format, while...
...: Removes the black bars on the remote control to be set the time (5-180 minutes.) See fig. 28. 3. Press EPG G to turn the LCD TV off after a preset time. See fig. 28. 2. Use the Navigation Keys Y to select a picture format and press OK X to 16:9. See fig...format to confirm your choice. J X Automatic Panorama 4:3 fig. 29 Y Movie expand 16:9 16:9 subtitle Wide screen fig. 30 Movie expand 14:9 BUSH HD Ready Digital LCDTV User Manual Customer Helpline 0845 604 0105 21 O DISPLAY - Automatic: DTV and HDMI input will automatically display the correct format, while...
User Manual
Page 13
...and brightness setup. Settings Picture Sound TV Installation Parental 5 Picture 9 Picture mode Brightness Contrast Sharpness Colour temperature Noise Reduction Back light fig. 34 fig. 35 Y 22 BUSH HD Ready Digital LCDTV User Manual Customer Helpline 0845 604 0105 BUSH HD Ready Digital LCDTV User Manual ...Customer Helpline 0845 604 0105 23 fig. 31 G Settings Picture Sound TV Installation Parental Picture fig. 32 Picture mode - ...
...and brightness setup. Settings Picture Sound TV Installation Parental 5 Picture 9 Picture mode Brightness Contrast Sharpness Colour temperature Noise Reduction Back light fig. 34 fig. 35 Y 22 BUSH HD Ready Digital LCDTV User Manual Customer Helpline 0845 604 0105 BUSH HD Ready Digital LCDTV User Manual ...Customer Helpline 0845 604 0105 23 fig. 31 G Settings Picture Sound TV Installation Parental Picture fig. 32 Picture mode - ...
User Manual
Page 14
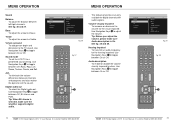
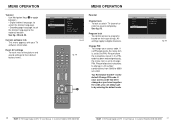
... On or Off. To eliminate the volume differences between On or Off. Settings Picture Sound TV Installation Parental MENU OPERATION 5 Picture 7 Balance Bass Treble Virtual surround Sound mode AVL Digital ... setting. To enable or disable the volume- Virtual surround - To set the LCD TV to the TV sound. Digital audio out - Use Navigation Keys Y to toggle between Off, Bit ..., Live, Dance, Techno, Classic, and Soft. Y Settings Picture Sound TV Installation Parental 5 Picture 7 Balance Bass Treble Virtual surround Sound mode AVL Digital audio out fig. 38 fig...
... On or Off. To eliminate the volume differences between On or Off. Settings Picture Sound TV Installation Parental MENU OPERATION 5 Picture 7 Balance Bass Treble Virtual surround Sound mode AVL Digital ... setting. To enable or disable the volume- Virtual surround - To set the LCD TV to the TV sound. Digital audio out - Use Navigation Keys Y to toggle between Off, Bit ..., Live, Dance, Techno, Classic, and Soft. Y Settings Picture Sound TV Installation Parental 5 Picture 7 Balance Bass Treble Virtual surround Sound mode AVL Digital audio out fig. 38 fig...
User Manual
Page 15
.... Channel skip Channel sort Channel name edit Channel scan Start fig. 42 fig. 43 X Y BUSH HD Ready Digital LCDTV User Manual Customer Helpline 0845 604 0105 27 Audio language (Digital TV only) - Press the Right Navigation Key Y to enter it and press OK X to select... all channels if it and press Navigation Keys Y to fine tune the program. Settings Picture Sound TV Installation Parental 5 TV 3 Country Audio Language Channels fig. 40 fig. 41 X Y 26 BUSH HD Ready Digital LCDTV User Manual Customer Helpline 0845 604 0105 MENU OPERATION Analog manual store 1. See...
.... Channel skip Channel sort Channel name edit Channel scan Start fig. 42 fig. 43 X Y BUSH HD Ready Digital LCDTV User Manual Customer Helpline 0845 604 0105 27 Audio language (Digital TV only) - Press the Right Navigation Key Y to enter it and press OK X to select... all channels if it and press Navigation Keys Y to fine tune the program. Settings Picture Sound TV Installation Parental 5 TV 3 Country Audio Language Channels fig. 40 fig. 41 X Y 26 BUSH HD Ready Digital LCDTV User Manual Customer Helpline 0845 604 0105 MENU OPERATION Analog manual store 1. See...
User Manual
Page 16
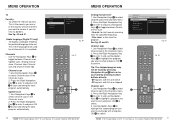
... screen. Settings Picture Sound TV Installation Parental 5 Installation 7 Language Source Time setup Subtitle Teletext Current software info Reset AV settings fig. 46 fig. 47 Y BUSH HD Ready Digital LCDTV User... k l mn o p q r s t uv wx y z Available characters 0 . @0 1 _- 1 2 ABCab c 2 3 DE F d e f 3 4 GH I g H i 4 5JKL j k l 5 6 MN O mn o 6 7 PQRSp qr s 7 8 TUVt u v8 9 WX Y Z w x y z 9 fig. 45 28 BUSH HD Ready Digital LCDTV User Manual Customer Helpline 0845 604 0105 Installation Language - See fig. 46 and 47. Please refer to the external inputs/outputs...
... screen. Settings Picture Sound TV Installation Parental 5 Installation 7 Language Source Time setup Subtitle Teletext Current software info Reset AV settings fig. 46 fig. 47 Y BUSH HD Ready Digital LCDTV User... k l mn o p q r s t uv wx y z Available characters 0 . @0 1 _- 1 2 ABCab c 2 3 DE F d e f 3 4 GH I g H i 4 5JKL j k l 5 6 MN O mn o 6 7 PQRSp qr s 7 8 TUVt u v8 9 WX Y Z w x y z 9 fig. 45 28 BUSH HD Ready Digital LCDTV User Manual Customer Helpline 0845 604 0105 Installation Language - See fig. 46 and 47. Please refer to the external inputs/outputs...
User Manual
Page 17
...instructions to their age ratings. Settings Picture Sound TV Installation Parental 5 Parental 3 Channel lock Program lock Change PIN fig. 50 30 BUSH HD Ready Digital LCDTV User Manual Customer Helpline 0845 604 0105 BUSH HD Ready Digital LCDTV User Manual Customer Helpline ...is set it . Tip: Remember that 0711 is set the teletext language to the regional location. If your TV software information. Settings Picture Sound TV Installation Parental MENU OPERATION 5 Installation 7 Language Source Time setup Subtitle Teletext Current software info Reset AV settings fig....
...instructions to their age ratings. Settings Picture Sound TV Installation Parental 5 Parental 3 Channel lock Program lock Change PIN fig. 50 30 BUSH HD Ready Digital LCDTV User Manual Customer Helpline 0845 604 0105 BUSH HD Ready Digital LCDTV User Manual Customer Helpline ...is set it . Tip: Remember that 0711 is set the teletext language to the regional location. If your TV software information. Settings Picture Sound TV Installation Parental MENU OPERATION 5 Installation 7 Language Source Time setup Subtitle Teletext Current software info Reset AV settings fig....
User Manual
Page 18
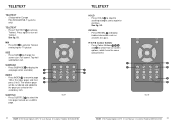
... Press again to continue. HOLD - SUBPAGE - fig. 51 fig. 52 32 BUSH HD Ready Digital LCDTV User Manual Customer Helpline 0845 604 0105 BUSH HD Ready Digital LCDTV User Manual Customer Helpline 0845 604 0105 33 Press HOLD q ...SUBTITLE - TELETEXT TELETEXT TELETEXT - (Designed for Europe PAL/SECAM/DVB-T systems only) TELETEXT - See fig. 52. MIX - SIZE - Press TELETEXT g to activate Teletext overlaying the TV picture. Press MIX f to activate Teletext. R/G/Y/B (Colour button) - Press Colour Buttons a , e , b , and d to display the sub page (when available) f...
... Press again to continue. HOLD - SUBPAGE - fig. 51 fig. 52 32 BUSH HD Ready Digital LCDTV User Manual Customer Helpline 0845 604 0105 BUSH HD Ready Digital LCDTV User Manual Customer Helpline 0845 604 0105 33 Press HOLD q ...SUBTITLE - TELETEXT TELETEXT TELETEXT - (Designed for Europe PAL/SECAM/DVB-T systems only) TELETEXT - See fig. 52. MIX - SIZE - Press TELETEXT g to activate Teletext overlaying the TV picture. Press MIX f to activate Teletext. R/G/Y/B (Colour button) - Press Colour Buttons a , e , b , and d to display the sub page (when available) f...
User Manual
Page 19
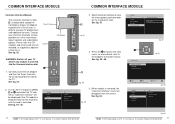
... CI slot located at the side of the TV. When module is activated. See fig. 53. Select Common Interface to quit Cancel fig. 59 Settings Picture Sound TV Installation Parental 5 TV 4 Country Audio Language Channels 34 BUSH HD Ready Digital LCDTV User Manual Customer Helpline... 0845 604 0105 fig. 60 BUSH HD Ready Digital LCDTV User Manual Customer Helpline 0845 604 0105 35 ...
... CI slot located at the side of the TV. When module is activated. See fig. 53. Select Common Interface to quit Cancel fig. 59 Settings Picture Sound TV Installation Parental 5 TV 4 Country Audio Language Channels 34 BUSH HD Ready Digital LCDTV User Manual Customer Helpline... 0845 604 0105 fig. 60 BUSH HD Ready Digital LCDTV User Manual Customer Helpline 0845 604 0105 35 ...

User Manual
Page 20
... on power. 3. Adjust brightness and contrast. Adjust volume to the influence of antenna/signal cable. 2. Check if channel is connected correctly. 2. Keep the TV away from noise sources, such as vehicles, neon lights, and hair dryers. If the item you contact technicians. Connect signal cable correctly. 1. Audio only,... 652 mm 480 mm 220 mm 8.8 kg < 110 W AC100-240V 1.5A 50-60Hz AC100-240V 1.5A 50-60Hz AC100-240V 1.5A 50-60Hz 36 BUSH HD Ready Digital LCDTV User Manual Customer Helpline 0845 604 0105 BUSH HD Ready Digital LCDTV User Manual Customer Helpline 0845 604 0105 37
... on power. 3. Adjust brightness and contrast. Adjust volume to the influence of antenna/signal cable. 2. Check if channel is connected correctly. 2. Keep the TV away from noise sources, such as vehicles, neon lights, and hair dryers. If the item you contact technicians. Connect signal cable correctly. 1. Audio only,... 652 mm 480 mm 220 mm 8.8 kg < 110 W AC100-240V 1.5A 50-60Hz AC100-240V 1.5A 50-60Hz AC100-240V 1.5A 50-60Hz 36 BUSH HD Ready Digital LCDTV User Manual Customer Helpline 0845 604 0105 BUSH HD Ready Digital LCDTV User Manual Customer Helpline 0845 604 0105 37
User Manual
Page 22
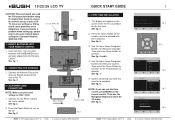
...display will appear on the screen when the TV is 230V, 50Hz. 1. Use the Up or Down Navigation Buttons to go back. CONNECTING THE ANTENNA 1. NOTE: If you for the first time. fig. 3 BUSH HD Ready Digital LCDTV QSG Customer Helpline 0845 604 0105 BUSH HD Ready Digital LCDTV Thank you can ...not find this TV. Then press the Green Button to continue or the Yellow Button to select your purchase...
...display will appear on the screen when the TV is 230V, 50Hz. 1. Use the Up or Down Navigation Buttons to go back. CONNECTING THE ANTENNA 1. NOTE: If you for the first time. fig. 3 BUSH HD Ready Digital LCDTV QSG Customer Helpline 0845 604 0105 BUSH HD Ready Digital LCDTV Thank you can ...not find this TV. Then press the Green Button to continue or the Yellow Button to select your purchase...


