
User Manual
Page 1
AUTOMATIC WASHING MACHINE USER MANUAL MODEL:HWM60-M1101 HWM60-M1201 HWM60-P1201 HWM60-M1101 HWM60-M1201 HWM60-P1201 230V/60Hz 0030511291 Please read this manual carefully before operating your washing machine.and retain it for future reference.
AUTOMATIC WASHING MACHINE USER MANUAL MODEL:HWM60-M1101 HWM60-M1201 HWM60-P1201 HWM60-M1101 HWM60-M1201 HWM60-P1201 230V/60Hz 0030511291 Please read this manual carefully before operating your washing machine.and retain it for future reference.
User Manual
Page 2
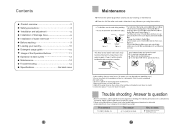
... the water supply. Clean the lint filter after each wash, otherwise it with a plastic bristled brush every two months. The filter at the water inlet valve may influence you using the machine. Product overview Safety precautions Installation and adjustment Installation of drainage hose Installation of water inlet hose Before washing Loading your laundry Detergent usage guide Usage of the Operation Buttons Operation & wash cycles Maintenance Trouble-shooting Specifications 2 3 5 6 7 9 10 10 11 13 14 14 the back cover Maintenance Remove the power plug before carrying out any cleaning or...
... the water supply. Clean the lint filter after each wash, otherwise it with a plastic bristled brush every two months. The filter at the water inlet valve may influence you using the machine. Product overview Safety precautions Installation and adjustment Installation of drainage hose Installation of water inlet hose Before washing Loading your laundry Detergent usage guide Usage of the Operation Buttons Operation & wash cycles Maintenance Trouble-shooting Specifications 2 3 5 6 7 9 10 10 11 13 14 14 the back cover Maintenance Remove the power plug before carrying out any cleaning or...
User Manual
Page 3
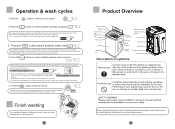
... the button,close the lid,you must push the START/PAUSE again to continue running program or cancel the relay setting, you need to switch off 13 Product Overview Outer tub cover Balance ring Control panel seat Control panel film Lint filter Filter cover Cabinet Adjustable foot Top lid component Water inlet valve water absorption gasket Power cord Inner tub Hook Pulsator back cover Drain hose Cabinet handle fixed foot(2 pieces) Base frame Description of the cycle then automatically...
... the button,close the lid,you must push the START/PAUSE again to continue running program or cancel the relay setting, you need to switch off 13 Product Overview Outer tub cover Balance ring Control panel seat Control panel film Lint filter Filter cover Cabinet Adjustable foot Top lid component Water inlet valve water absorption gasket Power cord Inner tub Hook Pulsator back cover Drain hose Cabinet handle fixed foot(2 pieces) Base frame Description of the cycle then automatically...
User Manual
Page 4
Cycle C " Cycle "button Program Application Program Just run the washing cycle without drainage cycle. The detergent was left detergent from the clothes and then rinse the clothes. D " "button During operation,the digitron tube will display the remained time (hours). Push down the delay button. During working . start the machine . The purpose is drying the inner tub and the outer tub,which can be recycled. Install Up Dismantle Down Power A " Power "button Power Power Start Pause B " Start Pause "button After the power is switched on...
Cycle C " Cycle "button Program Application Program Just run the washing cycle without drainage cycle. The detergent was left detergent from the clothes and then rinse the clothes. D " "button During operation,the digitron tube will display the remained time (hours). Push down the delay button. During working . start the machine . The purpose is drying the inner tub and the outer tub,which can be recycled. Install Up Dismantle Down Power A " Power "button Power Power Start Pause B " Start Pause "button After the power is switched on...

User Manual
Page 5
Cycle Child Lock Remaining(Minutes) Delay(Hours)
Cycle Child Lock Remaining(Minutes) Delay(Hours)
User Manual
Page 6
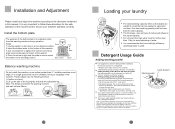
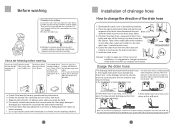
... directions for clothes less than the rated capacity. Install the bottom plate The purpose of the bottom plate is level; 2.Lift up the side of a load that low suds/high efficiency washing powder is suggested 1.Prepare warm water ( Steps: Screw 1.Lay the washer on its standing position. Loading your machine operates correctly. Do not select the high water level for the safe operation of the machine,and to ensure your laundry The rated washing capacity...
... directions for clothes less than the rated capacity. Install the bottom plate The purpose of the bottom plate is level; 2.Lift up the side of a load that low suds/high efficiency washing powder is suggested 1.Prepare warm water ( Steps: Screw 1.Lay the washer on its standing position. Loading your machine operates correctly. Do not select the high water level for the safe operation of the machine,and to ensure your laundry The rated washing capacity...
User Manual
Page 7
... water easily and wash by the drain hose frame. 5. Usage the drain hose The drainage shall be less make sure of the correct of installation, it is too long, cut it on pack)to change the direction of the drain hose with chemicals or solvents into the washing machine. Check if the laundry has any special washing instructions. Before washing 4.Slanting or uneven ground may result in unstable working or abnormal noise...
... water easily and wash by the drain hose frame. 5. Usage the drain hose The drainage shall be less make sure of the correct of installation, it is too long, cut it on pack)to change the direction of the drain hose with chemicals or solvents into the washing machine. Check if the laundry has any special washing instructions. Before washing 4.Slanting or uneven ground may result in unstable working or abnormal noise...
User Manual
Page 8
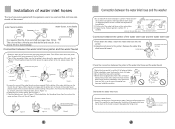
... fastened stable. 2.After installation, open the faucet to check if it leaks. 3.Do not bend the hose with the appliance are firm, so as to avoid leakage. See to Figure 6. Swing it gently to confirm if it to prevent dropping from the water inlet hose component. Release the slider till a click sound is used and that old hose-sets should not be...
... fastened stable. 2.After installation, open the faucet to check if it leaks. 3.Do not bend the hose with the appliance are firm, so as to avoid leakage. See to Figure 6. Swing it gently to confirm if it to prevent dropping from the water inlet hose component. Release the slider till a click sound is used and that old hose-sets should not be...


