Haier HWM60-111S Support and Manuals
Get Help and Manuals for this Haier item

View All Support Options Below
Free Haier HWM60-111S manuals!
Problems with Haier HWM60-111S?
Ask a Question
Free Haier HWM60-111S manuals!
Problems with Haier HWM60-111S?
Ask a Question
Popular Haier HWM60-111S Manual Pages
User Manual - Page 1

Twin-tub Washing Machine
User's manual
This manual is for future reference. Retain it for XPB60-111S HWM60-111S
Special number:0030805977 Please read this manual carefully before using.
User Manual - Page 2

Contents
Names of the parts
1
Safety precautions
2
Installation and adjustment
4
Preparation before washing
6
The musts in washing
7
Usage of the detergent
7
Washing sequence
8
Disposal after washing
12
Trouble-Shooting *Answer to question
14
Packing list *Specification
16
User Manual - Page 3

Names of the parts
Control panel Spin water-filling entrance Spin timer Wash selector Wash timer Transparent lid Overflow filter Wash water-filling entrance Water level adjusting lever Drain hose hook
Lint filter(Installed by user)
Pulsator Wash tub Drain hose Wash tub cover Base frame
Outer cover of the spin tub Inner...
User Manual - Page 4
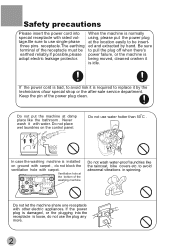
...hotter than 50 C .
50 C
In case the washing machine is installed on the control panel.
Do not use the plug any more.
2...and extracted by the technicians ofour special shop or the after-sale service department.
If the power plug is normally using, please put ... power failure, or the machine is idle.
Be sure to replace it is being moved, cleaned orwhen it by hand. Do not ...
User Manual - Page 5
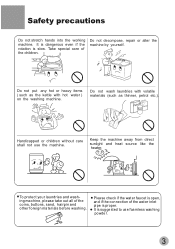
... ma chine, please take out all of the coins, buttons, sand, hairpin and other foreign ma terials before washing.
It is slow.
Do not decompose, repair or alter the machine by yourself. Keep the machine away from direct sunlight and heat source like the heater.
User Manual - Page 6

... shall be smooth with the drain hose.
1.The height of the manual.
Overflow filter
Lint filter
Usage of the drain hose
The drainage shall be less than 10cm , or the drainage will
30mm It is very important to the figure. Install the lint filter
After opening the package,please take out the...
User Manual - Page 7

...order of (1)~(3), heading
Soft
item
for drain hose at the two sides of the drain hose. Set the water level adjusting lever
to Figure 2). Extend it fromthe rear side as per the direction of... spin tub. (See to change the direction of the drain hoses
Figure 1 indicates the ex factory installation
position of the cabinet.) (See to Figure 4).
3
21
Embed into the groove with the front ...
User Manual - Page 9

... 2.4kg, so as they are prone to lose color. Usage of water. Refer to the user's manual for 30
seconds to dissolve it completely. 3.Put it . Run for the usage and quantity of the... and the laundries can be turned round in washing for the detail dosage.
7 Please refer to the instruction of water. 2.Add the powder . Laundries quantity in one time washing. The whitener shall not touch...
User Manual - Page 10
...
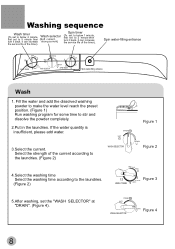
Wash selector
first set to 2 minute then turn it back. If the water quantity is insufficient, please add water.
3.Select the current. it can increase the service life of the ...laundries. (Figure 2)
OFF SILK
WOOL
3
12
6 Figure 3
COTTON
9 WASH TIMER
LINEN
5.After washing, set the "WASH SELECTOR" at "DRAIN". (Figure 4). Spin water-filling entrance
OFFSILK
STRONG
WOOL
15
3
SOFT
...
User Manual - Page 12
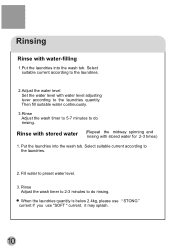
... do rinsing. Rinse with stored water
(Repeat the midway spinning and rinsing with water level adjusting lever according to the laundries.
2.Adjust the water level Set the water level with stored water for 2-3 times)
1. Rinse Adjust the wash timer to 2-3 minutes to the laundries.
2.
Rinsing
Rinse with water-filling
1.Put the...
User Manual - Page 14
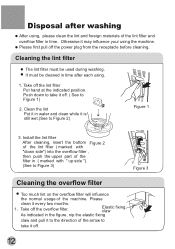
Install the lint filter After cleaning, insert the bottom Figure 2 of the lint filter ( marked with " up side "). (See to Figure 3)
Figure 3... with "down to take it is still wet.(See to Figure 1)
2. Push down side") into the overflow filter , then push the upper part of the filter in time. Clean the lint Put it in the figure, nip the elastic fixing
claw and pull it to
take it off...
User Manual - Page 15
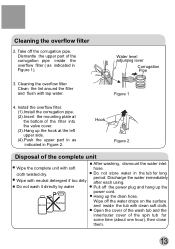
... into the valve cover. (3).Hang up the hook at the left upper side. (4).Push the upper part in as indicated in the tub for some time (about one hour), then close them.
13 Pull...pipe.
Figure 1
4. Wipe with soft cloth twisted dry. Hang up the power cord. Install the overflow filter. (1).Install the corrugation pipe. (2).Insert the mounting plate at the bottom of the complete unit
Wipe...
User Manual - Page 16

.... The laundries may fall to the
lower part of the outer side of the spin tub ...pulsator with hands gently.
Please check carefully. Trouble-shooting Answer to question
If the laundries fall...install the back edge of the spin tub (as indicated Spin tub
in the figure).
If the laundries fall to the outer side of the spin tub is reduced.)
Laundries
When the remained water is set...
User Manual - Page 17

Do not repair it to repair.
Is the pulsator twisted by yourself.
There may be some waterflowing out of the ... The following phenomena are real breakdowns, please come to the special maintenance department or after-sale service department of our company. Is the drain hose frozen? Trouble-shooting Answers to question
(If there's breakdown, please pull off the power plug before sending ...
User Manual - Page 18
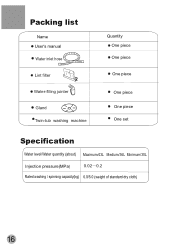
Packing list
Name User's manual Water inlet hose
Lint filter
Water-filling jointer
Gland Twin-tub washing machine
Quantity One piece One piece
One piece
One piece One piece One set
Specification
Water level/Water quantity (about) Maximum/43L Medium/36L Minimum/30L
Injection pressure(MPa)
0.02~0.2
Rated washing / spinning capacity(kg) 6.0/5.0 (weight of standard dry cloth)
16
Haier HWM60-111S Reviews
We have not received any reviews for Haier yet.