User Manual
Page 2
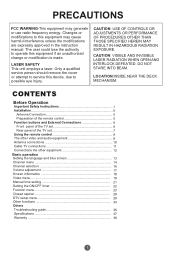
...unless the modifications are expressly approved in the instruction manual. CONTENTS Before Operation Important Safety Instructions 1 Installation 5 Antenna Connection 5 Preparation of the remote control 5 Function buttons and External Connections 6 Front panel of the TV set 6 Rear panel of the TV set 7 Using the... remote control 8 The other video and audio equipment 9 Antenna connections 10 Cable TV connections 11 Connections the other equipment 12 Basic operation ...
...unless the modifications are expressly approved in the instruction manual. CONTENTS Before Operation Important Safety Instructions 1 Installation 5 Antenna Connection 5 Preparation of the remote control 5 Function buttons and External Connections 6 Front panel of the TV set 6 Rear panel of the TV set 7 Using the... remote control 8 The other video and audio equipment 9 Antenna connections 10 Cable TV connections 11 Connections the other equipment 12 Basic operation ...

User Manual
Page 6
Tips for remote operation !When the remote control will not be used to avoid interference. *To avoid interference from electrical signals, do not bind the antenna cable together with any mains lead. ... batteries to prevent leakage. !Do not throw the batteries into fire. Dispose of the battery to the +/marks inside the battery compartment. Preparation for the remote control Battery installation !Remove the battery cover. !Insert two size AAA batteries matching the +/-polarities of used batteries in the specified manner. !Do not drop...
Tips for remote operation !When the remote control will not be used to avoid interference. *To avoid interference from electrical signals, do not bind the antenna cable together with any mains lead. ... batteries to prevent leakage. !Do not throw the batteries into fire. Dispose of the battery to the +/marks inside the battery compartment. Preparation for the remote control Battery installation !Remove the battery cover. !Insert two size AAA batteries matching the +/-polarities of used batteries in the specified manner. !Do not drop...
User Manual
Page 7
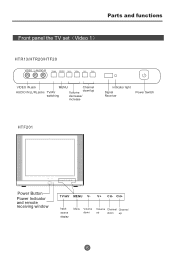
VOL+ CH- CH+ Power Button Power Indicator and remote receiving window TV/AV MENU V- Parts and functions Front panel the TV set Video 1 HTR13/HTR20/HTF20 VIDEO L-AUDIO-R TV/AV MENU VOL- V+ CH- CH+ VIDEO IN jack MENU Channel AUDIO IN (L/R) jacks TV/AV down up Volume switching decrease/ increase Indicator light Signal Receiver Power Switch HTF201 TV/AV MENU V- V+ CH- CH+ Input source display Menu Volume Volume Channel Channel down up down /up 6
VOL+ CH- CH+ Power Button Power Indicator and remote receiving window TV/AV MENU V- Parts and functions Front panel the TV set Video 1 HTR13/HTR20/HTF20 VIDEO L-AUDIO-R TV/AV MENU VOL- V+ CH- CH+ VIDEO IN jack MENU Channel AUDIO IN (L/R) jacks TV/AV down up Volume switching decrease/ increase Indicator light Signal Receiver Power Switch HTF201 TV/AV MENU V- V+ CH- CH+ Input source display Menu Volume Volume Channel Channel down up down /up 6
User Manual
Page 9
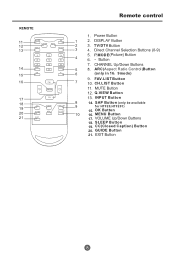
SAP Button (only be available CC SLEEP FAV.LIST 9 for HTF20,HTF201) 19 GUIDE ARC CH.LIST 15. OK Button 20 10 16. MENU Button 21 EXIT 17. 18. GUIDE Button 21. 8 CC(Closed Caption) Button 20. MENU VOL + Q.VIEW Button CH- 17 INPUT Button 18 8 14. SLEEP Button 19. Remote control 11 MUTE Q.VIEW INFO 1 12 INPUT 2 TV/DTV 13 3 1 2 3 4 4 5 6 TV/DTV MODE 7 8 9 14 SAP P.MODE 0 5 OK 15 - 6 16 CH+ 7 ARC(Aspect Ratio Control)Button (only in 16 9mode) FAV.LIST Button CH.LIST Button VOL -
SAP Button (only be available CC SLEEP FAV.LIST 9 for HTF20,HTF201) 19 GUIDE ARC CH.LIST 15. OK Button 20 10 16. MENU Button 21 EXIT 17. 18. GUIDE Button 21. 8 CC(Closed Caption) Button 20. MENU VOL + Q.VIEW Button CH- 17 INPUT Button 18 8 14. SLEEP Button 19. Remote control 11 MUTE Q.VIEW INFO 1 12 INPUT 2 TV/DTV 13 3 1 2 3 4 4 5 6 TV/DTV MODE 7 8 9 14 SAP P.MODE 0 5 OK 15 - 6 16 CH+ 7 ARC(Aspect Ratio Control)Button (only in 16 9mode) FAV.LIST Button CH.LIST Button VOL -
User Manual
Page 15
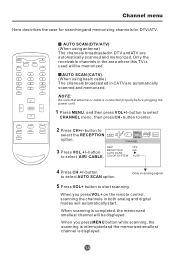
.../DTV 1 2 3 4 5 6 7 8 9 SAP P.MODE 0 OK - Only the receivable channels in analog signal 5 Press VOL+ button to select the RECEPTION option. When you press VOL+ on the remote control, scanning the channels in DTV and ATV are automatically scanned and memorized. COLOR SYSTEM OFF AIR AUTO 4 Press CH +/- CH+ MENU CH- AUTO SCAN...
.../DTV 1 2 3 4 5 6 7 8 9 SAP P.MODE 0 OK - Only the receivable channels in analog signal 5 Press VOL+ button to select the RECEPTION option. When you press VOL+ on the remote control, scanning the channels in DTV and ATV are automatically scanned and memorized. COLOR SYSTEM OFF AIR AUTO 4 Press CH +/- CH+ MENU CH- AUTO SCAN...
User Manual
Page 17
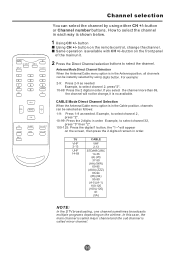
...-94 (86) (94) 95-99 (A-5) (A-1) 100-125 (100) (125) 01 (5A) NOTE: In the DTV broadcasting, one channel sometimes broadcasts multiple programs depending on the remote control, change , it is in order. Example, to select the channel. button or Channel number buttons. button Using CH +/- Antenna Mode Direct Channel Selection When...
...-94 (86) (94) 95-99 (A-5) (A-1) 100-125 (100) (125) 01 (5A) NOTE: In the DTV broadcasting, one channel sometimes broadcasts multiple programs depending on the remote control, change , it is in order. Example, to select the channel. button or Channel number buttons. button Using CH +/- Antenna Mode Direct Channel Selection When...
User Manual
Page 18
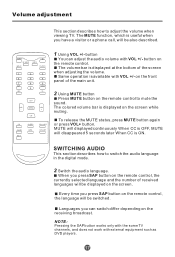
... how to switch the audio language in the digital mode. 2 Switch the audio language. button on the remote control to mute the sound. When you press SAP button on the remote control, the language will be displayed on the receiving broadcast. Languages you have a visitor or a phone call... press VOL+ button. SWITCHING AUDIO This section describes how to adjust the volume when viewing TV. The volume bar is displayed on the remote control, the currently selected language and the number of the screen when adjusting the volume. NOTE: Pressing the SAP button works only with...
... how to switch the audio language in the digital mode. 2 Switch the audio language. button on the remote control to mute the sound. When you press SAP button on the remote control, the language will be displayed on the receiving broadcast. Languages you have a visitor or a phone call... press VOL+ button. SWITCHING AUDIO This section describes how to adjust the volume when viewing TV. The volume bar is displayed on the remote control, the currently selected language and the number of the screen when adjusting the volume. NOTE: Pressing the SAP button works only with...
User Manual
Page 19
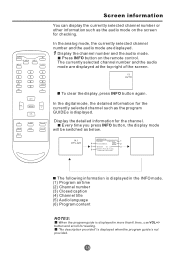
... the detailed information for checking. Screen information You can display the currently selected channel number or other information such as the audio mode on the remote control. CH+ MENU CH- In the digital mode, the detailed information for reading.
... the detailed information for checking. Screen information You can display the currently selected channel number or other information such as the audio mode on the remote control. CH+ MENU CH- In the digital mode, the detailed information for reading.

User Manual
Page 24
button to select the desired caption. FUNCTION 0101 3.Then use VOL+/- CH+ MENU VOL + You can also press CC button on the remote control to enter, then press CH+/- TEXT The term for the words that appear in a large black frame and almost cover the entire screen; EXIT ...
button to select the desired caption. FUNCTION 0101 3.Then use VOL+/- CH+ MENU VOL + You can also press CC button on the remote control to enter, then press CH+/- TEXT The term for the words that appear in a large black frame and almost cover the entire screen; EXIT ...

User Manual
Page 35
...+ VOL - CC GUIDE EXIT SLEEP ARC VOL + FAV.LIST CH.LIST 1. button to select desired program, then press the OK button to switch on the remote control when a channel is used and transmitted by some , but not all, electronic program guides (EPG data) when it is highlighted and then you can...
...+ VOL - CC GUIDE EXIT SLEEP ARC VOL + FAV.LIST CH.LIST 1. button to select desired program, then press the OK button to switch on the remote control when a channel is used and transmitted by some , but not all, electronic program guides (EPG data) when it is highlighted and then you can...


