User Manual
Page 1
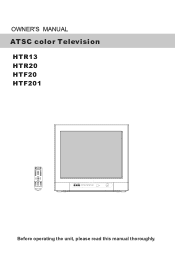
VOL+ CH- CH+ Before operating the unit, please read this manual thoroughly. OWNER'S MANUAL ATSC color Television HTR13 HTR20 HTF20 HTF201 MUTE Q.VIEW INPUT INFO TV/DTV 1 2 3 4 5 6 7 8 9 SAP P.MODE 0 OK - CH+ MENU CH- VOL - VOL + CC SLEEP S.MODE GUIDE ARC CH.LIST FAV.LIST AUDIOLIST EXIT VIDEO L-AUDIO-R TV/AV MENU VOL-
VOL+ CH- CH+ Before operating the unit, please read this manual thoroughly. OWNER'S MANUAL ATSC color Television HTR13 HTR20 HTF20 HTF201 MUTE Q.VIEW INPUT INFO TV/DTV 1 2 3 4 5 6 7 8 9 SAP P.MODE 0 OK - CH+ MENU CH- VOL - VOL + CC SLEEP S.MODE GUIDE ARC CH.LIST FAV.LIST AUDIOLIST EXIT VIDEO L-AUDIO-R TV/AV MENU VOL-
User Manual
Page 2
The user could lose the authority to operate this equipment may generate or use radio frequency energy. CAUTION: VISIBLE AND INVISIBLE LASER RADIATION WHEN OPEN AND INTERLOCK DEFEATED. DO NOT STARE INTO BEAM. CONTENTS Before Operation Important Safety Instructions 1 Installation 5 Antenna Connection 5 Preparation of the remote control 5 Function buttons and External Connections 6 Front panel of the TV set 6 Rear panel of the TV set 7 Using the remote control 8 The other video and audio equipment 9 Antenna connections 10 Cable TV connections 11 Connections the other equipment 12...
The user could lose the authority to operate this equipment may generate or use radio frequency energy. CAUTION: VISIBLE AND INVISIBLE LASER RADIATION WHEN OPEN AND INTERLOCK DEFEATED. DO NOT STARE INTO BEAM. CONTENTS Before Operation Important Safety Instructions 1 Installation 5 Antenna Connection 5 Preparation of the remote control 5 Function buttons and External Connections 6 Front panel of the TV set 6 Rear panel of the TV set 7 Using the remote control 8 The other video and audio equipment 9 Antenna connections 10 Cable TV connections 11 Connections the other equipment 12...
User Manual
Page 3
This symbol indicates thereare important operating and maintenance instructions in a wet basement, or near a swimming pool. 8. Use of controls or adjustments or performance of the unit, and to protect it from overheating. READ THESE INSTRUCTIONS All the safety and operating instructions should be followed. 5.CLEAN ONLY WITH DRY CLOTH. INSTALL IN ACCORDANCE WITH THE MANUFACTURER`S INSTRUCTIONS. 7. Do not install near a bathtub, washbowl, kitchen sink, laundry tub, in packaged with radiation performance standards under the Federal Food, Drug and Cosmetic Act 1. When a cart is ...
This symbol indicates thereare important operating and maintenance instructions in a wet basement, or near a swimming pool. 8. Use of controls or adjustments or performance of the unit, and to protect it from overheating. READ THESE INSTRUCTIONS All the safety and operating instructions should be followed. 5.CLEAN ONLY WITH DRY CLOTH. INSTALL IN ACCORDANCE WITH THE MANUFACTURER`S INSTRUCTIONS. 7. Do not install near a bathtub, washbowl, kitchen sink, laundry tub, in packaged with radiation performance standards under the Federal Food, Drug and Cosmetic Act 1. When a cart is ...
User Manual
Page 4
The wide blade or the third prong are provided for your outlet, consult an electrician for replacement of the obsolete outlet. 15. Refer all servicing to qualified service personnel. OVERLOADING Do not overload wall outlets and extension cords, as this unit yourself as opening or removing covers may touch dangerous voltage points or short out parts that could result in any way, such as contact with them might be fatal. 19. If the provided plug does not fit into your safety. Unplug this unit, as they exit from touching such power lines or circuits, as power-supply cord ...
The wide blade or the third prong are provided for your outlet, consult an electrician for replacement of the obsolete outlet. 15. Refer all servicing to qualified service personnel. OVERLOADING Do not overload wall outlets and extension cords, as this unit yourself as opening or removing covers may touch dangerous voltage points or short out parts that could result in any way, such as contact with them might be fatal. 19. If the provided plug does not fit into your safety. Unplug this unit, as they exit from touching such power lines or circuits, as power-supply cord ...
User Manual
Page 5
DAMAGE REQUIRING SERVICE Unplug this indicates a need for service. 24. c. Adjust only those controls that are covered by the manufacturer or those that the unit is damaged. f. HEAT The product should be situated away from heat sources such as the original part. It may cause serious personal injury. 28. These discs are required, be connected to the grounding system of any connections. 29. SAFETY CHECK Upon completion of the building, as close to rain or water. CONNECTING When you turn off the power and unplug all of other products (including amplifiers) that ...
DAMAGE REQUIRING SERVICE Unplug this indicates a need for service. 24. c. Adjust only those controls that are covered by the manufacturer or those that the unit is damaged. f. HEAT The product should be situated away from heat sources such as the original part. It may cause serious personal injury. 28. These discs are required, be connected to the grounding system of any connections. 29. SAFETY CHECK Upon completion of the building, as close to rain or water. CONNECTING When you turn off the power and unplug all of other products (including amplifiers) that ...

User Manual
Page 6
Installation Antenna connection If the picture is not clear or is snowy, it is recommended that an External Aerial is used, this is usually mounted outside. 300 twin-lead cable Antenna adapter (Not supplied) 75 coaxial cable Plug (Not supplied) Aerial input 75 standard coaxial type Note: AC power socket * It is recommended that a 75 ohm coaxial antenna is used batteries in the specified manner. !Do not drop, dampen or disassemble the remote control. 5 Dispose of used to avoid interference. *To avoid interference from electrical signals, do not bind the antenna cable together with any...
Installation Antenna connection If the picture is not clear or is snowy, it is recommended that an External Aerial is used, this is usually mounted outside. 300 twin-lead cable Antenna adapter (Not supplied) 75 coaxial cable Plug (Not supplied) Aerial input 75 standard coaxial type Note: AC power socket * It is recommended that a 75 ohm coaxial antenna is used batteries in the specified manner. !Do not drop, dampen or disassemble the remote control. 5 Dispose of used to avoid interference. *To avoid interference from electrical signals, do not bind the antenna cable together with any...
User Manual
Page 7
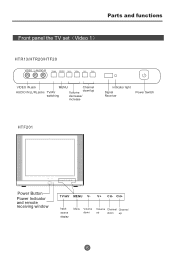
V+ CH- VOL+ CH- V+ CH- CH+ Input source display Menu Volume Volume Channel Channel down up down /up 6 CH+ VIDEO IN jack MENU Channel AUDIO IN (L/R) jacks TV/AV down up Volume switching decrease/ increase Indicator light Signal Receiver Power Switch HTF201 TV/AV MENU V- Parts and functions Front panel the TV set Video 1 HTR13/HTR20/HTF20 VIDEO L-AUDIO-R TV/AV MENU VOL- CH+ Power Button Power Indicator and remote receiving window TV/AV MENU V-
V+ CH- VOL+ CH- V+ CH- CH+ Input source display Menu Volume Volume Channel Channel down up down /up 6 CH+ VIDEO IN jack MENU Channel AUDIO IN (L/R) jacks TV/AV down up Volume switching decrease/ increase Indicator light Signal Receiver Power Switch HTF201 TV/AV MENU V- Parts and functions Front panel the TV set Video 1 HTR13/HTR20/HTF20 VIDEO L-AUDIO-R TV/AV MENU VOL- CH+ Power Button Power Indicator and remote receiving window TV/AV MENU V-

User Manual
Page 8
Parts and functions Rear panel of the TV set HTR13/HTR20/HTF20 Component video input terminal Video output terminal Video input terminal HTF201 Y Cb Cr OUT IN VIDEO1 L R AUDIO1 Antenna input socket Audio right channel output terminal Audio left channel output terminal Audio right channel input terminal Audio ...
Parts and functions Rear panel of the TV set HTR13/HTR20/HTF20 Component video input terminal Video output terminal Video input terminal HTF201 Y Cb Cr OUT IN VIDEO1 L R AUDIO1 Antenna input socket Audio right channel output terminal Audio left channel output terminal Audio right channel input terminal Audio ...
User Manual
Page 9
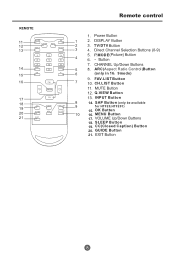
MENU VOL + Q.VIEW Button CH- 17 INPUT Button 18 8 14. OK Button 20 10 16. SAP Button (only be available CC SLEEP FAV.LIST 9 for HTF20,HTF201) 19 GUIDE ARC CH.LIST 15. SLEEP Button 19. MENU Button 21 EXIT 17. 18. GUIDE Button 21. 8 CC(Closed Caption) Button 20. Remote control 11 MUTE Q.VIEW INFO 1 12 INPUT 2 TV/DTV 13 3 1 2 3 4 4 5 6 TV/DTV MODE 7 8 9 14 SAP P.MODE 0 5 OK 15 - 6 16 CH+ 7 ARC(Aspect Ratio Control)Button (only in 16 9mode) FAV.LIST Button CH.LIST Button VOL -
MENU VOL + Q.VIEW Button CH- 17 INPUT Button 18 8 14. OK Button 20 10 16. SAP Button (only be available CC SLEEP FAV.LIST 9 for HTF20,HTF201) 19 GUIDE ARC CH.LIST 15. SLEEP Button 19. MENU Button 21 EXIT 17. 18. GUIDE Button 21. 8 CC(Closed Caption) Button 20. Remote control 11 MUTE Q.VIEW INFO 1 12 INPUT 2 TV/DTV 13 3 1 2 3 4 4 5 6 TV/DTV MODE 7 8 9 14 SAP P.MODE 0 5 OK 15 - 6 16 CH+ 7 ARC(Aspect Ratio Control)Button (only in 16 9mode) FAV.LIST Button CH.LIST Button VOL -

User Manual
Page 10
The other video and audio equipment Connections You can connect the DVD,VCR and stereo system to the output to enjoy a higher quality of picture and sound effect. ANT IN 1 1 9
The other video and audio equipment Connections You can connect the DVD,VCR and stereo system to the output to enjoy a higher quality of picture and sound effect. ANT IN 1 1 9
User Manual
Page 11
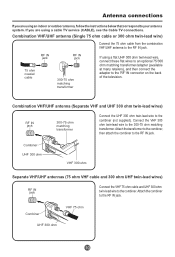
Combiner VHF 75 ohm UHF 300 ohm 10 Antenna connections If you are using an indoor or outdoor antenna, follow the instructions below that correspond to the combiner. Combiner UHF 300 ohm VHF 300 ohm Separate VHF/UHF antennas (75 ohm VHF cable and 300 ohm UHF twin-lead wires) RF IN jack Connect the VHF 75 ohm cable and UHF 300 ohm twin-lead wire to your antenna system. Combination VHF/UHF antenna (Separate VHF and UHF 300 ohm twin-lead wires) RF IN jack 300-75 ohm matching transformer Connect the UHF 300 ohm twin-lead wire to the RF IN jack. Attach ...
Combiner VHF 75 ohm UHF 300 ohm 10 Antenna connections If you are using an indoor or outdoor antenna, follow the instructions below that correspond to the combiner. Combiner UHF 300 ohm VHF 300 ohm Separate VHF/UHF antennas (75 ohm VHF cable and 300 ohm UHF twin-lead wires) RF IN jack Connect the VHF 75 ohm cable and UHF 300 ohm twin-lead wire to your antenna system. Combination VHF/UHF antenna (Separate VHF and UHF 300 ohm twin-lead wires) RF IN jack 300-75 ohm matching transformer Connect the UHF 300 ohm twin-lead wire to the RF IN jack. Attach ...
User Manual
Page 12
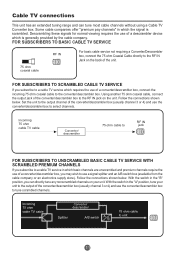
Descrambling these signals for normal viewing requires the use of a converter/descrambler box, connect the incoming 75 ohm coaxial cable to a cable TV service which requires the use of a descrambler device which is scrambled. Follow the connections shown below . With the switch in the "B" position, you subscribe to the converter/descrambler box. FOR SUBSCRIBERS TO SCRAMBLED CABLE TV SERVICE If you can tune most cable channels without using a Cable TV Converter box. Follow the connections shown below . Using another 75 ohm coaxial cable, connect the output jack of the ...
Descrambling these signals for normal viewing requires the use of a converter/descrambler box, connect the incoming 75 ohm coaxial cable to a cable TV service which requires the use of a descrambler device which is scrambled. Follow the connections shown below . With the switch in the "B" position, you subscribe to the converter/descrambler box. FOR SUBSCRIBERS TO SCRAMBLED CABLE TV SERVICE If you can tune most cable channels without using a Cable TV Converter box. Follow the connections shown below . Using another 75 ohm coaxial cable, connect the output jack of the ...
User Manual
Page 13
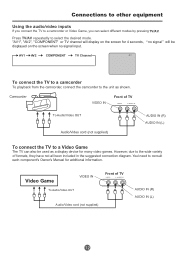
Press TV/AV repeatedly to the unit as a display device for 4 seconds, no signal will display on the screen when no signal input. AV1 AV2 COMPONENT TV Channel AV 1 To connect the TV to a camcorder To playback from the camcorder, connect the camcorder to select the desired mode. Video Game VIDEO IN To Audio/Video OUT Front of TV To Audio/Video OUT Audio/Video cord (not supplied) AUDIO IN (R) AUDIO IN (L) To connect the TV to a camcorder or Video Game, you connect the TV to a Video Game The TV can select different modes by pressing TV/AV. "AV1", "AV2", "COMPONENT" ...
Press TV/AV repeatedly to the unit as a display device for 4 seconds, no signal will display on the screen when no signal input. AV1 AV2 COMPONENT TV Channel AV 1 To connect the TV to a camcorder To playback from the camcorder, connect the camcorder to select the desired mode. Video Game VIDEO IN To Audio/Video OUT Front of TV To Audio/Video OUT Audio/Video cord (not supplied) AUDIO IN (R) AUDIO IN (L) To connect the TV to a camcorder or Video Game, you connect the TV to a Video Game The TV can select different modes by pressing TV/AV. "AV1", "AV2", "COMPONENT" ...
User Manual
Page 14
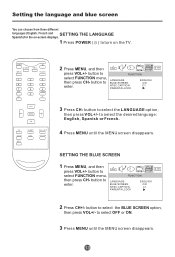
VOL - VOL + CC GUIDE EXIT SLEEP ARC FAV.LIST CH.LIST 2 Press MENU, and then 0101 press VOL+/- button to select the LANGUAGE option, then press VOL+/- FUNCTION LANGUAGE BLUE SCREEN NTSC CAPTION PARENTAL LOCK ENGLISH ON C1 3 Press CH- SETTING THE BLUE SCREEN 1 Press MENU, and then 0101 press VOL+/- button to select FUNCTION menu, then press CH- button to enter. LANGUAGE BLUE SCREEN NTSC CAPTION PARENTAL LOCK ENGLISH ON C1 2 Press CH+/- button to select FUNCTION menu, FUNCTION then press CH- button to turn on the TV. MUTE Q.VIEW INPUT INFO TV/DTV...
VOL - VOL + CC GUIDE EXIT SLEEP ARC FAV.LIST CH.LIST 2 Press MENU, and then 0101 press VOL+/- button to select the LANGUAGE option, then press VOL+/- FUNCTION LANGUAGE BLUE SCREEN NTSC CAPTION PARENTAL LOCK ENGLISH ON C1 3 Press CH- SETTING THE BLUE SCREEN 1 Press MENU, and then 0101 press VOL+/- button to select FUNCTION menu, then press CH- button to enter. LANGUAGE BLUE SCREEN NTSC CAPTION PARENTAL LOCK ENGLISH ON C1 2 Press CH+/- button to select FUNCTION menu, FUNCTION then press CH- button to turn on the TV. MUTE Q.VIEW INPUT INFO TV/DTV...
User Manual
Page 15
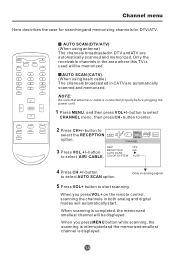
MUTE Q.VIEW INPUT INFO TV/DTV 1 2 3 4 5 6 7 8 9 SAP P.MODE 0 OK - NOTE: Be sure that antenna or cable is completed, the memorized smallest channel will be memorized. button to select the RECEPTION option. button to enter. 2 Press CH+/- COLOR SYSTEM OFF AIR AUTO 4 Press CH +/- button to select AIR/ CABLE. When you press VOL+ on the remote control, scanning the channels in analog signal 5 Press VOL+ button to select CHANNEL menu, then press CH- VOL + CC GUIDE EXIT SLEEP ARC FAV.LIST CH.LIST AUTO SCAN (DTV/ATV) (When using basic cable) The channels ...
MUTE Q.VIEW INPUT INFO TV/DTV 1 2 3 4 5 6 7 8 9 SAP P.MODE 0 OK - NOTE: Be sure that antenna or cable is completed, the memorized smallest channel will be memorized. button to select the RECEPTION option. button to enter. 2 Press CH+/- COLOR SYSTEM OFF AIR AUTO 4 Press CH +/- button to select AIR/ CABLE. When you press VOL+ on the remote control, scanning the channels in analog signal 5 Press VOL+ button to select CHANNEL menu, then press CH- VOL + CC GUIDE EXIT SLEEP ARC FAV.LIST CH.LIST AUTO SCAN (DTV/ATV) (When using basic cable) The channels ...
User Manual
Page 16
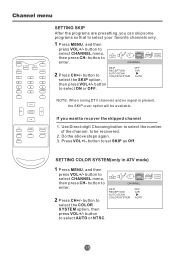
Channel menu MUTE Q.VIEW INPUT INFO TV/DTV 1 2 3 4 5 6 7 8 9 SAP P.MODE 0 OK - button to select AUTO or NTSC. 15 SETTING COLOR SYSTEM(only in ATV mode) 1 Press MENU, and then press VOL+/- button to SKIP RECEPTION AUTO SCAN COLOR SYSTEM select the SKIP option, then press VOL+/- VOL - button to set SKIP as Off. CHANNEL 0101 2 Press CH+/- If you can skip some programs so that to be available. Do the above steps again. 3. button to select CHANNEL menu, then press CH- button to CHANNEL enter. 2 Press CH+/- OFF AIR AUTO NOTE: When tuning DTV ...
Channel menu MUTE Q.VIEW INPUT INFO TV/DTV 1 2 3 4 5 6 7 8 9 SAP P.MODE 0 OK - button to select AUTO or NTSC. 15 SETTING COLOR SYSTEM(only in ATV mode) 1 Press MENU, and then press VOL+/- button to SKIP RECEPTION AUTO SCAN COLOR SYSTEM select the SKIP option, then press VOL+/- VOL - button to set SKIP as Off. CHANNEL 0101 2 Press CH+/- If you can skip some programs so that to be available. Do the above steps again. 3. button to select CHANNEL menu, then press CH- button to CHANNEL enter. 2 Press CH+/- OFF AIR AUTO NOTE: When tuning DTV ...
User Manual
Page 17
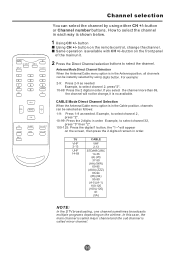
button on the air time. For example: 2-9: Press 2-9 as needed . button Using CH +/- Same operation is in the Antenna position, all channels can be instantly selected by using digits button. button on the screen, then press the 2 digits of the main unit. 2 Press the Direct Channel selection buttons to select the channel in each way is in order. Antenna Mode Direct Channel Selection When the Antenna/Cable menu option is available with CH +/- CH+ MENU CH- MUTE Q.VIEW INPUT INFO TV/DTV 1 2 3 4 5 6 7 8 9 SAP P.MODE 0 OK - 1 Using CH +/- VOL - button ...
button on the air time. For example: 2-9: Press 2-9 as needed . button Using CH +/- Same operation is in the Antenna position, all channels can be instantly selected by using digits button. button on the screen, then press the 2 digits of the main unit. 2 Press the Direct Channel selection buttons to select the channel in each way is in order. Antenna Mode Direct Channel Selection When the Antenna/Cable menu option is available with CH +/- CH+ MENU CH- MUTE Q.VIEW INPUT INFO TV/DTV 1 2 3 4 5 6 7 8 9 SAP P.MODE 0 OK - 1 Using CH +/- VOL - button ...
User Manual
Page 18
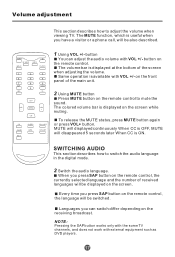
Volume adjustment This section describes how to mute the sound. MUTE Q.VIEW INPUT INFO TV/DTV 1 2 3 4 5 6 7 8 9 SAP P.MODE 0 OK - The volume bar is displayed at the bottom of received languages will be also described. When you press SAP button on the remote control. NOTE: Pressing the SAP button works only with the some TV channels, and does not work with VOL +/- CH+ MENU CH- VOL + CC GUIDE EXIT SLEEP ARC FAV.LIST CH.LIST 1 Using VOL +/- Same operation is ON. The MUTE function, which is displayed on the receiving broadcast. button on ...
Volume adjustment This section describes how to mute the sound. MUTE Q.VIEW INPUT INFO TV/DTV 1 2 3 4 5 6 7 8 9 SAP P.MODE 0 OK - The volume bar is displayed at the bottom of received languages will be also described. When you press SAP button on the remote control. NOTE: Pressing the SAP button works only with the some TV channels, and does not work with VOL +/- CH+ MENU CH- VOL + CC GUIDE EXIT SLEEP ARC FAV.LIST CH.LIST 1 Using VOL +/- Same operation is ON. The MUTE function, which is displayed on the receiving broadcast. button on ...
User Manual
Page 19
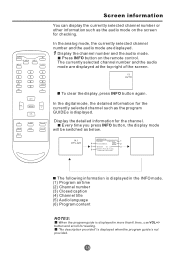
MUTE Q.VIEW INPUT INFO TV/DTV 1 2 3 4 5 6 7 8 9 SAP P.MODE 0 OK - The currently selected channel number and the audio mode are displayed. 1 Display the channel number and the audio mode. Every time you press INFO button, the display mode will be switched as below. 14.1 DTV-AIR INFORMATION ENCODE 17:00-18:30 1 4 America Masters 9.2 2 5 ENGLISH 1/3 CC 3 6 Satchmo: The Life of the screen. 13 AUTO To clear the display, press INFO button again. In the digital mode, the detailed information for reading. Display the detailed information for checking. ...
MUTE Q.VIEW INPUT INFO TV/DTV 1 2 3 4 5 6 7 8 9 SAP P.MODE 0 OK - The currently selected channel number and the audio mode are displayed. 1 Display the channel number and the audio mode. Every time you press INFO button, the display mode will be switched as below. 14.1 DTV-AIR INFORMATION ENCODE 17:00-18:30 1 4 America Masters 9.2 2 5 ENGLISH 1/3 CC 3 6 Satchmo: The Life of the screen. 13 AUTO To clear the display, press INFO button again. In the digital mode, the detailed information for reading. Display the detailed information for checking. ...

User Manual
Page 20
CH+ MENU CH- VIDEO CONTRAST 80 BRIGHTNESS 80 COLOR 50 SHARPNESS 50 TINT 0 3 Press CH+/- Brightness This will adjust the light output of the complete picture, which will adjust the saturation level of the colors to enter. Video menu SETTING VIDEO MUTE Q.VIEW INPUT INFO TV/DTV 1 2 3 4 5 6 7 8 9 SAP P.MODE 0 OK - VOL + CC GUIDE EXIT SLEEP ARC FAV.LIST CH.LIST 1 Press MENU button. button to adjust. to select VIDEO Option, 0101 then press CH- Color This will mainly affect the darker areas of fine details in the picture but keep the dark ...
CH+ MENU CH- VIDEO CONTRAST 80 BRIGHTNESS 80 COLOR 50 SHARPNESS 50 TINT 0 3 Press CH+/- Brightness This will adjust the light output of the complete picture, which will adjust the saturation level of the colors to enter. Video menu SETTING VIDEO MUTE Q.VIEW INPUT INFO TV/DTV 1 2 3 4 5 6 7 8 9 SAP P.MODE 0 OK - VOL + CC GUIDE EXIT SLEEP ARC FAV.LIST CH.LIST 1 Press MENU button. button to adjust. to select VIDEO Option, 0101 then press CH- Color This will mainly affect the darker areas of fine details in the picture but keep the dark ...