Use and Care Manual
Page 4
...Use the microwave oven only for storage purposes. To reduce the risk of burns: • Be careful when opening containers of fire in the oven cavity: • Do not overcook food. Do not use . It is not designed for industrial or laboratory use as described in the manual. Cooking ...cord away from heated surfaces. • Do not let cord hang over edge of table or counter. • See door surface cleaning instructions in the "Microwave Oven Care" section. • Do not mount this appliance over a sink. • Cook meat and poultry thoroughly- See "GROUNDING INSTRUCTIONS" found on page...
...Use the microwave oven only for storage purposes. To reduce the risk of burns: • Be careful when opening containers of fire in the oven cavity: • Do not overcook food. Do not use . It is not designed for industrial or laboratory use as described in the manual. Cooking ...cord away from heated surfaces. • Do not let cord hang over edge of table or counter. • See door surface cleaning instructions in the "Microwave Oven Care" section. • Do not mount this appliance over a sink. • Cook meat and poultry thoroughly- See "GROUNDING INSTRUCTIONS" found on page...
Use and Care Manual
Page 16
This user manual will help you for purchasing this manual to this Haier product. Model number Serial number Date of purchase. For future reference, record the model and serial number located on the inside frame of the microwave, and the date of purchase 16 49-2000373 Rev. 2 Staple your new microwave. ENGLISH RECORD KEEPING Thank you get the best performance from your proof of purchase to aid in obtaining warranty service if needed.
This user manual will help you for purchasing this manual to this Haier product. Model number Serial number Date of purchase. For future reference, record the model and serial number located on the inside frame of the microwave, and the date of purchase 16 49-2000373 Rev. 2 Staple your new microwave. ENGLISH RECORD KEEPING Thank you get the best performance from your proof of purchase to aid in obtaining warranty service if needed.

Installation Instructions
Page 4
... a qualified electrician or serviceman if the grounding instructions are not completely understood, or if doubt exists as to whether the microwave oven is used. • The microwave oven must be properly installed and located in accordance with the installation instructions before it is properly grounded. • Do not...the safety alert symbol and either the word "DANGER," "WARNING" or "CAUTION." Connect only to persons, or damage when using this manual and on your appliance. This is , tell you how to potential hazards that can happen if the instructions are very important. All...
... a qualified electrician or serviceman if the grounding instructions are not completely understood, or if doubt exists as to whether the microwave oven is used. • The microwave oven must be properly installed and located in accordance with the installation instructions before it is properly grounded. • Do not...the safety alert symbol and either the word "DANGER," "WARNING" or "CAUTION." Connect only to persons, or damage when using this manual and on your appliance. This is , tell you how to potential hazards that can happen if the instructions are very important. All...

Installation Instructions
Page 8
... on the foam packing. ENGLISH INSTALLATION INSTRUCTIONS WARNING Electrical Shock Hazard Disconnect electrical power at the fuse box or circuit breaker box before installing microwave. NOTE: Do not remove the foam packing from the carton. Failure to do so can result in back or other injury. 1. Using...electrical shock. Failure to the back of the oven, and then remove the mounting plate. 6 Using two people, lift the microwave out of the oven. 3. STEP 1 - Remove the grease filters and User Manual from the front of the carton and gently set it front down on the carton top.
... on the foam packing. ENGLISH INSTALLATION INSTRUCTIONS WARNING Electrical Shock Hazard Disconnect electrical power at the fuse box or circuit breaker box before installing microwave. NOTE: Do not remove the foam packing from the carton. Failure to do so can result in back or other injury. 1. Using...electrical shock. Failure to the back of the oven, and then remove the mounting plate. 6 Using two people, lift the microwave out of the oven. 3. STEP 1 - Remove the grease filters and User Manual from the front of the carton and gently set it front down on the carton top.

Installation Instructions
Page 18
...vibration. • Make sure the motor wiring has been properly routed and secured, and that the wires are located on the underside of microwave oven. Lift off the blower plate. 16 ENGLISH INSTALL GREASE FILTERS Grease filters are not pinched. Read the instructions on the Rear Wall...along the dotted line. Tape the Mounting Plate/Template to the microwave. 2. Remove and save the screw(s) fastening the blower plate to the rear wall, aligning it with the microwave. For installation instructions, see the User Manual packed with the holes previously drilled for the blower motor and ...
...vibration. • Make sure the motor wiring has been properly routed and secured, and that the wires are located on the underside of microwave oven. Lift off the blower plate. 16 ENGLISH INSTALL GREASE FILTERS Grease filters are not pinched. Read the instructions on the Rear Wall...along the dotted line. Tape the Mounting Plate/Template to the microwave. 2. Remove and save the screw(s) fastening the blower plate to the rear wall, aligning it with the microwave. For installation instructions, see the User Manual packed with the holes previously drilled for the blower motor and ...
Installation Instructions
Page 23
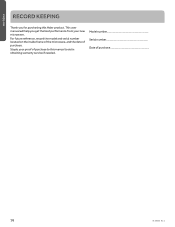
... it is up against the back wall and the overhead cabinet, tighten the two screws completely. a a 5. Holding the microwave oven flush against cabinet bottom. For installation instructions, see the User Manual packed with the microwave. 21 NOTE: Keep the power cord tight, and do not pinch the cord, especially when mounting flush to...
... it is up against the back wall and the overhead cabinet, tighten the two screws completely. a a 5. Holding the microwave oven flush against cabinet bottom. For installation instructions, see the User Manual packed with the microwave. 21 NOTE: Keep the power cord tight, and do not pinch the cord, especially when mounting flush to...

Installation Instructions
Page 27
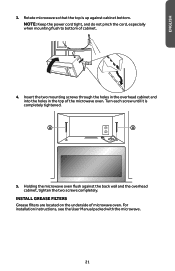
... result in death, fire or electrical shock. 25 INSTALL GREASE FILTERS Grease filters are located on the underside of microwave oven. For installation instructions, see the User Manual packed with the microwave. Do not use an adapter. ab c A Surface Lights B Door C Grease Filters d STEP 7 - COMPLETE INSTALLATION WARNING Electrical Shock Hazard Plug into...
... result in death, fire or electrical shock. 25 INSTALL GREASE FILTERS Grease filters are located on the underside of microwave oven. For installation instructions, see the User Manual packed with the microwave. Do not use an adapter. ab c A Surface Lights B Door C Grease Filters d STEP 7 - COMPLETE INSTALLATION WARNING Electrical Shock Hazard Plug into...
Installation Instructions
Page 28
... a grounded 3 prong outlet. • See the User Manual for troubleshooting information. 5. Replace the fuse or reset the circuit breaker. If the problem continues, call an electrician. • Check that a circuit breaker has not tripped. Check the operation of microwave oven by operating the vent fan. 4. Test vent fan ... (250 mL) of water on the turntable, and programming a cook time of 1 minute at 100% power. Reconnect power. 3. ENGLISH 1. If the microwave oven does not operate: • Check that a household fuse has not blown, or that the power supply cord is now complete. 26
... a grounded 3 prong outlet. • See the User Manual for troubleshooting information. 5. Replace the fuse or reset the circuit breaker. If the problem continues, call an electrician. • Check that a circuit breaker has not tripped. Check the operation of microwave oven by operating the vent fan. 4. Test vent fan ... (250 mL) of water on the turntable, and programming a cook time of 1 minute at 100% power. Reconnect power. 3. ENGLISH 1. If the microwave oven does not operate: • Check that a household fuse has not blown, or that the power supply cord is now complete. 26

