

User Manual
Page 2
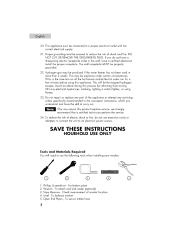
... away your product online at www.prodregister.com/haier 1 Remember to obtain warranty service. Please register your old appliance, remove the door so that children may not easily become trapped inside and outside of your manual. DANGER Risk of the washer. They are on the Washer. Inspect and remove all packing materials. Inspect...
... away your product online at www.prodregister.com/haier 1 Remember to obtain warranty service. Please register your old appliance, remove the door so that children may not easily become trapped inside and outside of your manual. DANGER Risk of the washer. They are on the Washer. Inspect and remove all packing materials. Inspect...
User Manual
Page 4
...attempt any servicing unless specifically recommended in the wall, have the skill to reduce the risk of shock and fire. Level - To balance washer 5. To secure intake hose 3 English 20. This may be explosive under certain circumstances. If this is the case turn on all the... fire, do not have a three-prong electric receptacle outlet in the user-repair instructions, which you do not use the following tools when installing your washer: // 0 0 0 0 1. If you understand and have a certified electrician install the proper receptacle. This will need to use extension cords or ...
...attempt any servicing unless specifically recommended in the wall, have the skill to reduce the risk of shock and fire. Level - To balance washer 5. To secure intake hose 3 English 20. This may be explosive under certain circumstances. If this is the case turn on all the... fire, do not have a three-prong electric receptacle outlet in the user-repair instructions, which you do not use the following tools when installing your washer: // 0 0 0 0 1. If you understand and have a certified electrician install the proper receptacle. This will need to use extension cords or ...
User Manual
Page 6
English TABLE OF CONTENTS UNPACKING YOUR WASHING MACHINE IMPORTANT SAFETY INSTRUCTIONS UNPACKING AND CHECKING PARTS WASHER PARTS AND FEATURES CONTROL PANEL INSTALLATION INSTRUCTIONS OPERATING YOUR WASHER CHOOSING A CYCLE PROPER CARE AND CLEANING TROUBLESHOOTING GUIDE WARRANTY PAGE 1 2-4 6 7 8 10 15 17 21 23 26 5
English TABLE OF CONTENTS UNPACKING YOUR WASHING MACHINE IMPORTANT SAFETY INSTRUCTIONS UNPACKING AND CHECKING PARTS WASHER PARTS AND FEATURES CONTROL PANEL INSTALLATION INSTRUCTIONS OPERATING YOUR WASHER CHOOSING A CYCLE PROPER CARE AND CLEANING TROUBLESHOOTING GUIDE WARRANTY PAGE 1 2-4 6 7 8 10 15 17 21 23 26 5

User Manual
Page 7
... condition. If you find that is 1-877-337-3639. 6 Inspect and remove any remaining packing, tape or printed materials before using the washer. Parts a) 1 Bottom Panel b) 6 Screws for the Bottom Plate c) 1 Water Inlet Hose d) 1 Drain Hook (Gooseneck) e) 1 Quick Sink Faucet Adapter...the bottom Styrofoam that they are missing, please contact our customer service department for protection and box. Remove all adhesive tape holding the washer accessories inside and outside. UNPACKING AND CHECKING PARTS English Unpacking 1. This includes the foam base and all packing materials.
... condition. If you find that is 1-877-337-3639. 6 Inspect and remove any remaining packing, tape or printed materials before using the washer. Parts a) 1 Bottom Panel b) 6 Screws for the Bottom Plate c) 1 Water Inlet Hose d) 1 Drain Hook (Gooseneck) e) 1 Quick Sink Faucet Adapter...the bottom Styrofoam that they are missing, please contact our customer service department for protection and box. Remove all adhesive tape holding the washer accessories inside and outside. UNPACKING AND CHECKING PARTS English Unpacking 1. This includes the foam base and all packing materials.

User Manual
Page 8
Front Leveling Leg (or for Caster) 5. Water inlet hose 12. Rubber Washer 9. Power Cord (120 Volt / 60 Hz) Water Inlet Fitting 8. Control Panel 3. Drain Hose 11. English WASHER PARTS AND FEATURES Front View 1 c :. 3 5 4 1. Top Lid 2. Cabinet Handle (located on both sides of the washer) B 10 10. Water Level Selector 7 4. Washer Cabinet 11 Back View 7 8 9 12 7.
Front Leveling Leg (or for Caster) 5. Water inlet hose 12. Rubber Washer 9. Power Cord (120 Volt / 60 Hz) Water Inlet Fitting 8. Control Panel 3. Drain Hose 11. English WASHER PARTS AND FEATURES Front View 1 c :. 3 5 4 1. Top Lid 2. Cabinet Handle (located on both sides of the washer) B 10 10. Water Level Selector 7 4. Washer Cabinet 11 Back View 7 8 9 12 7.

User Manual
Page 9
Normal Wash Heavy - Huge and heavy garments Quick Wash - English CONTROL PANEL 1. Status Incicator Lights Indicates cycle chosen with stages of the washer. 1 2 3 4 Haier STATUS CYCLE CIUlb = 'Cr NORMAL SPIN RINSE POWERg',±% Water Level Selector Knob Select water height in operation. 3. Power ON/OFF Button Press in the "...
Normal Wash Heavy - Huge and heavy garments Quick Wash - English CONTROL PANEL 1. Status Incicator Lights Indicates cycle chosen with stages of the washer. 1 2 3 4 Haier STATUS CYCLE CIUlb = 'Cr NORMAL SPIN RINSE POWERg',±% Water Level Selector Knob Select water height in operation. 3. Power ON/OFF Button Press in the "...

User Manual
Page 10
...button. 8. Select "NORMAL" washing using the Quick connect fitting, or directly connect to faucet. 4. log Drain Hook Drain hose Water inlet hose Washer Sink Faucet Silver Faucet Connector Quick Sink Faucet Adapter Rear View of the drum. 6. et120W4 et 2. Make sure the lint filter is near a...a 15 AMP 110-120 VOLT, 60 HZ GROUNDED OUTLET ONLY. 7. It is in drain or inside the sink using your NEW compact portable washer. English QUICK SET-UP INSTRUCTIONS FOR NORMAL WASH 1. Power On/Off 9. CYCLE NORMAL WASH Start Pause 9 Locate the best place for using...
...button. 8. Select "NORMAL" washing using the Quick connect fitting, or directly connect to faucet. 4. log Drain Hook Drain hose Water inlet hose Washer Sink Faucet Silver Faucet Connector Quick Sink Faucet Adapter Rear View of the drum. 6. et120W4 et 2. Make sure the lint filter is near a...a 15 AMP 110-120 VOLT, 60 HZ GROUNDED OUTLET ONLY. 7. It is in drain or inside the sink using your NEW compact portable washer. English QUICK SET-UP INSTRUCTIONS FOR NORMAL WASH 1. Power On/Off 9. CYCLE NORMAL WASH Start Pause 9 Locate the best place for using...
User Manual
Page 11
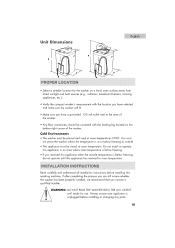
... or outside. • This appliance must be stored at or below freezing, do not operate until ready for the washer on the bottom right corner of the washer. • Any floor unevenness should be corrected with the leveling leg located on a hard, even surface away from ...8226; Select a suitable location for use. Always ensure your appliance is at room temperature. Unit Dimensions MO I English I WARNING: DO NOT PLUG THE WASHER INTO THE A/C OUTLET until this washing machine. Do not install or operate this appliance in an area where room temperature is below freezing. • ...
... or outside. • This appliance must be stored at or below freezing, do not operate until ready for the washer on the bottom right corner of the washer. • Any floor unevenness should be corrected with the leveling leg located on a hard, even surface away from ...8226; Select a suitable location for use. Always ensure your appliance is at room temperature. Unit Dimensions MO I English I WARNING: DO NOT PLUG THE WASHER INTO THE A/C OUTLET until this washing machine. Do not install or operate this appliance in an area where room temperature is below freezing. • ...
User Manual
Page 12
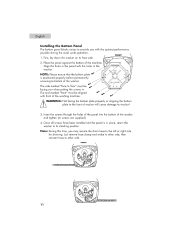
... other side. FRONT c57 O O 67. Once all screws have been installed and the panel is positioned properly before permanently screwing to bottom of the washer. • FA.•CE TO FLOOR The side marked "face to floor" must be facing you when putting the screws in place, return the... screws through the holes of the panel into the bottom of the washing machine. The end marked "front" must be aligned Awith front of the washer and tighten. (6 screws are supplied.) 4. English Installing the Bottom Panel The bottom panel blocks noises to provide you may reroute the drain hose to ...
... other side. FRONT c57 O O 67. Once all screws have been installed and the panel is positioned properly before permanently screwing to bottom of the washer. • FA.•CE TO FLOOR The side marked "face to floor" must be facing you when putting the screws in place, return the... screws through the holes of the panel into the bottom of the washing machine. The end marked "front" must be aligned Awith front of the washer and tighten. (6 screws are supplied.) 4. English Installing the Bottom Panel The bottom panel blocks noises to provide you may reroute the drain hose to ...

User Manual
Page 13
... bottom base by turning the center foot counter-clockwise to raise the foot and clockwise to the washer body. Screw each of the fixed foot. The leveling leg can be done for mobility and portability. Unscrew and remove the fixed feet. Warning! Using a level is inclined more than 2°, the machine will...
... bottom base by turning the center foot counter-clockwise to raise the foot and clockwise to the washer body. Screw each of the fixed foot. The leveling leg can be done for mobility and portability. Unscrew and remove the fixed feet. Warning! Using a level is inclined more than 2°, the machine will...

User Manual
Page 14
...below: 1. Attach the other end of the water inlet hose to the washer water inlet and make sure that the rubber washer is placed in between . 5. English Installing Your Washer Read the installation instructions carefully and ensure washer location before beginning. A B Attached hose to water inlet - 'oar im... from your faucet nozzle and determine the size/type of the faucet (Outside Threaded End or Inside Threaded End), place the proper sized rubber washer into the silver faucet adapter. 3. Attach the faucet connector to a fixed utility hot and cold water outlet by using a "Y Hose"...
...below: 1. Attach the other end of the water inlet hose to the washer water inlet and make sure that the rubber washer is placed in between . 5. English Installing Your Washer Read the installation instructions carefully and ensure washer location before beginning. A B Attached hose to water inlet - 'oar im... from your faucet nozzle and determine the size/type of the faucet (Outside Threaded End or Inside Threaded End), place the proper sized rubber washer into the silver faucet adapter. 3. Attach the faucet connector to a fixed utility hot and cold water outlet by using a "Y Hose"...

User Manual
Page 15
... to make sure it • is used . You may need to sink should look like this. Drain hose Water inlet hose Washer Rear View of washer to tighten any leaks around the machine and at the back. CAUTION! The lint filter is installed. Make sure the lint filter ... properly installed. Installing the Lint Filter The lint filter must reach a height of sink or for any loose connections. Plug fin the washer to ensure that the washer be installed before each use plastic ties. We recommend I that it is a leak, check if any connections are loose. Drain Hook...
... to make sure it • is used . You may need to sink should look like this. Drain hose Water inlet hose Washer Rear View of washer to tighten any leaks around the machine and at the back. CAUTION! The lint filter is installed. Make sure the lint filter ... properly installed. Installing the Lint Filter The lint filter must reach a height of sink or for any loose connections. Plug fin the washer to ensure that the washer be installed before each use plastic ties. We recommend I that it is a leak, check if any connections are loose. Drain Hook...
User Manual
Page 16
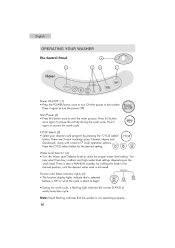
the desired setting. You may select from low, medium and high water level settings depending on the wash load. Haier 3 5 2 1 ST TIM 0 CYCLE OW6010 NORMAL RI SE SPIN = POONW/OEFRF Power ON/OFF: (1) • Press the POWER button once to turn...SPIN • During the wash cycle, a flashing light indicates the current STATUS of Press the CYCLE select button for 7 wash operation options. English OPERATING YOUR WASHER The Control Panel 4 ....."'"'", s. There is also a MANUAL overide, by pressing the "CYCLE Select" CYCLE button. CYCLE Select: (3) • Select your ...
the desired setting. You may select from low, medium and high water level settings depending on the wash load. Haier 3 5 2 1 ST TIM 0 CYCLE OW6010 NORMAL RI SE SPIN = POONW/OEFRF Power ON/OFF: (1) • Press the POWER button once to turn...SPIN • During the wash cycle, a flashing light indicates the current STATUS of Press the CYCLE select button for 7 wash operation options. English OPERATING YOUR WASHER The Control Panel 4 ....."'"'", s. There is also a MANUAL overide, by pressing the "CYCLE Select" CYCLE button. CYCLE Select: (3) • Select your ...

User Manual
Page 17
...Turn the power ON by turning OFF the machine and then restarting to the tub and/or make the new selection. Note: If the washer is filled to remove. Push down the tab in the tub, it will not rotate unless the water is turned ON without the filter... is also a filter in the water from light fabrics. • Carefully check all the laundry is evenly distributed. The pulsator will start washing. 2. Separate heavy fabrics from entering the washer. Clean this at least once a month. A small nylon bag collects lint and residue from the colored clothing. Press the...
...Turn the power ON by turning OFF the machine and then restarting to the tub and/or make the new selection. Note: If the washer is filled to remove. Push down the tab in the tub, it will not rotate unless the water is turned ON without the filter... is also a filter in the water from light fabrics. • Carefully check all the laundry is evenly distributed. The pulsator will start washing. 2. Separate heavy fabrics from entering the washer. Clean this at least once a month. A small nylon bag collects lint and residue from the colored clothing. Press the...

User Manual
Page 18
..., for your selection, please press the START button. Press Once 3. English Selecting the Wash Cycle When you first turn on the POWER, the washer will move throught the washers cycle menu. Power ON 2. Choose between 7 various washing cycles options. Press Three Times 5. Press Six Times Wash Program Normal Wash Cycle Wash only...
..., for your selection, please press the START button. Press Once 3. English Selecting the Wash Cycle When you first turn on the POWER, the washer will move throught the washers cycle menu. Power ON 2. Choose between 7 various washing cycles options. Press Three Times 5. Press Six Times Wash Program Normal Wash Cycle Wash only...
User Manual
Page 20
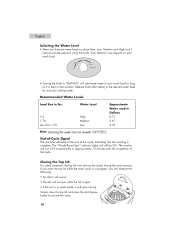
... High Medium Low Approximate Water used in progress, you will observe the following: • An alarm will sound. • The tub will stop running. The washer will still be closed during the wash process. Mph Manual Wafer Lavol • Turning the knob to "MANUAL" will add more water to chose from...
... High Medium Low Approximate Water used in progress, you will observe the following: • An alarm will sound. • The tub will stop running. The washer will still be closed during the wash process. Mph Manual Wafer Lavol • Turning the knob to "MANUAL" will add more water to chose from...
User Manual
Page 21
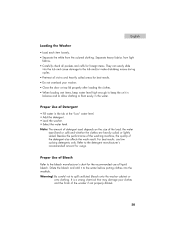
...to allow clothing to float easily in the tub at the "Low" water level. • Add the detergent. • Load the washer. • Select the water level. English Loading the Washer • Load each item loosely. • Separate the white from light fabrics. • Carefully check all pockets and cuffs for ...used depends on the size of Detergent • Fill water in the water. Dilute the bleach and add it to spill undiluted bleach onto the washer cabinet or onto clothing. Be careful not to the water before putting clothes into the tub and cause damage to the tub and/or make...
...to allow clothing to float easily in the tub at the "Low" water level. • Add the detergent. • Load the washer. • Select the water level. English Loading the Washer • Load each item loosely. • Separate the white from light fabrics. • Carefully check all pockets and cuffs for ...used depends on the size of Detergent • Fill water in the water. Dilute the bleach and add it to spill undiluted bleach onto the washer cabinet or onto clothing. Be careful not to the water before putting clothes into the tub and cause damage to the tub and/or make...

User Manual
Page 22
...liquid/powdered softener, bleach or detergent is being moved to the cabinet finish, wipe the appliance cabinet as needed. DO NOT USE YOUR WASHER WITHOUT THE LINT FILTER IN PLACE. • The filter screen of damage to another location. 21 This will prevent damage from becoming damaged...• Do not use for optimal efficiency. General Cleaning and Maintenance Use only a damp or sudsy cloth to vibrations and shock when the washer is spilled onto the cabinet, wipe the cabinet immediately because it with a brush monthly. Please clean it may result in personal injury or ...
...liquid/powdered softener, bleach or detergent is being moved to the cabinet finish, wipe the appliance cabinet as needed. DO NOT USE YOUR WASHER WITHOUT THE LINT FILTER IN PLACE. • The filter screen of damage to another location. 21 This will prevent damage from becoming damaged...• Do not use for optimal efficiency. General Cleaning and Maintenance Use only a damp or sudsy cloth to vibrations and shock when the washer is spilled onto the cabinet, wipe the cabinet immediately because it with a brush monthly. Please clean it may result in personal injury or ...

User Manual
Page 23
English Normal Operating Sounds The following sounds are normally heard during the operation of the washer: • Tumbling sounds can be heard as heavy wet clothes in the washer are tossed around continuously. • Air rushing noise is the result of the washtub spinning at a very high RPM. • Clicking sounds are caused by the wash and rinse cycles turning ON and OFF. 22
English Normal Operating Sounds The following sounds are normally heard during the operation of the washer: • Tumbling sounds can be heard as heavy wet clothes in the washer are tossed around continuously. • Air rushing noise is the result of the washtub spinning at a very high RPM. • Clicking sounds are caused by the wash and rinse cycles turning ON and OFF. 22
User Manual
Page 24
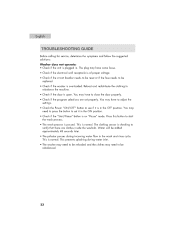
... the clothes may have to adjust the settings. • Check the Power "ON/OFF" button to be added approximately 48 seconds later. • The pulsator pauses during incoming water flow in the ON position. • Check if the "Start/Pause" button is on "Pause" mode. Water will be replaced.... • Check if the program selections are clothes inside the washtub. This is paused. This prevents splashing during water inlet. • The washer may need to press the button to be rebalanced. 23 You may have come loose. • Check if the electrical wall receptacle is of ...
... the clothes may have to adjust the settings. • Check the Power "ON/OFF" button to be added approximately 48 seconds later. • The pulsator pauses during incoming water flow in the ON position. • Check if the "Start/Pause" button is on "Pause" mode. Water will be replaced.... • Check if the program selections are clothes inside the washtub. This is paused. This prevents splashing during water inlet. • The washer may need to press the button to be rebalanced. 23 You may have come loose. • Check if the electrical wall receptacle is of ...


