
User Manual
Page 3
... worn power cords, loose plugs and power outlets. 7. To reduce the risk of children. 4. This will reduce the possibility of children is necessary when the appliance is not being used to a complete stop before it to come to clean flammable or explosive materials should not be closed when the tub is spinning. 15. Replace immediately any flammable or explosive substances to remove clothes...
... worn power cords, loose plugs and power outlets. 7. To reduce the risk of children. 4. This will reduce the possibility of children is necessary when the appliance is not being used to a complete stop before it to come to clean flammable or explosive materials should not be closed when the tub is spinning. 15. Replace immediately any flammable or explosive substances to remove clothes...
User Manual
Page 4
... let the hot water run for any part of washer location 4. Check measurement of the appliance or attempt any electrical appliances, smoking, lighting a match/lighter, or using this process by refraining from turning ON any servicing unless specifically recommended in the wall, have the skill to an electrical power source. If you do not use the following tools when installing your washer: // 0 0 0 0 1. Open End Plyers - SAVE THESE INSTRUCTIONS HOUEHOLD USE ONLY...
... let the hot water run for any part of washer location 4. Check measurement of the appliance or attempt any electrical appliances, smoking, lighting a match/lighter, or using this process by refraining from turning ON any servicing unless specifically recommended in the wall, have the skill to an electrical power source. If you do not use the following tools when installing your washer: // 0 0 0 0 1. Open End Plyers - SAVE THESE INSTRUCTIONS HOUEHOLD USE ONLY...

User Manual
Page 5
... prong. 2 Power supply cord with 3-blade grounding plug. Improper use an extension cord: A. Warning! C. AWARNING Avoid fire hazard or electric shock. English SAFETY INSTRUCTIONS Electrical Requirements Grounding Instructions 4 WARNINGS: This appliance must be plugged into at the household distribution panel by modifying the plug. Grounding type wall receptacle Do not, under any maintenance or cleaning (except the removal and cleaning of the grounded wire can be plugged into an...
... prong. 2 Power supply cord with 3-blade grounding plug. Improper use an extension cord: A. Warning! C. AWARNING Avoid fire hazard or electric shock. English SAFETY INSTRUCTIONS Electrical Requirements Grounding Instructions 4 WARNINGS: This appliance must be plugged into at the household distribution panel by modifying the plug. Grounding type wall receptacle Do not, under any maintenance or cleaning (except the removal and cleaning of the grounded wire can be plugged into an...

User Manual
Page 7
... good condition. Note: The bottom panel is 1-877-337-3639. 6 Parts a) 1 Bottom Panel b) 6 Screws for the Bottom Plate c) 1 Water Inlet Hose d) 1 Drain Hook (Gooseneck) e) 1 Quick Sink Faucet Adapter f) 2 Washers g) 1 Lint Filter (see p.14 for protection and box. Our Toll-Free number is located between the top foam used to protect the washer from shipping damage due to make sure that is used for installation) h) Optional 4 Casters i) Caster wrench...
... good condition. Note: The bottom panel is 1-877-337-3639. 6 Parts a) 1 Bottom Panel b) 6 Screws for the Bottom Plate c) 1 Water Inlet Hose d) 1 Drain Hook (Gooseneck) e) 1 Quick Sink Faucet Adapter f) 2 Washers g) 1 Lint Filter (see p.14 for protection and box. Our Toll-Free number is located between the top foam used to protect the washer from shipping damage due to make sure that is used for installation) h) Optional 4 Casters i) Caster wrench...

User Manual
Page 8
Top Lid 2. Rubber Washer 9. Water Level Selector 7 4. Drain Hose 11. Cabinet Handle (located on both sides of the washer) B 10 10. Washer Cabinet 11 Back View 7 8 9 12 7. Front Leveling Leg (or for Caster) 5. Water inlet hose 12. Control Panel 3. Water Inlet Fitting 8. Power Cord (120 Volt / 60 Hz) English WASHER PARTS AND FEATURES Front View 1 c :. 3 5 4 1.
Top Lid 2. Rubber Washer 9. Water Level Selector 7 4. Drain Hose 11. Cabinet Handle (located on both sides of the washer) B 10 10. Washer Cabinet 11 Back View 7 8 9 12 7. Front Leveling Leg (or for Caster) 5. Water inlet hose 12. Control Panel 3. Water Inlet Fitting 8. Power Cord (120 Volt / 60 Hz) English WASHER PARTS AND FEATURES Front View 1 c :. 3 5 4 1.

User Manual
Page 10
... but clothing is installed on the bottom plate with a drain. et120W4 et 2. It is in place. English QUICK SET-UP INSTRUCTIONS FOR NORMAL WASH 1. Locate the best place for using the Drain Hook. Select water height. Power On/Off 9. CYCLE NORMAL WASH Start Pause 9 Place drain hose in drain or inside the sink using your NEW compact portable washer. log Drain Hook Drain hose Water inlet hose Washer Sink Faucet Silver Faucet Connector Quick Sink Faucet Adapter Rear View of the drum...
... but clothing is installed on the bottom plate with a drain. et120W4 et 2. It is in place. English QUICK SET-UP INSTRUCTIONS FOR NORMAL WASH 1. Locate the best place for using the Drain Hook. Select water height. Power On/Off 9. CYCLE NORMAL WASH Start Pause 9 Place drain hose in drain or inside the sink using your NEW compact portable washer. log Drain Hook Drain hose Water inlet hose Washer Sink Faucet Silver Faucet Connector Quick Sink Faucet Adapter Rear View of the drum...
User Manual
Page 12
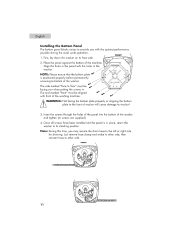
... FRONT c57 O O 67. FRONT 1. Note: During this time, you with the holes in the washer. 'FRONT NOTE: Please ensure that the bottom plate e • is in . Place the panel against the bottom of the washing machine. English Installing the Bottom Panel The bottom panel blocks noises to provide you may reroute the drain hose to the left or right side for...
... FRONT c57 O O 67. FRONT 1. Note: During this time, you with the holes in the washer. 'FRONT NOTE: Please ensure that the bottom plate e • is in . Place the panel against the bottom of the washing machine. English Installing the Bottom Panel The bottom panel blocks noises to provide you may reroute the drain hose to the left or right side for...

User Manual
Page 13
... "off-balance" washer will not operate. This should be adjusted by hand first, then use a wrench to secure the caster's locking bolt to casters is best practice. • Loosen the adjustable outer and larger ring of the washer. Lift tab DOWN to lock and UP to lower the washer. Using a level is when installing the bottom panel. The best time to change from fixed feet to casters...
... "off-balance" washer will not operate. This should be adjusted by hand first, then use a wrench to secure the caster's locking bolt to casters is best practice. • Loosen the adjustable outer and larger ring of the washer. Lift tab DOWN to lock and UP to lower the washer. Using a level is when installing the bottom panel. The best time to change from fixed feet to casters...

User Manual
Page 14
A Outside Thread B Large Inside thread 4. Installing Quick Sink Adapter: When installing the quick sink faucet adapter to a fixed utility hot and cold water outlet by using a "Y Hose" (NOT supplied) . Once you can install directly to the faucet, follow the steps below: 1. A B Attached hose to water inlet - 'oar im As a second option, you determine the size/type of the faucet. 2. First, remove the aerator from your faucet nozzle and determine...
A Outside Thread B Large Inside thread 4. Installing Quick Sink Adapter: When installing the quick sink faucet adapter to a fixed utility hot and cold water outlet by using a "Y Hose" (NOT supplied) . Once you can install directly to the faucet, follow the steps below: 1. A B Attached hose to water inlet - 'oar im As a second option, you determine the size/type of the faucet. 2. First, remove the aerator from your faucet nozzle and determine...

User Manual
Page 15
... the hose in diameter. Note: Carefully inspect for a more permanent use to ensure that the washer be installed before each use plastic ties. Check before the washer is properly installed. If after all water and drain lines are connected . Drain Hook Plastic Tie Final connection of Washer 7. The lint filter is a leak, check if any loose connections. English 6. CAUTION! If there is packaged with the User Manual. 14...
... the hose in diameter. Note: Carefully inspect for a more permanent use to ensure that the washer be installed before each use plastic ties. Check before the washer is properly installed. If after all water and drain lines are connected . Drain Hook Plastic Tie Final connection of Washer 7. The lint filter is a leak, check if any loose connections. English 6. CAUTION! If there is packaged with the User Manual. 14...
User Manual
Page 16
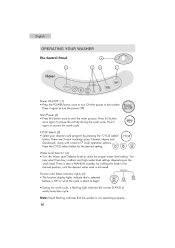
... Lights: (5) • The function display lights indicate that the washer is about to begin. Push it again to pause the activity during the wash cycle. OUdICAS N9ORMAL Water Level Selector: (4) • Turn the Water Level Selector knob to resume the wash cycle. There is also a MANUAL overide, by pressing the "CYCLE Select" CYCLE button. There are 3 main washing cycles, Normal, Heavy and 0 Quickwash, along with a total of wash/rinse/spin cycle. English OPERATING YOUR WASHER The Control Panel...
... Lights: (5) • The function display lights indicate that the washer is about to begin. Push it again to pause the activity during the wash cycle. OUdICAS N9ORMAL Water Level Selector: (4) • Turn the Water Level Selector knob to resume the wash cycle. There is also a MANUAL overide, by pressing the "CYCLE Select" CYCLE button. There are 3 main washing cycles, Normal, Heavy and 0 Quickwash, along with a total of wash/rinse/spin cycle. English OPERATING YOUR WASHER The Control Panel...

User Manual
Page 17
... "Cycle Select" to spin after every load for foreign items. They can easily slide into the tub and cause damage to remove. Press the Start / Pause button. 8. Clean and slide the filter back in place. • There is evenly distributed. Clean this at least once a month. Add the wash load. 7. Turn the power ON by turning OFF the machine and then restarting to a selected level. After the washing machine starts, you start...
... "Cycle Select" to spin after every load for foreign items. They can easily slide into the tub and cause damage to remove. Press the Start / Pause button. 8. Clean and slide the filter back in place. • There is evenly distributed. Clean this at least once a month. Add the wash load. 7. Turn the power ON by turning OFF the machine and then restarting to a selected level. After the washing machine starts, you start...
User Manual
Page 20
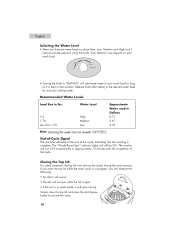
... long as it will stop running. End-of the cycle, indicating that position. The "Wash/Rinse/Spin" indicator lights will beep at the end of -Cycle Signal The machine will still be closed during the wash process. If you will observe the following: • An alarm will sound. • The tub will not spin while the lid is open. • If the unit is complete. Recommended Water Levels Load Size...
... long as it will stop running. End-of the cycle, indicating that position. The "Wash/Rinse/Spin" indicator lights will beep at the end of -Cycle Signal The machine will still be closed during the wash process. If you will observe the following: • An alarm will sound. • The tub will not spin while the lid is open. • If the unit is complete. Recommended Water Levels Load Size...
User Manual
Page 21
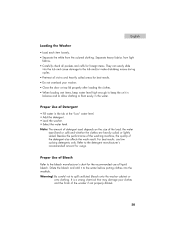
Besides the performance of the washing machine, the quality of Detergent • Fill water in the tub at the "Low" water level. • Add the detergent. • Load the washer. • Select the water level. Dilute the bleach and add it to the water before putting clothes into the tub and cause damage to the tub and/or make disturbing noises during cycles. • Pre-treat all pockets and cuffs for foreign...
Besides the performance of the washing machine, the quality of Detergent • Fill water in the tub at the "Low" water level. • Add the detergent. • Load the washer. • Select the water level. Dilute the bleach and add it to the water before putting clothes into the tub and cause damage to the tub and/or make disturbing noises during cycles. • Pre-treat all pockets and cuffs for foreign...

User Manual
Page 22
... because it with a brush monthly. If liquid/powdered softener, bleach or detergent is being moved to the cabinet finish, wipe the appliance cabinet as needed. Please clean it may result in personal injury or death. I Before using cleaning products, always read and follow the cleaning product manufacturer's instructions and warnings to avoid electric shock. Long Absences / Moving • Turn OFF the water supply faucets and disconnect the hoses.
... because it with a brush monthly. If liquid/powdered softener, bleach or detergent is being moved to the cabinet finish, wipe the appliance cabinet as needed. Please clean it may result in personal injury or death. I Before using cleaning products, always read and follow the cleaning product manufacturer's instructions and warnings to avoid electric shock. Long Absences / Moving • Turn OFF the water supply faucets and disconnect the hoses.
User Manual
Page 24
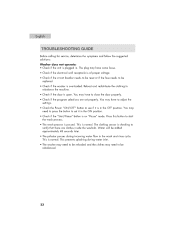
... later. • The pulsator pauses during water inlet. • The washer may need to be replaced. • Check if the washer is paused. The clothing sensor is checking to set properly. You may need to press the button to verify that there are set it is open. English TROUBLESHOOTING GUIDE Before calling for service, determine the symptoms and follow the suggested solutions: Washer does not operate: • Check if the unit is...
... later. • The pulsator pauses during water inlet. • The washer may need to be replaced. • Check if the washer is paused. The clothing sensor is checking to set properly. You may need to press the button to verify that there are set it is open. English TROUBLESHOOTING GUIDE Before calling for service, determine the symptoms and follow the suggested solutions: Washer does not operate: • Check if the unit is...

User Manual
Page 25
... drain - Water hose may be due to an overloaded wash tub. • Vibration noises are due to be fully turned ON. Your home drain may be clogged or bent. • Water flows out of the drain hose during the first use of clothing in the tub. 24 Water may need to an improper leveling of the washer or an uneven distribution of the machine - Refer to the washer installation section. • Wash load may also leak...
... drain - Water hose may be due to an overloaded wash tub. • Vibration noises are due to be fully turned ON. Your home drain may be clogged or bent. • Water flows out of the drain hose during the first use of clothing in the tub. 24 Water may need to an improper leveling of the washer or an uneven distribution of the machine - Refer to the washer installation section. • Wash load may also leak...
User Manual
Page 26
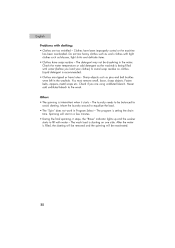
.... The wash load is intermittent when it stops, the "Rinse" indicator lights up and the washer starts to fill with water - Do not mix heavy clothes such as work in the water. Other: • The spinning is slanting on clothes. Spinning will be balanced to be reactivated. 25 Check if you load your clothes) to the wash. English Problems with water (before you are using undiluted bleach. Liquid detergent is being filled with clothing: • Clothes are...
.... The wash load is intermittent when it stops, the "Rinse" indicator lights up and the washer starts to fill with water - Do not mix heavy clothes such as work in the water. Other: • The spinning is slanting on clothes. Spinning will be balanced to be reactivated. 25 Check if you load your clothes) to the wash. English Problems with water (before you are using undiluted bleach. Liquid detergent is being filled with clothing: • Clothes are...

User Manual
Page 27
...: Model number and serial number of your nearest authorized service center. Any service charges not specifically identified as normal such as identified in the owner's manual. Damage from state to state. The name and address of the problem. the dealer you . Damage caused by this warranty is exclusive and is granted in shipping. A product whose original serial number has been removed or altered. Damage from any part free of...
...: Model number and serial number of your nearest authorized service center. Any service charges not specifically identified as normal such as identified in the owner's manual. Damage from state to state. The name and address of the problem. the dealer you . Damage caused by this warranty is exclusive and is granted in shipping. A product whose original serial number has been removed or altered. Damage from any part free of...
User Manual
Page 28
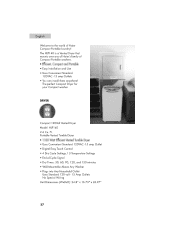
... Haier's family of -Cycle Signal • Dry Times: 30, 60, 90, 120, and 150 minutes • Wall-Mountable Above Any Washer • Plugs into Any Household Outlet Uses Standard 120 volt - 15 Amp Outlets No Special Wiring Unit Dimensions (WxDxH): 24.8" x 16.73" x 26.97" 27 English Welcome to the world of Haier Compact Portable Laundry! DRYER e-120VAC • Compact 120Volt Vented Dryer Model...
... Haier's family of -Cycle Signal • Dry Times: 30, 60, 90, 120, and 150 minutes • Wall-Mountable Above Any Washer • Plugs into Any Household Outlet Uses Standard 120 volt - 15 Amp Outlets No Special Wiring Unit Dimensions (WxDxH): 24.8" x 16.73" x 26.97" 27 English Welcome to the world of Haier Compact Portable Laundry! DRYER e-120VAC • Compact 120Volt Vented Dryer Model...


