User Manual
Page 3
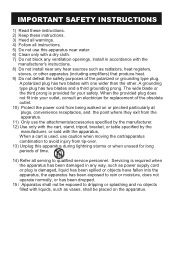
... by the manufacturer. 12) Use only with the cart, stand, tripod, bracket, or table specified by the manufacturer, or sold with the apparatus. When a cart is used, use caution when moving the cart/apparatus combination to avoid injury from tip-over. 13) Unplug this apparatus near any hear sources such as power supply cord or plug is damaged, liquid has been...
... by the manufacturer. 12) Use only with the cart, stand, tripod, bracket, or table specified by the manufacturer, or sold with the apparatus. When a cart is used, use caution when moving the cart/apparatus combination to avoid injury from tip-over. 13) Unplug this apparatus near any hear sources such as power supply cord or plug is damaged, liquid has been...
User Manual
Page 4
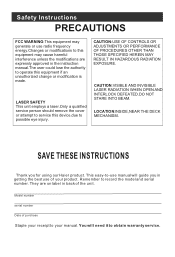
... generate or use radio frequency energy.Changes or modifications to this equipment may cause harmful interference unless the modifications are on label in getting the best use of your manual. Model number serial number Date of the unit. SAVE THESE INSTRUCTIONS Thank you in back of purchase Staple your receipt to record the model and serial number. You will guide you for using our Haier product.
... generate or use radio frequency energy.Changes or modifications to this equipment may cause harmful interference unless the modifications are on label in getting the best use of your manual. Model number serial number Date of the unit. SAVE THESE INSTRUCTIONS Thank you in back of purchase Staple your receipt to record the model and serial number. You will guide you for using our Haier product.
User Manual
Page 5
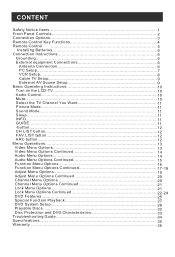
...Front Panel Controls 2 Connection Options 3 Remote Control Key Functions 4 Remote Control 5 Installing Batteries 5 Connection Instructions 6 Grounding 6 External equipment Connections 6 Antenna Connection 6 PC Setup 7 VCR Setup 8 Cable TV Setup 9 External AV Source Setup 9 Basic Operating Instructions 10 Turn on the LCD-TV 10 Audio Control 10 Mute...10 Select the TV Channel You Want 11 Picture Mode 11 Sound Mode 11 Sleep...1. 1 INFO...11 GUIDE 11 -button 12 CH.LIST button 1. 2 FAV.LIST button 12 ARC button 12 Menu Operations 13 Video Menu Options 13 Video Menu Options...
...Front Panel Controls 2 Connection Options 3 Remote Control Key Functions 4 Remote Control 5 Installing Batteries 5 Connection Instructions 6 Grounding 6 External equipment Connections 6 Antenna Connection 6 PC Setup 7 VCR Setup 8 Cable TV Setup 9 External AV Source Setup 9 Basic Operating Instructions 10 Turn on the LCD-TV 10 Audio Control 10 Mute...10 Select the TV Channel You Want 11 Picture Mode 11 Sound Mode 11 Sleep...1. 1 INFO...11 GUIDE 11 -button 12 CH.LIST button 1. 2 FAV.LIST button 12 ARC button 12 Menu Operations 13 Video Menu Options 13 Video Menu Options...
User Manual
Page 6
... set with the LCD-TV, disconnect the power cord from the LCD-TV . l Never put the unit in this machine. If water comes in contact with a dry soft cloth; l Please comply strictly with the instructions provided; l Please comply with the warning instructions on unstable, dusty and humid places; l Allow enough space for later use additional devices that are installing, using...
... set with the LCD-TV, disconnect the power cord from the LCD-TV . l Never put the unit in this machine. If water comes in contact with a dry soft cloth; l Please comply strictly with the instructions provided; l Please comply with the warning instructions on unstable, dusty and humid places; l Allow enough space for later use additional devices that are installing, using...

User Manual
Page 8
... the models Antenna Input Connect cable or antenna signals to the TV, either directly or through your cable box. Connection Options DVD STOP PLAY/PAUSE OPEN/CLOSE ANT IN PC AUDIO IN R AUDIO IN L V VIDEO IN PREV NEXT DVD insert S-VIDEO Pr Pb COMPONENT IN Y VGA IN Please see the real set of a PC graphics card to use set as a PC display VGA IN Y Pb Component Input Connect a component video device to these jacks S-Video Input Connect S-Video out from an external device...
... the models Antenna Input Connect cable or antenna signals to the TV, either directly or through your cable box. Connection Options DVD STOP PLAY/PAUSE OPEN/CLOSE ANT IN PC AUDIO IN R AUDIO IN L V VIDEO IN PREV NEXT DVD insert S-VIDEO Pr Pb COMPONENT IN Y VGA IN Please see the real set of a PC graphics card to use set as a PC display VGA IN Y Pb Component Input Connect a component video device to these jacks S-Video Input Connect S-Video out from an external device...
User Manual
Page 9
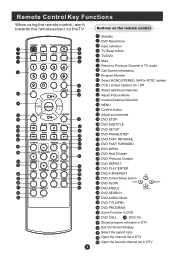
... the remote control POWER TV/AV TV/DVD OPEN/CLOSE SLEEP Q.VIEW INFO MUTE 1234 56 90 SAP 78 CC P.MODE CH+ VOL - PREV NEXT D.MENU REPEAT A-B PLAY/ENTER SLOW ANGLE TITLE/PBC SEARCH AUDIO PROGRAM ZOOM D.CALL 10+ EXIT ARC GUIDE CH.LIST FAV.LIST Standby DVD Open/close Input selection TV Sleep button TV/DVD Mute Return to Previous Channel in TV mode Call Screen Infromation Program Number Select MONO,STEREO, SAP in NTSC system CCD ( closed caption...
... the remote control POWER TV/AV TV/DVD OPEN/CLOSE SLEEP Q.VIEW INFO MUTE 1234 56 90 SAP 78 CC P.MODE CH+ VOL - PREV NEXT D.MENU REPEAT A-B PLAY/ENTER SLOW ANGLE TITLE/PBC SEARCH AUDIO PROGRAM ZOOM D.CALL 10+ EXIT ARC GUIDE CH.LIST FAV.LIST Standby DVD Open/close Input selection TV Sleep button TV/DVD Mute Return to Previous Channel in TV mode Call Screen Infromation Program Number Select MONO,STEREO, SAP in NTSC system CCD ( closed caption...
User Manual
Page 10
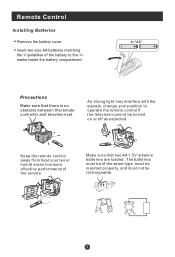
As strong light may interfere with the signals, change your position to operate the remote control if the television cannot be rechargeable. Keep the remote control away from heat sources or humid areas to the +/marks inside the battery compartment. The batteries must not be turned on or off as expected. Insert two size AA batteries matching the +/-polarities of the battery to...
As strong light may interfere with the signals, change your position to operate the remote control if the television cannot be rechargeable. Keep the remote control away from heat sources or humid areas to the +/marks inside the battery compartment. The batteries must not be turned on or off as expected. Insert two size AA batteries matching the +/-polarities of the battery to...
User Manual
Page 12
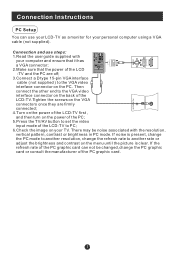
... using a VGA cable (not supplied). Connection Instructions PC Setup You can not be noise associated with your computer and ensure that it has a VGA connector; 2.Make sure that the power of the LCD -TV and the PC are firmly connected; 4.Turn on the power of the LCD-TV first , and then turn on the power of the PC; 5.Press the TV/AV button to set the video input mode...
... using a VGA cable (not supplied). Connection Instructions PC Setup You can not be noise associated with your computer and ensure that it has a VGA connector; 2.Make sure that the power of the LCD -TV and the PC are firmly connected; 4.Turn on the power of the LCD-TV first , and then turn on the power of the PC; 5.Press the TV/AV button to set the video input mode...

User Manual
Page 13
... colors (Video = yellow, Audio Left = white,and Audio Right = red). and then turn on the power of the AV device; 4.Press the TV/AV button to set the video 1 input mode of the LCD-TV and the AV device are off; When connecting the TV to the S-VIDEO input, the picture quality is improved; cting a regular VCR to the VCR owner s manual.) 3.Turn on the VCR. (Refer to the Video input. 2. Connection Instructions VCR Setup - Insert a video...
... colors (Video = yellow, Audio Left = white,and Audio Right = red). and then turn on the power of the AV device; 4.Press the TV/AV button to set the video 1 input mode of the LCD-TV and the AV device are off; When connecting the TV to the S-VIDEO input, the picture quality is improved; cting a regular VCR to the VCR owner s manual.) 3.Turn on the VCR. (Refer to the Video input. 2. Connection Instructions VCR Setup - Insert a video...

User Manual
Page 14
... channel switch on the remote control. 2. Connect the audio and video cables from the external equipment's output jacks to the TV input jacks, as shown in the figure. Select the input source by using the TV/AV button on cable box. 3. External AV Source Setup How to connect Connect the audio and video cables from the Cable Box's output jacks to external equipment, match the jack colors (Video = yellow, Audio Left = white, and Audio Right = red). pment. After subscribing to the TV. - How to external equipment operating guide...
... channel switch on the remote control. 2. Connect the audio and video cables from the external equipment's output jacks to the TV input jacks, as shown in the figure. Select the input source by using the TV/AV button on cable box. 3. External AV Source Setup How to connect Connect the audio and video cables from the Cable Box's output jacks to external equipment, match the jack colors (Video = yellow, Audio Left = white, and Audio Right = red). pment. After subscribing to the TV. - How to external equipment operating guide...
User Manual
Page 15
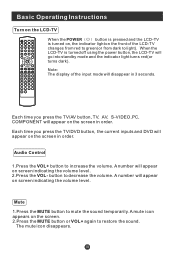
... mute the sound temporarily. S.MODE STOP SETUP PAUSE/STEP SUBTITLE REV FWD . The mute icon disappears. Note: The display of the LCD-TV changes from red to green(or from dark to light). A mute icon appears on screen indicating the volume level. PREV NEXT D.MENU REPEAT A-B PLAY/ENTER SLOW ANGLE TITLE/PBC SEARCH AUDIO PROGRAM ZOOM D.CALL 10+ EXIT ARC GUIDE CH.LIST FAV.LIST When the POWER button is pressed...
... mute the sound temporarily. S.MODE STOP SETUP PAUSE/STEP SUBTITLE REV FWD . The mute icon disappears. Note: The display of the LCD-TV changes from red to green(or from dark to light). A mute icon appears on screen indicating the volume level. PREV NEXT D.MENU REPEAT A-B PLAY/ENTER SLOW ANGLE TITLE/PBC SEARCH AUDIO PROGRAM ZOOM D.CALL 10+ EXIT ARC GUIDE CH.LIST FAV.LIST When the POWER button is pressed...
User Manual
Page 16
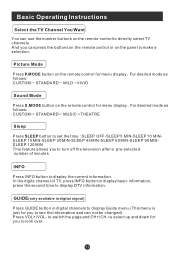
... changed) Press VOL+/VOL- In the digits channel of minutes INFO Press INFO button to display DTV information. GUIDE(only available in digital signal) Press GUIDE button in digital channels to display Guide menu.(This menu is just for you to turn off the television after a pre-selected number of TV, press INFO button to display basic information, press the second time to display the current information. Picture Mode Press P.MODE button on the remote control for menu display . For desired mode...
... changed) Press VOL+/VOL- In the digits channel of minutes INFO Press INFO button to display DTV information. GUIDE(only available in digital signal) Press GUIDE button in digital channels to display Guide menu.(This menu is just for you to turn off the television after a pre-selected number of TV, press INFO button to display basic information, press the second time to display the current information. Picture Mode Press P.MODE button on the remote control for menu display . For desired mode...

User Manual
Page 25
...: Allows you change the name of the channels in digital signal. button to increase and decrease the level to adjust the selected option to match the PC input source clock frequency H POSITION : Picture horizontal position adjust V POSITION : Picture vertical position adjust . The display will show the current playing channel. 2. Channel Menu Options 1. Menu Operations Adjust Menu Options Continued Functions: AUTO CONFIG : Automatically adjusts picture location frequency and phase parameters . CLOCK : Adjust the TFT-LCD to your preference...
...: Allows you change the name of the channels in digital signal. button to increase and decrease the level to adjust the selected option to match the PC input source clock frequency H POSITION : Picture horizontal position adjust V POSITION : Picture vertical position adjust . The display will show the current playing channel. 2. Channel Menu Options 1. Menu Operations Adjust Menu Options Continued Functions: AUTO CONFIG : Automatically adjusts picture location frequency and phase parameters . CLOCK : Adjust the TFT-LCD to your preference...

User Manual
Page 26
... the active channels in the menu . Press CH+/CH- to cable, please select CABLE under ' TUNER ' sub menu. AFC : Auto frequency control. FINE TUNE : If the image or sound received is poor. 6. button to the TV's memory. The TV searches channels in analog first and then searches channels in order .After the search has finished, the first digital program number will display on which there is connected to select...
... the active channels in the menu . Press CH+/CH- to cable, please select CABLE under ' TUNER ' sub menu. AFC : Auto frequency control. FINE TUNE : If the image or sound received is poor. 6. button to the TV's memory. The TV searches channels in analog first and then searches channels in order .After the search has finished, the first digital program number will display on which there is connected to select...
User Manual
Page 27
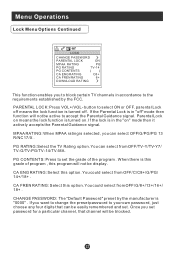
... the program . CA FREN RATING: Select this option. Menu Operations Lock Menu Options Continued LOCK CHANGE PASSWORD PARENTAL LOCK ON MPAA RATING PG PG RATING TV-14 PG CONTENTS ( ) CA ENG RATING C8+ CA FREN RATING 8+ DOWNLOAD RATING This function enables you to block certain TV channels in accordance to the requirements established by the manufacturer is "0000" . If the lock is turned off " mode...
... the program . CA FREN RATING: Select this option. Menu Operations Lock Menu Options Continued LOCK CHANGE PASSWORD PARENTAL LOCK ON MPAA RATING PG PG RATING TV-14 PG CONTENTS ( ) CA ENG RATING C8+ CA FREN RATING 8+ DOWNLOAD RATING This function enables you to block certain TV channels in accordance to the requirements established by the manufacturer is "0000" . If the lock is turned off " mode...
User Manual
Page 31
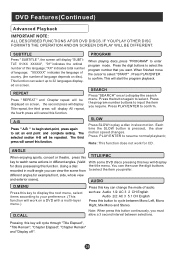
... slow motion speed changes. Using a disc the title menu. AUDIO D.MENU Press this key to display the root menu, select items according to input the item you want. Press PLAY/ENTER to confirm. Press PLAY/ENTER to confirm. The selected section A-B will be displayed on screen. DVD Features(Continued) Advanced Playback IMPORTANT NOTE: ALL DESCRIBED FUNCTIONS AFOR DVD DISCS. Press the program number buttons to your preference...
... slow motion speed changes. Using a disc the title menu. AUDIO D.MENU Press this key to display the root menu, select items according to input the item you want. Press PLAY/ENTER to confirm. Press PLAY/ENTER to confirm. The selected section A-B will be displayed on screen. DVD Features(Continued) Advanced Playback IMPORTANT NOTE: ALL DESCRIBED FUNCTIONS AFOR DVD DISCS. Press the program number buttons to your preference...
User Manual
Page 33
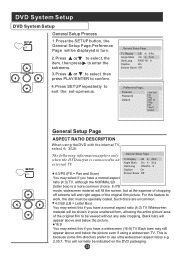
... to confirm. 4.Press SETUP repeatedly to an external TV. ..General Setup Page.. Widescreen material will be shown in turn. Tv Display LB 4 3:.Ps Angle Mark On 4 3:.Lb Osd Lang ENG 16 9 Caption On Screen Saver Off ..Preference Page.. The following information applies only when the DVD output is connected to exit the set-up menus. ..General Setup Page.. Black bars will appear above...
... to confirm. 4.Press SETUP repeatedly to an external TV. ..General Setup Page.. Widescreen material will be shown in turn. Tv Display LB 4 3:.Ps Angle Mark On 4 3:.Lb Osd Lang ENG 16 9 Caption On Screen Saver Off ..Preference Page.. The following information applies only when the DVD output is connected to exit the set-up menus. ..General Setup Page.. Black bars will appear above...

User Manual
Page 36
Press ENTER to the manufacturers original settings. DVD System Setup(Continued) DVD System Setup SETUP PLAY/ENTER DEFAULT: Resets all settings (except password and parental lock status) for this DVD player back to perform the reset. ..Preference Page.. Parental Password Default Reset Note: Some functions may not be available depending on the type of disc.
Press ENTER to the manufacturers original settings. DVD System Setup(Continued) DVD System Setup SETUP PLAY/ENTER DEFAULT: Resets all settings (except password and parental lock status) for this DVD player back to perform the reset. ..Preference Page.. Parental Password Default Reset Note: Some functions may not be available depending on the type of disc.
User Manual
Page 39
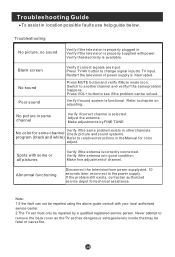
.... Switch to the power supply. Make adjustments by a qualified registered service person. Troubleshooting No picture, no sound Verify if the television is in the Manual for color adjust. Verify if the antenna is properly plugged in other channels. Restart the television of channel. Never attempt to relative instructions in good condition. Press TV/AV button to change signal input to chapter on . No color for technical assistance. Refer to TV input. If the problem still...
.... Switch to the power supply. Make adjustments by a qualified registered service person. Troubleshooting No picture, no sound Verify if the television is in the Manual for color adjust. Verify if the antenna is properly plugged in other channels. Restart the television of channel. Never attempt to relative instructions in good condition. Press TV/AV button to change signal input to chapter on . No color for technical assistance. Refer to TV input. If the problem still...
User Manual
Page 40
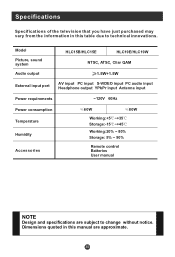
... in this table due to change without notice. Model Picture, sound system Audio output HLC15B/HLC15E HLC19E/HLC19W NTSC, ATSC, Cliar QAM 1.5W+1.5W External input port AV input PC input S-VIDEO input PC audio input Headphone output YPbPr input Antenna input Power requirements ~120V 60Hz Power consumption Temperature Humidity Accessories 60W 80W Working:+5 ~+35 Storage:-15 ~+45 Working:20% ~ 80% Storage: 5% ~ 90% Remote control Batteries User manual NOTE Design and specifications are approximate. Dimensions quoted in this manual are subject...
... in this table due to change without notice. Model Picture, sound system Audio output HLC15B/HLC15E HLC19E/HLC19W NTSC, ATSC, Cliar QAM 1.5W+1.5W External input port AV input PC input S-VIDEO input PC audio input Headphone output YPbPr input Antenna input Power requirements ~120V 60Hz Power consumption Temperature Humidity Accessories 60W 80W Working:+5 ~+35 Storage:-15 ~+45 Working:20% ~ 80% Storage: 5% ~ 90% Remote control Batteries User manual NOTE Design and specifications are approximate. Dimensions quoted in this manual are subject...


