Instruction Manual
Page 2
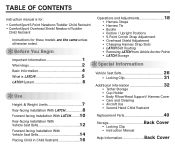
... Seat Belts 26 • Locking Clip 31 Additional Information 32 • Tether Storage • Cup Holder • Body Pillow/Head Support/ Harness Cover • Care and Cleaning • Aircraft Use • Second Hand Child Restraint Forward-facing Installation With LATCH.........10 Replacement Parts 40 Rear-facing Installation With Vehicle Seat Belts 12 Forward-facing Installation With Vehicle Seat Belts 14 Placing Child in Child Restraint 16 Storage Back Cover • Locking Clip • Instruction Manual Help...
... Seat Belts 26 • Locking Clip 31 Additional Information 32 • Tether Storage • Cup Holder • Body Pillow/Head Support/ Harness Cover • Care and Cleaning • Aircraft Use • Second Hand Child Restraint Forward-facing Installation With LATCH.........10 Replacement Parts 40 Rear-facing Installation With Vehicle Seat Belts 12 Forward-facing Installation With Vehicle Seat Belts 14 Placing Child in Child Restraint 16 Storage Back Cover • Locking Clip • Instruction Manual Help...
Instruction Manual
Page 3
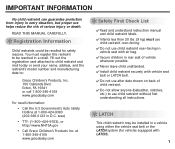
... Graco Children's Products Inc. c LATCH This child restraint may be installed in a vehicle using either the vehicle seat belt or the LATCH system (for safety reasons. Fill out the registration card attached to child restraint and mail today or send your name, address, and the restraint's model number and manufacturing date to be recalled for vehicles equipped with vehicle seat belt or LATCH belt...
... Graco Children's Products Inc. c LATCH This child restraint may be installed in a vehicle using either the vehicle seat belt or the LATCH system (for safety reasons. Fill out the registration card attached to child restraint and mail today or send your name, address, and the restraint's model number and manufacturing date to be recalled for vehicles equipped with vehicle seat belt or LATCH belt...
Instruction Manual
Page 4
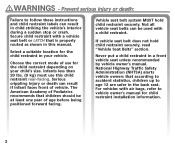
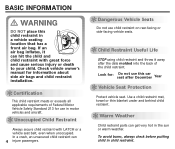
... or crash. Select a suitable location for the child restraint in a front vehicle seat unless recommended by vehicle owner's manual. Vehicle seat belt system MUST hold child restraint securely, read "Vehicle Seat Belts" section. Never put a child restraint in your child's size. Infants less than 20 lbs. (9 kg) must use for child restraint installation information. 2 For vehicles with a child restraint. Choose the correct mode of age before...
... or crash. Select a suitable location for the child restraint in a front vehicle seat unless recommended by vehicle owner's manual. Vehicle seat belt system MUST hold child restraint securely, read "Vehicle Seat Belts" section. Never put a child restraint in your child's size. Infants less than 20 lbs. (9 kg) must use for child restraint installation information. 2 For vehicles with a child restraint. Choose the correct mode of age before...

Instruction Manual
Page 5
.... • Too upright can cause unseen damage and using vehicle seat belt to one vehicle lower anchor point unless specifically allowed by Graco. DO NOT remove LATCH system from child restraint. Insert the harness straps in harness straps and suffocate or strangle. WARNINGS - Their use it is in serious injury or death. DO NOT use could result in a crash, it again could alter...
.... • Too upright can cause unseen damage and using vehicle seat belt to one vehicle lower anchor point unless specifically allowed by Graco. DO NOT remove LATCH system from child restraint. Insert the harness straps in harness straps and suffocate or strangle. WARNINGS - Their use it is in serious injury or death. DO NOT use could result in a crash, it again could alter...
Instruction Manual
Page 6
... NOT place this car seat after the date molded into the back of Federal Motor Vehicle Safety Standard 213 for use in the sun or warm weather. To avoid burns, always check before putting child in a vehicle seating location that has a front air bag. Check vehicle owner's manual for information about side air bags and child restraint installation. In a crash...
... NOT place this car seat after the date molded into the back of Federal Motor Vehicle Safety Standard 213 for use in the sun or warm weather. To avoid burns, always check before putting child in a vehicle seating location that has a front air bag. Check vehicle owner's manual for information about side air bags and child restraint installation. In a crash...
Instruction Manual
Page 9
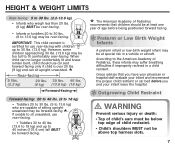
... at special risk in a child restraint. IMPORTANT: This child restraint is certified for use car seat forward-facing only if child is over 20 lbs. * (9 kg) and can no longer comfortably fit and knees remain bent, child should be forward-facing . When child can sit upright unassisted. c Preterm or Low Birth Weight Infants A preterm infant or low birth weight infant may be at least one...
... at special risk in a child restraint. IMPORTANT: This child restraint is certified for use car seat forward-facing only if child is over 20 lbs. * (9 kg) and can no longer comfortably fit and knees remain bent, child should be forward-facing . When child can sit upright unassisted. c Preterm or Low Birth Weight Infants A preterm infant or low birth weight infant may be at least one...
Instruction Manual
Page 10
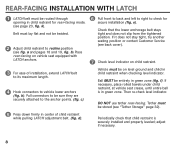
... stored (see back cover). 7 Check level indicator on vehicle seat equipped with LATCH anchors. 3 For ease of child restraint while pulling LATCH adjustment belt. (fig. a and pages 18 and 19, fig. c). 5 Press down firmly in center of installation, extend LATCH belt to its maximum length...(see fig. REAR-FACING INSTALLATION WITH LATCH 1 LATCH belt must be routed through opening in child restraint for secure installation (fig. If it does not stay tight, try another seating position or contact Customer Service (see "Tether Storage" page 32). Check that child restraint is in green zone...
... stored (see back cover). 7 Check level indicator on vehicle seat equipped with LATCH anchors. 3 For ease of child restraint while pulling LATCH adjustment belt. (fig. a and pages 18 and 19, fig. c). 5 Press down firmly in center of installation, extend LATCH belt to its maximum length...(see fig. REAR-FACING INSTALLATION WITH LATCH 1 LATCH belt must be routed through opening in child restraint for secure installation (fig. If it does not stay tight, try another seating position or contact Customer Service (see "Tether Storage" page 32). Check that child restraint is in green zone...
Instruction Manual
Page 12
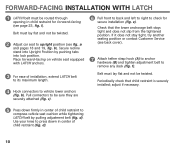
d). 10 FORWARD-FACING INSTALLATION WITH LATCH 1 LATCH belt must be routed through opening in center of child restraint (fig. Secure recline stand into Upright Position by pulling adjustment belt (fig. Pull connectors to remove any slack (fig. If it does not stay tight, try another seating position or contact Customer Service (see back cover). 7 Attach tether strap hook (A) to anchor...
d). 10 FORWARD-FACING INSTALLATION WITH LATCH 1 LATCH belt must be routed through opening in center of child restraint (fig. Secure recline stand into Upright Position by pulling adjustment belt (fig. Pull connectors to remove any slack (fig. If it does not stay tight, try another seating position or contact Customer Service (see back cover). 7 Attach tether strap hook (A) to anchor...
Instruction Manual
Page 16
... belt to remove excess slack by pushing tabs into Upright Position by pulling adjustment belt. 2 Adjust car seat to attach tether hook, tether hook should be stored, see fig. Place forward-facing on some models). If vehicle does not have anchor points to upright position (see "Tether Storage", page 32. Periodically check that child restraint is securely installed...
... belt to remove excess slack by pushing tabs into Upright Position by pulling adjustment belt. 2 Adjust car seat to attach tether hook, tether hook should be stored, see fig. Place forward-facing on some models). If vehicle does not have anchor points to upright position (see "Tether Storage", page 32. Periodically check that child restraint is securely installed...
Instruction Manual
Page 18
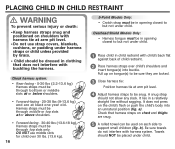
...lbs (9-13.6 kg) and are snug. 5 A rolled towel can be through top slots only. Overhead Shield Models Only: • Harness tongue must be used on each side to but not under harness straps or child unless provided by Graco. • Child should be through middle or top ...fig. DO NOT use strap covers, blankets, cushions, or padding under child. 1 Place child in child restraint with child's back flat against back of child restraint. 2 Place harness straps over 30 lbs. (13.6 kg). 16 5-Point Models Only: • Crotch strap must be in opening closest to support small children (fig...
...lbs (9-13.6 kg) and are snug. 5 A rolled towel can be through top slots only. Overhead Shield Models Only: • Harness tongue must be used on each side to but not under harness straps or child unless provided by Graco. • Child should be through middle or top ...fig. DO NOT use strap covers, blankets, cushions, or padding under child. 1 Place child in child restraint with child's back flat against back of child restraint. 2 Place harness straps over 30 lbs. (13.6 kg). 16 5-Point Models Only: • Crotch strap must be in opening closest to support small children (fig...
Instruction Manual
Page 20
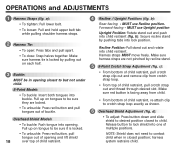
... not under child. 5-Point Models • To buckle: Insert both tongues into lock position. c): • From bottom of child restraint, pull crotch strap clip out and remove clip from child. • From bottom of child restraint. 4 Recline / Upright Positions (fig. Release button to child. a): • To tighten: Pull lower belt. • To loosen: Pull and hold upper belt tab while pulling shoulder harness straps. 2 Harness Tie...
... not under child. 5-Point Models • To buckle: Insert both tongues into lock position. c): • From bottom of child restraint, pull crotch strap clip out and remove clip from child. • From bottom of child restraint. 4 Recline / Upright Positions (fig. Release button to child. a): • To tighten: Pull lower belt. • To loosen: Pull and hold upper belt tab while pulling shoulder harness straps. 2 Harness Tie...

Instruction Manual
Page 22
... attach left strap loop. Overhead Shield Models (fig. B Remove both strap loops are securely attached within Splitter Plate hook. • Make sure straps are NOT twisted and are threaded through matching slot of seat pad and child restraint. OPERATIONS and ADJUSTMENTS (continued) 7 Changing Harness Strap Slots: A Loosen harness straps: Pull and hold upper belt tab. Pull harness straps out. Make sure harness straps are routed behind...
... attach left strap loop. Overhead Shield Models (fig. B Remove both strap loops are securely attached within Splitter Plate hook. • Make sure straps are NOT twisted and are threaded through matching slot of seat pad and child restraint. OPERATIONS and ADJUSTMENTS (continued) 7 Changing Harness Strap Slots: A Loosen harness straps: Pull and hold upper belt tab. Pull harness straps out. Make sure harness straps are routed behind...

Instruction Manual
Page 28
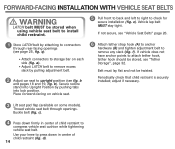
... belt (or lap belt portion of the child restraint: • Read the vehicle owner's manual regarding child restraint installation and seat belt use with a child restraint. VEHICLE SEAT BELTS WARNING Not all vehicle seat belts can be held securely after following instructions in this manual, vehicle seat belt labels, and vehicle owner's manual: • Move child restraint to another seating location and try again, or • Contact vehicle dealer for possible seat belt modification parts. 26...
... belt (or lap belt portion of the child restraint: • Read the vehicle owner's manual regarding child restraint installation and seat belt use with a child restraint. VEHICLE SEAT BELTS WARNING Not all vehicle seat belts can be held securely after following instructions in this manual, vehicle seat belt labels, and vehicle owner's manual: • Move child restraint to another seating location and try again, or • Contact vehicle dealer for possible seat belt modification parts. 26...

Instruction Manual
Page 32
... angle. b) and re-buckle. If this works. Test installation again to another seating position. 30 Pull (fig. a) Flip (fig. If not, move child restraint to see Pg. 31 "Locking Clip" section). See vehicle owner's manual and label on latch plate (fig. If belt slides freely through latch plate, a locking clip MUST be converted into an "automatic locking mode" that will allow use without a locking clip. a).
... angle. b) and re-buckle. If this works. Test installation again to another seating position. 30 Pull (fig. a) Flip (fig. If not, move child restraint to see Pg. 31 "Locking Clip" section). See vehicle owner's manual and label on latch plate (fig. If belt slides freely through latch plate, a locking clip MUST be converted into an "automatic locking mode" that will allow use without a locking clip. a).
Instruction Manual
Page 36
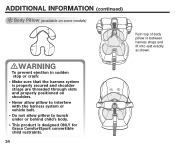
... sure that the harness system is properly secured and shoulder straps are threaded through slots and properly positioned on shoulders. • Never allow pillow to interfere with the harness system or vehicle belt. • Do not allow pillow to bunch under or behind child's body. • This product is designed ONLY for Graco ComfortSport convertible child restraints. 34
... sure that the harness system is properly secured and shoulder straps are threaded through slots and properly positioned on shoulders. • Never allow pillow to interfere with the harness system or vehicle belt. • Do not allow pillow to bunch under or behind child's body. • This product is designed ONLY for Graco ComfortSport convertible child restraints. 34
Instruction Manual
Page 37
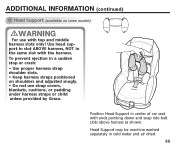
.... 35 Head Support may be machine washed separately in center of car seat with ends pointing down and snap into belt slots above harness as shown. Use head support in slot ABOVE harness, NOT in a sudden stop or crash: • Use proper harness strap shoulder slots. • Keep harness straps positioned on some models) WARNING For use strap covers, blankets, cushions, or padding under harness straps or child unless provided by Graco. To...
.... 35 Head Support may be machine washed separately in center of car seat with ends pointing down and snap into belt slots above harness as shown. Use head support in slot ABOVE harness, NOT in a sudden stop or crash: • Use proper harness strap shoulder slots. • Keep harness straps positioned on some models) WARNING For use strap covers, blankets, cushions, or padding under harness straps or child unless provided by Graco. To...

Instruction Manual
Page 40
...-21) 1 Unhook "J" hooks from child restraint shell. 2 Pull three 2-button clips out of lower front edge of child restraint shell and inside center 2 of pad. ADDITIONAL INFORMATION (continued) c Care & Cleaning Removing Seat Pad (all models): Remove both 2-button clips out of shield and unwrap pad from around shield. Removing Overhead Shield Pad: 3 Pull both harness strap loops from 1 Splitter Plate on...
...-21) 1 Unhook "J" hooks from child restraint shell. 2 Pull three 2-button clips out of lower front edge of child restraint shell and inside center 2 of pad. ADDITIONAL INFORMATION (continued) c Care & Cleaning Removing Seat Pad (all models): Remove both 2-button clips out of shield and unwrap pad from around shield. Removing Overhead Shield Pad: 3 Pull both harness strap loops from 1 Splitter Plate on...

Instruction Manual
Page 41
...; Periodically inspect and clean buckle to remove objects or debris that could prevent latching. Use this child restraint only on gentle cycle and drip dry. Buckle: Rinse buckle with mild soap and damp cloth. ADDITIONAL INFORMATION (continued) Seat Pad and Overhead Shield Pad: Remove the plastic 2-button clips. If harness straps or belt are frayed or heavily soiled, they...
...; Periodically inspect and clean buckle to remove objects or debris that could prevent latching. Use this child restraint only on gentle cycle and drip dry. Buckle: Rinse buckle with mild soap and damp cloth. ADDITIONAL INFORMATION (continued) Seat Pad and Overhead Shield Pad: Remove the plastic 2-button clips. If harness straps or belt are frayed or heavily soiled, they...

Instruction Manual
Page 42
REPLACEMENT PARTS To purchase parts or accessories in the United States, please contact us at the following: www.gracobaby.com or 1-800-345-4109 40
REPLACEMENT PARTS To purchase parts or accessories in the United States, please contact us at the following: www.gracobaby.com or 1-800-345-4109 40

Instruction Manual
Page 44
Exton, PA 19341 Attention: Customer Service Department or visit our internet website: www.gracobaby.com 1 Fold instruction manual. 2 Store instruction manual behind this tab. Exton, PA 19341 or write us at 1-610-884-8730. A Division of Newell Rubbermaid 150 Oaklands Blvd. CALL US FIRST Call toll-free 1-800-345-4109 from anywhere in the U.S. Graco Children's Products Inc. or Canada or fax at : Graco Children's Products 150 Oaklands Blvd. Store locking clip here. If a part is damaged, missing, or you need help or replacement parts, DO NOT return child restraint to the store.
Exton, PA 19341 Attention: Customer Service Department or visit our internet website: www.gracobaby.com 1 Fold instruction manual. 2 Store instruction manual behind this tab. Exton, PA 19341 or write us at 1-610-884-8730. A Division of Newell Rubbermaid 150 Oaklands Blvd. CALL US FIRST Call toll-free 1-800-345-4109 from anywhere in the U.S. Graco Children's Products Inc. or Canada or fax at : Graco Children's Products 150 Oaklands Blvd. Store locking clip here. If a part is damaged, missing, or you need help or replacement parts, DO NOT return child restraint to the store.


