
Owners Manual
Page 1
FAILURE TO PROPERLY USE THIS CAR SEAT INCREASES THE RISK OF SERIOUS INJURY OR DEATH IN A SUDDEN STOP OR CRASH. © 2006 Graco ISPB007BE 10/06 US 1 Car Seat/Booster Seat Owner's Manual READ THIS MANUAL. Do not install or use this car seat until you read and understand the instructions in this manual.
FAILURE TO PROPERLY USE THIS CAR SEAT INCREASES THE RISK OF SERIOUS INJURY OR DEATH IN A SUDDEN STOP OR CRASH. © 2006 Graco ISPB007BE 10/06 US 1 Car Seat/Booster Seat Owner's Manual READ THIS MANUAL. Do not install or use this car seat until you read and understand the instructions in this manual.

Owners Manual
Page 2
... Other Users 3 2.0 Registration Information 4 2.1 Register Your Car Seat 4 2.2 Recall Information 4 2.3 If You Need Help 4 3.0 Features 5-6 4.0 Important Information 7-10 4.1 Warnings 7 4.2 Height and Weight Limitations 9 4.2.1 WITH Built-In Harness 10 4.2.2 WITHOUT Built-In Harness 10 5.0 Car Seat Location 11-17 5.1 Vehicle Seat Requirements 11 5.2 Vehicle Seat Belt Requirements 12 5.2.1 UNSAFE Vehicle Belt Systems . . . . .12 5.2.2 SAFE Vehicle Belt Systems 14 6.0 Using Car Seat With Built-In Harness . . .18-27 6.1 Positioning the Harness Straps 18...
... Other Users 3 2.0 Registration Information 4 2.1 Register Your Car Seat 4 2.2 Recall Information 4 2.3 If You Need Help 4 3.0 Features 5-6 4.0 Important Information 7-10 4.1 Warnings 7 4.2 Height and Weight Limitations 9 4.2.1 WITH Built-In Harness 10 4.2.2 WITHOUT Built-In Harness 10 5.0 Car Seat Location 11-17 5.1 Vehicle Seat Requirements 11 5.2 Vehicle Seat Belt Requirements 12 5.2.1 UNSAFE Vehicle Belt Systems . . . . .12 5.2.2 SAFE Vehicle Belt Systems 14 6.0 Using Car Seat With Built-In Harness . . .18-27 6.1 Positioning the Harness Straps 18...

Owners Manual
Page 3
... to READ THE OWNER'S MANUAL and the vehicle owner's manual. Properly routing the vehicle seat belt or properly using this car seat correctly. 1.0 Warnings to Parents and Other Users Failure to properly use this car seat increases the risk of use for the car seat depending on your child. 3. Your child's safety depends on you installing and using LATCH. 5. Selecting a suitable location for the car seat in the vehicle using this car seat, even though...
... to READ THE OWNER'S MANUAL and the vehicle owner's manual. Properly routing the vehicle seat belt or properly using this car seat correctly. 1.0 Warnings to Parents and Other Users Failure to properly use this car seat increases the risk of use for the car seat depending on your child. 3. Your child's safety depends on you installing and using LATCH. 5. Selecting a suitable location for the car seat in the vehicle using this car seat, even though...

Owners Manual
Page 4
... parts, use, or maintenance. When you efficiently. Fill out the prepaid registration postcard attached to : Graco Children's Products Inc. 150 Oaklands Blvd. 2.0 Registration Information Model Number: Manufactured in: Purchase Date: 2.1 Register Your Car Seat Please fill in (date) ready so that we may have your child restraint. 1-800-345-4109 or www.gracobaby.com 4 This number can be recalled for safety reasons. Child...
... parts, use, or maintenance. When you efficiently. Fill out the prepaid registration postcard attached to : Graco Children's Products Inc. 150 Oaklands Blvd. 2.0 Registration Information Model Number: Manufactured in: Purchase Date: 2.1 Register Your Car Seat Please fill in (date) ready so that we may have your child restraint. 1-800-345-4109 or www.gracobaby.com 4 This number can be recalled for safety reasons. Child...

Owners Manual
Page 6
... vehicle. A tether anchors the top of the car seat to vehicle owners manual for installing car seats in vehicles. 6 Junction plate storage Locking clip storage* Adjustment belt LATCH*** LATCH & Tether Storage bars LATCH Connector Metal junction plate Tether clip Tether strap** Owner's manual storage compartment - When used IN PLACE of vehicle seat belts. **Vehicles are now (or can be used properly with the vehicle seat belt, a tether helps reduce injury in a sudden stop...
... vehicle. A tether anchors the top of the car seat to vehicle owners manual for installing car seats in vehicles. 6 Junction plate storage Locking clip storage* Adjustment belt LATCH*** LATCH & Tether Storage bars LATCH Connector Metal junction plate Tether clip Tether strap** Owner's manual storage compartment - When used IN PLACE of vehicle seat belts. **Vehicles are now (or can be used properly with the vehicle seat belt, a tether helps reduce injury in a sudden stop...
Owners Manual
Page 7
... installed or if your vehicle owner's manual for car seat installation. 7 Your child can hit the child and booster seat with a front passenger air bag, refer to accident statistics, CHILDREN ARE SAFER WHEN PROPERLY RESTRAINED IN REAR VEHICLE SEATING POSITIONS, RATHER THAN FRONT SEATING POSITIONS. DO NOT let others install or use the car seat unless they understand how to your vehicle owner's manual as well as these instructions...
... installed or if your vehicle owner's manual for car seat installation. 7 Your child can hit the child and booster seat with a front passenger air bag, refer to accident statistics, CHILDREN ARE SAFER WHEN PROPERLY RESTRAINED IN REAR VEHICLE SEATING POSITIONS, RATHER THAN FRONT SEATING POSITIONS. DO NOT let others install or use the car seat unless they understand how to your vehicle owner's manual as well as these instructions...
Owners Manual
Page 8
... thrown around and may injure occupants in Aircraft ONLY when used as a booster without also giving them this restraint is NOT certified for use any metal or plastic parts before putting your child's skin. Remove it is certified for use a cut, frayed or damaged car seat harness, LATCH belt or vehicle seat belt. • THE CAR SEAT CAN BECOME VERY HOT IF LEFT IN THE SUN...
... thrown around and may injure occupants in Aircraft ONLY when used as a booster without also giving them this restraint is NOT certified for use any metal or plastic parts before putting your child's skin. Remove it is certified for use a cut, frayed or damaged car seat harness, LATCH belt or vehicle seat belt. • THE CAR SEAT CAN BECOME VERY HOT IF LEFT IN THE SUN...

Owners Manual
Page 11
... seat. 11 5.0 Car Seat Location 5.1 Vehicle Seat Requirements IMPROPER PLACEMENT OF THE CAR SEAT INCREASES THE RISK OF SERIOUS INJURY OR DEATH. However, this position is often equipped with a lap belt only and cannot be safe for this car seat is used safely with the car seat. If you are not sure where to place the car seat in your vehicle, consult your vehicle owner's manual or call Graco...
... seat. 11 5.0 Car Seat Location 5.1 Vehicle Seat Requirements IMPROPER PLACEMENT OF THE CAR SEAT INCREASES THE RISK OF SERIOUS INJURY OR DEATH. However, this position is often equipped with a lap belt only and cannot be safe for this car seat is used safely with the car seat. If you are not sure where to place the car seat in your vehicle, consult your vehicle owner's manual or call Graco...
Owners Manual
Page 12
... vehicle owner's manual or call Graco Children's Products Inc., 1-800-345-4109. 5.2.1 UNSAFE Vehicle Belt Systems DO NOT USE ANY OF THE FOLLOWING SYSTEMS TO SECURE THE CAR SEAT. THE VEHICLE SEAT BELT MUST BE DESIGNED TO HOLD THE CAR SEAT TIGHTLY AT ALL TIMES. If you are safe to use . LATCH can move until it locks in a crash or sudden stop. 12 5.2 Vehicle Seat Belt...
... vehicle owner's manual or call Graco Children's Products Inc., 1-800-345-4109. 5.2.1 UNSAFE Vehicle Belt Systems DO NOT USE ANY OF THE FOLLOWING SYSTEMS TO SECURE THE CAR SEAT. THE VEHICLE SEAT BELT MUST BE DESIGNED TO HOLD THE CAR SEAT TIGHTLY AT ALL TIMES. If you are safe to use . LATCH can move until it locks in a crash or sudden stop. 12 5.2 Vehicle Seat Belt...

Owners Manual
Page 14
... BE USED WITH YOUR CAR SEAT, IF the seat location meets all other requirements of the following vehicle belt systems if your vehicle owner's manual. Please refer to lengthen once it is equipped with Automatic Locking Retractor (ALR) The automatic locking retractor will not permit the lap belt to vehicle owners manual for LATCH locations. For Built-in place of these instructions and...
... BE USED WITH YOUR CAR SEAT, IF the seat location meets all other requirements of the following vehicle belt systems if your vehicle owner's manual. Please refer to lengthen once it is equipped with Automatic Locking Retractor (ALR) The automatic locking retractor will not permit the lap belt to vehicle owners manual for LATCH locations. For Built-in place of these instructions and...
Owners Manual
Page 15
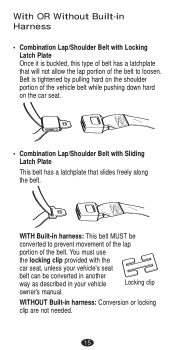
... hard on the car seat. • Combination Lap/Shoulder Belt with Sliding Latch Plate This belt has a latchplate that slides freely along the belt. You must use the locking clip provided with the car seat, unless your vehicle Locking clip owner's manual. WITHOUT Built-in harness: Conversion or locking clip are not needed. 15 With OR Without Built-in Harness • Combination Lap/Shoulder Belt with Locking Latch Plate Once...
... hard on the car seat. • Combination Lap/Shoulder Belt with Sliding Latch Plate This belt has a latchplate that slides freely along the belt. You must use the locking clip provided with the car seat, unless your vehicle Locking clip owner's manual. WITHOUT Built-in harness: Conversion or locking clip are not needed. 15 With OR Without Built-in Harness • Combination Lap/Shoulder Belt with Locking Latch Plate Once...

Owners Manual
Page 16
Connect lap and shoulder belts as shown Ê. 4. Rebuckle belt. Remove locking clip when not using car seat. Store under it to slip. 3. Tighten the buckled belt by pulling hard. Unbuckle the belt without allowing it 's tab on the back of seat. Ê ½" (1.25 cm) 16 If belt loosens or lengthens, repeat procedure. Check that lap belt does not move by pushing down on the shoulder belt. 2. While pushing down hard on the car seat and pulling hard on seat, pinch the two straps together behind the buckle tongue. To Install Locking Clip: 1.
Connect lap and shoulder belts as shown Ê. 4. Rebuckle belt. Remove locking clip when not using car seat. Store under it to slip. 3. Tighten the buckled belt by pulling hard. Unbuckle the belt without allowing it 's tab on the back of seat. Ê ½" (1.25 cm) 16 If belt loosens or lengthens, repeat procedure. Check that lap belt does not move by pushing down on the shoulder belt. 2. While pushing down hard on the car seat and pulling hard on seat, pinch the two straps together behind the buckle tongue. To Install Locking Clip: 1.

Owners Manual
Page 18
... harness clip Ê. Ê Ë 2. It lies in the seat. 18 Place child in a relatively straight line without sagging. It does not press on the child's flesh or push the child's body into an unnatural position. 1. Unbuckle harness straps Ë. 3. Snugly adjust the belts provided with this child restraint around your child. A snug strap should not allow any slack. 6.0 Using Car Seat WITH Built-in Harness 6.1 Positioning the Harness Straps...
... harness clip Ê. Ê Ë 2. It lies in the seat. 18 Place child in a relatively straight line without sagging. It does not press on the child's flesh or push the child's body into an unnatural position. 1. Unbuckle harness straps Ë. 3. Snugly adjust the belts provided with this child restraint around your child. A snug strap should not allow any slack. 6.0 Using Car Seat WITH Built-in Harness 6.1 Positioning the Harness Straps...

Owners Manual
Page 26
... child in the car seat. • Avoid bulky clothing. 1. Place harness straps over child's shoulders and insert tongues into buckle Ê. 6.3 Securing Your Child in car seat with child's back flat Ê against back of car seat. 2. CHECK that harness is securely latched by pulling up on straps. CHECK that straps are properly secured. Follow these instructions carefully to properly secure your child. • ADJUST THE HARNESS SYSTEM SNUGLY...
... child in the car seat. • Avoid bulky clothing. 1. Place harness straps over child's shoulders and insert tongues into buckle Ê. 6.3 Securing Your Child in car seat with child's back flat Ê against back of car seat. 2. CHECK that harness is securely latched by pulling up on straps. CHECK that straps are properly secured. Follow these instructions carefully to properly secure your child. • ADJUST THE HARNESS SYSTEM SNUGLY...
Owners Manual
Page 29
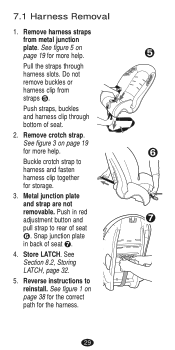
... 32. 5. See figure 5 on page 38 for the correct path for more help . Ï Buckle crotch strap to harness and fasten harness clip together for storage. 3. Reverse instructions to rear of seat Ï. Remove harness straps from straps Î. Push in back of seat. 2. 7.1 Harness Removal 1. See figure 3 on page 19 for the harness. 29 Do not remove buckles or harness clip from metal junction plate. Remove crotch strap. Store LATCH.
... 32. 5. See figure 5 on page 38 for the correct path for more help . Ï Buckle crotch strap to harness and fasten harness clip together for storage. 3. Reverse instructions to rear of seat Ï. Remove harness straps from straps Î. Push in back of seat. 2. 7.1 Harness Removal 1. See figure 3 on page 19 for the harness. 29 Do not remove buckles or harness clip from metal junction plate. Remove crotch strap. Store LATCH.

Owners Manual
Page 31
... vehicle is Ì securely attached to use the tether, check your vehicle owner's manual for the proper anchor location and installation. Tighten the tether strap securely Í. 4. Check car seat tightness Í after securing tether. If necessary, retighten vehicle seat belt when used with a tether anchor, it may purchase a tether anchor parts kit by calling Graco Customer Service at 1-800-345-4109. 1. If...
... vehicle is Ì securely attached to use the tether, check your vehicle owner's manual for the proper anchor location and installation. Tighten the tether strap securely Í. 4. Check car seat tightness Í after securing tether. If necessary, retighten vehicle seat belt when used with a tether anchor, it may purchase a tether anchor parts kit by calling Graco Customer Service at 1-800-345-4109. 1. If...

Owners Manual
Page 34
Your model may include one or more of the following accessory items. To prevent ejection in sudden stop or crash: • Always make sure shoulder straps are threaded through slots and properly positioned on shoulders. • Never allow body support to bunch or fold behind child. • Use body support with bottom harness slots only. • Make sure that harness covers do not interfere with placement of the chest clip at armpit level. Detachable Head Pillow Body Support (styles vary) Harness Covers 34
Your model may include one or more of the following accessory items. To prevent ejection in sudden stop or crash: • Always make sure shoulder straps are threaded through slots and properly positioned on shoulders. • Never allow body support to bunch or fold behind child. • Use body support with bottom harness slots only. • Make sure that harness covers do not interfere with placement of the chest clip at armpit level. Detachable Head Pillow Body Support (styles vary) Harness Covers 34

Owners Manual
Page 35
... LUBRICATE THE BUCKLE. Remove objects with tweezers and/or clean with the buckle securely locked, do not use this car seat. 9.0 Care and Maintenance • CONTINUOUS USE OF CAR SEAT MAY CAUSE DAMAGE TO VEHICLE SEAT. NO BLEACH OR DETERGENTS. • HARNESS STRAPS AND LATCH STRAPS: spot clean or replace. If you cannot get the harness to purchase a replacement harness or buckle. • SEAT COVER: clean with mild...
... LUBRICATE THE BUCKLE. Remove objects with tweezers and/or clean with the buckle securely locked, do not use this car seat. 9.0 Care and Maintenance • CONTINUOUS USE OF CAR SEAT MAY CAUSE DAMAGE TO VEHICLE SEAT. NO BLEACH OR DETERGENTS. • HARNESS STRAPS AND LATCH STRAPS: spot clean or replace. If you cannot get the harness to purchase a replacement harness or buckle. • SEAT COVER: clean with mild...
Owners Manual
Page 37
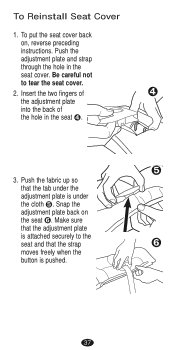
... securely to tear the seat cover. 2. Snap the adjustment plate back on , reverse preceding instructions. To put the seat cover back on the seat Ï. Insert the two fingers of Í the adjustment plate into the back of the hole in the seat cover. Push the adjustment plate and strap through the hole in the seat Í. Î 3. Push the...
... securely to tear the seat cover. 2. Snap the adjustment plate back on , reverse preceding instructions. To put the seat cover back on the seat Ï. Insert the two fingers of Í the adjustment plate into the back of the hole in the seat cover. Push the adjustment plate and strap through the hole in the seat Í. Î 3. Push the...

Owners Manual
Page 40
10.0 Replacement Parts To purchase parts or accessories or for warranty information in the United States, please contact us at the following: www.gracobaby.com or 1-800-345-4109 40
10.0 Replacement Parts To purchase parts or accessories or for warranty information in the United States, please contact us at the following: www.gracobaby.com or 1-800-345-4109 40


