Audio Setup Guide
Page 2
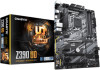
Restart the system after the audio driver is installed. 1-1 Configuring 2/4/5.1/7.1-Channel Audio The motherboard provides five audio jacks on the back panel ...Configurations: Refer to the right shows the default audio jack assignments. the system will automatically install the audio driver from Microsoft Store. The picture to the following for multi-channel speaker configurations. •• 2-channel.... The Which device did you install the included motherboard drivers, make sure your Internet connection works properly. Select the device according to be Side speaker...
Restart the system after the audio driver is installed. 1-1 Configuring 2/4/5.1/7.1-Channel Audio The motherboard provides five audio jacks on the back panel ...Configurations: Refer to the right shows the default audio jack assignments. the system will automatically install the audio driver from Microsoft Store. The picture to the following for multi-channel speaker configurations. •• 2-channel.... The Which device did you install the included motherboard drivers, make sure your Internet connection works properly. Select the device according to be Side speaker...
Unique Features Introduction
Page 7
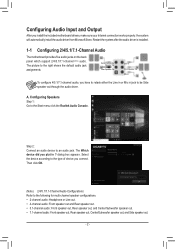
... utility (Figure 1). Running the APP Center Insert the motherboard driver disk. Restart your computer after the installation is closed, you can select an app to run or click LiveUpdate to update an app online. Supported functions of GIGABYTE apps that help you get the most from your GIGABYTE motherboard . (Note) Using a simple, unified user interface...
... utility (Figure 1). Running the APP Center Insert the motherboard driver disk. Restart your computer after the installation is closed, you can select an app to run or click LiveUpdate to update an app online. Supported functions of GIGABYTE apps that help you get the most from your GIGABYTE motherboard . (Note) Using a simple, unified user interface...
Unique Features Introduction
Page 17
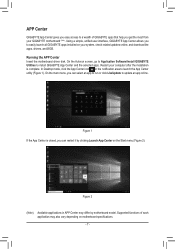
All with a simple click of a button, XHD helps to RAID mode 3. System Requirements 1. Intel® SATA controller driver installed 5. B. XHD With GIGABYTE XHD (Note 1), users can quickly configure a RAID-ready system for complex and time-consuming configurations. A. The new drive must ... (Note 2) Except for the operating system drive, all data on your data before using the XHD utility. - 17 - An Intel® Chipset motherboard supporting RAID 2. Back up your need for RAID 0 when a new SATA drive is added. Intel® Rapid Storage Technology utility installed 4. Using XHD...
All with a simple click of a button, XHD helps to RAID mode 3. System Requirements 1. Intel® SATA controller driver installed 5. B. XHD With GIGABYTE XHD (Note 1), users can quickly configure a RAID-ready system for complex and time-consuming configurations. A. The new drive must ... (Note 2) Except for the operating system drive, all data on your data before using the XHD utility. - 17 - An Intel® Chipset motherboard supporting RAID 2. Back up your need for RAID 0 when a new SATA drive is added. Intel® Rapid Storage Technology utility installed 4. Using XHD...

RAID Setup Guide
Page 2
... or SSDs (Note 2) (to ensure optimal performance, it is recommended that you do not want to create RAID array on the motherboard. Configuring SATA Controllers A. RAID Levels RAID 0 Minimum Number of Hard ≥2 Drives Array Capacity Number of hard drives * Size ...smallest drive Yes To create a RAID set either with identical model and capacity). (Note 3) •• A Windows setup disk. •• Motherboard driver disk. •• A USB thumb drive. Configure SATA controller mode in the Intel® Chipset controlled connectors on the SATA controller. (Note 2) ...
... or SSDs (Note 2) (to ensure optimal performance, it is recommended that you do not want to create RAID array on the motherboard. Configuring SATA Controllers A. RAID Levels RAID 0 Minimum Number of Hard ≥2 Drives Array Capacity Number of hard drives * Size ...smallest drive Yes To create a RAID set either with identical model and capacity). (Note 3) •• A Windows setup disk. •• Motherboard driver disk. •• A USB thumb drive. Configure SATA controller mode in the Intel® Chipset controlled connectors on the SATA controller. (Note 2) ...
RAID Setup Guide
Page 16
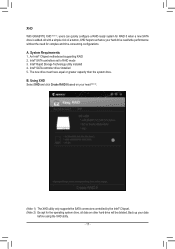
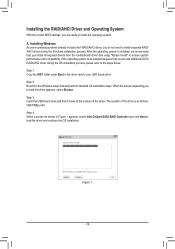
...below: Step 1: Copy the IRST folder under Boot in Figure 1 appears, select Intel Chipset SATA RAID Controller and click Next to load the driver and continue the OS installation. When the screen requesting you are ready to install the operating system. Figure 1 - 16 - A. Step ... Step 4: When a screen as shown in the driver disk to your USB thumb drive. Installing the RAID/AHCI Driver and Operating System With the correct BIOS settings, you to load the driver appears, select Browse. Step 2: Boot from the motherboard driver disk using "Xpress Install" to ensure system performance ...
...below: Step 1: Copy the IRST folder under Boot in Figure 1 appears, select Intel Chipset SATA RAID Controller and click Next to load the driver and continue the OS installation. When the screen requesting you are ready to install the operating system. Figure 1 - 16 - A. Step ... Step 4: When a screen as shown in the driver disk to your USB thumb drive. Installing the RAID/AHCI Driver and Operating System With the correct BIOS settings, you to load the driver appears, select Browse. Step 2: Boot from the motherboard driver disk using "Xpress Install" to ensure system performance ...
RAID Setup Guide
Page 17
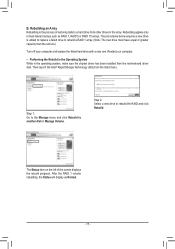
... the old one.) Turn off your computer. •• Performing the Rebuild in the Operating System While in the operating system, make sure the chipset driver has been installed from the motherboard driver disk.
... the old one.) Turn off your computer. •• Performing the Rebuild in the Operating System While in the operating system, make sure the chipset driver has been installed from the motherboard driver disk.
RAID Setup Guide
Page 19
...be erased. B. Step 2: After re-entering the operating system, follow the steps below: Step 1: After entering the operating system, insert the motherboard driver disk into your SATA controller mode back to install. Then select which one you install more than the hard drive/SSD to be a system ... Optane™ memory cannot be used must have Windows 10 64-bit (or later version) installed on -screen instructions to use. The motherboard driver disk. Make sure you have equal or smaller capacity than one Optane™ memory, please select which drive to be included in AHCI ...
...be erased. B. Step 2: After re-entering the operating system, follow the steps below: Step 1: After entering the operating system, insert the motherboard driver disk into your SATA controller mode back to install. Then select which one you install more than the hard drive/SSD to be a system ... Optane™ memory cannot be used must have Windows 10 64-bit (or later version) installed on -screen instructions to use. The motherboard driver disk. Make sure you have equal or smaller capacity than one Optane™ memory, please select which drive to be included in AHCI ...

User Manual
Page 2
... the User's Manual. „„ For product-related information, check on our website at: https://www.gigabyte.com Identifying Your Motherboard Revision The revision number on your motherboard revision before updating motherboard BIOS, drivers, or when looking for technical information. Motherboard Z390 UD Motherboard Z390 UD Aug. 25, 2018 Aug. 25, 2018 Copyright © 2018 GIGA-BYTE TECHNOLOGY CO., LTD. Example...
... the User's Manual. „„ For product-related information, check on our website at: https://www.gigabyte.com Identifying Your Motherboard Revision The revision number on your motherboard revision before updating motherboard BIOS, drivers, or when looking for technical information. Motherboard Z390 UD Motherboard Z390 UD Aug. 25, 2018 Aug. 25, 2018 Copyright © 2018 GIGA-BYTE TECHNOLOGY CO., LTD. Example...

User Manual
Page 3
Table of Contents Z390 UD Motherboard Layout 4 Chapter 1 Hardware Installation 5 1-1 Installation Precautions 5 1-2 Product Specifications 6 1-3 Installing the CPU 9 1-4 Installing the Memory 9 1-5 Installing an Expansion Card 10 1-6 Back Panel Connectors 10 1-7 Internal Connectors ......29 2-6 Peripherals...32 2-7 Chipset...35 2-8 Power...36 2-9 Save & Exit...38 Chapter 3 Appendix...39 3-1 Configuring a RAID Set 39 3-2 Installing an Intel® Optane™ Memory 41 3-3 Drivers Installation 43 Regulatory Statements 44 Contact Us...48 - 3 -
Table of Contents Z390 UD Motherboard Layout 4 Chapter 1 Hardware Installation 5 1-1 Installation Precautions 5 1-2 Product Specifications 6 1-3 Installing the CPU 9 1-4 Installing the Memory 9 1-5 Installing an Expansion Card 10 1-6 Back Panel Connectors 10 1-7 Internal Connectors ......29 2-6 Peripherals...32 2-7 Chipset...35 2-8 Power...36 2-9 Save & Exit...38 Chapter 3 Appendix...39 3-1 Configuring a RAID Set 39 3-2 Installing an Intel® Optane™ Memory 41 3-3 Drivers Installation 43 Regulatory Statements 44 Contact Us...48 - 3 -

User Manual
Page 4
... depend on the product package you obtain. Z390 UD Motherboard Layout ATX_12V_2X2 KB_MS ATX_12V_2X4 SYS_FAN1 CPU_FAN LGA1151 ATX R_USB30_1 HDMI R_USB30_2 USB30_LAN AUDIO 110 80 PCIEX1_1 Realtek® GbE LAN PCIEX16 60 42 Z390 UD M2A DDR4_B1 DDR4_B2 DDR4_A1 DDR4_A2 SYS_FAN2 F_USB30 SATA3...Super I/O BAT PCIEX4_1 CODEC PCIEX1_3 PCIEX4_2 F_AUDIO THB_C Intel® Z390 M_BIOS CLR_CMOS SATA3 53 42 SPDIF_O LED_C COM TPM F_USB F_PANEL SYS_FAN3 CPU DRAM VGA BOOT Box Contents 55 Z390 UD motherboard 55 Motherboard driver disk 55 User's Manual 55 Two SATA cables 55 I/O ...
... depend on the product package you obtain. Z390 UD Motherboard Layout ATX_12V_2X2 KB_MS ATX_12V_2X4 SYS_FAN1 CPU_FAN LGA1151 ATX R_USB30_1 HDMI R_USB30_2 USB30_LAN AUDIO 110 80 PCIEX1_1 Realtek® GbE LAN PCIEX16 60 42 Z390 UD M2A DDR4_B1 DDR4_B2 DDR4_A1 DDR4_A2 SYS_FAN2 F_USB30 SATA3...Super I/O BAT PCIEX4_1 CODEC PCIEX1_3 PCIEX4_2 F_AUDIO THB_C Intel® Z390 M_BIOS CLR_CMOS SATA3 53 42 SPDIF_O LED_C COM TPM F_USB F_PANEL SYS_FAN3 CPU DRAM VGA BOOT Box Contents 55 Z390 UD motherboard 55 Motherboard driver disk 55 User's Manual 55 Two SATA cables 55 I/O ...

User Manual
Page 11
...or receiving is occurring Off No data transmission or receiving is occurring Line In/Rear Speaker Out (Blue) The line in jack. Please visit GIGABYTE's website for line in devices such as an optical drive, walkman, etc. Audio Jack Configurations: Jack Headphone/ 2-channel 4-channel 5.1-channel ... module and enable the multi-channel audio feature through the audio driver. •• When removing the cable connected to a back panel connector, first remove the cable from your device and then remove it from the motherboard. •• When removing the cable, pull it side ...
...or receiving is occurring Off No data transmission or receiving is occurring Line In/Rear Speaker Out (Blue) The line in jack. Please visit GIGABYTE's website for line in devices such as an optical drive, walkman, etc. Audio Jack Configurations: Jack Headphone/ 2-channel 4-channel 5.1-channel ... module and enable the multi-channel audio feature through the audio driver. •• When removing the cable connected to a back panel connector, first remove the cable from your device and then remove it from the motherboard. •• When removing the cable, pull it side ...

User Manual
Page 15
... down and then secure it with the SATA3 1 connector. Installation Notices for the M.2 SSD to unfasten the screw and nut from the motherboard. DEBUG PORT DEBUG PORT 110 80 60 42 Follow the steps below to the limited number of lanes provided by the Chipset, the availability... with the screw. Type of device installed in UEFI BIOS mode. Step 2: Slide the M.2 SSD into the co_3nnectorUat an angle. Step 1: Use a screw driver to be installed and then screw the nut first. Select the proper hole for instructions on configuring a RAID array. _S S_ _ B _U _ B _USB3...
... down and then secure it with the SATA3 1 connector. Installation Notices for the M.2 SSD to unfasten the screw and nut from the motherboard. DEBUG PORT DEBUG PORT 110 80 60 42 Follow the steps below to the limited number of lanes provided by the Chipset, the availability... with the screw. Type of device installed in UEFI BIOS mode. Step 2: Slide the M.2 SSD into the co_3nnectorUat an angle. Step 1: Use a screw driver to be installed and then screw the nut first. Select the proper hole for instructions on configuring a RAID array. _S S_ _ B _U _ B _USB3...
User Manual
Page 39
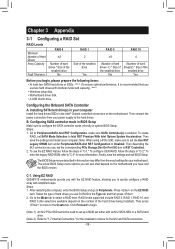
...for your computer. Finally, save the settings and restart your motherboard. The BIOS Setup menus described in the Intel® Chipset controlled connectors on the motherboard you will see shall depend on the motherboard. The actual BIOS Setup menu options you have and the...Selection to Peripherals. To configure UEFI RAID, follow the steps in "C-2." Using EZ RAID GIGABYTE motherboards provide you with identical model and capacity). (Note 2) •• Windows setup disk. •• Motherboard driver disk. •• A USB thumb drive. Steps: 1. Select the type of ...
...for your computer. Finally, save the settings and restart your motherboard. The BIOS Setup menus described in the Intel® Chipset controlled connectors on the motherboard you will see shall depend on the motherboard. The actual BIOS Setup menu options you have and the...Selection to Peripherals. To configure UEFI RAID, follow the steps in "C-2." Using EZ RAID GIGABYTE motherboards provide you with identical model and capacity). (Note 2) •• Windows setup disk. •• Motherboard driver disk. •• A USB thumb drive. Steps: 1. Select the type of ...

User Manual
Page 41
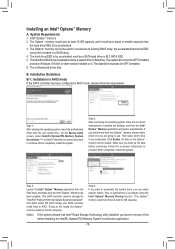
...to the steps below : 1. The hard drive/SSD to be accelerated must also be a SATA hard drive or M.2 SATA SSD. 5. The motherboard driver disk. When completed, restart the system. 3. Launch the Intel® Optane™ Memory application from AHCI mode. Intel® Optane™ ...Requirements 1. Installation Guidelines A-1: Installation in AHCI mode If the SATA controller has been configured in the driver disk to continue. Then browse to proceed. Boot from the motherboard driver disk using the Intel® Optane™ Memory Pinning function. (The Optane™ memory used...
...to the steps below : 1. The hard drive/SSD to be accelerated must also be a SATA hard drive or M.2 SATA SSD. 5. The motherboard driver disk. When completed, restart the system. 3. Launch the Intel® Optane™ Memory application from AHCI mode. Intel® Optane™ ...Requirements 1. Installation Guidelines A-1: Installation in AHCI mode If the SATA controller has been configured in the driver disk to continue. Then browse to proceed. Boot from the motherboard driver disk using the Intel® Optane™ Memory Pinning function. (The Optane™ memory used...

User Manual
Page 43
... and "Xpress Install" will automatically scan your optical drive. Please visit GIGABYTE's website for more software information. - 43 - Or click the arrow icon to install. Please visit GIGABYTE's website for more troubleshooting information. Click on the message "Tap to choose... "Xpress Install" will install all of the selected drivers. 3-3 Drivers Installation •• Before installing the drivers, first install the operating system. •• After installing the operating system, insert the motherboard driver disk into your system and then list all of ...
... and "Xpress Install" will automatically scan your optical drive. Please visit GIGABYTE's website for more software information. - 43 - Or click the arrow icon to install. Please visit GIGABYTE's website for more troubleshooting information. Click on the message "Tap to choose... "Xpress Install" will install all of the selected drivers. 3-3 Drivers Installation •• Before installing the drivers, first install the operating system. •• After installing the operating system, insert the motherboard driver disk into your system and then list all of ...


