Gigabyte P25X v2 Support and Manuals
Get Help and Manuals for this Gigabyte item

View All Support Options Below
Free Gigabyte P25X v2 manuals!
Problems with Gigabyte P25X v2?
Ask a Question
Free Gigabyte P25X v2 manuals!
Problems with Gigabyte P25X v2?
Ask a Question
Popular Gigabyte P25X v2 Manual Pages
Manual - Page 2

Using GIGABYTE Notebook for the First Time
1
3
2
To install the battery please follow these steps:
1 Target the battery's direction into ...GIGABYTE Notebook!
1
This Manual will help you to get started with setting up your notebook. For more detailed information, please visit our website at the time of shipping and may change without prior notice, written or otherwise.
All specifications...
Manual - Page 3

... for the First Time :
Depending on -screen prompts and instructions and enter your configuration, the Microsoft® Windows® Boot Screen will be the first screen that the volume for the very first time, do not turn it off until Windows® Setup has completed. Follow the on your personal information to...
Manual - Page 4
...: In Windows® Mode Press "Smart+"
button to enter "Smart Setup" menu in power off
mode. Your GIGABYTE Notebook Tour
3
English
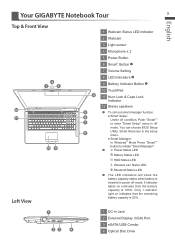
Top & Front View
2
1
3
12
-
+
11
10 9
Left View
1 Webcam Status LED indicator
2 Webcam
3 Light sensor
4 Microphone x 2
5 Power Button 6 Smart+ Button
7 Volume Setting
8 LED Indicators
9 Battery Indicator Button
10...
Manual - Page 6
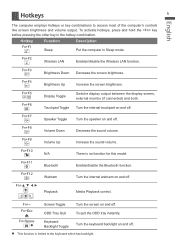
...+F4
Brightness Up
Increase the screen brightness. Fn+F7
Speaker Toggle
Turn the speaker on and off .
This function is no function for this model. Fn+F9
Volume Up
Increase the sound volume. Fn
Playback
Media Playback control.
Touchpad Toggle Turn the internal touchpad on and off . Fn+F10 N/A
There...
Manual - Page 7

... mode, press Smart+ Button to intuitionally access common system setup as well as GIGABYTE exclusive utilities. You can activate GIGABYTE Smart Manager by double clicking on the shortcut icon on the purchased models. Press"Shutdown" button to enter operating system. Press"BIOS Setup Utility" button to enter GIGABYTE Smart Recovery. Press"Smart Recovery" button to enter...
Manual - Page 8

...Items: Buffer Bracket*1 ●● Please remove the power cord and battery first, and Follow the Step 1~4 for installing the HDD.
1
1
2
2
• Take off the labeled release paper and
place the HDD within the dotted...with HDD/SSD.
4 2
• Once connected -
English
Installing the HDD on and fasten the screws. release paper
3
2
1
• Fold the Mylar as shown in blue.
Manual - Page 9

.../index.aspx CAUTION
●● GIGABYTE will take no responsibility for installing the SSD.
1
1
bracket
• Open the back cover or get the ...
8
Installing a 2nd mSATA SSD on local conditions. Fasten both mSATA SSDs onto the motherboard with bracket.
• Push the mSATAs lightly until the bracket falls in the box, you send your notebook to an authorized GIGABYTE service center if...
Manual - Page 10

... "RAID".
• Press F10 to save and exit. English
Setup Your System for RAID 0/1
9
WARNING
●● Please backup your data before you may set Name to your laptop. Different capacity is complete and restart the laptop...●● RAID 1 needs two storage drives of the same specification and capacity in your laptop. ●● R AID 0 needs two storage drives of the same...
Manual - Page 11
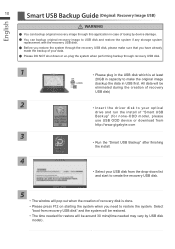
... Guide ...
made the backup of "Smart USB
Backup" (for none-ODD model, please
use USB ODD device or download from the drop-down ...USB disk and restore the system if any storage system
replacement with the recovery USB disk. ●● Before ... te.c o m
3
• Run the "Smart USB Backup" after finishing the install.
4
• Select your data. ●● Please DO NOT shut down list...
Manual - Page 12
... or the partition deleted, the recovery option will no longer be available and a recovery service will be needed.
˙˙The recovery function is plugged in. All ready to ... system will be reset to factory default settings.
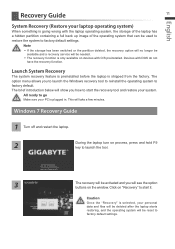
The option menu allows you will be used to restore the system to factory default settings. Windows 7 Recovery Guide
1 Turn off and restart the laptop....
Manual - Page 13

.... English
12
4
5
A progress indicator bar will be lost. Windows 8 Recovery Guide
1 Turn off the laptop. Caution: All personal data and files will show on process, press and hold F9 key to remove all of languages.
4
Choose "Troubleshoot" to enter the recovery settings. (Also you can choose "Continue" to exit recovery system and continue...
Manual - Page 14

... installed from loading. Automatic Repair Fix problems that keep Windows from discs or websites will be removed. ˙˙A list of your personal files and apps will be removed. ˙˙Your PC settings will be restored to factory default settings.
▓▓ Advanced options
System Restore Use a restore point recorded on your PC's UEFI firmware...
Manual - Page 15

... key to launch the tool.
3
Choose "Troubleshoot" to enter the recovery settings. (Also you can choose "Continue" to ...Guide
1 Turn off and restart the laptop. 2
During the laptop turn on "Reset" to execute recovery function.]
Here are what will happen ˙˙Your files and personalization settings won't be changed. ˙˙Your PC settings will be restored to factory default settings...
Manual - Page 16

Automatic Repair Fix problems that keep Windows from loading. Startup Settings Change Windows Startup behavior. English
15
▓▓ Advanced options
System Restore Use a restore point recorded on your PC's UEFI firmware.
UEFI Firmware Settings Change settings in your PC to restore Windows.
Command Prompt Use the Command Prompt for advanced trobleshooting. System Image Recovery ...
Manual - Page 17

16
Appendix
English
„„ Warranty & Service :
Warranty and service and related information please refer to the warranty card or GIGABYTE service website as the below link: http://www.gigabyte.com/support-downloads/technical-support.aspx
„„ FAQ :
FAQ (Frequent Asked Questions) please refer to the below link: http://www.gigabyte.com/support-downloads/faq.aspx
Gigabyte P25X v2 Reviews
We have not received any reviews for Gigabyte yet.