Manual
Page 3
... for home and other limited viewing uses only unless otherwise authorized by Macrovision. patents and other intellectual property rights. Copyright © 2006 GIGABYTE TECHNOLOGY CO., LTD Copyright by GIGA-BYTE TECHNOLOGY CO., LTD. ("GBT"). GV-RX195P256D-RH Radeon X1950 Pro Graphics Accelerator User's Manual Rev. 101 12MD-RX195P2R-101R * The WEEE marking on VGA card, this may be handed over to rapid change in technology, some of the specifications might be authorized by...
... for home and other limited viewing uses only unless otherwise authorized by Macrovision. patents and other intellectual property rights. Copyright © 2006 GIGABYTE TECHNOLOGY CO., LTD Copyright by GIGA-BYTE TECHNOLOGY CO., LTD. ("GBT"). GV-RX195P256D-RH Radeon X1950 Pro Graphics Accelerator User's Manual Rev. 101 12MD-RX195P2R-101R * The WEEE marking on VGA card, this may be handed over to rapid change in technology, some of the specifications might be authorized by...
Manual
Page 4
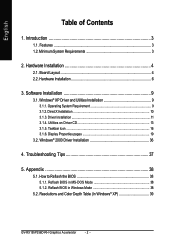
... XP Driver and Utilities Installation 9 3.1.1. Troubleshooting Tips 37 5. Reflash BIOS in MS-DOS Mode 38 5.1.2. English Table of Contents 1. Appendix 38 5.1. How to Reflash the BIOS 38 5.1.1. Features ...3 1.2. DirectX Installation 10 3.1.3. Driver Installation 11 3.1.4. Resolutions and Color Depth Table (In Windows® XP 39 GV-RX195P256D-RH Graphics Accelerator - 2 - Board Layout 4 2.2. Windows® 2000 Driver Installation 36 4. Utilities on Driver CD 13 3.1.5. Display Properties pages 19 3.2. Taskbar Icon 16 3.1.6. Introduction 3 1.1. Software...
... XP Driver and Utilities Installation 9 3.1.1. Troubleshooting Tips 37 5. Reflash BIOS in MS-DOS Mode 38 5.1.2. English Table of Contents 1. Appendix 38 5.1. How to Reflash the BIOS 38 5.1.1. Features ...3 1.2. DirectX Installation 10 3.1.3. Driver Installation 11 3.1.4. Resolutions and Color Depth Table (In Windows® XP 39 GV-RX195P256D-RH Graphics Accelerator - 2 - Board Layout 4 2.2. Windows® 2000 Driver Installation 36 4. Utilities on Driver CD 13 3.1.5. Display Properties pages 19 3.2. Taskbar Icon 16 3.1.6. Introduction 3 1.1. Software...
Manual
Page 5
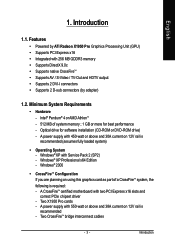
Minimum System Requirements • Hardware - Windows® 2000 • CrossFireTM Configuration If you are planning on using this graphics card as part of system memory ; 1 GB or more for software installation (CD-ROM or DVD-ROM drive) - Two CrossFireTM bridge interconnect cables - 3 - Features • Powered by adapter) 1.2. Windows® XP with 256 MB GDDR3 memory • Supports DirectX 9.0c • Supports native CrossFireTM • Supports AV / S-Video / TV-Out and HDTV output • Supports 2 DVI-I connectors • Supports 2 D-sub connectors (by ATi...
Minimum System Requirements • Hardware - Windows® 2000 • CrossFireTM Configuration If you are planning on using this graphics card as part of system memory ; 1 GB or more for software installation (CD-ROM or DVD-ROM drive) - Two CrossFireTM bridge interconnect cables - 3 - Features • Powered by adapter) 1.2. Windows® XP with 256 MB GDDR3 memory • Supports DirectX 9.0c • Supports native CrossFireTM • Supports AV / S-Video / TV-Out and HDTV output • Supports 2 DVI-I connectors • Supports 2 D-sub connectors (by ATi...
Manual
Page 6
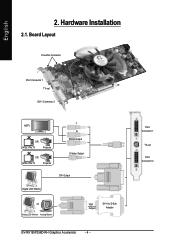
Board Layout CrossFire Connector DVI-I Connector 1 TV-out DVI-I Connector 2 HDTV OR NTSC / PAL TV Projector OR NTSC / PAL TV Projector Y Pr Pb/AV Output S-Video Output DVI Output Digital LCD Monitor OR Analog LCD Monitor Analog Monitor VGA Output DVI-I Connector 2 Hardware Installation 2.1. DVI-I Connector 1 TV-out DVI-I to D-Sub Adapter GV-RX195P256D-RH Graphics Accelerator - 4 - English 2.
Board Layout CrossFire Connector DVI-I Connector 1 TV-out DVI-I Connector 2 HDTV OR NTSC / PAL TV Projector OR NTSC / PAL TV Projector Y Pr Pb/AV Output S-Video Output DVI Output Digital LCD Monitor OR Analog LCD Monitor Analog Monitor VGA Output DVI-I Connector 2 Hardware Installation 2.1. DVI-I Connector 1 TV-out DVI-I to D-Sub Adapter GV-RX195P256D-RH Graphics Accelerator - 4 - English 2.
Manual
Page 8
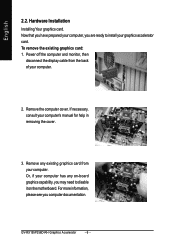
... the display cable from your computer. 2. Remove the computer cover. Remove any on the motherboard. For more information, please see you may need to install your computer's manual for help in removing the cover. 3. Or, if your computer has any existing graphics card from the back of your computer. Hardware Installation Installing Your graphics card. If necessary, consult your graphics accelerator card. GV-RX195P256D-RH Graphics Accelerator - 6 - To remove the existing graphics card...
... the display cable from your computer. 2. Remove the computer cover. Remove any on the motherboard. For more information, please see you may need to install your computer's manual for help in removing the cover. 3. Or, if your computer has any existing graphics card from the back of your computer. Hardware Installation Installing Your graphics card. If necessary, consult your graphics accelerator card. GV-RX195P256D-RH Graphics Accelerator - 6 - To remove the existing graphics card...
Manual
Page 9
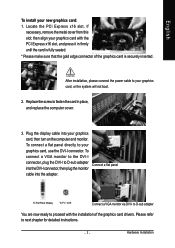
... graphics card, use the DVI-I connector. Locate the PCI Express x16 slot. To connect a VGA monitor to the DVI-I connector, plug the DVI-I connector, then plug the monitor cable into the adapter. After installation, please connect the power cable to D-sub adapter into your new graphics card: 1. Please refer to fasten the card in firmly until the card is fully seated. * Please make sure that the gold edge connector of the graphics card drivers. Replace the screw to next chapter for detailed instructions. - 7 - Hardware Installation...
... graphics card, use the DVI-I connector. Locate the PCI Express x16 slot. To connect a VGA monitor to the DVI-I connector, plug the DVI-I connector, then plug the monitor cable into the adapter. After installation, please connect the power cable to D-sub adapter into your new graphics card: 1. Please refer to fasten the card in firmly until the card is fully seated. * Please make sure that the gold edge connector of the graphics card drivers. Replace the screw to next chapter for detailed instructions. - 7 - Hardware Installation...
Manual
Page 10
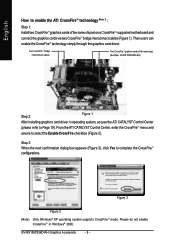
English How to enable the ATI CrossFireTM technology (Note 1) : Step 1: Install two CrossFireTM graphics cards of the same type. (Example: GV-RX195P256D-RH) Step 2: Figure 1 After installing graphics card driver in Windows® 2000. Then users can enable the CrossFireTM technology simply through the graphics card driver. Two CrossFireTM bridge interconnect cables. Two CrossFireTM graphics cards of the same chipset on a CrossFireTM-supported motherboard and connect the graphics cards via two CrossFireTM bridge interconnect cables (Figure 1). Step 3: When the next confirmation...
English How to enable the ATI CrossFireTM technology (Note 1) : Step 1: Install two CrossFireTM graphics cards of the same type. (Example: GV-RX195P256D-RH) Step 2: Figure 1 After installing graphics card driver in Windows® 2000. Then users can enable the CrossFireTM technology simply through the graphics card driver. Two CrossFireTM bridge interconnect cables. Two CrossFireTM graphics cards of the same chipset on a CrossFireTM-supported motherboard and connect the graphics cards via two CrossFireTM bridge interconnect cables (Figure 1). Step 3: When the next confirmation...
Manual
Page 11
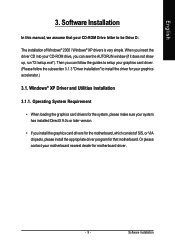
... window (if it does not show up, run "D:\setup.exe"). Then you install the graphics card drivers for motherboard driver. - 9 - Operating System Requirement • When loading the graphics card drivers for the system, please make sure your graphics card driver. (Please follow the subsection 3.1.3 "Driver installation" to be Drive D: The installation of SIS, or VIA chipsets, please install the appropriate driver program for that your CD-ROM Drive letter to install the driver for your motherboard...
... window (if it does not show up, run "D:\setup.exe"). Then you install the graphics card drivers for motherboard driver. - 9 - Operating System Requirement • When loading the graphics card drivers for the system, please make sure your graphics card driver. (Please follow the subsection 3.1.3 "Driver installation" to be Drive D: The installation of SIS, or VIA chipsets, please install the appropriate driver program for that your CD-ROM Drive letter to install the driver for your motherboard...

Manual
Page 12
... 1. When autorun window show up, click the Install DirectX 9 item. Click the Install DirectX 9 item. Step 3. Installing the components. DirectX Installation Install Microsoft DirectX to enable 3D hardware acceleration support for Windows® 2000 or Windows® XP to install DirectX separately. Step 2. Then the DirectX 9 installation is completed. English 3.1.2. Step 4. Choose I accept the agreement and click the Next button. Click Finish to restart computer. Click the Next button. GV-RX195P256D-RH Graphics Accelerator - 10 -
... 1. When autorun window show up, click the Install DirectX 9 item. Click the Install DirectX 9 item. Step 3. Installing the components. DirectX Installation Install Microsoft DirectX to enable 3D hardware acceleration support for Windows® 2000 or Windows® XP to install DirectX separately. Step 2. Then the DirectX 9 installation is completed. English 3.1.2. Step 4. Choose I accept the agreement and click the Next button. Click Finish to restart computer. Click the Next button. GV-RX195P256D-RH Graphics Accelerator - 10 -
Manual
Page 13
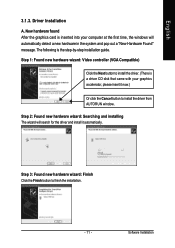
Step 1: Found new hardware wizard: Video controller (VGA Compatible) Click the Next button to install the driver. (There is a driver CD disk that came with your computer at the first time, the windows will search for the driver and install it now.) Or click the Cancel button to finish the installation. - 11 - New hardware found After the graphics card is the step-by-step installation guide. Software Installation Step 2: Found new hardware wizard: Searching and...
Step 1: Found new hardware wizard: Video controller (VGA Compatible) Click the Next button to install the driver. (There is a driver CD disk that came with your computer at the first time, the windows will search for the driver and install it now.) Or click the Cancel button to finish the installation. - 11 - New hardware found After the graphics card is the step-by-step installation guide. Software Installation Step 2: Found new hardware wizard: Searching and...
Manual
Page 14
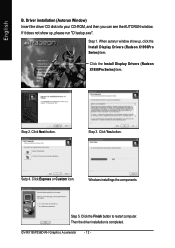
... driver installation is completed. GV-RX195P256D-RH Graphics Accelerator - 12 - Click the Finish button to restart computer. If it does not show up , please run "D:\setup.exe". Windows installings the components. Driver installation (Autorun Window) Insert the driver CD disk into your CD-ROM, and then you can see the AUTORUN window. Click Next button. Step 3. Click Yes button. Step 1. Step 2. Click the Install Display Drivers (Radeon X1950Pro Series) item. When autorun window...
... driver installation is completed. GV-RX195P256D-RH Graphics Accelerator - 12 - Click the Finish button to restart computer. If it does not show up , please run "D:\setup.exe". Windows installings the components. Driver installation (Autorun Window) Insert the driver CD disk into your CD-ROM, and then you can see the AUTORUN window. Click Next button. Step 3. Click Yes button. Step 1. Step 2. Click the Install Display Drivers (Radeon X1950Pro Series) item. When autorun window...
Manual
Page 17
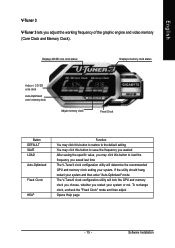
... saving the specific value, you may click this button to load the frequency you adjust the working frequency of the graphic engine and video memory (Core Clock and Memory Clock). Software Installation English V-Tuner 3 V-Tuner 3 lets you saved last time The V-Tuner3 clock configuration utility will lock the GPU and memory clock you choose, whether you restart your system. To rechange clock, uncheck the "Fixed Clock" mode and then adjust Opens...
... saving the specific value, you may click this button to load the frequency you adjust the working frequency of the graphic engine and video memory (Core Clock and Memory Clock). Software Installation English V-Tuner 3 V-Tuner 3 lets you saved last time The V-Tuner3 clock configuration utility will lock the GPU and memory clock you choose, whether you restart your system. To rechange clock, uncheck the "Fixed Clock" mode and then adjust Opens...
Manual
Page 18
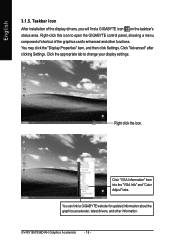
... "VGA Info" and "Color Adjust" tabs. GV-RX195P256D-RH Graphics Accelerator - 16 - Click the appropriate tab to GIGABYTE website for updated information about the graphics accelerator, latest drivers, and other functions. English 3.1.5. Click "Advanced" after clicking Settings. Right-click this icon to open the GIGABYTE control panel, showing a menu composed of shortcut of the display drivers, you will find a GIGABYTE icon on the taskbar's status area. You can link to change...
... "VGA Info" and "Color Adjust" tabs. GV-RX195P256D-RH Graphics Accelerator - 16 - Click the appropriate tab to GIGABYTE website for updated information about the graphics accelerator, latest drivers, and other functions. English 3.1.5. Click "Advanced" after clicking Settings. Right-click this icon to open the GIGABYTE control panel, showing a menu composed of shortcut of the display drivers, you will find a GIGABYTE icon on the taskbar's status area. You can link to change...
Manual
Page 20
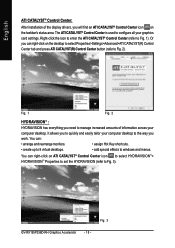
... rearrange monitors. • assign Hot Key shortcuts. • create up to 9 virtual desktops. • add special effects to Fig. 1). Fig. 3 GV-RX195P256D-RH Graphics Accelerator - 18 - Fig. 1 Fig. 2 HYDRAVISIONTM : HYDRAVISION has everything you need to Fig. 2). You can right-click on the taskbar's status area. English ATI CATALYST® Control Center: After installation of the display drivers, you will find an ATI CATALYST® Control Center icon...
... rearrange monitors. • assign Hot Key shortcuts. • create up to 9 virtual desktops. • add special effects to Fig. 1). Fig. 3 GV-RX195P256D-RH Graphics Accelerator - 18 - Fig. 1 Fig. 2 HYDRAVISIONTM : HYDRAVISION has everything you need to Fig. 2). You can right-click on the taskbar's status area. English ATI CATALYST® Control Center: After installation of the display drivers, you will find an ATI CATALYST® Control Center icon...
Manual
Page 21
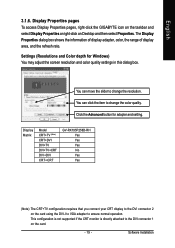
... the refresh rate. Settings (Resolutions and Color depth for adapter and setting. Software Installation Click the Advanced button for Windows) You may adjust the screen resolution and color quality settings in this dialog box. You can move the slider to the DVI connector 2 on Desktop and then select Properties. Display Matrix Model CRT+TV (Note) CRT+DVI DVI+TV DVI+TV+CRT DVI +DVI CRT+CRT GV-RX195P256D-RH Yes Yes Yes No Yes Yes (Note) The CRT+TV configuration requires that you connect your CRT display to change the color quality...
... the refresh rate. Settings (Resolutions and Color depth for adapter and setting. Software Installation Click the Advanced button for Windows) You may adjust the screen resolution and color quality settings in this dialog box. You can move the slider to the DVI connector 2 on Desktop and then select Properties. Display Matrix Model CRT+TV (Note) CRT+DVI DVI+TV DVI+TV+CRT DVI +DVI CRT+CRT GV-RX195P256D-RH Yes Yes Yes No Yes Yes (Note) The CRT+TV configuration requires that you connect your CRT display to change the color quality...
Manual
Page 24
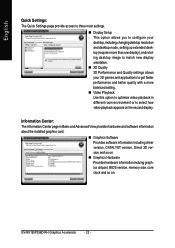
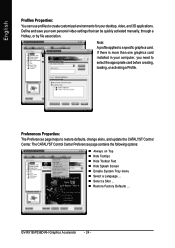
GV-RX195P256D-RH Graphics Accelerator - 22 - Information Center: The Information Center page in different room environment or to optimize video playback in Basic and Advanced View provides hardware and software information about the installed graphics card. „ Graphics Software Provides software information including driver version, CATALYST version, Direct 3D version and so on. „ Graphics Hardware Provides hardware information incluing graphics chipset, BIOS version, memory size, core clock and so on the second display. English Quick Settings: The Quick Settings page provide...
GV-RX195P256D-RH Graphics Accelerator - 22 - Information Center: The Information Center page in different room environment or to optimize video playback in Basic and Advanced View provides hardware and software information about the installed graphics card. „ Graphics Software Provides software information including driver version, CATALYST version, Direct 3D version and so on. „ Graphics Hardware Provides hardware information incluing graphics chipset, BIOS version, memory size, core clock and so on the second display. English Quick Settings: The Quick Settings page provide...
Manual
Page 26
.... GV-RX195P256D-RH Graphics Accelerator - 24 - The CATALYST Control Center Preferences page contains the following options: „ Always on Top „ Hide Tooltips „ Hide Toolbar Text „ Hide Splash Screen „ Enable System Tray menu „ Select a Language ... „ Select a Skin ... „ Restore Factory Defaults ... If there is more than one graphics card installed in your own personal video settings that can use profiles to restore defaults, change skins...
.... GV-RX195P256D-RH Graphics Accelerator - 24 - The CATALYST Control Center Preferences page contains the following options: „ Always on Top „ Hide Tooltips „ Hide Toolbar Text „ Hide Splash Screen „ Enable System Tray menu „ Select a Language ... „ Select a Skin ... „ Restore Factory Defaults ... If there is more than one graphics card installed in your own personal video settings that can use profiles to restore defaults, change skins...
Manual
Page 38
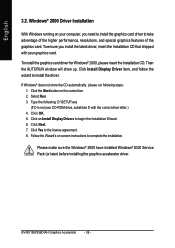
... steps: 1. Click Next. 7. GV-RX195P256D-RH Graphics Accelerator - 36 - To install the graphics card driver for Windows® 2000, please insert the Installation CD. Click the Start button on your computer, you install the latest driver, insert the Installation CD that shipped with your CD-ROM drive, substitute D with the correct drive letter.) 4. Click on -screen instructions to the license agreement. 8. English 3.2. Windows® 2000 Driver Installation With Windows running on the control bar. 2.
... steps: 1. Click Next. 7. GV-RX195P256D-RH Graphics Accelerator - 36 - To install the graphics card driver for Windows® 2000, please insert the Installation CD. Click the Start button on your computer, you install the latest driver, insert the Installation CD that shipped with your CD-ROM drive, substitute D with the correct drive letter.) 4. Click on -screen instructions to the license agreement. 8. English 3.2. Windows® 2000 Driver Installation With Windows running on the control bar. 2.
Manual
Page 39
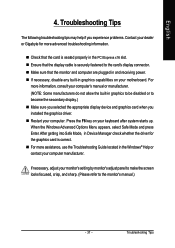
... card's display connector. „ Make sure that the monitor and computer are plugged in and receiving power. „ If necessary, disable any built-in graphics capabilities on your motherboard. After getting into Safe Mode, in Device Manager check whether the driver for more advanced troubleshooting information. „ Check that the card is seated properly in the PCI Express x16 slot. „ Ensure that the display cable...
... card's display connector. „ Make sure that the monitor and computer are plugged in and receiving power. „ If necessary, disable any built-in graphics capabilities on your motherboard. After getting into Safe Mode, in Device Manager check whether the driver for more advanced troubleshooting information. „ Check that the card is seated properly in the PCI Express x16 slot. „ Ensure that the display cable...
Manual
Page 40
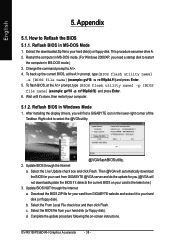
... card from GIGABYTE website and extract it detects the current BIOS on -screen instructions. Download the BIOS ZIP file for your card from GIGABYTE @VGA server and do the update for your hard disk(s) or floppy disk. GV-RX195P256D-RH Graphics Accelerator - 38 - Extract the downloaded Zip file to select the @VGA utility. @VGA flash BIOS utility. 2. c. How to A:\>. 4. Reflash BIOS in MS-DOS Mode 1. Select the From Local File check box and then click Flash. Reflash BIOS in Windows Mode 1. Change...
... card from GIGABYTE website and extract it detects the current BIOS on -screen instructions. Download the BIOS ZIP file for your card from GIGABYTE @VGA server and do the update for your hard disk(s) or floppy disk. GV-RX195P256D-RH Graphics Accelerator - 38 - Extract the downloaded Zip file to select the @VGA utility. @VGA flash BIOS utility. 2. c. How to A:\>. 4. Reflash BIOS in MS-DOS Mode 1. Select the From Local File check box and then click Flash. Reflash BIOS in Windows Mode 1. Change...


