Manual
Page 1
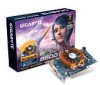
... GIGA-BYTE TECHNOLOGY CO., LTD. ("GBT"). The author assumes no responsibility for home and other intellectual property rights. Due to update the information contained herein. GV-NX88T512HP/ GV-NX88T512H/ GV-NX88G384H/ GV-NX96G384H/ GV-NX88T256H GeForceTM 8800/9600 Graphics Accelerator User's Manual Rev. 103 12MD-NX88T5HP-103R Copyright © 2008...
... GIGA-BYTE TECHNOLOGY CO., LTD. ("GBT"). The author assumes no responsibility for home and other intellectual property rights. Due to update the information contained herein. GV-NX88T512HP/ GV-NX88T512H/ GV-NX88G384H/ GV-NX96G384H/ GV-NX88T256H GeForceTM 8800/9600 Graphics Accelerator User's Manual Rev. 103 12MD-NX88T5HP-103R Copyright © 2008...
Manual
Page 6
...memory (For GV-NX88T512HP/512H only) • Integrated with 384 MB GDDR3 memory (For GV-NX88G384H/GV-NX96G384H only) • Integrated with two x16 physical connectors. GV-NX88T512H(P)/GV-NX88G384H/GV-NX96G384H/GV-NX88T256H) and...GV-NX88/NX96 Series Graphics Accelerator - 6 - Introduction 1.1. Optical drive for best performance - An SLI certified motherboard with Service Pack 2 (SP2) - Graphics cards working in an SLI configuration must • Operating System - Intel® Pentium® 4 or AMD AthlonTM - 128 MB of an SLI system, the following are required: - GIGABYTE...
...memory (For GV-NX88T512HP/512H only) • Integrated with 384 MB GDDR3 memory (For GV-NX88G384H/GV-NX96G384H only) • Integrated with two x16 physical connectors. GV-NX88T512H(P)/GV-NX88G384H/GV-NX96G384H/GV-NX88T256H) and...GV-NX88/NX96 Series Graphics Accelerator - 6 - Introduction 1.1. Optical drive for best performance - An SLI certified motherboard with Service Pack 2 (SP2) - Graphics cards working in an SLI configuration must • Operating System - Intel® Pentium® 4 or AMD AthlonTM - 128 MB of an SLI system, the following are required: - GIGABYTE...
Manual
Page 7
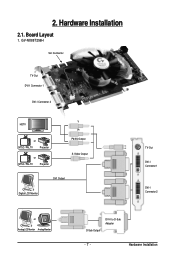
2. Hardware Installation GV-NX88T256H SLI Connector TV-Out DVI-I Connector 1 DVI-I Connector 2 HDTV or NTSC / PAL TV Projector or NTSC / PAL TV Projector Y Pr Pb/AV Output S-Video Output DVI Output Digital LCD Monitor TV-Out DVI-I Connector 1 DVI-I Connector 2 or Analog LCD Monitor Analog Monitor D-Sub Output DVI-I to D-Sub Adapter - 7 - Hardware Installation 2.1. Board Layout 1.
2. Hardware Installation GV-NX88T256H SLI Connector TV-Out DVI-I Connector 1 DVI-I Connector 2 HDTV or NTSC / PAL TV Projector or NTSC / PAL TV Projector Y Pr Pb/AV Output S-Video Output DVI Output Digital LCD Monitor TV-Out DVI-I Connector 1 DVI-I Connector 2 or Analog LCD Monitor Analog Monitor D-Sub Output DVI-I to D-Sub Adapter - 7 - Hardware Installation 2.1. Board Layout 1.

Manual
Page 10
Step 2. Remove any existing graphics card from the back of your graphics card. If necessary, consult your computer. Hardware Installation Now that you have prepared your computer, you are ready to install your computer. To remove the existing graphics card: Step 1. GV-NX88/NX96 Series Graphics Accelerator - 10 - Remove the computer cover. Step 3. 2.2. Power off the computer and monitor, then disconnect the display cable from your computer's manual for help in removing the cover.
Step 2. Remove any existing graphics card from the back of your graphics card. If necessary, consult your computer. Hardware Installation Now that you have prepared your computer, you are ready to install your computer. To remove the existing graphics card: Step 1. GV-NX88/NX96 Series Graphics Accelerator - 10 - Remove the computer cover. Step 3. 2.2. Power off the computer and monitor, then disconnect the display cable from your computer's manual for help in removing the cover.
Manual
Page 12
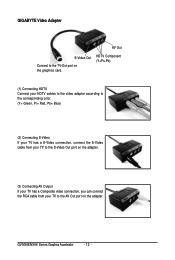
GIGABYTE Video Adapter AV Out S-Video Out Connect to the AV Out port on the graphics card. HDTV Component (Y+Pr+Pb) (1) Connecting HDTV Connect your HDTV ... Output If your TV has a Composite video connection, you can connect the RCA cable from your TV to the TV-Out port on the adapter. GV-NX88/NX96 Series Graphics Accelerator - 12 -
GIGABYTE Video Adapter AV Out S-Video Out Connect to the AV Out port on the graphics card. HDTV Component (Y+Pr+Pb) (1) Connecting HDTV Connect your HDTV ... Output If your TV has a Composite video connection, you can connect the RCA cable from your TV to the TV-Out port on the adapter. GV-NX88/NX96 Series Graphics Accelerator - 12 -

Manual
Page 13
How NVIDIA® SLITM technology works: In an SLI configuration, two SLI-ready graphics cards of the same type. (Example: GV-NX88X768H-RH) - 13 - Hardware Installation The picture below shows that provides two x16 PCI Express slots to scale graphics performance. SLI bridge connector (provided by motherboard manufacturer) Two SLI-ready graphics cards of the same model and the same manufacturers are connected together via SLI bridge connector in a system that two graphics cards are linked in parallel in an SLI configuration.
How NVIDIA® SLITM technology works: In an SLI configuration, two SLI-ready graphics cards of the same type. (Example: GV-NX88X768H-RH) - 13 - Hardware Installation The picture below shows that provides two x16 PCI Express slots to scale graphics performance. SLI bridge connector (provided by motherboard manufacturer) Two SLI-ready graphics cards of the same model and the same manufacturers are connected together via SLI bridge connector in a system that two graphics cards are linked in parallel in an SLI configuration.
Manual
Page 14
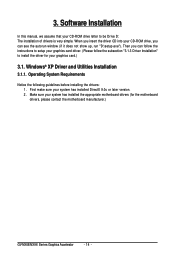
... has installed the appropriate motherboard drivers (for your CD-ROM drive letter to install the driver for the motherboard drivers, please contact the motherboard manufacturer.) GV-NX88/NX96 Series Graphics Accelerator - 14 - Operating System Requirements Notice the following guidelines before installing the drivers: 1. Windows® XP Driver and Utilities Installation 3.1.1. Software...
... has installed the appropriate motherboard drivers (for your CD-ROM drive letter to install the driver for the motherboard drivers, please contact the motherboard manufacturer.) GV-NX88/NX96 Series Graphics Accelerator - 14 - Operating System Requirements Notice the following guidelines before installing the drivers: 1. Windows® XP Driver and Utilities Installation 3.1.1. Software...
Manual
Page 16
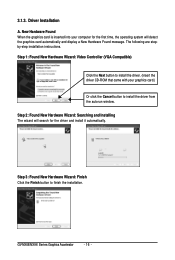
... Click the Finish button to install the driver. (Insert the driver CD-ROM that came with your computer for the driver and install it automatically. GV-NX88/NX96 Series Graphics Accelerator - 16 - 3.1.3. New Hardware Found When the graphics card is inserted into your graphics card.) Or click the Cancel button to...
... Click the Finish button to install the driver. (Insert the driver CD-ROM that came with your computer for the driver and install it automatically. GV-NX88/NX96 Series Graphics Accelerator - 16 - 3.1.3. New Hardware Found When the graphics card is inserted into your graphics card.) Or click the Cancel button to...
Manual
Page 18
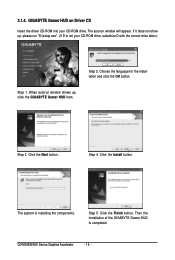
... OK button. Click the Next button. GV-NX88/NX96 Series Graphics Accelerator - 18 - When autorun window shows up , please run "D:\setup.exe". (If D is not your CD-ROM drive. Step 5. Step 1. Step 3. Step 4. Click the Finish button. GIGABYTE Gamer HUD on Driver CD Insert the ...driver CD-ROM into your CD-ROM drive, substitute D with the correct drive letter.) Step 2. The autorun window will appear. The system is completed. Then the installation of the GIGABYTE Gamer HUD is installing the components....
... OK button. Click the Next button. GV-NX88/NX96 Series Graphics Accelerator - 18 - When autorun window shows up , please run "D:\setup.exe". (If D is not your CD-ROM drive. Step 5. Step 1. Step 3. Step 4. Click the Finish button. GIGABYTE Gamer HUD on Driver CD Insert the ...driver CD-ROM into your CD-ROM drive, substitute D with the correct drive letter.) Step 2. The autorun window will appear. The system is completed. Then the installation of the GIGABYTE Gamer HUD is installing the components....

Manual
Page 20
You can adjust the properties of the graphics card here. Taskbar Icon After installing the graphics card driver, you will find an NVIDIA icon in your system tray. Click this icon to enter the NVIDIA Control Center. GV-NX88/NX96 Series Graphics Accelerator - 20 - Right click the NVIDIA icon to open the control panel. 3.1.5.
You can adjust the properties of the graphics card here. Taskbar Icon After installing the graphics card driver, you will find an NVIDIA icon in your system tray. Click this icon to enter the NVIDIA Control Center. GV-NX88/NX96 Series Graphics Accelerator - 20 - Right click the NVIDIA icon to open the control panel. 3.1.5.
Manual
Page 22
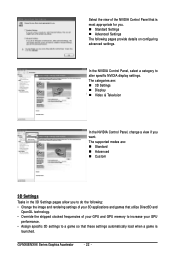
... your 3D applications and games that utilize Direct3D and OpenGL technology. • Override the shipped clocked frequencies of the NVIDIA Control Panel that is launched. GV-NX88/NX96 Series Graphics Accelerator - 22 - The supported modes are : „ 3D Settings „ Display „ Video & Television In the NVIDIA Control Panel, change a view...
... your 3D applications and games that utilize Direct3D and OpenGL technology. • Override the shipped clocked frequencies of the NVIDIA Control Panel that is launched. GV-NX88/NX96 Series Graphics Accelerator - 22 - The supported modes are : „ 3D Settings „ Display „ Video & Television In the NVIDIA Control Panel, change a view...

Manual
Page 24
Display A variety of display features enable you connect two monitors. GV-NX88/NX96 Series Graphics Accelerator - 24 - Tasks in the Display pages allow you to do the following: • Run display optimization wizard • Move CRT ...
Display A variety of display features enable you connect two monitors. GV-NX88/NX96 Series Graphics Accelerator - 24 - Tasks in the Display pages allow you to do the following: • Run display optimization wizard • Move CRT ...
Manual
Page 26
The Advanced Timing page enables you to adjust timings for analog CRT and DVI connections. GV-NX88/NX96 Series Graphics Accelerator - 26 - „ Rotate Display The NVIDIA Rotate features enable you to change the orientation of your desktop to match the ...
The Advanced Timing page enables you to adjust timings for analog CRT and DVI connections. GV-NX88/NX96 Series Graphics Accelerator - 26 - „ Rotate Display The NVIDIA Rotate features enable you to change the orientation of your desktop to match the ...

Manual
Page 28
... Model CRT+TV CRT+DVI DVI+TV DVI+TV+CRT DVI +DVI CRT+CRT GV-NX88T512H(P) Yes Yes Yes No Yes Yes GV-NX88(96)G384H Yes Yes Yes No Yes Yes GV-NX88T256H Yes Yes Yes NO Yes Yes GV-NX88/NX96 Series Graphics Accelerator - 28 - Vertical Span Mode (4) Configured independently from each...
... Model CRT+TV CRT+DVI DVI+TV DVI+TV+CRT DVI +DVI CRT+CRT GV-NX88T512H(P) Yes Yes Yes No Yes Yes GV-NX88(96)G384H Yes Yes Yes No Yes Yes GV-NX88T256H Yes Yes Yes NO Yes Yes GV-NX88/NX96 Series Graphics Accelerator - 28 - Vertical Span Mode (4) Configured independently from each...

Manual
Page 30
.... Connect the TV Out cable from the adapter to the corresponding color. (Y= Green, Pr= Red, Pb= Blue). Step 4: Select Component in the Video & Television page. GV-NX88/NX96 Series Graphics Accelerator - 30 - Step 1: Connect the HDTV component cable to the adapter according to the TV Out port on the specifications of...
.... Connect the TV Out cable from the adapter to the corresponding color. (Y= Green, Pr= Red, Pb= Blue). Step 4: Select Component in the Video & Television page. GV-NX88/NX96 Series Graphics Accelerator - 30 - Step 1: Connect the HDTV component cable to the adapter according to the TV Out port on the specifications of...
Manual
Page 32
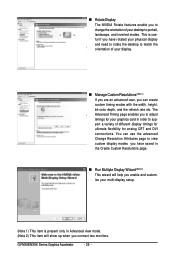
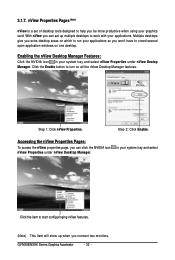
... features. (Note) This item will show up multiple desktops to crowd several open application windows on all the nView Desktop Manager features. Step 2: Click Enable. GV-NX88/NX96 Series Graphics Accelerator - 32 -
... features. (Note) This item will show up multiple desktops to crowd several open application windows on all the nView Desktop Manager features. Step 2: Click Enable. GV-NX88/NX96 Series Graphics Accelerator - 32 -
Manual
Page 34
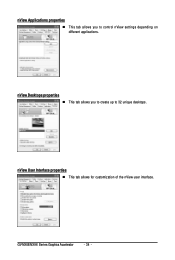
GV-NX88/NX96 Series Graphics Accelerator - 34 - nView User Interface properties „ This tab allows for customization of the nView user interface. nView Applications properties „ This tab allows you to create up to control nView settings depending on different applications. nView Desktops properties „ This tab allows you to 32 unique desktops.
GV-NX88/NX96 Series Graphics Accelerator - 34 - nView User Interface properties „ This tab allows for customization of the nView user interface. nView Applications properties „ This tab allows you to create up to control nView settings depending on different applications. nView Desktops properties „ This tab allows you to 32 unique desktops.
Manual
Page 36
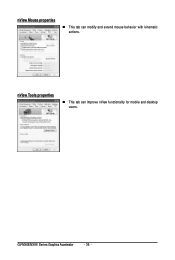
nView Mouse properties „ This tab can improve nView functionality for mobile and desktop users. GV-NX88/NX96 Series Graphics Accelerator - 36 - nView Tools properties „ This tab can modify and extend mouse behavior with kinematic actions.
nView Mouse properties „ This tab can improve nView functionality for mobile and desktop users. GV-NX88/NX96 Series Graphics Accelerator - 36 - nView Tools properties „ This tab can modify and extend mouse behavior with kinematic actions.

Manual
Page 38
....f1) and press Enter. 5. Extract the downloaded Zip file to restart the computer in MS-DOS mode. (You may need a startup disk to your computer. GV-NX88/NX96 Series Graphics Accelerator - 38 - Appendix 5.1. Restart the computer in MS-DOS mode.) 3.
....f1) and press Enter. 5. Extract the downloaded Zip file to restart the computer in MS-DOS mode. (You may need a startup disk to your computer. GV-NX88/NX96 Series Graphics Accelerator - 38 - Appendix 5.1. Restart the computer in MS-DOS mode.) 3.

Manual
Page 40
The actual resolutions supported depend on the monitor you use. GV-NX88/NX96 Series Graphics Accelerator - 40 - Display Refresh Color Depth (bpp) Screen Rate 8bpp(256 color) 16bpp(65K color) 32bpp(16.7M) Resolution (Hz) Standard mode High mode True mode 1600 x 1200 60~100 3 3 3 120 3 3 X 1920 x 1080 (16:9) 60~85 3 3 3 100 3 3 X 1920 x 1200 (16:10) 60~85 3 3 3 100 3 3 X 1920 x 1440 60~85 3 3 3 2048 x 1536 60~85 3 3 3 2560 x 1600 60 3 3 3 (Dual-Link) * This table is for reference only.
The actual resolutions supported depend on the monitor you use. GV-NX88/NX96 Series Graphics Accelerator - 40 - Display Refresh Color Depth (bpp) Screen Rate 8bpp(256 color) 16bpp(65K color) 32bpp(16.7M) Resolution (Hz) Standard mode High mode True mode 1600 x 1200 60~100 3 3 3 120 3 3 X 1920 x 1080 (16:9) 60~85 3 3 3 100 3 3 X 1920 x 1200 (16:10) 60~85 3 3 3 100 3 3 X 1920 x 1440 60~85 3 3 3 2048 x 1536 60~85 3 3 3 2560 x 1600 60 3 3 3 (Dual-Link) * This table is for reference only.


