Manual
Page 7
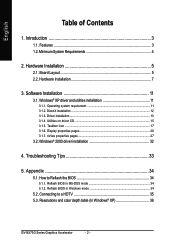
... product notice: This product incorporates copyright protection technology that may appear in this document nor does the author make a commitment to rapid change in technology, some of the specifications might be authorized by GIGA-BYTE TECHNOLOGY CO., LTD. ("GBT"). Reverse engineering or disassembly is protected by Macrovision. GV-NX73G128D / GV-NX73G128D-RH / GV-NX73G256D-RH GeForce™ 7300 GS Graphics Accelerator User's Manual Rev. 104 12MD-NX73G1D-104R * The WEEE marking on VGA card...
... product notice: This product incorporates copyright protection technology that may appear in this document nor does the author make a commitment to rapid change in technology, some of the specifications might be authorized by GIGA-BYTE TECHNOLOGY CO., LTD. ("GBT"). Reverse engineering or disassembly is protected by Macrovision. GV-NX73G128D / GV-NX73G128D-RH / GV-NX73G256D-RH GeForce™ 7300 GS Graphics Accelerator User's Manual Rev. 104 12MD-NX73G1D-104R * The WEEE marking on VGA card...
Manual
Page 8
... 11 3.1.1. DirectX installation ...12 3.1.3. Taskbar icon ...17 3.1.6. nView properties pages 27 3.2. Reflash BIOS in Windows mode 34 5.2. Connecting to Reflash the BIOS 34 5.1.1. Board Layout 5 2.2. Hardware Installation 7 3. Utilities on driver CD ...15 3.1.5. How to a HDTV 35 5.3. Resolutions and color depth table (In Windows® XP 36 GV-NX73G Series Graphics Accelerator - 2 - Minimum System Requirements 4 2. Display properties pages 20 3.1.7. Windows® 2000 driver installation 32 4. Reflash BIOS in MS-DOS mode 34 5.1.2. Troubleshooting Tips...
... 11 3.1.1. DirectX installation ...12 3.1.3. Taskbar icon ...17 3.1.6. nView properties pages 27 3.2. Reflash BIOS in Windows mode 34 5.2. Connecting to Reflash the BIOS 34 5.1.1. Board Layout 5 2.2. Hardware Installation 7 3. Utilities on driver CD ...15 3.1.5. How to a HDTV 35 5.3. Resolutions and color depth table (In Windows® XP 36 GV-NX73G Series Graphics Accelerator - 2 - Minimum System Requirements 4 2. Display properties pages 20 3.1.7. Windows® 2000 driver installation 32 4. Reflash BIOS in MS-DOS mode 34 5.1.2. Troubleshooting Tips...
Manual
Page 9
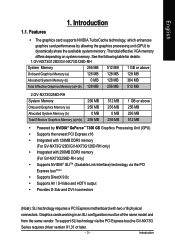
...® GeForce™ 7300 GS Graphics Processing Unit (GPU) • Supports the newest PCI Express x16 • Integrated with 128MB DDRII memory (For GV-NX73G128D/GV-NX73G128D-RH only) • Integrated with 256MB DDRII memory (For GV-NX73G256D-RH only) • Supports NVIDIA® SLITM (Scalable Link Interface) technology via the PCI Express bus,the GV-NX73G Series requires driver version 91.31 or later. - 3 - Graphics cards working in an SLI configuration must be of the same model and...
...® GeForce™ 7300 GS Graphics Processing Unit (GPU) • Supports the newest PCI Express x16 • Integrated with 128MB DDRII memory (For GV-NX73G128D/GV-NX73G128D-RH only) • Integrated with 256MB DDRII memory (For GV-NX73G256D-RH only) • Supports NVIDIA® SLITM (Scalable Link Interface) technology via the PCI Express bus,the GV-NX73G Series requires driver version 91.31 or later. - 3 - Graphics cards working in an SLI configuration must be of the same model and...
Manual
Page 13
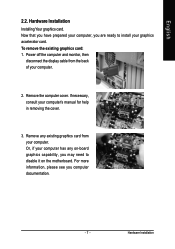
Hardware Installation Installing Your graphics card. Remove any on the motherboard. For more information, please see you are ready to disable it on -board graphics capability, you may need to install your graphics accelerator card. Hardware Installation Remove the computer cover. To remove the existing graphics card: 1. Power off the computer and monitor, then disconnect the display cable from your computer. 2. If necessary, consult your computer has any existing graphics card from the back of your...
Hardware Installation Installing Your graphics card. Remove any on the motherboard. For more information, please see you are ready to disable it on -board graphics capability, you may need to install your graphics accelerator card. Hardware Installation Remove the computer cover. To remove the existing graphics card: 1. Power off the computer and monitor, then disconnect the display cable from your computer. 2. If necessary, consult your computer has any existing graphics card from the back of your...
Manual
Page 14
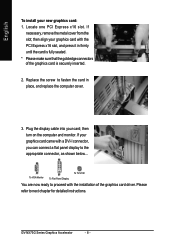
... now ready to the appropriate connector, as shown below... then align your graphics card came with the PCI Express x16 slot, and press it in place, and replace the computer cover. 3. If your graphics card with a DVI-I connector, you can connect a flat panel display to proceed with the installation of the graphics card is fully seated. * Please make sure that the gold edge connectors of the graphics card driver. GV-NX73G Series Graphics Accelerator - 8 - Please...
... now ready to the appropriate connector, as shown below... then align your graphics card came with the PCI Express x16 slot, and press it in place, and replace the computer cover. 3. If your graphics card with a DVI-I connector, you can connect a flat panel display to proceed with the installation of the graphics card is fully seated. * Please make sure that the gold edge connectors of the graphics card driver. GV-NX73G Series Graphics Accelerator - 8 - Please...
Manual
Page 15
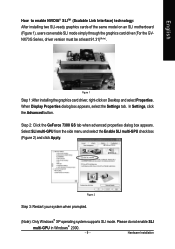
... on an SLI motherboard (Figure 1), users can enable SLI mode simply through the graphics card driver (For the GVNX73G Series, driver version must be at least 91.31)(Note). Hardware Installation Select SLI multi-GPU from the side menu and select the Enable SLI multi-GPU check box (Figure 2) and click Apply. Please do not enable SLI multi-GPU in Windows® 2000. - 9 - Step 2: Click the GeForce 7300 GS tab when advanced properties dialog box appears. When Display Properties dialog...
... on an SLI motherboard (Figure 1), users can enable SLI mode simply through the graphics card driver (For the GVNX73G Series, driver version must be at least 91.31)(Note). Hardware Installation Select SLI multi-GPU from the side menu and select the Enable SLI multi-GPU check box (Figure 2) and click Apply. Please do not enable SLI multi-GPU in Windows® 2000. - 9 - Step 2: Click the GeForce 7300 GS tab when advanced properties dialog box appears. When Display Properties dialog...
Manual
Page 17
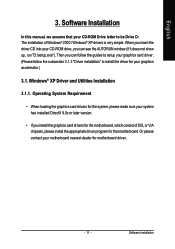
... drive, you can follow the guides to setup your graphics card driver. (Please follow the subsection 3.1.3 "Driver installation" to be Drive D: The installation of SIS, or VIA chipsets, please install the appropriate driver program for motherboard driver. - 11 - Then you install the graphics card drivers for the motherboard, which consist of Windows® 2000 / Windows® XP drivers is very simple. Software Installation Software Installation In this manual, we assume that your system has installed DirectX 9.0c or later version...
... drive, you can follow the guides to setup your graphics card driver. (Please follow the subsection 3.1.3 "Driver installation" to be Drive D: The installation of SIS, or VIA chipsets, please install the appropriate driver program for motherboard driver. - 11 - Then you install the graphics card drivers for the motherboard, which consist of Windows® 2000 / Windows® XP drivers is very simple. Software Installation Software Installation In this manual, we assume that your system has installed DirectX 9.0c or later version...
Manual
Page 19
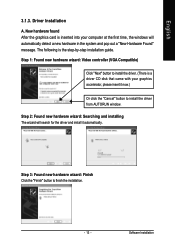
Step 1: Found new hardware wizard: Video controller (VGA Compatible) Click "Next" button to install the driver. (There is a driver CD disk that came with your computer at the first time, the windows will search for the driver and install it now.) Or click the "Cancel" button to finish the installation. - 13 - The following is inserted into your graphics accelerator, please insert it automatically. Step 3: Found new hardware wizard: Finish...
Step 1: Found new hardware wizard: Video controller (VGA Compatible) Click "Next" button to install the driver. (There is a driver CD disk that came with your computer at the first time, the windows will search for the driver and install it now.) Or click the "Cancel" button to finish the installation. - 13 - The following is inserted into your graphics accelerator, please insert it automatically. Step 3: Found new hardware wizard: Finish...
Manual
Page 22
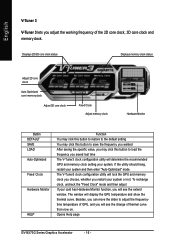
... "Fixed Clock" mode and then adjust If your card has Hardware Monitor function, you will display the GPU temperature and show the thermal curve. Besides, you can move the slider to load the frequency you saved last time The V-Tuner3 clock configuration utility will see the change of the 2D core clock, 3D core clock and memory clock. The window will see the extend window. Opens Help page GV-NX73G Series Graphics Accelerator...
... "Fixed Clock" mode and then adjust If your card has Hardware Monitor function, you will display the GPU temperature and show the thermal curve. Besides, you can move the slider to load the frequency you saved last time The V-Tuner3 clock configuration utility will see the change of the 2D core clock, 3D core clock and memory clock. The window will see the extend window. Opens Help page GV-NX73G Series Graphics Accelerator...
Manual
Page 23
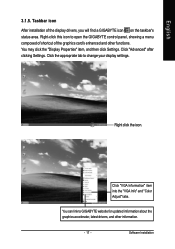
... Settings. Click "VGA Information" item into the "VGA Info" and "Color Adjust" tabs. Taskbar icon After installation of the graphics card's enhanced and other information. - 17 - Click the appropriate tab to open the GIGABYTE control panel, showing a menu composed of shortcut of the display drivers, you will find a GIGABYTE icon on the taskbar's status area. Software Installation You can link to GIGABYTE website for updated information about the graphics accelerator...
... Settings. Click "VGA Information" item into the "VGA Info" and "Color Adjust" tabs. Taskbar icon After installation of the graphics card's enhanced and other information. - 17 - Click the appropriate tab to open the GIGABYTE control panel, showing a menu composed of shortcut of the display drivers, you will find a GIGABYTE icon on the taskbar's status area. Software Installation You can link to GIGABYTE website for updated information about the graphics accelerator...
Manual
Page 26
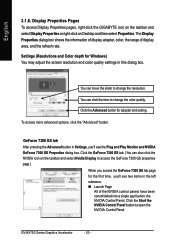
... this dialog box. GV-NX73G Series Graphics Accelerator - 20 - Settings (Resolutions and Color depth for Windows) You may adjust the screen resolution and color quality settings in the left submenu: „ Launch Page All of display area, and the refresh rate. Display Properties Pages To access Display Properties pages, right-click the GIGABYTE icon on the taskbar and select Display Properties or right-click on the taskbar and select Nvidia Display to change the resolution. English 3.1.6.
... this dialog box. GV-NX73G Series Graphics Accelerator - 20 - Settings (Resolutions and Color depth for Windows) You may adjust the screen resolution and color quality settings in the left submenu: „ Launch Page All of display area, and the refresh rate. Display Properties Pages To access Display Properties pages, right-click the GIGABYTE icon on the taskbar and select Display Properties or right-click on the taskbar and select Nvidia Display to change the resolution. English 3.1.6.
Manual
Page 27
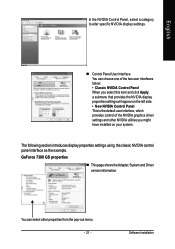
... In the NVIDIA Control Panel, select a category to alter specific NVIDIA display settings. „ Control Panel User Interface You can select other NVIDIA utilities you might have installed on the left side. • New NVIDIA Control Panel This is the default user interface, which provides control of the NVIDIA graphics driver settings and other properties from the pop-out menu. - 21 - The following section introduces display properties settings using the classic NVIDIA control panel interface as...
... In the NVIDIA Control Panel, select a category to alter specific NVIDIA display settings. „ Control Panel User Interface You can select other NVIDIA utilities you might have installed on the left side. • New NVIDIA Control Panel This is the default user interface, which provides control of the NVIDIA graphics driver settings and other properties from the pop-out menu. - 21 - The following section introduces display properties settings using the classic NVIDIA control panel interface as...
Manual
Page 28
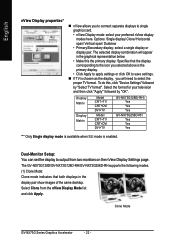
...-RH/GV-NX73G256D-RH supports the following modes. (1) Clone Mode: Clone mode indicates that the display corresponding to select the proper TV format. Select the format for your preferred nView display modes here. The selected display combination will need to the icon you will appear in the display pair show images of the same desktop. Clone Mode GV-NX73G Series Graphics Accelerator - 22 - Dual-Monitor Setup: You can set the display to save settings. „ If TV is enabled. Options: Single display/ Clone...
...-RH/GV-NX73G256D-RH supports the following modes. (1) Clone Mode: Clone mode indicates that the display corresponding to select the proper TV format. Select the format for your preferred nView display modes here. The selected display combination will need to the icon you will appear in the display pair show images of the same desktop. Clone Mode GV-NX73G Series Graphics Accelerator - 22 - Dual-Monitor Setup: You can set the display to save settings. „ If TV is enabled. Options: Single display/ Clone...
Manual
Page 30
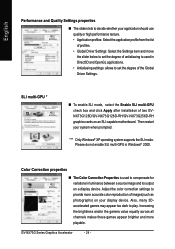
... channels makes these games appear brighter and more accurate color reproduction of two GVNX73G128D/GV-NX73G128D-RH/GV-NX73G256D-RH graphics cards on a display device. Then restart your display device. SLI multi-GPU * „ To enable SLI mode, select the Enable SLI multi-GPU check box and click Apply after installation of images(such as photographs) on your system when prompted. GV-NX73G Series Graphics Accelerator - 24 - Color Correction properties „ The Color Correction Properties is used in Windows® 2000.
... channels makes these games appear brighter and more accurate color reproduction of two GVNX73G128D/GV-NX73G128D-RH/GV-NX73G256D-RH graphics cards on a display device. Then restart your display device. SLI multi-GPU * „ To enable SLI mode, select the Enable SLI multi-GPU check box and click Apply after installation of images(such as photographs) on your system when prompted. GV-NX73G Series Graphics Accelerator - 24 - Color Correction properties „ The Color Correction Properties is used in Windows® 2000.
Manual
Page 31
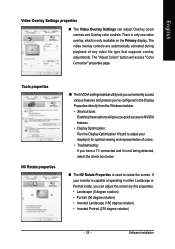
... "Color Correction" properties page. Software Installation There is only one video overlay, which is used to adjust your monitor is capable of colors . • Troubleshooting: If you 've configured in either Landscape or Portrait mode, you can adjust Overlay zoom controls and Overlay color controls. The video overlay controls are automatically activated during playback of any video file type that supports overlay adjustments. English Video Overlay Settings properties „ The Video Overlay Settings can adjust the screen by...
... "Color Correction" properties page. Software Installation There is only one video overlay, which is used to adjust your monitor is capable of colors . • Troubleshooting: If you 've configured in either Landscape or Portrait mode, you can adjust Overlay zoom controls and Overlay color controls. The video overlay controls are automatically activated during playback of any video file type that supports overlay adjustments. English Video Overlay Settings properties „ The Video Overlay Settings can adjust the screen by...
Manual
Page 34
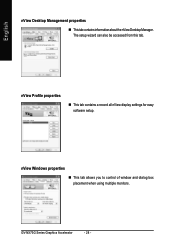
GV-NX73G Series Graphics Accelerator - 28 - nView Profile properties „ This tab contains a record all nView display settings for easy software setup. English nView Desktop Management properties „ ThistabcontainsinformationaboutthenViewDesktopManager. The setup wizard can also be accessed from this tab. nView Windows properties „ This tab allows you to control of window and dialog box placement when using multiple monitors.
GV-NX73G Series Graphics Accelerator - 28 - nView Profile properties „ This tab contains a record all nView display settings for easy software setup. English nView Desktop Management properties „ ThistabcontainsinformationaboutthenViewDesktopManager. The setup wizard can also be accessed from this tab. nView Windows properties „ This tab allows you to control of window and dialog box placement when using multiple monitors.

Manual
Page 35
nView User Interface properties „ This tab allows customization of the nView user interface. - 29 - English nView Applications properties „ This tab allows you to create up to control nView settings depending on different applications. Software Installation nView Desktops properties „ This tab allows you to 32 unique desktops.
nView User Interface properties „ This tab allows customization of the nView user interface. - 29 - English nView Applications properties „ This tab allows you to create up to control nView settings depending on different applications. Software Installation nView Desktops properties „ This tab allows you to 32 unique desktops.
Manual
Page 38
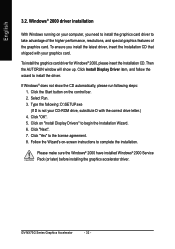
... driver installation With Windows running on -screen instructions to complete the installation. To ensure you need to install the graphics card driver to begin the Installation Wizard. 6. Click Install Display Driver item, and follow the wizard to the license agreement. 8. Click "Next". 7. Follow the Wizard's on your graphics card. GV-NX73G Series Graphics Accelerator - 32 - Select Run. 3. Click "OK". 5. Click "Yes" to install the driver. Then the AUTORUN window will show the CD automatically, please run following : D:\SETUP...
... driver installation With Windows running on -screen instructions to complete the installation. To ensure you need to install the graphics card driver to begin the Installation Wizard. 6. Click Install Display Driver item, and follow the wizard to the license agreement. 8. Click "Next". 7. Follow the Wizard's on your graphics card. GV-NX73G Series Graphics Accelerator - 32 - Select Run. 3. Click "OK". 5. Click "Yes" to install the driver. Then the AUTORUN window will show the CD automatically, please run following : D:\SETUP...
Manual
Page 39
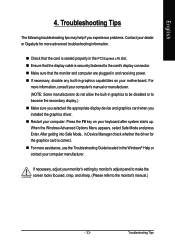
When the Windows Advanced Options Menu appears, select Safe Mode and press Enter. Troubleshooting Tips For more assistance, use the Troubleshooting Guide located in graphics capabilities on your monitor's setting by monitor's adjust panel to make the screen looks focused, crisp, and sharp. (Please refer to the card's display connector. „ Make sure that the monitor and computer are plugged in and receiving power. „ If necessary, disable any built...
When the Windows Advanced Options Menu appears, select Safe Mode and press Enter. Troubleshooting Tips For more assistance, use the Troubleshooting Guide located in graphics capabilities on your monitor's setting by monitor's adjust panel to make the screen looks focused, crisp, and sharp. (Please refer to the card's display connector. „ Make sure that the monitor and computer are plugged in and receiving power. „ If necessary, disable any built...
Manual
Page 40
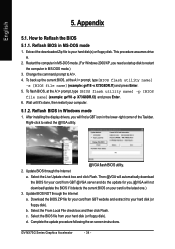
... current BIOS on -screen instructions. Right-click to A:\>. 4. Then @VGA will automatically download the BIOS for your card from GBT @VGA server and do the update for your card from your card is the latest one.) 3. b. Select the BIOS file from GBT website and extract it 's done, then restart your hard disk(s) or floppy disk. GV-NX73G Series Graphics Accelerator - 34 - Change the command prompt to select the @VGA utility. @VGA flash BIOS utility. 2. To...
... current BIOS on -screen instructions. Right-click to A:\>. 4. Then @VGA will automatically download the BIOS for your card from GBT @VGA server and do the update for your card from your card is the latest one.) 3. b. Select the BIOS file from GBT website and extract it 's done, then restart your hard disk(s) or floppy disk. GV-NX73G Series Graphics Accelerator - 34 - Change the command prompt to select the @VGA utility. @VGA flash BIOS utility. 2. To...


