Manual
Page 1
... without the expressed, written permission of this manual. Use of GBT. GV-N98TOC-1GI/ GV-N98TOC-512I/ GV-N98TOC-1GI rev2.0/ GV-N98TOC-512I rev2.0 NVIDIA® GeForceTM 9800 GT Graphics Accelerator User's Manual Rev. 202 12MM-N98TO5I-202R Copyright © 2010 GIGABYTE TECHNOLOGY CO., LTD Copyright by Macrovision. Doing so may appear in any errors or omissions that is prohibited. patents and other limited viewing uses only unless otherwise authorized by GIGA-BYTE TECHNOLOGY CO., LTD...
... without the expressed, written permission of this manual. Use of GBT. GV-N98TOC-1GI/ GV-N98TOC-512I/ GV-N98TOC-1GI rev2.0/ GV-N98TOC-512I rev2.0 NVIDIA® GeForceTM 9800 GT Graphics Accelerator User's Manual Rev. 202 12MM-N98TO5I-202R Copyright © 2010 GIGABYTE TECHNOLOGY CO., LTD Copyright by Macrovision. Doing so may appear in any errors or omissions that is prohibited. patents and other limited viewing uses only unless otherwise authorized by GIGA-BYTE TECHNOLOGY CO., LTD...

Manual
Page 4
Features ...5 1.2. Hardware Installation ...9 3. Regulatory Statements 28 - 4 - Introduction ...5 1.1. Minimum System Requirements 5 2. Driver Installation ...11 3.1.2. GIGABYTE Gamer HUD on Driver Disk 13 3.2. Resolutions and Color Depth Tables 26 5.3. Driver and Utility Installation 11 3.1.1. Board Layout ...6 2.2. Software Installation 11 3.1. Appendix ...25 5.1. Hardware Installation 6 2.1. Accessing NVIDIA Control Panel 16 4. How to Reflash the BIOS in MS-DOS Mode 25 5.2. Table of Contents 1. Display Properties Pages 15 3.3. Troubleshooting Tips...
Features ...5 1.2. Hardware Installation ...9 3. Regulatory Statements 28 - 4 - Introduction ...5 1.1. Minimum System Requirements 5 2. Driver Installation ...11 3.1.2. GIGABYTE Gamer HUD on Driver Disk 13 3.2. Resolutions and Color Depth Tables 26 5.3. Driver and Utility Installation 11 3.1.1. Board Layout ...6 2.2. Software Installation 11 3.1. Appendix ...25 5.1. Hardware Installation 6 2.1. Accessing NVIDIA Control Panel 16 4. How to Reflash the BIOS in MS-DOS Mode 25 5.2. Table of Contents 1. Display Properties Pages 15 3.3. Troubleshooting Tips...
Manual
Page 5
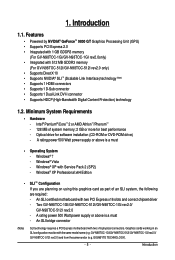
... technology requires a PCI Express motherboard with Service Pack 2 (SP2) - 1. GIGABYTE TECHNOLOGY). - 5 - A rating power 500 Watt power supply or above is a must - Windows® XP with two x16 physical connectors. Windows® XP Professional x64 Edition • SLI TM Configuration If you are planning on using this graphics card as part of system memory; 2 GB or more for software installation (CD-ROM or DVD-ROM drive) - Graphics cards working in an SLI configuration must be with the same model name (e.g. GV-N98TOC-1GI/GV-N98TOC-512I/GV-N98TOC-1GI rev2.0/ GV-N98TOC...
... technology requires a PCI Express motherboard with Service Pack 2 (SP2) - 1. GIGABYTE TECHNOLOGY). - 5 - A rating power 500 Watt power supply or above is a must - Windows® XP with two x16 physical connectors. Windows® XP Professional x64 Edition • SLI TM Configuration If you are planning on using this graphics card as part of system memory; 2 GB or more for software installation (CD-ROM or DVD-ROM drive) - Graphics cards working in an SLI configuration must be with the same model name (e.g. GV-N98TOC-1GI/GV-N98TOC-512I/GV-N98TOC-1GI rev2.0/ GV-N98TOC...
Manual
Page 8
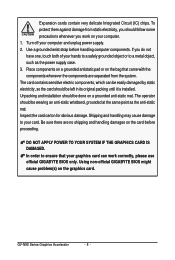
... installed. In order to ensure that came with the components whenever the components are no shipping and handling damages on the graphics card. Using non-official GIGABYTE BIOS might cause problem(s) on the card before handling computer components. Shipping and handling may cause damage to a metal object, such as the anti-static mat. If you work correctly, please use official GIGABYTE BIOS...
... installed. In order to ensure that came with the components whenever the components are no shipping and handling damages on the graphics card. Using non-official GIGABYTE BIOS might cause problem(s) on the card before handling computer components. Shipping and handling may cause damage to a metal object, such as the anti-static mat. If you work correctly, please use official GIGABYTE BIOS...

Manual
Page 9
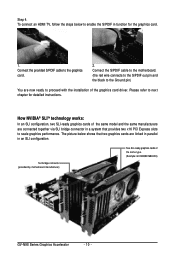
... are ready to your graphics card, use the DVI-I connector. Do not touch the card when it in place, and replace the computer cover. To connect a flat panel display to install your graphics card,use the D-Sub connector. After installation, remember to connect the power cable to your graphics card. Step 3. Plug the display cable into your graphics card, or the system will not boot. Hardware Installation then align your graphics card, use the HDMI connector. Replace the screw to your graphics card with the PCI Express x16...
... are ready to your graphics card, use the DVI-I connector. Do not touch the card when it in place, and replace the computer cover. To connect a flat panel display to install your graphics card,use the D-Sub connector. After installation, remember to connect the power cable to your graphics card. Step 3. Plug the display cable into your graphics card, or the system will not boot. Hardware Installation then align your graphics card, use the HDMI connector. Replace the screw to your graphics card with the PCI Express x16...
Manual
Page 10
... chapter for the graphics card. 1. Please refer to proceed with the installation of the graphics card driver. Connect the S/PDIF cable to the motherboard. (the red wire connects to the S/PDIF out pin and the black to the Ground pin) You are connected together via SLI bridge connector in an SLI configuration. How NVIDIA® SLITM technology works: In an SLI configuration, two SLI-ready graphics cards of the same type. (Example: GV-NX88X768H-RH) GV-N98 Series Graphics Accelerator - 10 -
... chapter for the graphics card. 1. Please refer to proceed with the installation of the graphics card driver. Connect the S/PDIF cable to the motherboard. (the red wire connects to the S/PDIF out pin and the black to the Ground pin) You are connected together via SLI bridge connector in an SLI configuration. How NVIDIA® SLITM technology works: In an SLI configuration, two SLI-ready graphics cards of the same type. (Example: GV-NX88X768H-RH) GV-N98 Series Graphics Accelerator - 10 -

Manual
Page 11
... motherboard drivers (for the motherboard drivers, please contact the motherboard manufacturer.) 3.1. Step 2: Click the Next button. Users who run Windows XP with Service Pack 2 or above do not need to My Computer, double-click the optical drive and execute the setup.exe program.) Step 1: Click the Install Display Driver item. Software Installation Notice the following guidelines before installing the drivers: 1. Driver and Utility Installation 3.1.1. Make sure your optical drive. For software MPEG support in the screen...
... motherboard drivers (for the motherboard drivers, please contact the motherboard manufacturer.) 3.1. Step 2: Click the Next button. Users who run Windows XP with Service Pack 2 or above do not need to My Computer, double-click the optical drive and execute the setup.exe program.) Step 1: Click the Install Display Driver item. Software Installation Notice the following guidelines before installing the drivers: 1. Driver and Utility Installation 3.1.1. Make sure your optical drive. For software MPEG support in the screen...

Manual
Page 12
Then the driver installation is installing the components. Step 4: Click the Finish button to restart the computer. GV-N98 Series Graphics Accelerator - 12 - Step 3: Click the Yes button. The system is completed.
Then the driver installation is installing the components. Step 4: Click the Finish button to restart the computer. GV-N98 Series Graphics Accelerator - 12 - Step 3: Click the Yes button. The system is completed.
Manual
Page 14
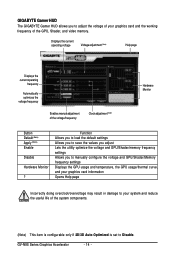
... Disable. GIGABYTE Gamer HUD The GIGABYTE Gamer HUD allows you to manually configure the voltage and GPU/Shader/Memory frequency settings Displays the GPU usage and temperature, the GPU usage/thermal curve, and your graphics card information Opens Help page Incorrectly doing overclock/overvoltage may result in damage to your graphics card and the working frequency of the GPU, Shader, and video memory. Function Allows you to load the default settings Allows you to save the values you adjust...
... Disable. GIGABYTE Gamer HUD The GIGABYTE Gamer HUD allows you to manually configure the voltage and GPU/Shader/Memory frequency settings Displays the GPU usage and temperature, the GPU usage/thermal curve, and your graphics card information Opens Help page Incorrectly doing overclock/overvoltage may result in damage to your graphics card and the working frequency of the GPU, Shader, and video memory. Function Allows you to load the default settings Allows you to save the values you adjust...

Manual
Page 15
You can move the slider to change the color quality. You can click the item to adjust the screen resolution and color quality settings. Display Properties Pages Display Settings (Resolutions and Color Quality for advanced settings. - 15 - Select Display Settings to change the resolution. Click the Advanced button for Windows) To access Display Settings page, right-click on desktop and select Personalize, then the Personalization windows will show up. Software Installation 3.2.
You can move the slider to change the color quality. You can click the item to adjust the screen resolution and color quality settings. Display Properties Pages Display Settings (Resolutions and Color Quality for advanced settings. - 15 - Select Display Settings to change the resolution. Click the Advanced button for Windows) To access Display Settings page, right-click on desktop and select Personalize, then the Personalization windows will show up. Software Installation 3.2.
Manual
Page 16
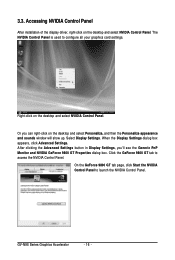
... Generic PnP Monitor and NVIDIA GeForce 9800 GT Properties dialog box. Select Display Settings. GV-N98 Series Graphics Accelerator - 16 - Right-click on the desktop and select NVIDIA Control Panel. The NVIDIA Control Panel is used to access the NVIDIA Control Panel. When the Display Settings dialog box appears, click Advanced Settings. Accessing NVIDIA Control Panel After installation of the display driver, right-click on the desktop and select NVIDIA Control Panel. After clicking the Advanced Settings button in Display Settings, you...
... Generic PnP Monitor and NVIDIA GeForce 9800 GT Properties dialog box. Select Display Settings. GV-N98 Series Graphics Accelerator - 16 - Right-click on the desktop and select NVIDIA Control Panel. The NVIDIA Control Panel is used to access the NVIDIA Control Panel. When the Display Settings dialog box appears, click Advanced Settings. Accessing NVIDIA Control Panel After installation of the display driver, right-click on the desktop and select NVIDIA Control Panel. After clicking the Advanced Settings button in Display Settings, you...
Manual
Page 17
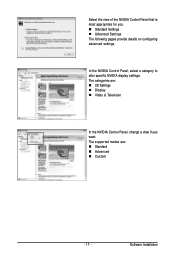
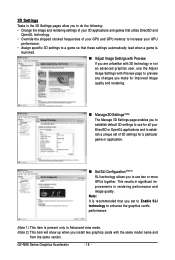
Select the view of the NVIDIA Control Panel that is most appropriate for you want. Software Installation The categories are : „ Standard „ Advanced „ Custom - 17 - The supported modes are : „ 3D Settings „ Display „ Video & Television In the NVIDIA Control Panel, change a view if you . „ Standard Settings „ Advanced Settings The following pages provide details on configuring advanced settings. In the NVIDIA Control Panel, select a category to alter specific NVIDIA display settings.
Select the view of the NVIDIA Control Panel that is most appropriate for you want. Software Installation The categories are : „ Standard „ Advanced „ Custom - 17 - The supported modes are : „ 3D Settings „ Display „ Video & Television In the NVIDIA Control Panel, change a view if you . „ Standard Settings „ Advanced Settings The following pages provide details on configuring advanced settings. In the NVIDIA Control Panel, select a category to alter specific NVIDIA display settings.
Manual
Page 18
... you install two graphics cards with Preview page to preview any changes you make for improved image quality and rendering. „ Manage 3D Settings (Note) The Manage 3D Settings page enables you to establish default 3D settings to use for all your Direct3D or OpenGL applications and to use the Adjust Image Settings with the same model name and from the same vendor. GV-N98 Series Graphics Accelerator...
... you install two graphics cards with Preview page to preview any changes you make for improved image quality and rendering. „ Manage 3D Settings (Note) The Manage 3D Settings page enables you to establish default 3D settings to use for all your Direct3D or OpenGL applications and to use the Adjust Image Settings with the same model name and from the same vendor. GV-N98 Series Graphics Accelerator...
Manual
Page 19
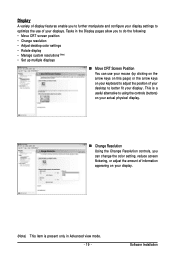
Software Installation This is present only in the Display pages allow you can use of your desktop to adjust the position of your display. Display A variety of display features enable you to further manipulate and configure your display settings to optimize the use your mouse (by clicking on the arrow keys on this page) or the arrow keys on your actual physical display. „ Change Resolution Using the Change Resolution controls, you...
Software Installation This is present only in the Display pages allow you can use of your desktop to adjust the position of your display. Display A variety of display features enable you to further manipulate and configure your display settings to optimize the use your mouse (by clicking on the arrow keys on this page) or the arrow keys on your actual physical display. „ Change Resolution Using the Change Resolution controls, you...
Manual
Page 20
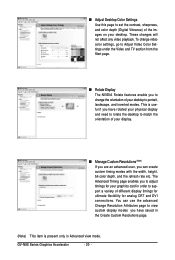
... page enables you to adjust timings for analog CRT and DVI connections. GV-N98 Series Graphics Accelerator - 20 - This is present only in order to support a variety of different display timings for ultimate flexibility for your desktop to portrait, landscape, and inverted modes. These changes will not affect any video playback. You can create custom timing modes with the width, height, bit-color depth, and the refresh rate etc. „ Adjust Desktop Color Settings Use this...
... page enables you to adjust timings for analog CRT and DVI connections. GV-N98 Series Graphics Accelerator - 20 - This is present only in order to support a variety of different display timings for ultimate flexibility for your desktop to portrait, landscape, and inverted modes. These changes will not affect any video playback. You can create custom timing modes with the width, height, bit-color depth, and the refresh rate etc. „ Adjust Desktop Color Settings Use this...

Manual
Page 21
... 3D applications are connected to your desktop in one of several multi-display modes to output from two monitors on both display (Clone) Clone mode indicates that both displays in the display pair show images of the displays (monitors) that both displays in Windows XP. - 21 - „ Set Up Multiple Displays NVIDIA nView technology enables you to view your computer. Unlike Horizontal Span or Vertical Span mode, Dualview treats each display as when the application spans displays. (Note) This item...
... 3D applications are connected to your desktop in one of several multi-display modes to output from two monitors on both display (Clone) Clone mode indicates that both displays in the display pair show images of the displays (monitors) that both displays in Windows XP. - 21 - „ Set Up Multiple Displays NVIDIA nView technology enables you to view your computer. Unlike Horizontal Span or Vertical Span mode, Dualview treats each display as when the application spans displays. (Note) This item...
Manual
Page 22
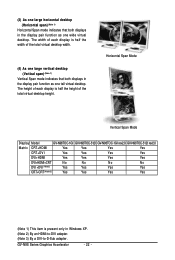
... Span Mode Vertical Span Mode Display Model GV-N98TOC-1GI GV-N98TOC-512I GV-N98TOC-1GI rev2.0 GV-N98TOC-512I rev2.0 Matrix CRT+HDMI Yes Yes Yes Yes CRT+DVI Yes Yes Yes Yes DVI+HDMI Yes Yes Yes Yes DVI+HDMI+CRT No No No No DVI +DVI (Note2) Yes Yes Yes Yes CRT+CRT(Note3) Yes Yes Yes Yes (Note 1) This item is half the width of the total virtual desktop height. GV-N98 Series Graphics Accelerator - 22 - The width of each display...
... Span Mode Vertical Span Mode Display Model GV-N98TOC-1GI GV-N98TOC-512I GV-N98TOC-1GI rev2.0 GV-N98TOC-512I rev2.0 Matrix CRT+HDMI Yes Yes Yes Yes CRT+DVI Yes Yes Yes Yes DVI+HDMI Yes Yes Yes Yes DVI+HDMI+CRT No No No No DVI +DVI (Note2) Yes Yes Yes Yes CRT+CRT(Note3) Yes Yes Yes Yes (Note 1) This item is half the width of the total virtual desktop height. GV-N98 Series Graphics Accelerator - 22 - The width of each display...

Manual
Page 23
... monitor your ForceWare graphics driver version. Consult the release notes for optimal viewing. Note: Support for video content on your display. For best results, play a video while you to fine tune the image settings for the best possible viewing in development and may not be available with your changes. Select one of the desktop video to best fit your television screen. • Enable full screen video mirroring. „ Adjust Video Color Settings Use...
... monitor your ForceWare graphics driver version. Consult the release notes for optimal viewing. Note: Support for video content on your display. For best results, play a video while you to fine tune the image settings for the best possible viewing in development and may not be available with your changes. Select one of the desktop video to best fit your television screen. • Enable full screen video mirroring. „ Adjust Video Color Settings Use...
Manual
Page 24
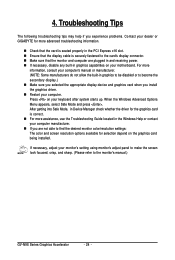
... the driver for selection depend on the graphics card being installed. After getting into Safe Mode, in graphics to be disabled or to the monitor's manual.) GV-N98 Series Graphics Accelerator - 24 - When the Windows Advanced Options Menu appears, select Safe Mode and press . If necessary, adjust your keyboard after system starts up. Press on your computer. For more assistance, use the Troubleshooting Guide located in graphics capabilities on your monitor's setting using monitor's adjust panel...
... the driver for selection depend on the graphics card being installed. After getting into Safe Mode, in graphics to be disabled or to the monitor's manual.) GV-N98 Series Graphics Accelerator - 24 - When the Windows Advanced Options Menu appears, select Safe Mode and press . If necessary, adjust your keyboard after system starts up. Press on your computer. For more assistance, use the Troubleshooting Guide located in graphics capabilities on your monitor's setting using monitor's adjust panel...
Manual
Page 28
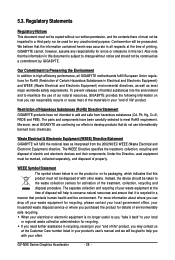
... GIGABYTE will be used equipment must be taken to maximize the use internationally banned toxic chemicals. GV-N98 Series Graphics Accelerator - 28 - For more information about where you can responsibly recycle or reuse most major worldwide safety requirements. Regulatory Statements Regulatory Notices This document ... centers for errors or omissions in your effort. WEEE Symbol Statement The symbol shown below is recycled in your product's user's manual and we at GIGABYTE are continuing our efforts to high-efficiency performance, all respects at the Customer Care number ...
... GIGABYTE will be used equipment must be taken to maximize the use internationally banned toxic chemicals. GV-N98 Series Graphics Accelerator - 28 - For more information about where you can responsibly recycle or reuse most major worldwide safety requirements. Regulatory Statements Regulatory Notices This document ... centers for errors or omissions in your effort. WEEE Symbol Statement The symbol shown below is recycled in your product's user's manual and we at GIGABYTE are continuing our efforts to high-efficiency performance, all respects at the Customer Care number ...


