Manual
Page 1
... to update the information contained herein. No part of this manual may void the warranty of this graphics card. patents and other limited viewing uses only unless otherwise authorized by Rovi Corporation, and is prohibited. Use of this card. Doing so may be authorized by Rovi Corporation. GV-N26-896H-B/ GV-N26OC-896H-B/ GV-N26OC-896H NVIDIA® GeForceTM GTX 260 Graphics Accelerator User's Manual Rev. 103 12MM-NX268B-103R Copyright © 2009 GIGABYTE TECHNOLOGY...
... to update the information contained herein. No part of this manual may void the warranty of this graphics card. patents and other limited viewing uses only unless otherwise authorized by Rovi Corporation, and is prohibited. Use of this card. Doing so may be authorized by Rovi Corporation. GV-N26-896H-B/ GV-N26OC-896H-B/ GV-N26OC-896H NVIDIA® GeForceTM GTX 260 Graphics Accelerator User's Manual Rev. 103 12MM-NX268B-103R Copyright © 2009 GIGABYTE TECHNOLOGY...

Manual
Page 5
Board Layout ...7 2.2. Windows® XP Driver and Utilities Installation 16 3.1.1. Troubleshooting Tips 39 5. How to Reflash the BIOS in MS-DOS Mode 40 5.2. Features ...6 1.2. Hardware Installation 7 2.1. nView Properties Pages (Note 34 4. Appendix ...40 5.1. Driver Installation ...18 3.1.4. Table of Contents 1. Software Installation 16 3.1. DirectX Installation ...17 3.1.3. Display Properties Pages 23 3.1.7. Operating System Requirements 16 3.1.2. Taskbar Icon ...22 3.1.6. Minimum System Requirements 6 2. GIGABYTE Gamer HUD Lite on Driver Disk 20 ...
Board Layout ...7 2.2. Windows® XP Driver and Utilities Installation 16 3.1.1. Troubleshooting Tips 39 5. How to Reflash the BIOS in MS-DOS Mode 40 5.2. Features ...6 1.2. Hardware Installation 7 2.1. nView Properties Pages (Note 34 4. Appendix ...40 5.1. Driver Installation ...18 3.1.4. Table of Contents 1. Software Installation 16 3.1. DirectX Installation ...17 3.1.3. Display Properties Pages 23 3.1.7. Operating System Requirements 16 3.1.2. Taskbar Icon ...22 3.1.6. Minimum System Requirements 6 2. GIGABYTE Gamer HUD Lite on Driver Disk 20 ...
Manual
Page 6
...) technology 1.2. Optical drive for GV-N26OC-896H-B only) • Supports 1 D-Sub connectors (by NVIDIA® GeForceTM GTX 260 Graphics Processing Unit (GPU) • Supports PCI Express 2.0 • Integrated with minimum 12V current rating of system memory; 2 GB or more for best performance - Windows® XP with two/three PCIe x16 slots and correct chipset driver - An SLI certified motherboard with Service Pack 2 (SP2) - A power supply with two/three x16 physical connectors. An SLI bridge connector or 3-way SLI bridge connector (Note 1) SLI technology requires a PCI Express...
...) technology 1.2. Optical drive for GV-N26OC-896H-B only) • Supports 1 D-Sub connectors (by NVIDIA® GeForceTM GTX 260 Graphics Processing Unit (GPU) • Supports PCI Express 2.0 • Integrated with minimum 12V current rating of system memory; 2 GB or more for best performance - Windows® XP with two/three PCIe x16 slots and correct chipset driver - An SLI certified motherboard with Service Pack 2 (SP2) - A power supply with two/three x16 physical connectors. An SLI bridge connector or 3-way SLI bridge connector (Note 1) SLI technology requires a PCI Express...
Manual
Page 7
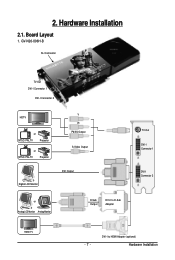
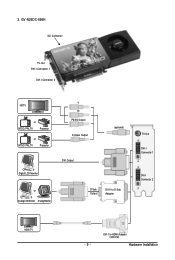
DVI-I to D-Sub Adapter TV-Out DVI-I Connector 1 DVI-I to HDMI Adapter (optional) Hardware Installation GV-N26-896H-B SLI Connector TV-Out DVI-I Connector 1 DVI-I Connector 2 HDTV or NTSC / PAL TV Projector or NTSC / PAL TV Projector Digital LCD Monitor Y Pr Pb/AV Output S-Video Output DVI Output or Analog LCD Monitor Analog Monitor D-Sub Output DVI-I Connector 2 HDMI TV - 7 - Hardware Installation 2.1. Board Layout 1. 2.
DVI-I to D-Sub Adapter TV-Out DVI-I Connector 1 DVI-I to HDMI Adapter (optional) Hardware Installation GV-N26-896H-B SLI Connector TV-Out DVI-I Connector 1 DVI-I Connector 2 HDTV or NTSC / PAL TV Projector or NTSC / PAL TV Projector Digital LCD Monitor Y Pr Pb/AV Output S-Video Output DVI Output or Analog LCD Monitor Analog Monitor D-Sub Output DVI-I Connector 2 HDMI TV - 7 - Hardware Installation 2.1. Board Layout 1. 2.
Manual
Page 9
DVI-I Connector 2 HDMI TV - 9 - 3. GV-N26OC-896H SLI Connector TV-Out DVI-I Connector 1 DVI-I Connector 2 HDTV or NTSC / PAL TV Projector or NTSC / PAL TV Projector Y Pr Pb/AV Output S-Video Output Digital LCD Monitor DVI Output (optional) or Analog LCD Monitor Analog Monitor D-Sub Output DVI-I to D-Sub Adapter TV-Out DVI-I Connector 1 DVI-I to HDMI Adapter (optional) Hardware Installation
DVI-I Connector 2 HDMI TV - 9 - 3. GV-N26OC-896H SLI Connector TV-Out DVI-I Connector 1 DVI-I Connector 2 HDTV or NTSC / PAL TV Projector or NTSC / PAL TV Projector Y Pr Pb/AV Output S-Video Output Digital LCD Monitor DVI Output (optional) or Analog LCD Monitor Analog Monitor D-Sub Output DVI-I to D-Sub Adapter TV-Out DVI-I Connector 1 DVI-I to HDMI Adapter (optional) Hardware Installation
Manual
Page 10
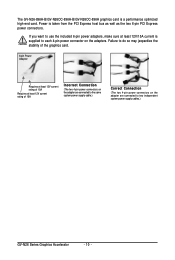
... high-end card. The GV-N26-896H-B/GV-N26OC-896H-B/GV-N26OC-896H graphics card is taken from the PCI Express host bus as well as the two 6-pin PCI Express power connectors. Failure to do so may jeopardize the stability of the graphics card. 6-pin Power Adapter Requires at least 12V current rating of 15A Requires at least 12V/15A current is supplied to two independent system power supply cables.) GV-N26 Series Graphics Accelerator - 10 - If you want to use the included 6-pin power adapters, make...
... high-end card. The GV-N26-896H-B/GV-N26OC-896H-B/GV-N26OC-896H graphics card is taken from the PCI Express host bus as well as the two 6-pin PCI Express power connectors. Failure to do so may jeopardize the stability of the graphics card. 6-pin Power Adapter Requires at least 12V current rating of 15A Requires at least 12V/15A current is supplied to two independent system power supply cables.) GV-N26 Series Graphics Accelerator - 10 - If you want to use the included 6-pin power adapters, make...

Manual
Page 12
... connect a 15-pin D-Sub monitor. Step 3. Connect a HDMI monitor via DVI-I to D-Sub adapter to see the details). Step 1. Hardware Installation Now that the gold edge connector of the graphics card is fully seated. This graphics card provides two DVI-I to prevent system instability. then align your graphics card with the PCI Express x16 slot, and press it 's operating to HDMI adapter After installation, remember to connect the power cable to D-Sub adapter GV-N26 Series Graphics Accelerator - 12 - 2.2. Or use the DVI...
... connect a 15-pin D-Sub monitor. Step 3. Connect a HDMI monitor via DVI-I to D-Sub adapter to see the details). Step 1. Hardware Installation Now that the gold edge connector of the graphics card is fully seated. This graphics card provides two DVI-I to prevent system instability. then align your graphics card with the PCI Express x16 slot, and press it 's operating to HDMI adapter After installation, remember to connect the power cable to D-Sub adapter GV-N26 Series Graphics Accelerator - 12 - 2.2. Or use the DVI...
Manual
Page 16
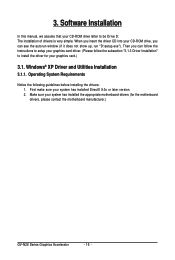
... Requirements Notice the following guidelines before installing the drivers: 1. Software Installation In this manual, we assume that your CD-ROM drive letter to install the driver for the motherboard drivers, please contact the motherboard manufacturer.) GV-N26 Series Graphics Accelerator - 16 - When you insert the driver CD into your system has installed DirectX 9.0c or later version. 2. Make sure your system has installed the appropriate motherboard drivers (for your graphics card driver. (Please follow the subsection "3.1.3 Driver Installation...
... Requirements Notice the following guidelines before installing the drivers: 1. Software Installation In this manual, we assume that your CD-ROM drive letter to install the driver for the motherboard drivers, please contact the motherboard manufacturer.) GV-N26 Series Graphics Accelerator - 16 - When you insert the driver CD into your system has installed DirectX 9.0c or later version. 2. Make sure your system has installed the appropriate motherboard drivers (for your graphics card driver. (Please follow the subsection "3.1.3 Driver Installation...

Manual
Page 18
... graphics card.) Or click the Cancel button to finish the installation. The following are stepby-step installation instructions. Step 1: Found New Hardware Wizard: Video Controller (VGA Compatible) Click the Next button to install the driver. (Insert the driver CD-ROM that came with your computer for the driver and install it automatically. Step 3: Found New Hardware Wizard: Finish Click the Finish button to install the driver from the autorun window. 3.1.3. GV-N26 Series Graphics Accelerator...
... graphics card.) Or click the Cancel button to finish the installation. The following are stepby-step installation instructions. Step 1: Found New Hardware Wizard: Video Controller (VGA Compatible) Click the Next button to install the driver. (Insert the driver CD-ROM that came with your computer for the driver and install it automatically. Step 3: Found New Hardware Wizard: Finish Click the Finish button to install the driver from the autorun window. 3.1.3. GV-N26 Series Graphics Accelerator...
Manual
Page 20
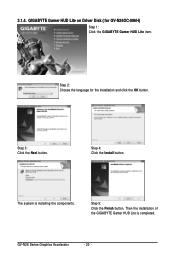
Step 3: Click the Next button. Then the installation of the GIGABYTE Gamer HUD Lite is installing the components. Step 5: Click the Finish button. The system is completed. Step 2: Choose the language for GV-N26OC-896H) Step 1: Click the GIGABYTE Gamer HUD Lite item. Step 4: Click the Install button. 3.1.4. GIGABYTE Gamer HUD Lite on Driver Disk ( for the installation and click the OK button. GV-N26 Series Graphics Accelerator - 20 -
Step 3: Click the Next button. Then the installation of the GIGABYTE Gamer HUD Lite is installing the components. Step 5: Click the Finish button. The system is completed. Step 2: Choose the language for GV-N26OC-896H) Step 1: Click the GIGABYTE Gamer HUD Lite item. Step 4: Click the Install button. 3.1.4. GIGABYTE Gamer HUD Lite on Driver Disk ( for the installation and click the OK button. GV-N26 Series Graphics Accelerator - 20 -
Manual
Page 21
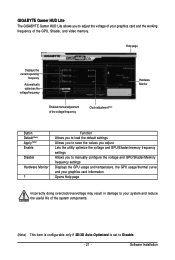
... and reduce the useful life of the voltage/frequency Clock adjustment(Note) Hardware Monitor Button Default(Note) Apply(Note) Enable Disable Hardware Monitor ? Software Installation GIGABYTE Gamer HUD Lite The GIGABYTE Gamer HUD Lite allows you to manually configure the voltage and GPU/Shader/Memory frequency settings Displays the GPU usage and temperature, the GPU usage/thermal curve, and your graphics card information Opens Help page Incorrectly doing overclock/overvoltage may result in damage to your graphics card and the working frequency of the GPU, Shader, and video memory.
... and reduce the useful life of the voltage/frequency Clock adjustment(Note) Hardware Monitor Button Default(Note) Apply(Note) Enable Disable Hardware Monitor ? Software Installation GIGABYTE Gamer HUD Lite The GIGABYTE Gamer HUD Lite allows you to manually configure the voltage and GPU/Shader/Memory frequency settings Displays the GPU usage and temperature, the GPU usage/thermal curve, and your graphics card information Opens Help page Incorrectly doing overclock/overvoltage may result in damage to your graphics card and the working frequency of the GPU, Shader, and video memory.

Manual
Page 23
... the Plug and Play Monitor and NVIDIA GeForce GTX 260 Properties dialog box. Software Installation You can also click the NVIDIA icon in this dialog box. Click the Advanced button for Windows) You may adjust the screen resolution and color quality settings in the notification area and select NVIDIA Control Panel.) Access the GeForce GTX 260 tab page to change the color quality. 3.1.6. Click the GeForce GTX 260 tab. (You...
... the Plug and Play Monitor and NVIDIA GeForce GTX 260 Properties dialog box. Software Installation You can also click the NVIDIA icon in this dialog box. Click the Advanced button for Windows) You may adjust the screen resolution and color quality settings in the notification area and select NVIDIA Control Panel.) Access the GeForce GTX 260 tab page to change the color quality. 3.1.6. Click the GeForce GTX 260 tab. (You...
Manual
Page 25
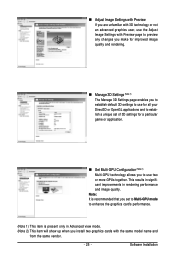
Software Installation Note: It is recommended that you set of 3D settings for a particular game or application. „ Set Multi-GPU Configuration (Note 2) Multi-GPU technology allows you to enhance the graphics card's performance. (Note 1) This item is present only in rendering performance and image quality. „ Adjust Image Settings with Preview If you are unfamiliar with 3D technology or not an advanced graphics user, use the Adjust Image Settings with the...
Software Installation Note: It is recommended that you set of 3D settings for a particular game or application. „ Set Multi-GPU Configuration (Note 2) Multi-GPU technology allows you to enhance the graphics card's performance. (Note 1) This item is present only in rendering performance and image quality. „ Adjust Image Settings with Preview If you are unfamiliar with 3D technology or not an advanced graphics user, use the Adjust Image Settings with the...
Manual
Page 28
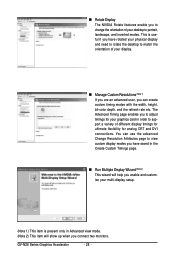
..., landscape, and inverted modes. GV-N26 Series Graphics Accelerator - 28 - This is useful if you have saved in the Create Custom Timings page. „ Run Multiple Display Wizard (Note 2) This wizard will help you enable and customize your multi-display setup. (Note 1) This item is present only in order to support a variety of different display timings for ultimate flexibility for your desktop to adjust timings for analog CRT and DVI connections.
..., landscape, and inverted modes. GV-N26 Series Graphics Accelerator - 28 - This is useful if you have saved in the Create Custom Timings page. „ Run Multiple Display Wizard (Note 2) This wizard will help you enable and customize your multi-display setup. (Note 1) This item is present only in order to support a variety of different display timings for ultimate flexibility for your desktop to adjust timings for analog CRT and DVI connections.

Manual
Page 29
.... Dual-Monitor Setup You can set the display to output from two monitors on the Set up Multiple Displays NVIDIA nView technology enables you to view your desktop in one of several multi-display modes to make the best use of the displays (monitors) that are connected to your preferred nView display modes here. • Only use one display (Single) • The same on both display (Clone) • As one large horizontal desktop (Horizontal span) • As one large vertical desktop (Vertical span...
.... Dual-Monitor Setup You can set the display to output from two monitors on the Set up Multiple Displays NVIDIA nView technology enables you to view your desktop in one of several multi-display modes to make the best use of the displays (monitors) that are connected to your preferred nView display modes here. • Only use one display (Single) • The same on both display (Clone) • As one large horizontal desktop (Horizontal span) • As one large vertical desktop (Vertical span...

Manual
Page 31
For best results, play a video while you make adjustment to view the changes as change country- Software Installation specific signal or the HDTV format. • Enable full screen video mirroring. „ Adjust Video Color Settings Use the controls on your display. Video & Television Video and television features are similar to those for analog and digital displays and include features specific to television and HDTV (high definition television) technology for optimal viewing.Tasks in the Video & Television pages allow you...
For best results, play a video while you make adjustment to view the changes as change country- Software Installation specific signal or the HDTV format. • Enable full screen video mirroring. „ Adjust Video Color Settings Use the controls on your display. Video & Television Video and television features are similar to those for analog and digital displays and include features specific to television and HDTV (high definition television) technology for optimal viewing.Tasks in the Video & Television pages allow you...

Manual
Page 35
nView Windows properties „ This tab allows you to control window and dialog box placement when using multiple monitors. - 35 - nView Profiles properties „ This tab contains a record of all nView display settings for easy software setup. Software Installation nView Desktop Management properties „ This tab contains information about the nView Desktop Manager. The Setup Wizard can also be accessed from this tab.
nView Windows properties „ This tab allows you to control window and dialog box placement when using multiple monitors. - 35 - nView Profiles properties „ This tab contains a record of all nView display settings for easy software setup. Software Installation nView Desktop Management properties „ This tab contains information about the nView Desktop Manager. The Setup Wizard can also be accessed from this tab.

Manual
Page 36
nView Desktops properties „ This tab allows you to 32 unique desktops. nView User Interface properties „ This tab allows for customization of the nView user interface. GV-N26 Series Graphics Accelerator - 36 - nView Applications properties „ This tab allows you to create up to control nView settings depending on different applications.
nView Desktops properties „ This tab allows you to 32 unique desktops. nView User Interface properties „ This tab allows for customization of the nView user interface. GV-N26 Series Graphics Accelerator - 36 - nView Applications properties „ This tab allows you to create up to control nView settings depending on different applications.

Manual
Page 37
nView Effects properties „ This tab provides special windows effects that you perform various actions with shortcut keys or key combinations. - 37 - Software Installation nView Hot Keys properties „ This tab lets you can apply to your applications. nView Zoom properties „ This tab provides dynamic zoom functionality on the desktop. Also enable full screen video playback via the video mirroring control button.
nView Effects properties „ This tab provides special windows effects that you perform various actions with shortcut keys or key combinations. - 37 - Software Installation nView Hot Keys properties „ This tab lets you can apply to your applications. nView Zoom properties „ This tab provides dynamic zoom functionality on the desktop. Also enable full screen video playback via the video mirroring control button.

Manual
Page 39
... GIGABYTE for the graphics card is securely fastened to the card's display connector. „ Make sure that the monitor and computer are plugged in and receiving power. „ If necessary, disable any built-in graphics capabilities on your computer. 4. For more assistance, use the Troubleshooting Guide located in graphics to be disabled or to the monitor's manual.) - 39 - Troubleshooting Tips The following troubleshooting tips may help if you install the graphics driver...
... GIGABYTE for the graphics card is securely fastened to the card's display connector. „ Make sure that the monitor and computer are plugged in and receiving power. „ If necessary, disable any built-in graphics capabilities on your computer. 4. For more assistance, use the Troubleshooting Guide located in graphics to be disabled or to the monitor's manual.) - 39 - Troubleshooting Tips The following troubleshooting tips may help if you install the graphics driver...


