
Manual
Page 1
GV-N210OC-512I/ GV-N210D3-512I/ GV-N210TC-1GI/ GV-N210TC-512I/ GV-N210D2-1GI NVIDIA® GeForceTM 210 Graphics Accelerator User's Manual Rev. 105 12MM-N210O5I-105R Copyright © 2010 GIGABYTE TECHNOLOGY CO., LTD Copyright by U.S. No part of this card. Reverse engineering or disassembly is intended for any labels on this manual. Trademarks Third-party brands and names are the properties of GBT. Use of this manual may be reproduced...
GV-N210OC-512I/ GV-N210D3-512I/ GV-N210TC-1GI/ GV-N210TC-512I/ GV-N210D2-1GI NVIDIA® GeForceTM 210 Graphics Accelerator User's Manual Rev. 105 12MM-N210O5I-105R Copyright © 2010 GIGABYTE TECHNOLOGY CO., LTD Copyright by U.S. No part of this card. Reverse engineering or disassembly is intended for any labels on this manual. Trademarks Third-party brands and names are the properties of GBT. Use of this manual may be reproduced...

Manual
Page 6
Hardware Installation 8 2.1. Accessing NVIDIA Control Panel 18 4. Appendix ...27 5.1. Regulatory Statements 30 - 6 - Introduction ...7 1.1. Hardware Installation ...12 3. Display Properties Pages 17 3.3. Troubleshooting Tips 26 5. Minimum System Requirements 7 2. Software Installation 13 3.1. Board Layout ...8 2.2. GIGABYTE Gamer HUD Lite on Driver Disk 15 3.2. How to Reflash the BIOS in MS-DOS Mode 27 5.2. Table of Contents 1. Resolutions and Color Depth Tables 28 5.3. Features ...7 1.2. Driver and Utility Installation 13 3.1.1. Driver Installation...
Hardware Installation 8 2.1. Accessing NVIDIA Control Panel 18 4. Appendix ...27 5.1. Regulatory Statements 30 - 6 - Introduction ...7 1.1. Hardware Installation ...12 3. Display Properties Pages 17 3.3. Troubleshooting Tips 26 5. Minimum System Requirements 7 2. Software Installation 13 3.1. Board Layout ...8 2.2. GIGABYTE Gamer HUD Lite on Driver Disk 15 3.2. How to Reflash the BIOS in MS-DOS Mode 27 5.2. Table of Contents 1. Resolutions and Color Depth Tables 28 5.3. Features ...7 1.2. Driver and Utility Installation 13 3.1.1. Driver Installation...
Manual
Page 7
... Watt power supply or above is a recommended • Operating System - Windows® Vista - Windows® XP with 1GB GDDR2 memory(For GV-N210D2-1GI only) • GV-N210TC-1GI/GV-N210TC-512I supports NVIDIA Turbo Cache technology which enables graphics card performance by allowing the graphics processing unit (GPU) to dynamically share the available system memory.The total effective VGA memory differs depending on system memory. • Supports DirectX 10.1 • Supports 1 HDMI connector • Supports 1 D-Sub connector • Supports 1 DVI-I connectors • Supports HDCP...
... Watt power supply or above is a recommended • Operating System - Windows® Vista - Windows® XP with 1GB GDDR2 memory(For GV-N210D2-1GI only) • GV-N210TC-1GI/GV-N210TC-512I supports NVIDIA Turbo Cache technology which enables graphics card performance by allowing the graphics processing unit (GPU) to dynamically share the available system memory.The total effective VGA memory differs depending on system memory. • Supports DirectX 10.1 • Supports 1 HDMI connector • Supports 1 D-Sub connector • Supports 1 DVI-I connectors • Supports HDCP...
Manual
Page 8
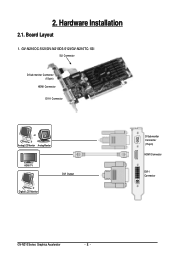
GV-N210OC-512I/GV-N210D3-512I/GV-N210TC-1GI SLI Connector D-Sub monitor Connector (15-pin) HDMI Connector DVI-I Connector or Analog LCD Monitor Analog Monitor HDMI TV Digital LCD Monitor DVI Output D-Sub monitor Connector (15-pin) HDMI Connector DVI-I Connector GV-N210 Series Graphics Accelerator - 8 - Board Layout 1. Hardware Installation 2.1. 2.
GV-N210OC-512I/GV-N210D3-512I/GV-N210TC-1GI SLI Connector D-Sub monitor Connector (15-pin) HDMI Connector DVI-I Connector or Analog LCD Monitor Analog Monitor HDMI TV Digital LCD Monitor DVI Output D-Sub monitor Connector (15-pin) HDMI Connector DVI-I Connector GV-N210 Series Graphics Accelerator - 8 - Board Layout 1. Hardware Installation 2.1. 2.
Manual
Page 10
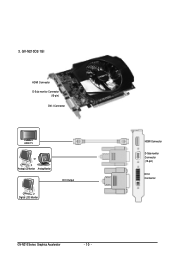
3. GV-N210D2-1GI HDMI Connector D-Sub monitor Connector (15-pin) DVI-I Connector HDMI Connector D-Sub monitor Connector (15-pin) DVI-I Connector HDMI TV or Analog LCD Monitor Analog Monitor DVI Output Digital LCD Monitor GV-N210 Series Graphics Accelerator - 10 -
3. GV-N210D2-1GI HDMI Connector D-Sub monitor Connector (15-pin) DVI-I Connector HDMI Connector D-Sub monitor Connector (15-pin) DVI-I Connector HDMI TV or Analog LCD Monitor Analog Monitor DVI Output Digital LCD Monitor GV-N210 Series Graphics Accelerator - 10 -
Manual
Page 12
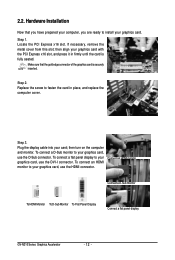
... a flat panel display to your graphics card, use the D-Sub connector. Locate the PCI Express x16 slot. To connect a D-Sub monitor to install your card; Step 2. Plug the display cable into your graphics card. Connect an HDMI monitor Connect a D-Sub monitor To HDMI Monitor To D-Sub Monitor To Flat Panel Display Connect a flat panel display GV-N210 Series Graphics Accelerator - 12 - then turn on the computer and monitor. Make sure that you have prepared your computer, you are ready to your graphics card, use the HDMI connector. Step 3. 2.2. Hardware Installation Now...
... a flat panel display to your graphics card, use the D-Sub connector. Locate the PCI Express x16 slot. To connect a D-Sub monitor to install your card; Step 2. Plug the display cable into your graphics card. Connect an HDMI monitor Connect a D-Sub monitor To HDMI Monitor To D-Sub Monitor To Flat Panel Display Connect a flat panel display GV-N210 Series Graphics Accelerator - 12 - then turn on the computer and monitor. Make sure that you have prepared your computer, you are ready to your graphics card, use the HDMI connector. Step 3. 2.2. Hardware Installation Now...
Manual
Page 13
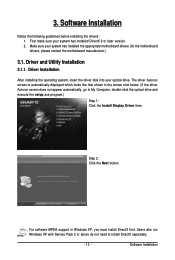
... drive. Driver Installation After installing the operating system, insert the driver disk into your system has installed DirectX 9 or later version. 2. For software MPEG support in the screen shot below. (If the driver Autorun screen does not appear automatically, go to install DirectX separately. - 13 - The driver Autorun screen is automatically displayed which looks like that shown in Windows XP, you must install DirectX first. Software Installation Software Installation Notice the following guidelines before installing the drivers: 1. Users who run Windows...
... drive. Driver Installation After installing the operating system, insert the driver disk into your system has installed DirectX 9 or later version. 2. For software MPEG support in the screen shot below. (If the driver Autorun screen does not appear automatically, go to install DirectX separately. - 13 - The driver Autorun screen is automatically displayed which looks like that shown in Windows XP, you must install DirectX first. Software Installation Software Installation Notice the following guidelines before installing the drivers: 1. Users who run Windows...
Manual
Page 14
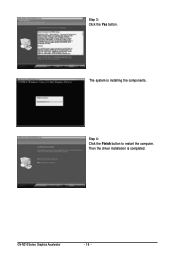
Then the driver installation is installing the components. Step 3: Click the Yes button. Step 4: Click the Finish button to restart the computer. The system is completed. GV-N210 Series Graphics Accelerator - 14 -
Then the driver installation is installing the components. Step 3: Click the Yes button. Step 4: Click the Finish button to restart the computer. The system is completed. GV-N210 Series Graphics Accelerator - 14 -
Manual
Page 16
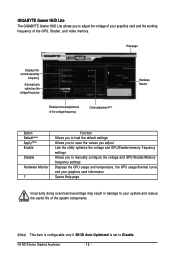
GIGABYTE Gamer HUD Lite The GIGABYTE Gamer HUD Lite allows you to manually configure the voltage and GPU/Shader/Memory frequency settings Displays the GPU usage and temperature, the GPU usage/thermal curve, and your graphics card information Opens Help page Incorrectly doing overclock/overvoltage may result in damage to Disable. GV-N210 Series Graphics Accelerator - 16 - Help page Displays the current operating frequency Automatically optimizes the voltage/frequency Enables manual adjustment of the GPU, Shader, and video memory. Function Allows you to load the...
GIGABYTE Gamer HUD Lite The GIGABYTE Gamer HUD Lite allows you to manually configure the voltage and GPU/Shader/Memory frequency settings Displays the GPU usage and temperature, the GPU usage/thermal curve, and your graphics card information Opens Help page Incorrectly doing overclock/overvoltage may result in damage to Disable. GV-N210 Series Graphics Accelerator - 16 - Help page Displays the current operating frequency Automatically optimizes the voltage/frequency Enables manual adjustment of the GPU, Shader, and video memory. Function Allows you to load the...
Manual
Page 17
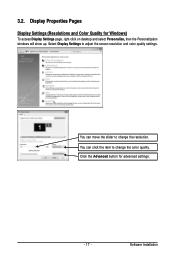
3.2. Select Display Settings to change the color quality. Software Installation You can click the item to change the resolution. Display Properties Pages Display Settings (Resolutions and Color Quality for advanced settings. - 17 - Click the Advanced button for Windows) To access Display Settings page, right-click on desktop and select Personalize, then the Personalization windows will show up. You can move the slider to adjust the screen resolution and color quality settings.
3.2. Select Display Settings to change the color quality. Software Installation You can click the item to change the resolution. Display Properties Pages Display Settings (Resolutions and Color Quality for advanced settings. - 17 - Click the Advanced button for Windows) To access Display Settings page, right-click on desktop and select Personalize, then the Personalization windows will show up. You can move the slider to adjust the screen resolution and color quality settings.
Manual
Page 18
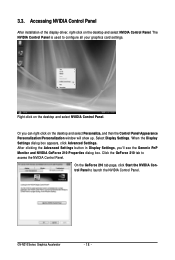
... see the Generic PnP Monitor and NVIDIA GeForce 210 Properties dialog box. Accessing NVIDIA Control Panel After installation of the display driver, right-click on the desktop and select NVIDIA Control Panel. When the Display Settings dialog box appears, click Advanced Settings. On the GeForce 210 tab page, click Start the NVIDIA Control Panel to access the NVIDIA Control Panel. The NVIDIA Control Panel is used to configure all your graphics card settings. Select Display Settings. GV-N210 Series Graphics Accelerator - 18 - 3.3.
... see the Generic PnP Monitor and NVIDIA GeForce 210 Properties dialog box. Accessing NVIDIA Control Panel After installation of the display driver, right-click on the desktop and select NVIDIA Control Panel. When the Display Settings dialog box appears, click Advanced Settings. On the GeForce 210 tab page, click Start the NVIDIA Control Panel to access the NVIDIA Control Panel. The NVIDIA Control Panel is used to configure all your graphics card settings. Select Display Settings. GV-N210 Series Graphics Accelerator - 18 - 3.3.
Manual
Page 19
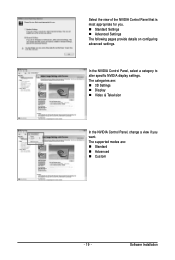
Software Installation The categories are : „ Standard „ Advanced „ Custom - 19 - In the NVIDIA Control Panel, select a category to alter specific NVIDIA display settings. The supported modes are : „ 3D Settings „ Display „ Video & Television In the NVIDIA Control Panel, change a view if you . „ Standard Settings „ Advanced Settings The following pages provide details on configuring advanced settings. Select the view of the NVIDIA Control Panel that is most appropriate for you want.
Software Installation The categories are : „ Standard „ Advanced „ Custom - 19 - In the NVIDIA Control Panel, select a category to alter specific NVIDIA display settings. The supported modes are : „ 3D Settings „ Display „ Video & Television In the NVIDIA Control Panel, change a view if you . „ Standard Settings „ Advanced Settings The following pages provide details on configuring advanced settings. Select the view of the NVIDIA Control Panel that is most appropriate for you want.
Manual
Page 20
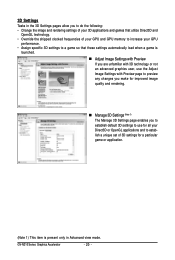
... and games that utilize Direct3D and OpenGL technology. • Override the shipped clocked frequencies of your GPU and GPU memory to increase your GPU performance. • Assign specific 3D settings to a game so that these settings automatically load when a game is launched. „ Adjust Image Settings with Preview If you are unfamiliar with 3D technology or not an advanced graphics user, use the Adjust Image Settings with Preview...
... and games that utilize Direct3D and OpenGL technology. • Override the shipped clocked frequencies of your GPU and GPU memory to increase your GPU performance. • Assign specific 3D settings to a game so that these settings automatically load when a game is launched. „ Adjust Image Settings with Preview If you are unfamiliar with 3D technology or not an advanced graphics user, use the Adjust Image Settings with Preview...
Manual
Page 21
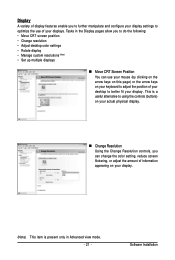
... of your desktop to adjust the position of information appearing on your keyboard to better fit your display. Tasks in Advanced view mode. - 21 - Display A variety of display features enable you to further manipulate and configure your display settings to optimize the use of your display. (Note) This item is a useful alternative to using the controls (buttons) on your actual physical display. „ Change Resolution Using the Change Resolution controls, you can use your...
... of your desktop to adjust the position of information appearing on your keyboard to better fit your display. Tasks in Advanced view mode. - 21 - Display A variety of display features enable you to further manipulate and configure your display settings to optimize the use of your display. (Note) This item is a useful alternative to using the controls (buttons) on your actual physical display. „ Change Resolution Using the Change Resolution controls, you can use your...
Manual
Page 22
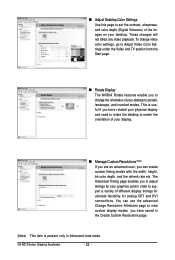
... custom timing modes with the width, height, bit-color depth, and the refresh rate etc. GV-N210 Series Graphics Accelerator - 22 - The Advanced Timing page enables you to change video color settings, go to Adjust Video Color Settings under the Video and TV section from the Start page. „ Rotate Display The NVIDIA Rotate features enable you to adjust timings for analog CRT and DVI connections. To change the orientation of your display. „ Manage Custom Resolutions(Note) If...
... custom timing modes with the width, height, bit-color depth, and the refresh rate etc. GV-N210 Series Graphics Accelerator - 22 - The Advanced Timing page enables you to change video color settings, go to Adjust Video Color Settings under the Video and TV section from the Start page. „ Rotate Display The NVIDIA Rotate features enable you to adjust timings for analog CRT and DVI connections. To change the orientation of your display. „ Manage Custom Resolutions(Note) If...
Manual
Page 23
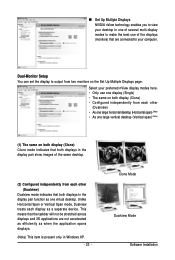
... the Set Up Multiple Displays page. Dual-Monitor Setup You can set the display to output from two monitors on both display (Clone) Clone mode indicates that both displays in the display pair function as one of several multi-display modes to make the best use of the same desktop. (2) Configured independently from each display as when the application spans displays. (Note) This item is present only in Windows XP. - 23 - Clone Mode Dualview Mode Software Installation „ Set Up Multiple Displays NVIDIA nView technology enables you...
... the Set Up Multiple Displays page. Dual-Monitor Setup You can set the display to output from two monitors on both display (Clone) Clone mode indicates that both displays in the display pair function as one of several multi-display modes to make the best use of the same desktop. (2) Configured independently from each display as when the application spans displays. (Note) This item is present only in Windows XP. - 23 - Clone Mode Dualview Mode Software Installation „ Set Up Multiple Displays NVIDIA nView technology enables you...

Manual
Page 24
GV-N210 Series Graphics Accelerator - 24 - (3) As one large horizontal desktop (Horizontal span) (Note 1) Horizontal Span mode indicates that both displays in the display pair function as one wide virtual desktop. Horizontal Span Mode Vertical Span Mode Display Model GV-N210OC-512I GV-N210D3-512I GV-N210TC-1GI GV-N210TC-512I GV-N210D2-1GI Matrix CRT+HDMI Yes Yes Yes Yes Yes CRT+DVI Yes Yes Yes Yes Yes DVI+HDMI Yes Yes Yes Yes Yes DVI+HDMI+CRT No No No No No DVI +DVI(Note...
GV-N210 Series Graphics Accelerator - 24 - (3) As one large horizontal desktop (Horizontal span) (Note 1) Horizontal Span mode indicates that both displays in the display pair function as one wide virtual desktop. Horizontal Span Mode Vertical Span Mode Display Model GV-N210OC-512I GV-N210D3-512I GV-N210TC-1GI GV-N210TC-512I GV-N210D2-1GI Matrix CRT+HDMI Yes Yes Yes Yes Yes CRT+DVI Yes Yes Yes Yes Yes DVI+HDMI Yes Yes Yes Yes Yes DVI+HDMI+CRT No No No No No DVI +DVI(Note...

Manual
Page 25
... desktop video to best fit your television screen. „ Adjust Video Color Settings Use the controls on this page to monitor your ForceWare graphics driver version. Consult the release notes for video content on supported features. - 25 - You can choose to fine tune the image settings for updated information on your display. Software Installation For best results, play a video while you to do the following: • Adjust your television picture quality and video color settings...
... desktop video to best fit your television screen. „ Adjust Video Color Settings Use the controls on this page to monitor your ForceWare graphics driver version. Consult the release notes for video content on supported features. - 25 - You can choose to fine tune the image settings for updated information on your display. Software Installation For best results, play a video while you to do the following: • Adjust your television picture quality and video color settings...
Manual
Page 26
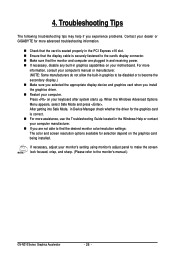
... properly in the PCI Express x16 slot. „ Ensure that the display cable is correct. „ For more assistance, use the Troubleshooting Guide located in graphics capabilities on your computer. Press on the graphics card being installed. Troubleshooting Tips The following troubleshooting tips may help if you experience problems. Contact your dealer or GIGABYTE for selection depend on your monitor's setting using monitor's adjust panel to make the screen look focused, crisp...
... properly in the PCI Express x16 slot. „ Ensure that the display cable is correct. „ For more assistance, use the Troubleshooting Guide located in graphics capabilities on your computer. Press on the graphics card being installed. Troubleshooting Tips The following troubleshooting tips may help if you experience problems. Contact your dealer or GIGABYTE for selection depend on your monitor's setting using monitor's adjust panel to make the screen look focused, crisp...
Manual
Page 30
...need further assistance in recycling, reusing in your "end of life" product, you purchased the product for details of environmentally safe recycling. Š When your product's user's manual and we at GIGABYTE are continuing our efforts to conserve natural resources and ensure that do not use of our natural resources, GIGABYTE... safety requirements. Moreover, we will be disposed of printing. GV-N210 Series Graphics Accelerator - 30 - The WEEE Directive specifies the treatment, collection, recycling and disposal of the materials in this document is on the product or ...
...need further assistance in recycling, reusing in your "end of life" product, you purchased the product for details of environmentally safe recycling. Š When your product's user's manual and we at GIGABYTE are continuing our efforts to conserve natural resources and ensure that do not use of our natural resources, GIGABYTE... safety requirements. Moreover, we will be disposed of printing. GV-N210 Series Graphics Accelerator - 30 - The WEEE Directive specifies the treatment, collection, recycling and disposal of the materials in this document is on the product or ...


