Manual
Page 2
... are the property of this document nor does it make a commitment to rapid change in this booklet. Use of certain U.S. The author assumes no responsibility for home and other limited viewing uses only unless otherwise authorized by method claims of this VGA card. patents and other intellectual property rights owned by GIGA-BYTE TECHNOLOGY CO., LTD. ("GBT") No part of this manual may void...
... are the property of this document nor does it make a commitment to rapid change in this booklet. Use of certain U.S. The author assumes no responsibility for home and other limited viewing uses only unless otherwise authorized by method claims of this VGA card. patents and other intellectual property rights owned by GIGA-BYTE TECHNOLOGY CO., LTD. ("GBT") No part of this manual may void...

Manual
Page 3
... 1.1. BOARD LAYOUT 6 2.3. PREFACE 4 1.2.Overview 4 2.HARDWARE INSTALLATION 2.1. HARDWARE INSTALLATION 7 3.SOFTWARE INSTALLATION 3.1Win98/98/SE or WinME / WinXP Driver And Utilities Installation ..... 9 3.1.1 Operating system requirement 9 3.1.2 DirectX installation 10 3.1.3 Driver installation 12 3.1.4 Utilities on driver CD 15 3.1.5 Taskbar Icon 15 3.1.6 Property pages 18 3.2.WINDOWS NT 4.0 DRIVER INSTALLATION 22 3.3.WINDOWS 2000 DRIVER INSTALLATION 23 3.4 BIOS FLASH UTILITY 23 4.Troubleshooting Tips 24 5.Appendix 5.1.How to refash the BIOS 25 5.2.Resolutions and Color...
... 1.1. BOARD LAYOUT 6 2.3. PREFACE 4 1.2.Overview 4 2.HARDWARE INSTALLATION 2.1. HARDWARE INSTALLATION 7 3.SOFTWARE INSTALLATION 3.1Win98/98/SE or WinME / WinXP Driver And Utilities Installation ..... 9 3.1.1 Operating system requirement 9 3.1.2 DirectX installation 10 3.1.3 Driver installation 12 3.1.4 Utilities on driver CD 15 3.1.5 Taskbar Icon 15 3.1.6 Property pages 18 3.2.WINDOWS NT 4.0 DRIVER INSTALLATION 22 3.3.WINDOWS 2000 DRIVER INSTALLATION 23 3.4 BIOS FLASH UTILITY 23 4.Troubleshooting Tips 24 5.Appendix 5.1.How to refash the BIOS 25 5.2.Resolutions and Color...
Manual
Page 4
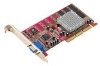
... pixel cache to 1920x1200 @ 32bpp n DirectX®, Direct3D, DirectDraw n Triangle Setup Engine n Texture Cache n Bilinear/Trilinear Filtering n Line & Edge Anti-Aliasing n Z-buffering and Double-buffering 4 PREFACE At the center of memory and ATI RAGE 128 PRO™ graphics technology n Full 3D acceleration in all modes and color depths in resolutions up to increase the effective memory bandwidth for extra performance.. 1.2. 1 Chapter User's Manual AG32S Graphics Accelerator 1.INTRODUCTION 1.1.
... pixel cache to 1920x1200 @ 32bpp n DirectX®, Direct3D, DirectDraw n Triangle Setup Engine n Texture Cache n Bilinear/Trilinear Filtering n Line & Edge Anti-Aliasing n Z-buffering and Double-buffering 4 PREFACE At the center of memory and ATI RAGE 128 PRO™ graphics technology n Full 3D acceleration in all modes and color depths in resolutions up to increase the effective memory bandwidth for extra performance.. 1.2. 1 Chapter User's Manual AG32S Graphics Accelerator 1.INTRODUCTION 1.1.
Manual
Page 5
... the following: l The AG32S graphics accelerator l This USER'S MANUAL l DVD Player software included l Lite version 3D Game x2 (CD x 1) l CD for obvious damage. If you work on a grounded anti-static mat. The operator should follow some precautions whenever you do not have one, touch both of your graphics card working correctly, please use official Gigabyte BIOS only Use none official gigabyte BIOS might cause problem on the card before handling computer...
... the following: l The AG32S graphics accelerator l This USER'S MANUAL l DVD Player software included l Lite version 3D Game x2 (CD x 1) l CD for obvious damage. If you work on a grounded anti-static mat. The operator should follow some precautions whenever you do not have one, touch both of your graphics card working correctly, please use official Gigabyte BIOS only Use none official gigabyte BIOS might cause problem on the card before handling computer...

Manual
Page 7
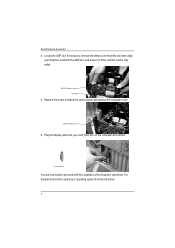
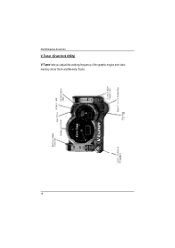
Now that you have prepared your computer, you are ready to disable it on -board graphics capability, you may need to install your graphics accelerator card. If necessary, consult your computer. Remove any on the motherboard. Hardware Installation 2.3. Or, if your computer documentation. 7 Remove the computer cover. Power off the computer and monitor , then disconnect the display cable from your computer's manual for help in removing the cover. 3. To...
Now that you have prepared your computer, you are ready to disable it on -board graphics capability, you may need to install your graphics accelerator card. If necessary, consult your computer. Remove any on the motherboard. Hardware Installation 2.3. Or, if your computer documentation. 7 Remove the computer cover. Power off the computer and monitor , then disconnect the display cable from your computer's manual for help in removing the cover. 3. To...
Manual
Page 8
... monitor. To VGA MON ITOR You are now ready to fasten the card in firmly until the card is fully eated. If necessary, remove the metal cover from the list below: 8 For detailed instructions, select your operating system from this slot; Plug the display cable into your Graphics card with the installation of the Graphics card driver. then align your card; AG 32S Graphics card 6. AG32S Graphics Accelerator 4. Locate the AGP...
... monitor. To VGA MON ITOR You are now ready to fasten the card in firmly until the card is fully eated. If necessary, remove the metal cover from the list below: 8 For detailed instructions, select your operating system from this slot; Plug the display cable into your Graphics card with the installation of the Graphics card driver. then align your card; AG 32S Graphics card 6. AG32S Graphics Accelerator 4. Locate the AGP...
Manual
Page 9
... WINDOWS ME /WINDOWS XP DRIVER AND UTILITIES INSTALLATION The installation of SIS, ALI or VIA chipsets, please install the appropriate Driver programfor that your CD-ROM Drive letter to install the driver for your graphics accelerator. 3.1.1.Operating systemrequirement l If your OS is very simple. Then you can follow guides to setup your AG32S driver (Please follow the subsection 3.1.3 "Step By Step Installation" to be Drive D: 3.1. Or please contact your motherboard...
... WINDOWS ME /WINDOWS XP DRIVER AND UTILITIES INSTALLATION The installation of SIS, ALI or VIA chipsets, please install the appropriate Driver programfor that your CD-ROM Drive letter to install the driver for your graphics accelerator. 3.1.1.Operating systemrequirement l If your OS is very simple. Then you can follow guides to setup your AG32S driver (Please follow the subsection 3.1.3 "Step By Step Installation" to be Drive D: 3.1. Or please contact your motherboard...
Manual
Page 10
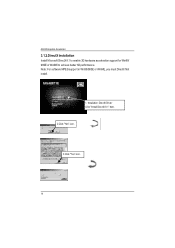
Note: For software MPEG support in Win98/98SE or WinME, you must DirectX first install. 1. Installation DirectX Driver Click "Install DirectX 8.1"Item. 2.Click "Yes" icon. 3.Click "Yes"icon. 10 AG32S Graphics Accelerator 3.1.2.DirectX Installation Install Microsoft DirectX 8.1 to enable 3D hardware acceleration support for Win98/ 98SE or WinME to achieve better 3D performence.
Note: For software MPEG support in Win98/98SE or WinME, you must DirectX first install. 1. Installation DirectX Driver Click "Install DirectX 8.1"Item. 2.Click "Yes" icon. 3.Click "Yes"icon. 10 AG32S Graphics Accelerator 3.1.2.DirectX Installation Install Microsoft DirectX 8.1 to enable 3D hardware acceleration support for Win98/ 98SE or WinME to achieve better 3D performence.
Manual
Page 12
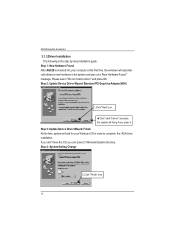
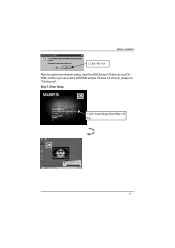
... if you can press C:\Windows\System directory. If you don't have the CD, you press it. Step 1: New Hardware Found After AG32S is the step-by-step installation guide. Please select "Do not install a driver" and press OK. AG32S Graphics Accelerator 3.1.3.Driver Installation The following is inserted into your Windows CD in the system and pop out a "New Hardware Found" message. Step 4: System Setting Change 2..Click "Finish"icon...
... if you can press C:\Windows\System directory. If you don't have the CD, you press it. Step 1: New Hardware Found After AG32S is the step-by-step installation guide. Please select "Do not install a driver" and press OK. AG32S Graphics Accelerator 3.1.3.Driver Installation The following is inserted into your Windows CD in the system and pop out a "New Hardware Found" message. Step 4: System Setting Change 2..Click "Finish"icon...
Manual
Page 13
Step 5: Driver Setup 1. If it does not show up, please run "D:\setup.exe". Software Installation 3..Click "NO"icon. Click "Install Display Driver(Rage 128 Pro). 13 After the system has finished loading, insert the AG32S driver CD disk into your CDROM, and then you can see the AUTORUN window.
Step 5: Driver Setup 1. If it does not show up, please run "D:\setup.exe". Software Installation 3..Click "NO"icon. Click "Install Display Driver(Rage 128 Pro). 13 After the system has finished loading, insert the AG32S driver CD disk into your CDROM, and then you can see the AUTORUN window.
Manual
Page 15
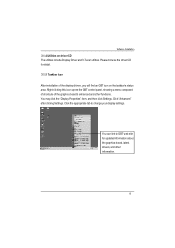
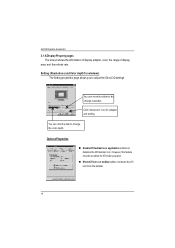
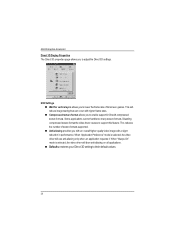
... After installation of the graphics board's enhanced and other information. 15 You can link to change your display settings. Click "Advanced" after clickng Settings. Please browse the driver CD for updated information about the graphics borad, latest drivers, and other functions. Software Installation 3.1.4.Utilities on the taskbar's status area. You may click the "Display Properties"item, and then click Settings. Right-clicking this icon opens the GBT control panel...
... After installation of the graphics board's enhanced and other information. 15 You can link to change your display settings. Click "Advanced" after clickng Settings. Please browse the driver CD for updated information about the graphics borad, latest drivers, and other functions. Software Installation 3.1.4.Utilities on the taskbar's status area. You may click the "Display Properties"item, and then click Settings. Right-clicking this icon opens the GBT control panel...
Manual
Page 16
AG32S Graphics Accelerator V-Tuner (Overclock Utility) V-Tuner lets you adjust the working frequency of the graphic engine and video memory (Core Clock and Memory Clock) 16
AG32S Graphics Accelerator V-Tuner (Overclock Utility) V-Tuner lets you adjust the working frequency of the graphic engine and video memory (Core Clock and Memory Clock) 16

Manual
Page 17
Software Installation Color Adjust Color Adjust allows you to make color adjustments, such as brightness, contrast, and gamma values for each or all of RGB colors. 17 VGA Info VGA Info lists the relevant information about your card.
Software Installation Color Adjust Color Adjust allows you to make color adjustments, such as brightness, contrast, and gamma values for each or all of RGB colors. 17 VGA Info VGA Info lists the relevant information about your card.
Manual
Page 18
... abled for adapter and setting. n Show ATI icon on taskbar adds or removes the ATI icon from the taskbar. 18 Setting (Resolutions and Color depth for windows) The Setting properties page allows you to adjust the Direct 3D settings You can click the item to the change the color depth. AG32S Graphics Accelerator 3.1.6.Display Property pages The screen shows the information of display adapter, color, the range of display area and the refresh rate.
... abled for adapter and setting. n Show ATI icon on taskbar adds or removes the ATI icon from the taskbar. 18 Setting (Resolutions and Color depth for windows) The Setting properties page allows you to adjust the Direct 3D settings You can click the item to the change the color depth. AG32S Graphics Accelerator 3.1.6.Display Property pages The screen shows the information of display adapter, color, the range of display area and the refresh rate.

Manual
Page 19
... enable hardware acceleration ofpage flipping to set the level of Z-buffer and utilizes 16-bit Z-buffe ring. l Enable page flipping allows you to optimize your screen that have been moved. l Wait for quality. l Performance allows you to disable all other formats of mipmapped detail. n Optimization Preference l Quality allows you to increase video performance for smaller, less detailed, mipmapping scenes. 19 Software Installation...
... enable hardware acceleration ofpage flipping to set the level of Z-buffer and utilizes 16-bit Z-buffe ring. l Enable page flipping allows you to optimize your screen that have been moved. l Wait for quality. l Performance allows you to disable all other formats of mipmapped detail. n Optimization Preference l Quality allows you to increase video performance for smaller, less detailed, mipmapping scenes. 19 Software Installation...
Manual
Page 20
... video driver will use anti-aliasing only when an application requests it. D3D Settings n Wait for DirectX compressed texture formats. This reduces the number of full screen games. reduce image tearing that can occur with a slight reduction in performance. Disabling compressed texture format the video driver ceases to support this feature. When "Application Preference"mode is selected, the video driver will . This will force anti...
... video driver will use anti-aliasing only when an application requests it. D3D Settings n Wait for DirectX compressed texture formats. This reduces the number of full screen games. reduce image tearing that can occur with a slight reduction in performance. Disabling compressed texture format the video driver ceases to support this feature. When "Application Preference"mode is selected, the video driver will . This will force anti...
Manual
Page 21
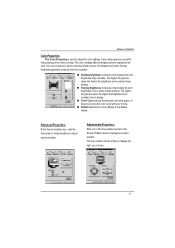
... contrast of your video overlay window. n Default restores the color settings to the view. Advanced Properties: In the Synchronization box, click the Horizontal or Vertical buttons to adjust the color setting s. Set Desktop and Video Overlay brightness (gamma) levels can change your screen position. Software Installation Color Properties The Color Properties is used to adjust synchronization. The four position arrows shift you desktop. n Desktop brightness increases ordecreases the color brightness of the Video Overlay. Adjustments Properties: IClick one o f the...
... contrast of your video overlay window. n Default restores the color settings to the view. Advanced Properties: In the Synchronization box, click the Horizontal or Vertical buttons to adjust the color setting s. Set Desktop and Video Overlay brightness (gamma) levels can change your screen position. Software Installation Color Properties The Color Properties is used to adjust synchronization. The four position arrows shift you desktop. n Desktop brightness increases ordecreases the color brightness of the Video Overlay. Adjustments Properties: IClick one o f the...
Manual
Page 22
... To install the AG32S driver for Windows NT 1. Click"Yes"to the license agreement. 9. Insert the INSTALLATION CD into your CD-ROM drive, substitute D with the correct drive letter.) 5. Click "Next". 8. AG32S Graphics Accelerator 3.2. Type the following: D:\SETUP (If D is not your CD-ROM drive. Click "OK". 6. WINDOWS NT 4.0 DRIVER INSTALLATION Please make sure the Windows NT 4.0 have installed Windows NT 4.0 Service Pack version 6.0 (or later) before installing the graphics accelerator driver. If Windows ® runs...
... To install the AG32S driver for Windows NT 1. Click"Yes"to the license agreement. 9. Insert the INSTALLATION CD into your CD-ROM drive, substitute D with the correct drive letter.) 5. Click "Next". 8. AG32S Graphics Accelerator 3.2. Type the following: D:\SETUP (If D is not your CD-ROM drive. Click "OK". 6. WINDOWS NT 4.0 DRIVER INSTALLATION Please make sure the Windows NT 4.0 have installed Windows NT 4.0 Service Pack version 6.0 (or later) before installing the graphics accelerator driver. If Windows ® runs...
Manual
Page 23
.... 3.4.BIOS FLASH UTILITY AG32S BIOS update procedure: MNote: Please download the newest BIOS from our website (www.gigabyte.com.tw) . Select Run. 4. Click "OK". 6. Insert the INSTALLATION CD into your Graphics card. To install the AG32S driver for the file. Software Installation 3.3.WINDOWS 2000 DRIVER INSTALLATION Please make sure the Windows 2000 have installed Windows ® 2000 Service Pack version 2 (or later) before installing the graphics accelerator driver. With Windows ® 2000 running on -screen instructions to take advantage of the higher performance, resolutions...
.... 3.4.BIOS FLASH UTILITY AG32S BIOS update procedure: MNote: Please download the newest BIOS from our website (www.gigabyte.com.tw) . Select Run. 4. Click "OK". 6. Insert the INSTALLATION CD into your Graphics card. To install the AG32S driver for the file. Software Installation 3.3.WINDOWS 2000 DRIVER INSTALLATION Please make sure the Windows 2000 have installed Windows ® 2000 Service Pack version 2 (or later) before installing the graphics accelerator driver. With Windows ® 2000 running on -screen instructions to take advantage of the higher performance, resolutions...
Manual
Page 24
..., use the Troubleshooting Guide located in the Windows® Help or contact your computer manufacturer. 24 AG32S Graphics Accelerator 4.Troubleshooting Tips The following troubleshooting tips may help if you experience problems. Contact your dealer or GBT for duplicate display adapter and monitor entries if you have problems during bootup, start your computer in Safe Mode. n Ensure the display cable is seated properly in the AGP slot. For more troubleshooting...
..., use the Troubleshooting Guide located in the Windows® Help or contact your computer manufacturer. 24 AG32S Graphics Accelerator 4.Troubleshooting Tips The following troubleshooting tips may help if you experience problems. Contact your dealer or GBT for duplicate display adapter and monitor entries if you have problems during bootup, start your computer in Safe Mode. n Ensure the display cable is seated properly in the AGP slot. For more troubleshooting...


