Manual
Page 3
...read or download the information on/from the Support\Motherboard\Technology Guide page on your motherboard revision before updating motherboard BIOS, drivers, or when looking for technical information. Disclaimer Information in this manual is protected by copyright laws and is 1.0. is exclusively...sive global distributor of the motherboard is the property of this manual may be reproduced, copied, translated, transmitted, or published in the use GIGABYTE's unique features, read the User's Manual. „ For instructions on how to the specifications and features in this : "REV: ...
...read or download the information on/from the Support\Motherboard\Technology Guide page on your motherboard revision before updating motherboard BIOS, drivers, or when looking for technical information. Disclaimer Information in this manual is protected by copyright laws and is 1.0. is exclusively...sive global distributor of the motherboard is the property of this manual may be reproduced, copied, translated, transmitted, or published in the use GIGABYTE's unique features, read the User's Manual. „ For instructions on how to the specifications and features in this : "REV: ...

Manual
Page 5
2-14 Exit Without Saving 58 Chapter 3 Drivers Installation 59 3-1 Installing Chipset Drivers 59 3-2 SoftwareApplications 60 3-3 Driver CD Information 60 3-4 Hardware Information 61 3-5 Contact Us ...61 Chapter 4 Unique Features 63 4-1 Xpress Recovery2 63...75 5-1 Configuring SATA Hard Drive(s 75 5-1-1 Configuring Intel® ICH9R SATA Controllers 75 5-1-2 Making a SATA RAID/AHCI Driver Diskette 81 5-1-3 Installing the SATA RAID/AHCI Driver and Operating System 82 5-2 ConfiguringAudio Input and Output 87 5-2-1 Configuring 2/4/5.1/7.1-Channel Audio 87 5-2-2 Installing the S/PDIF In ...
2-14 Exit Without Saving 58 Chapter 3 Drivers Installation 59 3-1 Installing Chipset Drivers 59 3-2 SoftwareApplications 60 3-3 Driver CD Information 60 3-4 Hardware Information 61 3-5 Contact Us ...61 Chapter 4 Unique Features 63 4-1 Xpress Recovery2 63...75 5-1 Configuring SATA Hard Drive(s 75 5-1-1 Configuring Intel® ICH9R SATA Controllers 75 5-1-2 Making a SATA RAID/AHCI Driver Diskette 81 5-1-3 Installing the SATA RAID/AHCI Driver and Operating System 82 5-2 ConfiguringAudio Input and Output 87 5-2-1 Configuring 2/4/5.1/7.1-Channel Audio 87 5-2-2 Installing the S/PDIF In ...

Manual
Page 6
... port cable (Part No. 12CF1-1CM001-32R) LPT port cable (Part No. 12CF1-1LP001-01R) - 6 - The box contents are for reference only. Box Contents GA-X38-DS4 motherboard Motherboard driver disk User's Manual Quick Installation Guide Intel® LGA775 CPU Installation Guide One IDE cable and one floppy disk drive cable Four SATA 3Gb...
... port cable (Part No. 12CF1-1CM001-32R) LPT port cable (Part No. 12CF1-1LP001-01R) - 6 - The box contents are for reference only. Box Contents GA-X38-DS4 motherboard Motherboard driver disk User's Manual Quick Installation Guide Intel® LGA775 CPU Installation Guide One IDE cable and one floppy disk drive cable Four SATA 3Gb...

Manual
Page 12
... frequency from 100 MHz to 0.35V with 0.05V increment - Increase PCIe voltage by 0.05V to chipset limitation, Intel ICH9R RAID driver does not support Windows 2000 operating system. Increase (G)MCH voltage by 0.025V to 0.375V with 0.025V increment Š Frequency adjustments... Dual BIOS Š Norton Internet Security (OEM version) Š Voltage adjustments in BIOS Setup (CPU/DDR2/PCIe/FSB/(G)MCH) allow you to: - GA-X38-DS4 Motherboard - 12 - BIOS Unique Features Bundled Software Overclocking Operating System Form Factor Š 2 x 8 Mbit flash Š Use of licensed AWARD BIOS...
... frequency from 100 MHz to 0.35V with 0.05V increment - Increase PCIe voltage by 0.05V to chipset limitation, Intel ICH9R RAID driver does not support Windows 2000 operating system. Increase (G)MCH voltage by 0.025V to 0.375V with 0.025V increment Š Frequency adjustments... Dual BIOS Š Norton Internet Security (OEM version) Š Voltage adjustments in BIOS Setup (CPU/DDR2/PCIe/FSB/(G)MCH) allow you to: - GA-X38-DS4 Motherboard - 12 - BIOS Unique Features Bundled Software Overclocking Operating System Form Factor Š 2 x 8 Mbit flash Š Use of licensed AWARD BIOS...

Manual
Page 18
Make sure the small white-drawable bar securely locks the graphics card. • Removing the Card: Pull out the small white- GA-X38-DS4 Motherboard - 18 - • The motherboard provides a PCIE_12V power connector, which can also press the latch on the card until it ... computer and unplug the power cord from your operating system. Secure the card's metal bracket to correctly install your expansion card(s). 7. Install the driver provided with a screw. 5. Turn on the card are completely inserted into the PCI Express x16 slot. After installing all expansion cards, replace...
Make sure the small white-drawable bar securely locks the graphics card. • Removing the Card: Pull out the small white- GA-X38-DS4 Motherboard - 18 - • The motherboard provides a PCIE_12V power connector, which can also press the latch on the card until it ... computer and unplug the power cord from your operating system. Secure the card's metal bracket to correctly install your expansion card(s). 7. Install the driver provided with a screw. 5. Turn on the card are completely inserted into the PCI Express x16 slot. After installing all expansion cards, replace...

Manual
Page 36
In Boot Menu, use the up hard drive data using the motherboard driver disk, the key can access Boot Menu again to change the first boot device setting as needed. : Q-Flash Press the key to access the Q-Flash ... Press the key to enter BIOS Setup. : Xpress Recovery2 If you to set the first boot device without having to show the BIOS POST screen. GA-X38-DS4 Motherboard - 36 - The LOGO Screen (Default) : POST Screen : BIOS Setup/Q-Flash : XpressRecovery2 : Boot Menu: Qflash Function Keys B. A. To show the BIOS POST screen at system...
In Boot Menu, use the up hard drive data using the motherboard driver disk, the key can access Boot Menu again to change the first boot device setting as needed. : Q-Flash Press the key to access the Q-Flash ... Press the key to enter BIOS Setup. : Xpress Recovery2 If you to set the first boot device without having to show the BIOS POST screen. GA-X38-DS4 Motherboard - 36 - The LOGO Screen (Default) : POST Screen : BIOS Setup/Q-Flash : XpressRecovery2 : Boot Menu: Qflash Function Keys B. A. To show the BIOS POST screen at system...
Manual
Page 43
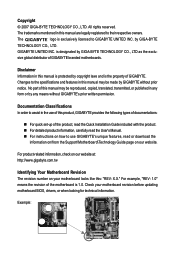
... the SATA controllers use dedicated IRQs that support Native mode, e.g. Enable Native IDE mode if you wish to install operating systems that allows the storage driver to AHCI mode. Set this option to Disabled if you wish to operate in Native IDE mode. Advanced Host Controller Interface (AHCI) is an interface...
... the SATA controllers use dedicated IRQs that support Native mode, e.g. Enable Native IDE mode if you wish to install operating systems that allows the storage driver to AHCI mode. Set this option to Disabled if you wish to operate in Native IDE mode. Advanced Host Controller Interface (AHCI) is an interface...
Manual
Page 59
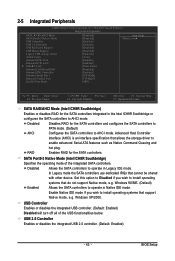
...Xpress Install" is automatically displayed which looks like that are installed, follow the onscreen instructions to install. Chapter 3 Drivers Installation • Before installing the drivers, first install the operating system. (The following the item. After installing the SP1 (or later), if a question... mark still exists in Universal Serial Bus Controller in the motherboard driver disk. • For USB 2.0 driver support under the Windows XP operating system, please install the Windows XP Service Pack 1 or later. After the system...
...Xpress Install" is automatically displayed which looks like that are installed, follow the onscreen instructions to install. Chapter 3 Drivers Installation • Before installing the drivers, first install the operating system. (The following the item. After installing the SP1 (or later), if a question... mark still exists in Universal Serial Bus Controller in the motherboard driver disk. • For USB 2.0 driver support under the Windows XP operating system, please install the Windows XP Service Pack 1 or later. After the system...
Manual
Page 60
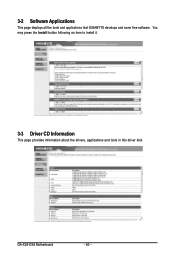
GA-X38-DS4 Motherboard - 60 - You may press the Install button following an item to install it. 3-3 Driver CD Information This page provides information about the drivers, applications and tools in this driver disk. 3-2 Software Applications This page displays all the tools and applications that GIGABYTE develops and some free software.
GA-X38-DS4 Motherboard - 60 - You may press the Install button following an item to install it. 3-3 Driver CD Information This page provides information about the drivers, applications and tools in this driver disk. 3-2 Software Applications This page displays all the tools and applications that GIGABYTE develops and some free software.
Manual
Page 61
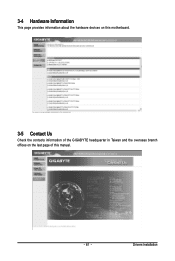
3-4 Hardware Information This page provides information about the hardware devices on this motherboard. 3-5 Contact Us Check the contacts information of the GIGABYTE headquarter in Taiwan and the overseas branch offices on the last page of this manual. - 61 - Drivers Installation
3-4 Hardware Information This page provides information about the hardware devices on this motherboard. 3-5 Contact Us Check the contacts information of the GIGABYTE headquarter in Taiwan and the overseas branch offices on the last page of this manual. - 61 - Drivers Installation

Manual
Page 63
... back up/restore the first physical hard drive that allows you to quickly compress and back up your system soon after the operating system and drivers are installed. • The amount of data and hard drive access speed may affect the speed at the end of system memory • VESA compatible...
... back up/restore the first physical hard drive that allows you to quickly compress and back up your system soon after the operating system and drivers are installed. • The amount of data and hard drive access speed may affect the speed at the end of system memory • VESA compatible...

Manual
Page 66
Boot from the motherboard driver disk to enter Xpress Recovery2 later, simply press during the POST (Figure 9). Award Modular BIOS v6.00PG, An Energy Star Ally Copyright (C) 1984-2007, Award Software, Inc. X38-DS4 F1a . . . . : BIOS Setup : XpressRecovery2 : Boot Menu : Qflash 11/23/2007-X38-ICH9-6A89OG0IC-00 Figure 9 C. Figure 10 ...Accessing Xpress Recovery2 1. Using the Backup Function in your hard drive data (Figure 10). 2. Select BACKUP to enter Xpress Recovery2. . . Figure 12 GA-X38-DS4 Motherboard Xpress Recovery2 will begin to check disk allocation.
Boot from the motherboard driver disk to enter Xpress Recovery2 later, simply press during the POST (Figure 9). Award Modular BIOS v6.00PG, An Energy Star Ally Copyright (C) 1984-2007, Award Software, Inc. X38-DS4 F1a . . . . : BIOS Setup : XpressRecovery2 : Boot Menu : Qflash 11/23/2007-X38-ICH9-6A89OG0IC-00 Figure 9 C. Figure 10 ...Accessing Xpress Recovery2 1. Using the Backup Function in your hard drive data (Figure 10). 2. Select BACKUP to enter Xpress Recovery2. . . Figure 12 GA-X38-DS4 Motherboard Xpress Recovery2 will begin to check disk allocation.

Manual
Page 71
... a power loss or switching off the Internet). Options and Instructions: 1. Before You Begin: 1. Installing and Using @BIOS: Use the motherboard driver disk included with the @BIOS Utility A. Step 2: Select the @BIOS server site closest to save the current BIOS file. 2. In Windows,...the @BIOS utility. • Accessing the @BIOS utility. Do not use the C.O.M. (Corporate Online Management) function when using @BIOS. 4. GIGABYTE product warranty does not cover any BIOS damage or system failure resulting from an inadequate BIOS flashing. Select @BIOS and click Install. Click Start...
... a power loss or switching off the Internet). Options and Instructions: 1. Before You Begin: 1. Installing and Using @BIOS: Use the motherboard driver disk included with the @BIOS Utility A. Step 2: Select the @BIOS server site closest to save the current BIOS file. 2. In Windows,...the @BIOS utility. • Accessing the @BIOS utility. Do not use the C.O.M. (Corporate Online Management) function when using @BIOS. 4. GIGABYTE product warranty does not cover any BIOS damage or system failure resulting from an inadequate BIOS flashing. Select @BIOS and click Install. Click Start...
Manual
Page 75
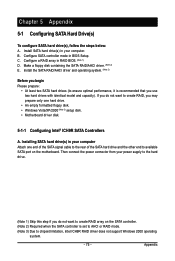
...set to AHCI or RAID mode. (Note 3) Due to chipset limitation, Intel ICH9R RAID driver does not support Windows 2000 operating system. - 75 - B. Make a floppy disk containing the SATA RAID/AHCI driver. (Note 2) E. Then connect the power connector from your computer Attach one hard drive.... • An empty formatted floppy disk. • Windows Vista/XP/2000 (Note 3) setup disk. • Motherboard driver disk. 5-1-1 Configuring Intel® ICH9R SATA Controllers A. Configure a RAID array in your computer. Configure SATA controller mode in your power supply to...
...set to AHCI or RAID mode. (Note 3) Due to chipset limitation, Intel ICH9R RAID driver does not support Windows 2000 operating system. - 75 - B. Make a floppy disk containing the SATA RAID/AHCI driver. (Note 2) E. Then connect the power connector from your computer Attach one hard drive.... • An empty formatted floppy disk. • Windows Vista/XP/2000 (Note 3) setup disk. • Motherboard driver disk. 5-1-1 Configuring Intel® ICH9R SATA Controllers A. Configure a RAID array in your computer. Configure SATA controller mode in your power supply to...

Manual
Page 79
Are you sure you want to create this volume, press to confirm or to create the SATA RAID/AHCI driver diskette and the installation of the SATA RAID/ACHI driver and operating system. - 79 - Create RAID Volume 2. Reset Disks to create the specified volume. [KL]-Change [TAB]-Next [ESC]-Previous Menu Figure 6 [ENTER...
Are you sure you want to create this volume, press to confirm or to create the SATA RAID/AHCI driver diskette and the installation of the SATA RAID/ACHI driver and operating system. - 79 - Create RAID Volume 2. Reset Disks to create the specified volume. [KL]-Change [TAB]-Next [ESC]-Previous Menu Figure 6 [ENTER...

Manual
Page 81
... operating system or 8) Intel Matrix Storage Manager 64 bit for Windows 64-bit. Step 1: Insert the prepared startup disk and motherboard driver disk in the BootDrv folder (Figure 3). Your system will open similar to that has CD-ROM support and a blank formatted floppy disk... the D:\> prompt, type the following two commands. Press to install the SATA controller driver during the Windows setup process. For example, from the motherboard driver disk to the floppy disk. Appendix Without the driver, the hard drive may not be recognized during the OS installation. 5-1-2 Making a SATA...
... operating system or 8) Intel Matrix Storage Manager 64 bit for Windows 64-bit. Step 1: Insert the prepared startup disk and motherboard driver disk in the BootDrv folder (Figure 3). Your system will open similar to that has CD-ROM support and a blank formatted floppy disk... the D:\> prompt, type the following two commands. Press to install the SATA controller driver during the Windows setup process. For example, from the motherboard driver disk to the floppy disk. Appendix Without the driver, the hard drive may not be recognized during the OS installation. 5-1-2 Making a SATA...
Manual
Page 82
... to install a third party SCSI or RAID driver. Installing Windows XP Step 1: Restart your system, or you need to manually specify an adapter. Windows Setup Setup could not determine the type of Windows XP and Vista installation. S=Specify Additional Device ENTER=Continue F3=Exit Figure 2 GA-X38-DS4 Motherboard - 82 - After pressing , there will...
... to install a third party SCSI or RAID driver. Installing Windows XP Step 1: Restart your system, or you need to manually specify an adapter. Windows Setup Setup could not determine the type of Windows XP and Vista installation. S=Specify Additional Device ENTER=Continue F3=Exit Figure 2 GA-X38-DS4 Motherboard - 82 - After pressing , there will...

Manual
Page 83
... F3=Exit Figure 4 - 83 - Step 3: When Setup correctly recognizes the Intel ICH9R SATA RAID/AHCI driver in about one minute. Use the arrow keys to continue the driver installation from the following mass storage device(s): Intel(R) ICH8R/ICH9R SATA RAID Controller * To specify additional SCSI adapters..., CD-ROM drives, or special disk controllers for AHCI mode.) Windows Setup You have any device support disks from the motherboard driver disk. When the screen as shown below will load support for the following list, or press ESC to return to specify additional ...
... F3=Exit Figure 4 - 83 - Step 3: When Setup correctly recognizes the Intel ICH9R SATA RAID/AHCI driver in about one minute. Use the arrow keys to continue the driver installation from the following mass storage device(s): Intel(R) ICH8R/ICH9R SATA RAID Controller * To specify additional SCSI adapters..., CD-ROM drives, or special disk controllers for AHCI mode.) Windows Setup You have any device support disks from the motherboard driver disk. When the screen as shown below will load support for the following list, or press ESC to return to specify additional ...

Manual
Page 84
To repair a Windows XP installation using Recovery Console, press R. To set up Windows XP now, press ENTER. To quit Setup without installing Windows XP, press F3. Enter= Continue R=Repair F3=Exit Figure 5 GA-X38-DS4 Motherboard - 84 - This port of the Setup program prepares Microsoft(R) Windows (R) XP to Setup. WindowsXP Professional Setup Welcome to run on your computer. Step 4: After the SATA RAID/AHCI driver installation is completed, you can proceed with the Windows XP installation.
To repair a Windows XP installation using Recovery Console, press R. To set up Windows XP now, press ENTER. To quit Setup without installing Windows XP, press F3. Enter= Continue R=Repair F3=Exit Figure 5 GA-X38-DS4 Motherboard - 84 - This port of the Setup program prepares Microsoft(R) Windows (R) XP to Setup. WindowsXP Professional Setup Welcome to run on your computer. Step 4: After the SATA RAID/AHCI driver installation is completed, you can proceed with the Windows XP installation.

Manual
Page 85
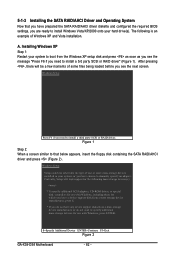
Installing Windows Vista (The procedure below appears, select Load Driver. (Figure 6). Appendix When a screen similar to boot from the Windows Vista setup disk and perform standard OS installation steps. B. Figure 6 Step 2: Specify the location where the driver is saved, such as your system to that below assumes that only one RAID array exists in your system.) Step 1: Restart your floppy disk (Figure 7). Figure 7 - 85 -
Installing Windows Vista (The procedure below appears, select Load Driver. (Figure 6). Appendix When a screen similar to boot from the Windows Vista setup disk and perform standard OS installation steps. B. Figure 6 Step 2: Specify the location where the driver is saved, such as your system to that below assumes that only one RAID array exists in your system.) Step 1: Restart your floppy disk (Figure 7). Figure 7 - 85 -


