Manual
Page 5
... 47 3-1 Installing Chipset Drivers 47 3-2 SoftwareApplications 48 3-3 Driver CD Information 48 3-4 Hardware Information 49 3-5 Contact Us ...49 Chapter 4 Unique Features 51 4-1 Xpress Recovery2 51 4-2 BIOS ...Configuring SATA Hard Drive(s 63 5-1-1 Configuring VIA VT8237S SATA Controllers 63 5-1-2 Making a SATA RAID Driver Diskette 70 5-1-3 Installing the SATA RAID Driver and Operating System 71 5-2 Configuring Audio Input and Output 74 5-2-1 Configuring 2/4/5.1/7.1-Channel Audio 74 5-2-2 Installing the S/PDIF In and Out Cable (Optional 77 5-2-3 Configuring Microphone Recording 79...
... 47 3-1 Installing Chipset Drivers 47 3-2 SoftwareApplications 48 3-3 Driver CD Information 48 3-4 Hardware Information 49 3-5 Contact Us ...49 Chapter 4 Unique Features 51 4-1 Xpress Recovery2 51 4-2 BIOS ...Configuring SATA Hard Drive(s 63 5-1-1 Configuring VIA VT8237S SATA Controllers 63 5-1-2 Making a SATA RAID Driver Diskette 70 5-1-3 Installing the SATA RAID Driver and Operating System 71 5-2 Configuring Audio Input and Output 74 5-2-1 Configuring 2/4/5.1/7.1-Channel Audio 74 5-2-2 Installing the S/PDIF In and Out Cable (Optional 77 5-2-3 Configuring Microphone Recording 79...

Manual
Page 19
..., be connected to this jack. Refer to the instructions on the motherboard. - 19 - English Mic In Jack (Pink) The default Mic in Chapter 5, "Configuring 2/4/5.1/7.1Channel Audio." 1-7 Internal Connectors 1 3 2 11 6 4 7 12 18 9 13 14 15 5 16 17 8 10 1) ATX_12V 2) ATX (Power Connector) 3) CPU_FAN 4) SYS_FAN 5) FDD 6) IDE1 / IDE2 7) SATAII0 / SATAII1 8) PWR_LED 9) BATTERY... on the computer, make sure your devices are compliant with the connectors you need to install a 5.1/7.1 surround cable (optional) and enable the multi-channel audio feature through the audio driver.
..., be connected to this jack. Refer to the instructions on the motherboard. - 19 - English Mic In Jack (Pink) The default Mic in Chapter 5, "Configuring 2/4/5.1/7.1Channel Audio." 1-7 Internal Connectors 1 3 2 11 6 4 7 12 18 9 13 14 15 5 16 17 8 10 1) ATX_12V 2) ATX (Power Connector) 3) CPU_FAN 4) SYS_FAN 5) FDD 6) IDE1 / IDE2 7) SATAII0 / SATAII1 8) PWR_LED 9) BATTERY... on the computer, make sure your devices are compliant with the connectors you need to install a 5.1/7.1 surround cable (optional) and enable the multi-channel audio feature through the audio driver.
Manual
Page 74
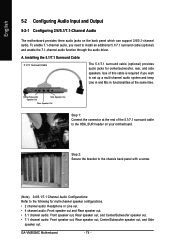
... HDA_SUR header on the back panel which can support 2/4/5.1-channel audio. GA-VM900MC Motherboard - 74 - A. Step 2: Secure the bracket to the chassis back panel with a screw. (Note) 2/4/5.1/7.1 Channel Audio Configurations: Refer to install an additional 5.1/7.1 surround cable (optional) and enable the 7.1-channel audio function through the audio driver. Installing the 5.1/7.1 Surround Cable: 5.1/7.1 Surround Cable The 5.1/7.1 surround cable...
... HDA_SUR header on the back panel which can support 2/4/5.1-channel audio. GA-VM900MC Motherboard - 74 - A. Step 2: Secure the bracket to the chassis back panel with a screw. (Note) 2/4/5.1/7.1 Channel Audio Configurations: Refer to install an additional 5.1/7.1 surround cable (optional) and enable the 7.1-channel audio function through the audio driver. Installing the 5.1/7.1 Surround Cable: 5.1/7.1 Surround Cable The 5.1/7.1 surround cable...
Manual
Page 75
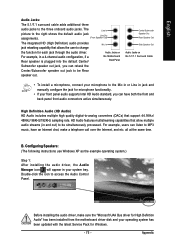
...in or Line in and out) to be simultaneously processed. HD Audio features multistreaming capabilities that allow multiple audio streams (in jack and manually configure the jack for each jack through the audio driver. Appendix Audio Jacks on the 5.1/7.1 Surround Cable • To install a ...Speakers: (The following instructions use Windows XP as the example operating system.) Step 1: After installing the audio driver, the Audio Manager icon will appear in a 4-channel audio configuration, if a Rear speaker is plugged into the default Center/ the Motherboard Back Panel Subwoofer speaker ...
...in or Line in and out) to be simultaneously processed. HD Audio features multistreaming capabilities that allow multiple audio streams (in jack and manually configure the jack for each jack through the audio driver. Appendix Audio Jacks on the 5.1/7.1 Surround Cable • To install a ...Speakers: (The following instructions use Windows XP as the example operating system.) Step 1: After installing the audio driver, the Audio Manager icon will appear in a 4-channel audio configuration, if a Rear speaker is plugged into the default Center/ the Motherboard Back Panel Subwoofer speaker ...
Manual
Page 79
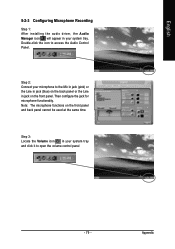
Step 2: Connect your microphone to access the Audio Control Panel. Appendix Then configure the jack for microphone functionality. Note: The microphone functions on the front panel. Double-click the icon to the Mic ... panel cannot be used at the same time. Step 3: Locate the Volume icon in your system tray. English 5-2-3 Configuring Microphone Recording Step 1: After installing the audio driver, the Audio Manager icon will appear in your system tray and click it to open the volume control panel - 79 -
Step 2: Connect your microphone to access the Audio Control Panel. Appendix Then configure the jack for microphone functionality. Note: The microphone functions on the front panel. Double-click the icon to the Mic ... panel cannot be used at the same time. Step 3: Locate the Volume icon in your system tray. English 5-2-3 Configuring Microphone Recording Step 1: After installing the audio driver, the Audio Manager icon will appear in your system tray and click it to open the volume control panel - 79 -


