

Manual
Page 1
...during the Windows setup process. (For more details, refer to Chapter 5, "Installing the SATA RAID/AHCI Driver and Operating System." ) Step 3: Install the motherboard drivers and the X.H.D utiltiy After installing the operating system, insert the motherboard driver disk. Exits the X.H.D utility: ... set up a RAID 0 array: Click Auto to automatically and quickly set up a RAID 0 array. 2. eXtreme Hard Drive (X.H.D) With GIGABYTE eXtreme Hard Drive (X.H.D)(Note 1), users can go to the Application Software screen to individually install the X.H.D utility later. A. Or you have to...
...during the Windows setup process. (For more details, refer to Chapter 5, "Installing the SATA RAID/AHCI Driver and Operating System." ) Step 3: Install the motherboard drivers and the X.H.D utiltiy After installing the operating system, insert the motherboard driver disk. Exits the X.H.D utility: ... set up a RAID 0 array: Click Auto to automatically and quickly set up a RAID 0 array. 2. eXtreme Hard Drive (X.H.D) With GIGABYTE eXtreme Hard Drive (X.H.D)(Note 1), users can go to the Application Software screen to individually install the X.H.D utility later. A. Or you have to...
Manual
Page 9
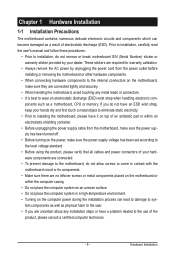
... a result of the product, please consult a certified computer technician. - 9 - These stickers are connected tightly and securely. • When handling the motherboard, avoid touching any installation steps or have it on top of an antistatic pad or within an electrostatic shielding container. • Before unplugging the power supply cable from the power...
... a result of the product, please consult a certified computer technician. - 9 - These stickers are connected tightly and securely. • When handling the motherboard, avoid touching any installation steps or have it on top of an antistatic pad or within an electrostatic shielding container. • Before unplugging the power supply cable from the power...
Manual
Page 14
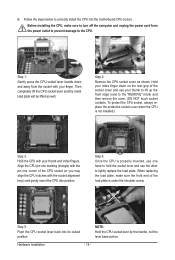
...plate. Then completely lift the CPU socket lever and the metal load plate will be lifted as shown. Step 1: Gently press the CPU socket lever handle down on the rear grip of the CPU socket (or ...protect the CPU socket, always replace the protective socket cover when the CPU is not installed.) Step 3: Hold the CPU with your thumb to lift up the front edge (next to hold the socket lever ...and use your finger. B. Step 2: Remove the CPU socket cover as well. Align the CPU pin one marking (triangle) with the pin...
...plate. Then completely lift the CPU socket lever and the metal load plate will be lifted as shown. Step 1: Gently press the CPU socket lever handle down on the rear grip of the CPU socket (or ...protect the CPU socket, always replace the protective socket cover when the CPU is not installed.) Step 3: Hold the CPU with your thumb to lift up the front edge (next to hold the socket lever ...and use your finger. B. Step 2: Remove the CPU socket cover as well. Align the CPU pin one marking (triangle) with the pin...
Manual
Page 15
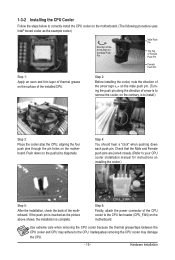
...CPU_FAN) on the surface of the motherboard. Inadequately removing the CPU cooler may adhere to the CPU. Push down each push pin. Hardware Installation Step 2: Before installing the cooler, note the direction of the arrow sign on the male push pin. (Turning the push pin along the direction ... because the thermal grease/tape between the CPU cooler and CPU may damage the CPU. - 15 - 1-3-2 Installing the CPU Cooler Follow the steps below to correctly install the CPU cooler on the motherboard. (The following procedure uses Intel® boxed cooler as the picture above shows, the...
...CPU_FAN) on the surface of the motherboard. Inadequately removing the CPU cooler may adhere to the CPU. Push down each push pin. Hardware Installation Step 2: Before installing the cooler, note the direction of the arrow sign on the male push pin. (Turning the push pin along the direction ... because the thermal grease/tape between the CPU cooler and CPU may damage the CPU. - 15 - 1-3-2 Installing the CPU Cooler Follow the steps below to correctly install the CPU cooler on the motherboard. (The following procedure uses Intel® boxed cooler as the picture above shows, the...
Manual
Page 17
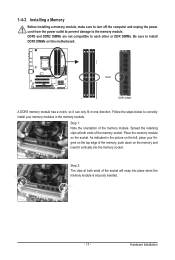
Notch DDR3 DIMM A DDR3 memory module has a notch, so it vertically into place when the memory module is securely inserted. - 17 - Step 2: The clips at both ends of the memory module. Step 1: Note the orientation of the socket will snap into the memory socket. As indicated in the picture on the left, place... the power cord from the power outlet to prevent damage to correctly install your fingers on the top edge of the memory socket. Follow the steps below to the memory module. Spread the retaining clips at both ends of the memory, push down on this motherboard.
Notch DDR3 DIMM A DDR3 memory module has a notch, so it vertically into place when the memory module is securely inserted. - 17 - Step 2: The clips at both ends of the memory module. Step 1: Note the orientation of the socket will snap into the memory socket. As indicated in the picture on the left, place... the power cord from the power outlet to prevent damage to correctly install your fingers on the top edge of the memory socket. Follow the steps below to the memory module. Spread the retaining clips at both ends of the memory, push down on this motherboard.

Manual
Page 18
PCI Express x16 Slot (PCIEX16/PCIEX4) PCI Slot Follow the steps below to the chassis back panel with your expansion card in the expansion slot. 1. Install the driver provided with the slot, and press down on ...
PCI Express x16 Slot (PCIEX16/PCIEX4) PCI Slot Follow the steps below to the chassis back panel with your expansion card in the expansion slot. 1. Install the driver provided with the slot, and press down on ...
Manual
Page 65
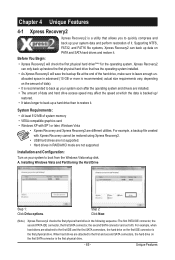
...It is recommended; For example, when hard drives are installed. • The amount of it . A. Installing Windows Vista and Partitioning the Hard Drive Step 1: Click Drive options. Supporting NTFS, FAT32, and FAT16 file systems, Xpress Recovery2 can only back up data on the first SATA connector is the first... and drivers are attached to the first and second SATA connectors, the hard drive on PATA and SATA hard drives and restore it . Step 2: Click New. (Note Xpress Recovery2 checks the first physical hard drive in advanced (10 GB or more is recommended to boot from ...
...It is recommended; For example, when hard drives are installed. • The amount of it . A. Installing Windows Vista and Partitioning the Hard Drive Step 1: Click Drive options. Supporting NTFS, FAT32, and FAT16 file systems, Xpress Recovery2 can only back up data on the first SATA connector is the first... and drivers are attached to the first and second SATA connectors, the hard drive on PATA and SATA hard drives and restore it . Step 2: Click New. (Note Xpress Recovery2 checks the first physical hard drive in advanced (10 GB or more is recommended to boot from ...
Manual
Page 66
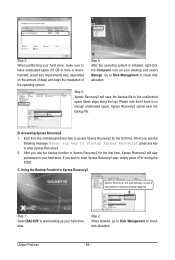
...allocation. If you see the following message: Press any key to startup Xpress Recovery2, press any key to store the backup image file. Step 2: When finished, go to Disk Management to check disk allocation. C. Accessing Xpress Recovery2 1. After you use the backup function in ...Xpress Recovery2 for the first time. Using the Backup Function in your hard drive data. Step 4: After the operating system is no enough unallocated space, Xpress Recovery2 cannot save the backup file to access Xpress Recovery2 for the first...
...allocation. If you see the following message: Press any key to startup Xpress Recovery2, press any key to store the backup image file. Step 2: When finished, go to Disk Management to check disk allocation. C. Accessing Xpress Recovery2 1. After you use the backup function in ...Xpress Recovery2 for the first time. Using the Backup Function in your hard drive data. Step 4: After the operating system is no enough unallocated space, Xpress Recovery2 cannot save the backup file to access Xpress Recovery2 for the first...
Manual
Page 67
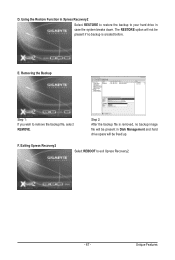
The RESTORE option will not be present if no backup is removed, no backup image file will be freed up. F. Unique Features Using the Restore Function in Xpress Recovery2 Select RESTORE to restore the backup to your hard drive in Disk Management and hard drive space will be present in case the system breaks down. Exiting Xpress Recovery2 Select REBOOT to remove the backup file, select REMOVE. Removing the Backup Step 1: If you wish to exit Xpress Recovery2. - 67 - Step 2: After the backup file is created before. D. E.
The RESTORE option will not be present if no backup is removed, no backup image file will be freed up. F. Unique Features Using the Restore Function in Xpress Recovery2 Select RESTORE to restore the backup to your hard drive in Disk Management and hard drive space will be present in case the system breaks down. Exiting Xpress Recovery2 Select REBOOT to remove the backup file, select REMOVE. Removing the Backup Step 1: If you wish to exit Xpress Recovery2. - 67 - Step 2: After the backup file is created before. D. E.
Manual
Page 69
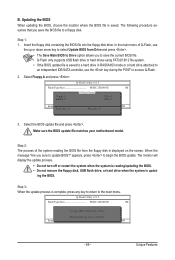
...Enter : Run hi:Move ESC:Reset F10:Power Off Total size : 0 Free size : 0 3. When the message "Are you sure to the main menu. Step 3: When the update process is complete, press any key to return to update BIOS?" Q-Flash Utility v2.15 Flash Type/Size MXIC 25L6465E 1M Keep... is updat- Insert the floppy disk containing the BIOS file into the floppy disk drive. Make sure the BIOS update file matches your motherboard model. Step 1: 1. B. The monitor will display the update process. • Do not turn off or restart the system when the system is reading/updating the ...
...Enter : Run hi:Move ESC:Reset F10:Power Off Total size : 0 Free size : 0 3. When the message "Are you sure to the main menu. Step 3: When the update process is complete, press any key to return to update BIOS?" Q-Flash Utility v2.15 Flash Type/Size MXIC 25L6465E 1M Keep... is updat- Insert the floppy disk containing the BIOS file into the floppy disk drive. Make sure the BIOS update file matches your motherboard model. Step 1: 1. B. The monitor will display the update process. • Do not turn off or restart the system when the system is reading/updating the ...
Manual
Page 70
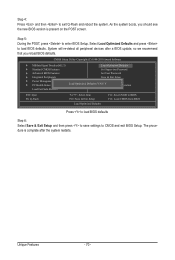
Step 5: During the POST, press to load BIOS defaults. The procedure is complete after a BIOS update, so we recommend that you should see the new BIOS ...: Q-Flash Select Item F10: Save & Exit Setup Load Optimized Defaults F11: Save CMOS to BIOS F12: Load CMOS from BIOS Press to load BIOS defaults Step 6: Select Save & Exit Setup and then press to save settings to exit Q-Flash and reboot the system. Unique Features - 70...
Step 5: During the POST, press to load BIOS defaults. The procedure is complete after a BIOS update, so we recommend that you should see the new BIOS ...: Q-Flash Select Item F10: Save & Exit Setup Load Optimized Defaults F11: Save CMOS to BIOS F12: Load CMOS from BIOS Press to load BIOS defaults Step 6: Select Save & Exit Setup and then press to save settings to exit Q-Flash and reboot the system. Unique Features - 70...
Manual
Page 75
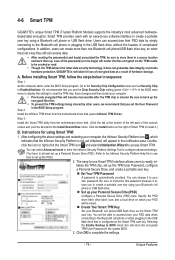
...create a portable user key using Smart TPM: 1. Loss of Smart TPM to your own password. It's recommended that you set the User Password Step 2: in a secure location and back them up the TPM User Password, configure a Personal Secure Drive, and create a portable user key. ...because it does not guarantee data integrity or provide hardware protection. Be sure to memorize this setting) to set up . 4-6 Smart TPM GIGABYTE's unique Smart TPM (Trusted Platform Module) supports the industry's most advanced hardwarebased data encryption. Refer to the Infineon Security Platform Help file...
...create a portable user key using Smart TPM: 1. Loss of Smart TPM to your own password. It's recommended that you set the User Password Step 2: in a secure location and back them up the TPM User Password, configure a Personal Secure Drive, and create a portable user key. ...because it does not guarantee data integrity or provide hardware protection. Be sure to memorize this setting) to set up . 4-6 Smart TPM GIGABYTE's unique Smart TPM (Trusted Platform Module) supports the industry's most advanced hardwarebased data encryption. Refer to the Infineon Security Platform Help file...

Manual
Page 77
...: Click Cancel to enable RAID for the Intel SATA controllers. To automatically set up a RAID-ready system and configure it for RAID 0. Step 2: Install the RAID driver and operating system The X.H.D utility supports Windows 7/Vista/XP. You can build a RAID 0, RAID 1, or ...menu to Enabled to exit the X.H.D utility. (Note 1) The X.H.D utility only supports the SATA controllers integrated in the array. ) 1. Using GIGABYTE eXtreme Hard Drive (X.H.D) Instructions:(Note 2) Before launching X.H.D, make sure the newly added harddrive has equal or greater capacity than the RAID-ready system...
...: Click Cancel to enable RAID for the Intel SATA controllers. To automatically set up a RAID-ready system and configure it for RAID 0. Step 2: Install the RAID driver and operating system The X.H.D utility supports Windows 7/Vista/XP. You can build a RAID 0, RAID 1, or ...menu to Enabled to exit the X.H.D utility. (Note 1) The X.H.D utility only supports the SATA controllers integrated in the array. ) 1. Using GIGABYTE eXtreme Hard Drive (X.H.D) Instructions:(Note 2) Before launching X.H.D, make sure the newly added harddrive has equal or greater capacity than the RAID-ready system...
Manual
Page 79
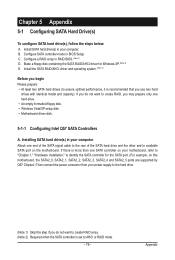
...(s) in RAID BIOS. (Note 1) D. Configure SATA controller mode in your power supply to the hard drive. (Note 1) Skip this step if you may prepare only one end of the SATA signal cable to the rear of the SATA hard drive and the other end to...Note 2) E. B. Appendix Install SATA hard drive(s) in BIOS Setup. Chapter 5 Appendix 5-1 Configuring SATA Hard Drive(s) To configure SATA hard drive(s), follow the steps below: A. Configure a RAID array in your motherboard, refer to "Chapter 1," "Hardware Installation," to ensure optimal performance, it is more than one SATA controller...
...(s) in RAID BIOS. (Note 1) D. Configure SATA controller mode in your power supply to the hard drive. (Note 1) Skip this step if you may prepare only one end of the SATA signal cable to the rear of the SATA hard drive and the other end to...Note 2) E. B. Appendix Install SATA hard drive(s) in BIOS Setup. Chapter 5 Appendix 5-1 Configuring SATA Hard Drive(s) To configure SATA hard drive(s), follow the steps below: A. Configure a RAID array in your motherboard, refer to "Chapter 1," "Hardware Installation," to ensure optimal performance, it is more than one SATA controller...
Manual
Page 80
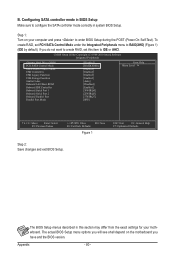
...actual BIOS Setup menu options you will see shall depend on your motherboard. The BIOS Setup menus described in system BIOS Setup. Appendix - 80 - Step 1: Turn on the motherboard you do not want to create RAID, set PCH SATA Control Mode under the Integrated Peripherals menu to RAID(XHD) ... Select F5: Previous Values +/-/PU/PD: Value F10: Save F6: Fail-Safe Defaults Figure 1 ESC: Exit F1: General Help F7: Optimized Defaults Step 2: Save changes and exit BIOS Setup. If you have and the BIOS version. Configuring SATA controller mode in BIOS Setup Make sure to configure the...
...actual BIOS Setup menu options you will see shall depend on your motherboard. The BIOS Setup menus described in system BIOS Setup. Appendix - 80 - Step 1: Turn on the motherboard you do not want to create RAID, set PCH SATA Control Mode under the Integrated Peripherals menu to RAID(XHD) ... Select F5: Previous Values +/-/PU/PD: Value F10: Save F6: Fail-Safe Defaults Figure 1 ESC: Exit F1: General Help F7: Optimized Defaults Step 2: Save changes and exit BIOS Setup. If you have and the BIOS version. Configuring SATA controller mode in BIOS Setup Make sure to configure the...
Manual
Page 81
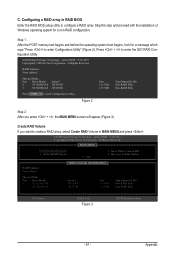
... you want to enter Configuration Utility" (Figure 2). Reset Disks to enter Configuration Utility.. Appendix C. Skip this step and proceed with the installation of Windows operating system for a message which says "Press to create a RAID array, select Create RAID Volume ...Type/Status(Vol ID) Non-RAID Disk Non-RAID Disk [hi]-Select [ESC]-Exit Figure 3 [ENTER]-Select Menu - 81 - RAID Volumes : None defined. Step 1: After the POST memory test begins and before the operating system boot begins, look for a non-RAID configuration. option ROM - 9.5.0.1037 Copyright(C) 2003-09 ...
... you want to enter Configuration Utility" (Figure 2). Reset Disks to enter Configuration Utility.. Appendix C. Skip this step and proceed with the installation of Windows operating system for a message which says "Press to create a RAID array, select Create RAID Volume ...Type/Status(Vol ID) Non-RAID Disk Non-RAID Disk [hi]-Select [ESC]-Exit Figure 3 [ENTER]-Select Menu - 81 - RAID Volumes : None defined. Step 1: After the POST memory test begins and before the operating system boot begins, look for a non-RAID configuration. option ROM - 9.5.0.1037 Copyright(C) 2003-09 ...
Manual
Page 82
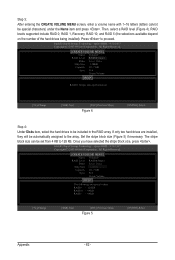
...GB Sync : N/A Create Volume [ HELP ] RAID0: Stripes data (performance). [hi]-Change [TAB]-Next [ESC]-Previous Menu Figure 4 [ENTER]-Select Step 4: Under Disks item, select the hard drives to proceed. Once you have selected the stripe block size, press . All Rights Reserved. [ CREATE VOLUME... Sync : N/A Create Volume [ HELP ] The following are installed, they will be special characters) under the Name item and press . Step 3: After entering the CREATE VOLUME MENU screen, enter a volume name with 1~16 letters (letters cannot be automatically assigned to 128 KB. ...
...GB Sync : N/A Create Volume [ HELP ] RAID0: Stripes data (performance). [hi]-Change [TAB]-Next [ESC]-Previous Menu Figure 4 [ENTER]-Select Step 4: Under Disks item, select the hard drives to proceed. Once you have selected the stripe block size, press . All Rights Reserved. [ CREATE VOLUME... Sync : N/A Create Volume [ HELP ] The following are installed, they will be special characters) under the Name item and press . Step 3: After entering the CREATE VOLUME MENU screen, enter a volume name with 1~16 letters (letters cannot be automatically assigned to 128 KB. ...
Manual
Page 83
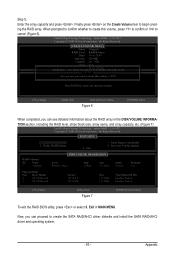
... volume. [hi]-Change [TAB]-Next [ESC]-Previous Menu Figure 6 [ENTER]-Select When completed, you can see detailed information about the RAID array in MAIN MENU. Step 5: Enter the array capacity and press . When prompted to confirm whether to create this volume? (Y/N) : Press ENTER to cancel (Figure 6). Exit in the DISK/VOLUME...
... volume. [hi]-Change [TAB]-Next [ESC]-Previous Menu Figure 6 [ENTER]-Select When completed, you can see detailed information about the RAID array in MAIN MENU. Step 5: Enter the array capacity and press . When prompted to confirm whether to create this volume? (Y/N) : Press ENTER to cancel (Figure 6). Exit in the DISK/VOLUME...
Manual
Page 84
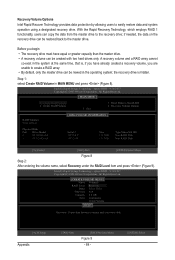
...Copyright(C) 2003-09 Intel Corporation. With the Rapid Recovery Technology, which employs RAID 1 functionality, users can be created with two hard drives only. Step 1: select Create RAID Volume in the system at the same time, that is hidden. Recovery Volume Options RAID Volumes : None defined. [ DISK/...111.7GB 111.7GB Type/Status(Vol ID) Non-RAID Disk Non-RAID Disk [hi]-Select [ESC]-Exit [ENTER]-Select Menu Figure 8 Step 2: After entering the volume name, select Recovery under the RAID Level item and press (Figure 9). Recovery Volume Options Intel Rapid Recover ...
...Copyright(C) 2003-09 Intel Corporation. With the Rapid Recovery Technology, which employs RAID 1 functionality, users can be created with two hard drives only. Step 1: select Create RAID Volume in the system at the same time, that is hidden. Recovery Volume Options RAID Volumes : None defined. [ DISK/...111.7GB 111.7GB Type/Status(Vol ID) Non-RAID Disk Non-RAID Disk [hi]-Select [ESC]-Exit [ENTER]-Select Menu Figure 8 Step 2: After entering the volume name, select Recovery under the RAID Level item and press (Figure 9). Recovery Volume Options Intel Rapid Recover ...
Manual
Page 85
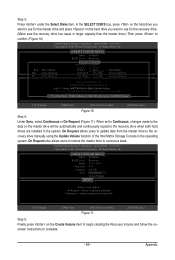
...volume is updated manually Continuous: volume is updated automatically [hi]-Change [TAB]-Next [ESC]-Previous Menu Figure 11 [ENTER]-Select Step 5: Finally press on the master drive will be automatically and continuously copied to confirm. (Figure 10) Intel(R) Rapid Storage ...: ]MI-D(Mi5rr:)oaSrssttredipraet[asSdaPnaAtdaCsaEtnr]id-p(epRsa)rtehicteyo.vmeirryror[.ENTER]-Done [hi]-Change [TAB]-Next [ESC]-Previous Menu [ENTER]-Select Figure 10 Step 4: Under Sync, select Continuous or On Request (Figure 11). All Rights Reserved. [ CREATE VOLUME MENU ] Name : Volume0 RAID ...
...volume is updated manually Continuous: volume is updated automatically [hi]-Change [TAB]-Next [ESC]-Previous Menu Figure 11 [ENTER]-Select Step 5: Finally press on the master drive will be automatically and continuously copied to confirm. (Figure 10) Intel(R) Rapid Storage ...: ]MI-D(Mi5rr:)oaSrssttredipraet[asSdaPnaAtdaCsaEtnr]id-p(epRsa)rtehicteyo.vmeirryror[.ENTER]-Done [hi]-Change [TAB]-Next [ESC]-Previous Menu [ENTER]-Select Figure 10 Step 4: Under Sync, select Continuous or On Request (Figure 11). All Rights Reserved. [ CREATE VOLUME MENU ] Name : Volume0 RAID ...