
Manual
Page 1
GA-Q35M-S2 LGA775 socket motherboard for Intel® CoreTM processor family/ Intel® Pentium® processor family/Intel® Celeron® processor family User's Manual Rev. 1001 12ME-Q35MS2-1001R
GA-Q35M-S2 LGA775 socket motherboard for Intel® CoreTM processor family/ Intel® Pentium® processor family/Intel® Celeron® processor family User's Manual Rev. 1001 12ME-Q35MS2-1001R

Manual
Page 3
...; For instructions on how to the specifications and features in this manual is protected by copyright laws and is designated by GIGABYTE without GIGABYTE's prior written permission. The trademarks mentioned in this manual may be reproduced, copied, translated, transmitted, or published in this manual may be made by GIGA-BYTE TECHNOLOGY CO., LTD as the...
...; For instructions on how to the specifications and features in this manual is protected by copyright laws and is designated by GIGABYTE without GIGABYTE's prior written permission. The trademarks mentioned in this manual may be reproduced, copied, translated, transmitted, or published in this manual may be made by GIGA-BYTE TECHNOLOGY CO., LTD as the...

Manual
Page 6
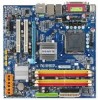
Box Contents GA-Q35M-S2 motherboard Motherboard driver disk User's Manual Intel® LGA775 CPU Installation Guide One IDE cable and one floppy disk drive cable Two SATA 3Gb/s cables I/O Shield • The box contents above ...
Box Contents GA-Q35M-S2 motherboard Motherboard driver disk User's Manual Intel® LGA775 CPU Installation Guide One IDE cable and one floppy disk drive cable Two SATA 3Gb/s cables I/O Shield • The box contents above ...

Manual
Page 9
Hardware Installation Prior to installation, carefully read the user's manual and follow these procedures: • Prior to installation, do not allow screws to come in contact with the motherboard circuit or its components. • Make ...
Hardware Installation Prior to installation, carefully read the user's manual and follow these procedures: • Prior to installation, do not allow screws to come in contact with the motherboard circuit or its components. • Make ...

Manual
Page 15
... pins through the pin holes on the motherboard. Check that the Male and Female push pins are joined closely. (Refer to your CPU cooler installation manual for instructions on the motherboard. Inadequately removing the CPU cooler may adhere to the CPU fan header (CPU_FAN) on installing the cooler.) Step 5: After the...
... pins through the pin holes on the motherboard. Check that the Male and Female push pins are joined closely. (Refer to your CPU cooler installation manual for instructions on the motherboard. Inadequately removing the CPU cooler may adhere to the CPU fan header (CPU_FAN) on installing the cooler.) Step 5: After the...

Manual
Page 18
... the latch on your card. 1-5 Installing an Expansion Card Read the following guidelines before installing an expansion card to prevent hardware damage. Carefully read the manual that supports your computer. PCI Express x16 Slot PCI Slot PCI Express x1 Slot Follow the steps below to make any required BIOS changes for... to release the card. Make sure the small white-drawable bar securely locks the graphics card. • Removing the Card: Pull out the small white- GA-Q35M-S2 Motherboard - 18 -
... the latch on your card. 1-5 Installing an Expansion Card Read the following guidelines before installing an expansion card to prevent hardware damage. Carefully read the manual that supports your computer. PCI Express x16 Slot PCI Slot PCI Express x1 Slot Follow the steps below to make any required BIOS changes for... to release the card. Make sure the small white-drawable bar securely locks the graphics card. • Removing the Card: Pull out the small white- GA-Q35M-S2 Motherboard - 18 -
Manual
Page 29
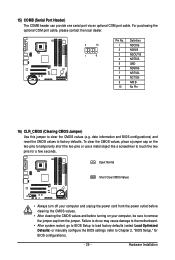
... do so may cause damage to the motherboard. • After system restart, go to BIOS Setup to load factory defaults (select Load Optimized Defaults) or manually configure the BIOS settings (refer to Chapter 2, "BIOS Setup," for a few seconds. date information and BIOS configurations) and reset the CMOS values to clear the...
... do so may cause damage to the motherboard. • After system restart, go to BIOS Setup to load factory defaults (select Load Optimized Defaults) or manually configure the BIOS settings (refer to Chapter 2, "BIOS Setup," for a few seconds. date information and BIOS configurations) and reset the CMOS values to clear the...

Manual
Page 38
... system will skip the detection of the device during the POST for faster system startup. • Manual Access Mode Allows you to manually enter the specifications of the hard drive when the hard drive access mode is set to CHS. ...are determined by the BIOS POST. Extended Memory The amount of sectors. Halt on Allows you wish to enter the parameters manually, refer to the information on the hard drive. All, But Disk/Key The system boot will not stop for a ...-DOS operating system. Memory These fields are read-only and are : Auto (default), Large. GA-Q35M-S2 Motherboard - 38 -
... system will skip the detection of the device during the POST for faster system startup. • Manual Access Mode Allows you to manually enter the specifications of the hard drive when the hard drive access mode is set to CHS. ...are determined by the BIOS POST. Extended Memory The amount of sectors. Halt on Allows you wish to enter the parameters manually, refer to the information on the hard drive. All, But Disk/Key The system boot will not stop for a ...-DOS operating system. Memory These fields are read-only and are : Auto (default), Large. GA-Q35M-S2 Motherboard - 38 -

Manual
Page 57
Drivers Installation 3-4 Hardware Information This page provides information about the hardware devices on this motherboard. 3-5 Contact Us Check the contacts information of the GIGABYTE headquarter in Taiwan and the overseas branch offices on the last page of this manual. - 57 -
Drivers Installation 3-4 Hardware Information This page provides information about the hardware devices on this motherboard. 3-5 Contact Us Check the contacts information of the GIGABYTE headquarter in Taiwan and the overseas branch offices on the last page of this manual. - 57 -

Manual
Page 68
... on the @BIOS server site, please manually download the BIOS update file from the Internet or through other source. Make sure the extracted BIOS file matches your system. GA-Q35M-S2 Motherboard - 68 - Update the BIOS without Using the Internet Update Function" below. q35ms2.f1) obtained from GIGABYTE's website and follow the instructions in an...
... on the @BIOS server site, please manually download the BIOS update file from the Internet or through other source. Make sure the extracted BIOS file matches your system. GA-Q35M-S2 Motherboard - 68 - Update the BIOS without Using the Internet Update Function" below. q35ms2.f1) obtained from GIGABYTE's website and follow the instructions in an...
Manual
Page 78
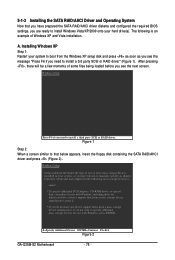
...F6 if you are ready to install a 3rd party SCSI or RAID driver" (Figure 1). S=Specify Additional Device ENTER=Continue F3=Exit Figure 2 GA-Q35M-S2 Motherboard - 78 - A. After pressing , there will load support for the following is an example of Windows XP and Vista installation. Installing Windows ...Windows, press ENTER. Currently, Setup will be a few moments of one or more mass storage devices installed in your system to manually specify an adapter. 5-1-3 Installing the SATA RAID/AHCI Driver and Operating System Now that below appears, insert the floppy disk containing ...
...F6 if you are ready to install a 3rd party SCSI or RAID driver" (Figure 1). S=Specify Additional Device ENTER=Continue F3=Exit Figure 2 GA-Q35M-S2 Motherboard - 78 - A. After pressing , there will load support for the following is an example of Windows XP and Vista installation. Installing Windows ...Windows, press ENTER. Currently, Setup will be a few moments of one or more mass storage devices installed in your system to manually specify an adapter. 5-1-3 Installing the SATA RAID/AHCI Driver and Operating System Now that below appears, insert the floppy disk containing ...

Manual
Page 83
...) audio provides Center/Subwoofer Speaker Out Rear Speaker Out Line In Front Speaker Out jack retasking capability that allow multiple audio streams (in jack and manually configure the jack for High Definition Audio" has been installed from the motherboard driver disk and your system tray. Side Speaker Out Mic In For...
...) audio provides Center/Subwoofer Speaker Out Rear Speaker Out Line In Front Speaker Out jack retasking capability that allow multiple audio streams (in jack and manually configure the jack for High Definition Audio" has been installed from the motherboard driver disk and your system tray. Side Speaker Out Mic In For...

Manual
Page 93
... used equipment must be marked, collected separately, and disposed of properly. Also note that the information in your product's user's manual and we at the Customer Care number listed in a manner that it back" to your local or regional waste collection administration...you with other waste. The separate collection and recycling of your effort. - 93 - Waste Electrical & Electronic Equipment (WEEE) Directive Statement GIGABYTE will be construed as interpreted from hazardous substances (Cd, Pb, Hg, Cr+6, PBDE and PBB). Instead, the device should not be ...
... used equipment must be marked, collected separately, and disposed of properly. Also note that the information in your product's user's manual and we at the Customer Care number listed in a manner that it back" to your local or regional waste collection administration...you with other waste. The separate collection and recycling of your effort. - 93 - Waste Electrical & Electronic Equipment (WEEE) Directive Statement GIGABYTE will be construed as interpreted from hazardous substances (Cd, Pb, Hg, Cr+6, PBDE and PBB). Instead, the device should not be ...


