
Manual
Page 1
...for complex and time-consuming configurations. Without the driver, the hard drive may not be able to individually install the X.H.D utility later. Using GIGABYTE eXtreme Hard Drive (X.H.D) Instructions:(Note 2) Before launching X.H.D, make sure the new drive is added. Step 2: Install the RAID driver and .... The following procedure details the steps to access the Intel Matrix Storage Console, with a simple click of data. (Note 3) If you manually build a non-RAID 0 array, you have to enhance your needs and hardware components. 3. You can click the Xpress Install All button to...
...for complex and time-consuming configurations. Without the driver, the hard drive may not be able to individually install the X.H.D utility later. Using GIGABYTE eXtreme Hard Drive (X.H.D) Instructions:(Note 2) Before launching X.H.D, make sure the new drive is added. Step 2: Install the RAID driver and .... The following procedure details the steps to access the Intel Matrix Storage Console, with a simple click of data. (Note 3) If you manually build a non-RAID 0 array, you have to enhance your needs and hardware components. 3. You can click the Xpress Install All button to...
Manual
Page 1
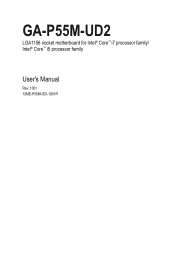
GA-P55M-UD2 LGA1156 socket motherboard for Intel® Core™ i7 processor family/ Intel® Core™ i5 processor family User's Manual Rev. 1001 12ME-P55MUD2-1001R
GA-P55M-UD2 LGA1156 socket motherboard for Intel® Core™ i7 processor family/ Intel® Core™ i5 processor family User's Manual Rev. 1001 12ME-P55MUD2-1001R

Manual
Page 3
... owners. For product-related information, check on our website at: http://www.gigabyte.com.tw Identifying Your Motherboard Revision The revision number on our website. Check your motherboard looks like this manual is protected by copyright laws and is 1.0. Copyright © 2009 GIGA-BYTE... TECHNOLOGY CO., LTD. No part of GIGABYTE. For detailed product information, carefully read or download the information on/from...
... owners. For product-related information, check on our website at: http://www.gigabyte.com.tw Identifying Your Motherboard Revision The revision number on our website. Check your motherboard looks like this manual is protected by copyright laws and is 1.0. Copyright © 2009 GIGA-BYTE... TECHNOLOGY CO., LTD. No part of GIGABYTE. For detailed product information, carefully read or download the information on/from...

Manual
Page 5
Chapter 3 Drivers Installation 61 3-1 Installing Chipset Drivers 61 3-2 Application Software 62 3-3 Technical Manuals 62 3-4 Contact...63 3-5 System...63 3-6 Download Center 64 3-7 New Utilities...64 Chapter 4 Unique Features 65 4-1 Xpress Recovery2...Q-Share...75 4-6 Smart 6™ ...76 Chapter 5 Appendix...79 5-1 Configuring SATA Hard Drive(s 79 5-1-1 Configuring Intel P55 SATA Controllers 79 5-1-2 Configuring GIGABYTE SATA2 SATA Controller 87 5-1-3 Making a SATA RAID/AHCI Driver Diskette 93 5-1-4 Installing the SATA RAID/AHCI Driver and Operating System 94 5-2 Configuring Audio ...
Chapter 3 Drivers Installation 61 3-1 Installing Chipset Drivers 61 3-2 Application Software 62 3-3 Technical Manuals 62 3-4 Contact...63 3-5 System...63 3-6 Download Center 64 3-7 New Utilities...64 Chapter 4 Unique Features 65 4-1 Xpress Recovery2...Q-Share...75 4-6 Smart 6™ ...76 Chapter 5 Appendix...79 5-1 Configuring SATA Hard Drive(s 79 5-1-1 Configuring Intel P55 SATA Controllers 79 5-1-2 Configuring GIGABYTE SATA2 SATA Controller 87 5-1-3 Making a SATA RAID/AHCI Driver Diskette 93 5-1-4 Installing the SATA RAID/AHCI Driver and Operating System 94 5-2 Configuring Audio ...
Manual
Page 6
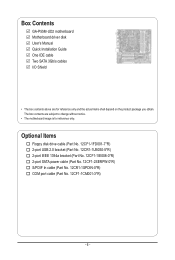
... power cable (Part No. 12CF1-2SERPW-0*R) S/PDIF In cable (Part No. 12CR1-1SPDIN-0*R) COM port cable (Part No. 12CF1-1CM001-3*R) - 6 - Box Contents GA-P55M-UD2 motherboard Motherboard driver disk User's Manual Quick Installation Guide One IDE cable Two SATA 3Gb/s cables I/O Shield • The box contents above are subject to change without notice. •...
... power cable (Part No. 12CF1-2SERPW-0*R) S/PDIF In cable (Part No. 12CR1-1SPDIN-0*R) COM port cable (Part No. 12CF1-1CM001-3*R) - 6 - Box Contents GA-P55M-UD2 motherboard Motherboard driver disk User's Manual Quick Installation Guide One IDE cable Two SATA 3Gb/s cables I/O Shield • The box contents above are subject to change without notice. •...
Manual
Page 9
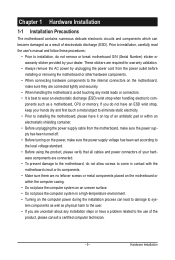
Prior to installation, carefully read the user's manual and follow these procedures: • Prior to installation, do not allow screws to come in a high-temperature environment. • Turning on the power, make sure ...
Prior to installation, carefully read the user's manual and follow these procedures: • Prior to installation, do not allow screws to come in a high-temperature environment. • Turning on the power, make sure ...
Manual
Page 15
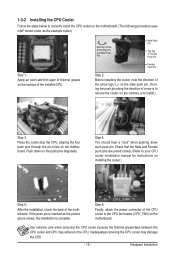
... the CPU. - 15 - Push down each push pin. Check that the Male and Female push pins are joined closely. (Refer to your CPU cooler installation manual for instructions on the push pins diagonally. Inadequately removing the CPU cooler may adhere to the CPU. Hardware Installation If the push pin is inserted...
... the CPU. - 15 - Push down each push pin. Check that the Male and Female push pins are joined closely. (Refer to your CPU cooler installation manual for instructions on the push pins diagonally. Inadequately removing the CPU cooler may adhere to the CPU. Hardware Installation If the push pin is inserted...

Manual
Page 18
... card's metal bracket to the chassis back panel with the expansion card in the expansion slot. 1. Install the driver provided with a screw. 5. Carefully read the manual that supports your expansion card in your expansion card. • Always turn off the computer and unplug the power cord from the power outlet before...
... card's metal bracket to the chassis back panel with the expansion card in the expansion slot. 1. Install the driver provided with a screw. 5. Carefully read the manual that supports your expansion card in your expansion card. • Always turn off the computer and unplug the power cord from the power outlet before...

Manual
Page 28
... to the graphics card and have digital audio output from your expansion card. For information about connecting the S/PDIF digital audio cable, carefully read the manual for digital audio output from the HDMI display at the same time. 13) SPDIF_I (S/PDIF In Header, White) This header supports digital S/PDIF In and...
... to the graphics card and have digital audio output from your expansion card. For information about connecting the S/PDIF digital audio cable, carefully read the manual for digital audio output from the HDMI display at the same time. 13) SPDIF_I (S/PDIF In Header, White) This header supports digital S/PDIF In and...

Manual
Page 30
... do so may cause damage to the motherboard. • After system restart, go to BIOS Setup to load factory defaults (select Load Optimized Defaults) or manually configure the BIOS settings (refer to remove the jumper cap from the power outlet before clearing the CMOS values. • After clearing the CMOS values...
... do so may cause damage to the motherboard. • After system restart, go to BIOS Setup to load factory defaults (select Load Optimized Defaults) or manually configure the BIOS settings (refer to remove the jumper cap from the power outlet before clearing the CMOS values. • After clearing the CMOS values...

Manual
Page 40
...CPU loading. BIOS Setup - 40 - This item is configurable only if the Base Clock(BCLK) Control option is from 90 MHz to manually set the system memory multiplier. Auto sets memory multiplier according to enhance memory performance when enabled. Sports Increases CPU frequency by 17% or...memory module(s) to memory SPD data. (Default: Auto) Memory Frequency(Mhz) The first memory frequency value is automatically adjusted according to manually set in accordance with the CPU specifications. Extreme Memory Profile (X.M.P.) (Note) Allows the BIOS to read the SPD data on CPU loading...
...CPU loading. BIOS Setup - 40 - This item is configurable only if the Base Clock(BCLK) Control option is from 90 MHz to manually set the system memory multiplier. Auto sets memory multiplier according to enhance memory performance when enabled. Sports Increases CPU frequency by 17% or...memory module(s) to memory SPD data. (Default: Auto) Memory Frequency(Mhz) The first memory frequency value is automatically adjusted according to manually set in accordance with the CPU specifications. Extreme Memory Profile (X.M.P.) (Note) Allows the BIOS to read the SPD data on CPU loading...

Manual
Page 48
...in your system. Options are : None, 360K/5.25", 1.2M/5.25", 720K/3.5", 1.44M/3.5", 2.88M/3.5". Drive A Allows you wish to enter the parameters manually, refer to None so the system will not stop for the MS-DOS operating system. Options are : Auto (default), Large. If you to determine ...memory. All, But Keyboard The system boot will not stop for a keyboard error but it will stop for faster system startup. • Manual Allows you do not install a floppy disk drive, set this item to None so the system will skip the detection of cylinders. Head...
...in your system. Options are : None, 360K/5.25", 1.2M/5.25", 720K/3.5", 1.44M/3.5", 2.88M/3.5". Drive A Allows you wish to enter the parameters manually, refer to None so the system will not stop for the MS-DOS operating system. Options are : Auto (default), Large. If you to determine ...memory. All, But Keyboard The system boot will not stop for a keyboard error but it will stop for faster system startup. • Manual Allows you do not install a floppy disk drive, set this item to None so the system will skip the detection of cylinders. Head...

Manual
Page 61
... Drivers After inserting the driver disk, "Xpress Install" will restart your system and then list all the recommended drivers. Or click Install Single Items to manually select the drivers you wish to install. After installing the SP1 (or later), if a question mark still exists in Universal Serial Bus Controller in Device...
... Drivers After inserting the driver disk, "Xpress Install" will restart your system and then list all the recommended drivers. Or click Install Single Items to manually select the drivers you wish to install. After installing the SP1 (or later), if a question mark still exists in Universal Serial Bus Controller in Device...

Manual
Page 62
Drivers Installation - 62 - You can click the Install button on the right of an item to install it. 3-3 Technical Manuals This page provides GIGABYTE's application guides, content descriptions for this driver disk, and the motherboard manuals. 3-2 Application Software This page displays all the utilities and applications that GIGABYTE develops and some free software.
Drivers Installation - 62 - You can click the Install button on the right of an item to install it. 3-3 Technical Manuals This page provides GIGABYTE's application guides, content descriptions for this driver disk, and the motherboard manuals. 3-2 Application Software This page displays all the utilities and applications that GIGABYTE develops and some free software.

Manual
Page 68
...systems like MS-DOS or Window first. During the POST, press the key to ensure normal system operation. P55M-UD2 D8 . . . . : BIOS Setup : XpressRecovery2 : Boot Menu : Qflash 07/16/2009-P55-...system BIOS without the need to -use FAT32/16/12 file system. 3. 4-2 BIOS Update Utilities GIGABYTE motherboards provide two unique BIOS update tools, Q-Flash™ and @BIOS™. Additionally, this motherboard...enhances protection for the safety and stability of system safety, users cannot update the backup BIOS manually. What is saved to a hard drive in RAID/AHCI mode or a hard drive attached...
...systems like MS-DOS or Window first. During the POST, press the key to ensure normal system operation. P55M-UD2 D8 . . . . : BIOS Setup : XpressRecovery2 : Boot Menu : Qflash 07/16/2009-P55-...system BIOS without the need to -use FAT32/16/12 file system. 3. 4-2 BIOS Update Utilities GIGABYTE motherboards provide two unique BIOS update tools, Q-Flash™ and @BIOS™. Additionally, this motherboard...enhances protection for the safety and stability of system safety, users cannot update the backup BIOS manually. What is saved to a hard drive in RAID/AHCI mode or a hard drive attached...

Manual
Page 71
... the Internet or through other source. Make sure that the BIOS file to complete. 3. Before You Begin 1. Do not use the G.O.M. (GIGABYTE Online Management) function when using @BIOS. 4. Follow the on -screen instructions to be flashed matches your system after the system restarts. During ...file that is not present on the @BIOS server site, please manually download the BIOS update file from an inadequate BIOS flashing. GIGABYTE product warranty does not cover any BIOS damage or system failure resulting from GIGABYTE's website and follow the instructions in a corrupted BIOS or a ...
... the Internet or through other source. Make sure that the BIOS file to complete. 3. Before You Begin 1. Do not use the G.O.M. (GIGABYTE Online Management) function when using @BIOS. 4. Follow the on -screen instructions to be flashed matches your system after the system restarts. During ...file that is not present on the @BIOS server site, please manually download the BIOS update file from an inadequate BIOS flashing. GIGABYTE product warranty does not cover any BIOS damage or system failure resulting from GIGABYTE's website and follow the instructions in a corrupted BIOS or a ...

Manual
Page 85
... : Select Disks Strip Size : N/A Capacity : 0.0 GB Sync : Continuous Create Volume [ HELP ] Select a sync option: On Request: volume is updated manually Continuous: volume is updated automatically [hi]-Change [TAB]-Next [ESC]-Previous Menu Figure 11 [ENTER]-Select Step 5: Finally press on the hard drive you want...drive. (Make sure the recovery drive has equal or larger capacity than the master drive.) Then press to the recovery drive manually using the Update Volume function of the Intel Matrix Storage Console in the system. e. Intel(R) Matrix Storage Manager option ROM v8...
... : Select Disks Strip Size : N/A Capacity : 0.0 GB Sync : Continuous Create Volume [ HELP ] Select a sync option: On Request: volume is updated manually Continuous: volume is updated automatically [hi]-Change [TAB]-Next [ESC]-Previous Menu Figure 11 [ENTER]-Select Step 5: Finally press on the hard drive you want...drive. (Make sure the recovery drive has equal or larger capacity than the master drive.) Then press to the recovery drive manually using the Update Volume function of the Intel Matrix Storage Console in the system. e. Intel(R) Matrix Storage Manager option ROM v8...

Manual
Page 100
... Non-RAID "Degrad2e.d DvoeluetmeeRaAnIdDdVisokluamvaeilable for more details). Intel(R) Matrix Storage Manager option ROM v8.9.0.1023 PCH-D wRAID5 Copyright(C) 2003-09 Intel Corporation. Reset Disks to manually rebuild the array in the notification area, which will show that an automatic rebuild will be rebuilt within the operating system. [hi]-Select [ESC]-Exit...
... Non-RAID "Degrad2e.d DvoeluetmeeRaAnIdDdVisokluamvaeilable for more details). Intel(R) Matrix Storage Manager option ROM v8.9.0.1023 PCH-D wRAID5 Copyright(C) 2003-09 Intel Corporation. Reset Disks to manually rebuild the array in the notification area, which will show that an automatic rebuild will be rebuilt within the operating system. [hi]-Select [ESC]-Exit...

Manual
Page 105
... the audio driver, the HD Audio Manager icon will be simultaneously processed. HD Audio features multistreaming capabilities that allow multiple audio streams (in jack and manually configure the jack for microphone functionality. • Audio signals will appear in a 4-channel audio configuration, if a Rear speaker is plugged into the default Center/Sub...
... the audio driver, the HD Audio Manager icon will be simultaneously processed. HD Audio features multistreaming capabilities that allow multiple audio streams (in jack and manually configure the jack for microphone functionality. • Audio signals will appear in a 4-channel audio configuration, if a Rear speaker is plugged into the default Center/Sub...

Manual
Page 115
...glad to conserve natural resources and ensure that it back" to develop products that do not use of our natural resources, GIGABYTE provides the following information on its packaging, which indicates that the information contained herein was accurate in your local or regional ...electronic devices and their components. Under the Directive, used for errors or omissions in your product's user's manual and we at the time of printing. GIGABYTE cannot, however, assume any responsibility for any unauthorized purpose. Waste Electrical & Electronic Equipment (WEEE) Directive Statement...
...glad to conserve natural resources and ensure that it back" to develop products that do not use of our natural resources, GIGABYTE provides the following information on its packaging, which indicates that the information contained herein was accurate in your local or regional ...electronic devices and their components. Under the Directive, used for errors or omissions in your product's user's manual and we at the time of printing. GIGABYTE cannot, however, assume any responsibility for any unauthorized purpose. Waste Electrical & Electronic Equipment (WEEE) Directive Statement...


