
Manual
Page 4
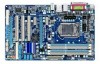
Table of Contents Box Contents...6 Optional Items...6 GA-P55-USB3L Motherboard Layout 7 GA-P55-USB3L Motherboard Block Diagram 8 Chapter 1 Hardware Installation 9 1-1 Installation Precautions 9 1-2 Product Specifications 10 1-3 Installing the CPU and CPU Cooler ...17 1-5 Installing an Expansion Card 18 1-6 Back Panel Connectors 19 1-7 Internal Connectors 21 Chapter 2 BIOS Setup 31 2-1 Startup Screen 32 2-2 The Main Menu 33 2-3 MB Intelligent Tweaker(M.I.T 35 2-4 Standard CMOS Features 45 2-5 Advanced BIOS Features 47 2-6 Integrated Peripherals 49 2-7 Power Management Setup 52 2-8...
Table of Contents Box Contents...6 Optional Items...6 GA-P55-USB3L Motherboard Layout 7 GA-P55-USB3L Motherboard Block Diagram 8 Chapter 1 Hardware Installation 9 1-1 Installation Precautions 9 1-2 Product Specifications 10 1-3 Installing the CPU and CPU Cooler ...17 1-5 Installing an Expansion Card 18 1-6 Back Panel Connectors 19 1-7 Internal Connectors 21 Chapter 2 BIOS Setup 31 2-1 Startup Screen 32 2-2 The Main Menu 33 2-3 MB Intelligent Tweaker(M.I.T 35 2-4 Standard CMOS Features 45 2-5 Advanced BIOS Features 47 2-6 Integrated Peripherals 49 2-7 Power Management Setup 52 2-8...

Manual
Page 11
Up to 12 USB 2.0/1.1 ports (Note 6) (8 on the back panel Internal w 1 x 24-pin ATX main power connector Connectors w 1 x 4-pin ATX 12V power connector w 1 x floppy disk drive connector w 1 x IDE connector w 8 x SATA 3Gb/s connectors w 1 x CPU fan header w 2 x...warning CPU/System/Power fan fail warning CPU/System fan speed control (Note 7) j Only for H55 chipset. - 11 - Hardware Installation k Only for P55 chipset. Up to 2 USB 3.0 ports on the back panel, 4 via the USB brackets connected to the internal USB headers) k NEC ...
Up to 12 USB 2.0/1.1 ports (Note 6) (8 on the back panel Internal w 1 x 24-pin ATX main power connector Connectors w 1 x 4-pin ATX 12V power connector w 1 x floppy disk drive connector w 1 x IDE connector w 8 x SATA 3Gb/s connectors w 1 x CPU fan header w 2 x...warning CPU/System/Power fan fail warning CPU/System fan speed control (Note 7) j Only for H55 chipset. - 11 - Hardware Installation k Only for P55 chipset. Up to 2 USB 3.0 ports on the back panel, 4 via the USB brackets connected to the internal USB headers) k NEC ...
Manual
Page 22
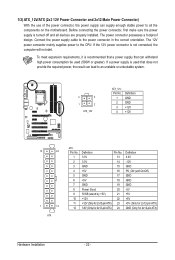
... Connector) With the use of the power connector, the power supply can supply enough stable power to the CPU. The 12V power connector mainly supplies power to all devices are properly installed. If the 12V power connector is recommended that a power supply that does not provide the required power, ...
... Connector) With the use of the power connector, the power supply can supply enough stable power to the CPU. The 12V power connector mainly supplies power to all devices are properly installed. If the 12V power connector is recommended that a power supply that does not provide the required power, ...

Manual
Page 26
... the chassis front panel. Speaker Power Switch Message/Power/ Sleep LED 20 19 SPEAK- The system reports system startup status by chassis. A front panel module mainly consists of power switch, reset switch, power LED, hard drive activity LED, speaker and etc. This function requires a chassis with a chassis intrusion switch/sensor. The...
... the chassis front panel. Speaker Power Switch Message/Power/ Sleep LED 20 19 SPEAK- The system reports system startup status by chassis. A front panel module mainly consists of power switch, reset switch, power LED, hard drive activity LED, speaker and etc. This function requires a chassis with a chassis intrusion switch/sensor. The...

Manual
Page 31
... is turned on the motherboard supplies the necessary power to the CMOS to keep the configuration values in the main menu of the BIOS Setup program. To upgrade the BIOS, use either the GIGABYTE Q-Flash or @BIOS utility. • Q-Flash allows the user to quickly and easily upgrade or back up BIOS...
... is turned on the motherboard supplies the necessary power to the CMOS to keep the configuration values in the main menu of the BIOS Setup program. To upgrade the BIOS, use either the GIGABYTE Q-Flash or @BIOS utility. • Q-Flash allows the user to quickly and easily upgrade or back up BIOS...

Manual
Page 33
...to BIOS Load CMOS from BIOS BIOS Setup Program Function Keys Move the selection bar to select an item Execute command or enter the submenu Main Menu: Exit the BIOS Setup program Submenus: Exit current submenu Increase the numeric value or make changes Decrease the numeric value or make ... submenu, press + to access more advanced options. • When the system is not stable as shown below) appears on the bottom line of the Main Menu. Use arrow keys to move among the items and press to accept or enter a sub-menu. (Sample BIOS Version: E12c) CMOS Setup Utility-...
...to BIOS Load CMOS from BIOS BIOS Setup Program Function Keys Move the selection bar to select an item Execute command or enter the submenu Main Menu: Exit the BIOS Setup program Submenus: Exit current submenu Increase the numeric value or make changes Decrease the numeric value or make ... submenu, press + to access more advanced options. • When the system is not stable as shown below) appears on the bottom line of the Main Menu. Use arrow keys to move among the items and press to accept or enter a sub-menu. (Sample BIOS Version: E12c) CMOS Setup Utility-...

Manual
Page 34
... not to make changes in BIOS Setup. Set User Password Change, set , or disable password. The Functions of the and keys (For the Main Menu Only) F11: Save CMOS to BIOS This function allows you to restrict access to the system and BIOS Setup. A supervisor password allows you...
... not to make changes in BIOS Setup. Set User Password Change, set , or disable password. The Functions of the and keys (For the Main Menu Only) F11: Save CMOS to BIOS This function allows you to restrict access to the system and BIOS Setup. A supervisor password allows you...

Manual
Page 47
... (Secs) Full Screen LOGO Show Backup BIOS Image to exit this item, set the password(s) under the Set Supervisor/User Password item in the BIOS Main Menu. Press to HDD Init Display First [Press Enter] [Disabled] [Hard Disk] [CDROM] [Floppy] [Setup] [Disabled] [Disabled] [Enabled] [0] [Enabled] [Disabled] [PCI] Item Help Menu Level...
... (Secs) Full Screen LOGO Show Backup BIOS Image to exit this item, set the password(s) under the Set Supervisor/User Password item in the BIOS Main Menu. Press to HDD Init Display First [Press Enter] [Disabled] [Hard Disk] [CDROM] [Floppy] [Setup] [Disabled] [Disabled] [Enabled] [0] [Enabled] [Disabled] [PCI] Item Help Menu Level...

Manual
Page 58
BIOS Setup - 58 - This exits the BIOS Setup without saving the changes made in BIOS Setup to the BIOS Setup Main Menu. Press or to return to the BIOS Setup Main Menu. 2-13 Exit Without Saving CMOS Setup Utility-Copyright (C) 1984-2009 Award Software MB Intelligent Tweaker(M.I .T.) Load Fail-Safe Defaults ...
BIOS Setup - 58 - This exits the BIOS Setup without saving the changes made in BIOS Setup to the BIOS Setup Main Menu. Press or to return to the BIOS Setup Main Menu. 2-13 Exit Without Saving CMOS Setup Utility-Copyright (C) 1984-2009 Award Software MB Intelligent Tweaker(M.I .T.) Load Fail-Safe Defaults ...

Manual
Page 66
...FAT32/16/12 file system. 3. Inadequate BIOS flashing may result in BIOS Setup. From GIGABYTE's website, download the latest compressed BIOS update file that support DualBIOS have two BIOS onboard, a main BIOS and a backup BIOS. Extract the file and save the new BIOS file (e.g. Unique...DualBIOS™ design, which enhances protection for the safety and stability of your motherboard model. 2. P55-USB3L E12c . . . . : BIOS Setup : XpressRecovery2 : Boot Menu : Qflash 12/04/2009-P55-7A89TG0DC-00 Because BIOS flashing is corrupted or damaged, the backup BIOS will download the latest BIOS...
...FAT32/16/12 file system. 3. Inadequate BIOS flashing may result in BIOS Setup. From GIGABYTE's website, download the latest compressed BIOS update file that support DualBIOS have two BIOS onboard, a main BIOS and a backup BIOS. Extract the file and save the new BIOS file (e.g. Unique...DualBIOS™ design, which enhances protection for the safety and stability of your motherboard model. 2. P55-USB3L E12c . . . . : BIOS Setup : XpressRecovery2 : Boot Menu : Qflash 12/04/2009-P55-7A89TG0DC-00 Because BIOS flashing is corrupted or damaged, the backup BIOS will download the latest BIOS...

Manual
Page 67
...Type/Size MXIC 25L1605A 2M Keep0 DfilMe(Is)DfaotuandEnable Floppy A Loa d CMO S Default Enable HDD 1-0 Upda te BIOS from Drive and press . • The Save Main BIOS to Drive option allows you to save the BIOS file to Drive Enter : Run hi:Move ESC:Reset F10:Power Off Total size : 0 Free... to a hard drive in RAID/AHCI mode or a hard drive attached to an independent IDE/SATA controller, use the key during the POST to the main menu. Update BIOS from the floppy disk is saved. Select the BIOS update file and press . B. Updating the BIOS When updating the BIOS, choose ...
...Type/Size MXIC 25L1605A 2M Keep0 DfilMe(Is)DfaotuandEnable Floppy A Loa d CMO S Default Enable HDD 1-0 Upda te BIOS from Drive and press . • The Save Main BIOS to Drive option allows you to save the BIOS file to Drive Enter : Run hi:Move ESC:Reset F10:Power Off Total size : 0 Free... to a hard drive in RAID/AHCI mode or a hard drive attached to an independent IDE/SATA controller, use the key during the POST to the main menu. Update BIOS from the floppy disk is saved. Select the BIOS update file and press . B. Updating the BIOS When updating the BIOS, choose ...
Manual
Page 75
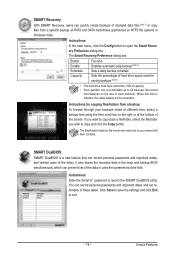
...; Each partition can record personal passwords and important dates, and remind users of the dates. It also stores the recorded data in the main and backup BIOS simultaneously, which can record personal passwords and important dates and set reminders of these dates. Click Save to save the settings... and click Exit to open the Smart Recovery Preference dialog box. Unique Features Instructions: In the main menu, click the Config button to exit. - 75 - When this limit is a new feature that can accommodate up to copy back a file...
...; Each partition can record personal passwords and important dates, and remind users of the dates. It also stores the recorded data in the main and backup BIOS simultaneously, which can record personal passwords and important dates and set reminders of these dates. Click Save to save the settings... and click Exit to open the Smart Recovery Preference dialog box. Unique Features Instructions: In the main menu, click the Config button to exit. - 75 - When this limit is a new feature that can accommodate up to copy back a file...

Manual
Page 77
...other Bluetooth receiver on Suspend mode Enters Suspend to RAM mode Disables this function The Bluetooth dongle included in 5-second increment. On the Auto Green main menu, click Configure and then click Configure BT devices. Then enter the same passkey on your needs, select a system power saving mode on...your Bluetooth cell phone key is out of the range of time you have turned on the search and Bluetooth functions on the Auto Green main menu and click Save to save the settings. Selecting a system energy saving mode: Depending on the motherboard models. Whether the Bluetooth dongle is...
...other Bluetooth receiver on Suspend mode Enters Suspend to RAM mode Disables this function The Bluetooth dongle included in 5-second increment. On the Auto Green main menu, click Configure and then click Configure BT devices. Then enter the same passkey on your needs, select a system power saving mode on...your Bluetooth cell phone key is out of the range of time you have turned on the search and Bluetooth functions on the Auto Green main menu and click Save to save the settings. Selecting a system energy saving mode: Depending on the motherboard models. Whether the Bluetooth dongle is...

Manual
Page 81
...Serial # 3JT354CP 3JT329JX Size 111.7GB 111.7GB Type/Status(Vol ID) Non-RAID Disk Non-RAID Disk Press to enter the P55 RAID Configuration Utility. Figure 2 Step 2: After you want to create a RAID array, select Create RAID Volume in RAID BIOS Enter... Technology - Delete RAID Volume 5. Press + to enter Configuration Utility.. option ROM - 9.5.0.1037 Copyright(C) 2003-09 Intel Corporation. All Rights Reserved. [ MAIN MENU ] 1. Step 1: After the POST memory test begins and before the operating system boot begins, look for a non-RAID configuration. Intel(R) Rapid ...
...Serial # 3JT354CP 3JT329JX Size 111.7GB 111.7GB Type/Status(Vol ID) Non-RAID Disk Non-RAID Disk Press to enter the P55 RAID Configuration Utility. Figure 2 Step 2: After you want to create a RAID array, select Create RAID Volume in RAID BIOS Enter... Technology - Delete RAID Volume 5. Press + to enter Configuration Utility.. option ROM - 9.5.0.1037 Copyright(C) 2003-09 Intel Corporation. All Rights Reserved. [ MAIN MENU ] 1. Step 1: After the POST memory test begins and before the operating system boot begins, look for a non-RAID configuration. Intel(R) Rapid ...

Manual
Page 83
...]-Exit Figure 7 [ENTER]-Select Menu To exit the RAID BIOS utility, press or select 5. Now, you can see detailed information about the RAID array in MAIN MENU. Appendix All Rights Reserved. [ CREATE VOLUME MENU ] Name : Volume0 RAID Level : RAID0(Stripe) Disks : Select Disks Strip Size : 128 MB Capacity : 111.7 ...[TAB]-Next [ESC]-Previous Menu Figure 6 [ENTER]-Select When completed, you want to create this volume? (Y/N) : Press ENTER to cancel (Figure 6). All Rights Reserved. [ MAIN MENU ] 1. Reset Disks to Non-RAID 4. Intel(R) Rapid Storage Technology - Create RAID Volume 2.
...]-Exit Figure 7 [ENTER]-Select Menu To exit the RAID BIOS utility, press or select 5. Now, you can see detailed information about the RAID array in MAIN MENU. Appendix All Rights Reserved. [ CREATE VOLUME MENU ] Name : Volume0 RAID Level : RAID0(Stripe) Disks : Select Disks Strip Size : 128 MB Capacity : 111.7 ...[TAB]-Next [ESC]-Previous Menu Figure 6 [ENTER]-Select When completed, you want to create this volume? (Y/N) : Press ENTER to cancel (Figure 6). All Rights Reserved. [ MAIN MENU ] 1. Reset Disks to Non-RAID 4. Intel(R) Rapid Storage Technology - Create RAID Volume 2.

Manual
Page 84
...time, that is hidden. Intel(R) Rapid Storage Technology - option ROM - 9.5.0.1037 Copyright(C) 2003-09 Intel Corporation. All Rights Reserved. [ MAIN MENU ] 1. Intel(R) Rapid Storage Technology - Reset Disks to easily restore data and system operation using a designated recovery drive. All Rights Reserved...; Step 1: select Create RAID Volume in the operating system; if needed, the data on the recovery drive can be riewed in MAIN MENU and press (Figure 8). Exit 3. option ROM - 9.5.0.1037 Copyright(C) 2003-09 Intel Corporation. Recovery Volume Options RAID Volumes :...
...time, that is hidden. Intel(R) Rapid Storage Technology - option ROM - 9.5.0.1037 Copyright(C) 2003-09 Intel Corporation. All Rights Reserved. [ MAIN MENU ] 1. Intel(R) Rapid Storage Technology - Reset Disks to easily restore data and system operation using a designated recovery drive. All Rights Reserved...; Step 1: select Create RAID Volume in the operating system; if needed, the data on the recovery drive can be riewed in MAIN MENU and press (Figure 8). Exit 3. option ROM - 9.5.0.1037 Copyright(C) 2003-09 Intel Corporation. Recovery Volume Options RAID Volumes :...

Manual
Page 86
... your selection (Figure 12), press to confirm or to be deleted and press . Delete RAID Volume To delete a RAID array, select Delete RAID Volume in MAIN MENU and press .
... your selection (Figure 12), press to confirm or to be deleted and press . Delete RAID Volume To delete a RAID array, select Delete RAID Volume in MAIN MENU and press .

Manual
Page 88
... Utility ... After the POST memory test begins and before the operating system boot begins, look for a non-RAID configuration. Gigabyte Technology Corp. Configuring a RAID array in the Main Menu block. Figure 2 In the main screen of Windows operating system for a message which says "Press to enter the RAID setup utility. C. PCI Express to...
... Utility ... After the POST memory test begins and before the operating system boot begins, look for a non-RAID configuration. Gigabyte Technology Corp. Configuring a RAID array in the Main Menu block. Figure 2 In the main screen of Windows operating system for a message which says "Press to enter the RAID setup utility. C. PCI Express to...

Manual
Page 89
Gigabyte Technology Corp. RAID Setup Utility v1.07.06 [ Create New RAID ] Name: Level: Disks: Block: Size: GRAID_ 0-Stripe Select Disk 128 KB 240 GB [ Hard ... New RAID ] Name: Level: Disks: Block: Size: GRAID 0-Stripe Select Disk 128 KB 240 GB Gigabyte Technology Corp. Then press to select RAID 0 (Stripe), RAID 1 (Mirror) or JBOD (Figure 5). Steps: 1. Appendix Create a RAID Array: In the main screen, press on the Create RAID Disk Drive item. Enter Array Name: Under the Name...
Gigabyte Technology Corp. RAID Setup Utility v1.07.06 [ Create New RAID ] Name: Level: Disks: Block: Size: GRAID_ 0-Stripe Select Disk 128 KB 240 GB [ Hard ... New RAID ] Name: Level: Disks: Block: Size: GRAID 0-Stripe Select Disk 128 KB 240 GB Gigabyte Technology Corp. Then press to select RAID 0 (Stripe), RAID 1 (Mirror) or JBOD (Figure 5). Steps: 1. Appendix Create a RAID Array: In the main screen, press on the Create RAID Disk Drive item. Enter Array Name: Under the Name...

Manual
Page 91
Gigabyte Technology Corp. When finished, the new RAID array will appear in the center of the screen (Figure 9). Appendix RAID Setup Utility v1.07.06 [ Main Menu ] [ Hard Disk Drive List ] Create RAID Disk Drive Delete RAID Disk Drive Revert HDD to Non-RAID Solve Mirror Conflict Rebuild ...To check more detailed information about the array, use the key while in the RAID Disk Drive List block (Figure 8). Gigabyte Technology Corp. RAID Setup Utility v1.07.06 [ Main Menu ] Create RAID Disk Drive Delete RAID Disk Drive Revert HDD to the RAID Disk Drive List block. Select the...
Gigabyte Technology Corp. When finished, the new RAID array will appear in the center of the screen (Figure 9). Appendix RAID Setup Utility v1.07.06 [ Main Menu ] [ Hard Disk Drive List ] Create RAID Disk Drive Delete RAID Disk Drive Revert HDD to Non-RAID Solve Mirror Conflict Rebuild ...To check more detailed information about the array, use the key while in the RAID Disk Drive List block (Figure 8). Gigabyte Technology Corp. RAID Setup Utility v1.07.06 [ Main Menu ] Create RAID Disk Drive Delete RAID Disk Drive Revert HDD to the RAID Disk Drive List block. Select the...