
Manual
Page 1
...X.H.D to easily add a hard drive into the array to enable RAID for RAID 0. You can click the Xpress Install All button to individually install the X.H.D utility later. eXtreme Hard Drive (X.H.D) With GIGABYTE eXtreme Hard Drive (X.H.D)(Note 1), users can quickly configure a RAIDready...Or you have to Chapter 5, "Installing the SATA RAID/AHCI Driver and Operating System." ) Step 3: Install the motherboard drivers and the X.H.D utiltiy After installing the operating system, insert the motherboard driver disk. Using GIGABYTE eXtreme Hard Drive (X.H.D) Instructions:(Note 2) Before launching...
...X.H.D to easily add a hard drive into the array to enable RAID for RAID 0. You can click the Xpress Install All button to individually install the X.H.D utility later. eXtreme Hard Drive (X.H.D) With GIGABYTE eXtreme Hard Drive (X.H.D)(Note 1), users can quickly configure a RAIDready...Or you have to Chapter 5, "Installing the SATA RAID/AHCI Driver and Operating System." ) Step 3: Install the motherboard drivers and the X.H.D utiltiy After installing the operating system, insert the motherboard driver disk. Using GIGABYTE eXtreme Hard Drive (X.H.D) Instructions:(Note 2) Before launching...
Manual
Page 5
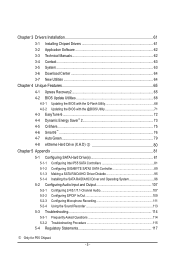
... Green...79 4-8 eXtreme Hard Drive (X.H.D) j 80 Chapter 5 Appendix...81 5-1 Configuring SATA Hard Drive(s 81 5-1-1 Configuring Intel P55 SATA Controllers 81 5-1-2 Configuring GIGABYTE SATA2 SATA Controller 89 5-1-3 Making a SATA RAID/AHCI Driver Diskette 95 5-1-4 Installing the SATA RAID/AHCI Driver and Operating System 96 5-2 Configuring Audio Input and Output 107 5-2-1 Configuring 2/4/5.1/7.1-Channel Audio 107 5-2-2 Configuring...
... Green...79 4-8 eXtreme Hard Drive (X.H.D) j 80 Chapter 5 Appendix...81 5-1 Configuring SATA Hard Drive(s 81 5-1-1 Configuring Intel P55 SATA Controllers 81 5-1-2 Configuring GIGABYTE SATA2 SATA Controller 89 5-1-3 Making a SATA RAID/AHCI Driver Diskette 95 5-1-4 Installing the SATA RAID/AHCI Driver and Operating System 96 5-2 Configuring Audio Input and Output 107 5-2-1 Configuring 2/4/5.1/7.1-Channel Audio 107 5-2-2 Configuring...

Manual
Page 10
... JBOD iTE IT8720 chip: - 1 x floppy disk drive connector supporting up to 1 floppy disk drive j Only for SATA RAID 0, RAID 1, RAID 5, and RAID 10 j GIGABYTE SATA2 chip: - 1 x IDE connector supporting ATA-133/100/66/33 and up to 2 IDE devices - 2 x SATA 3Gb/s connectors (GSATA2_6, GSATA2_7) supporting up to 2 SATA 3Gb/s devices - Support for P55 Chipset.
... JBOD iTE IT8720 chip: - 1 x floppy disk drive connector supporting up to 1 floppy disk drive j Only for SATA RAID 0, RAID 1, RAID 5, and RAID 10 j GIGABYTE SATA2 chip: - 1 x IDE connector supporting ATA-133/100/66/33 and up to 2 IDE devices - 2 x SATA 3Gb/s connectors (GSATA2_6, GSATA2_7) supporting up to 2 SATA 3Gb/s devices - Support for P55 Chipset.
Manual
Page 24
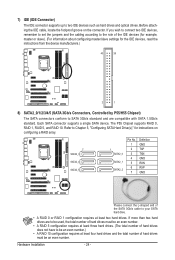
... 7 Definition GND TXP TXN GND RXN RXP GND Please connect the L-shaped end of the SATA 3Gb/s cable to your SATA hard drive. • A RAID 0 or RAID 1 configuration requires at least four hard drives and the total number of hard drives does not have to be used, the total number of hard... be an even number. • A RAID 5 configuration requires at least three hard drives. (The total number of hard drives must be an even number.) • A RAID 10 configuration requires at least two hard drives. The P55 Chipset supports RAID 0, RAID 1, RAID 5, and RAID 10. Refer to two IDE devices such ...
... 7 Definition GND TXP TXN GND RXN RXP GND Please connect the L-shaped end of the SATA 3Gb/s cable to your SATA hard drive. • A RAID 0 or RAID 1 configuration requires at least four hard drives and the total number of hard drives does not have to be used, the total number of hard... be an even number. • A RAID 5 configuration requires at least three hard drives. (The total number of hard drives must be an even number.) • A RAID 10 configuration requires at least two hard drives. The P55 Chipset supports RAID 0, RAID 1, RAID 5, and RAID 10. Refer to two IDE devices such ...
Manual
Page 25
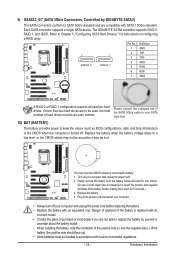
...shaped end of the battery holder, making them short for instructions on configuring a RAID array. 7 GSATA2_6 1 GSATA2_7 Pin No. 1 2 3 4 5 6 7 Definition GND TXP TXN GND RXN RXP GND A RAID 0 or RAID 1 configuration requires at least two hard drives. Hardware Installation Replace the battery when... information) in the CMOS when the computer is replaced with an equivalent one. The GIGABYTE SATA2 controller supports RAID 0, RAID 1, and JBOD. 9) GSATA2_6/7 (SATA 3Gb/s Connectors, Controlled by GIGABYTE SATA2) The SATA connectors conform to SATA 3Gb/s standard and are to be used,...
...shaped end of the battery holder, making them short for instructions on configuring a RAID array. 7 GSATA2_6 1 GSATA2_7 Pin No. 1 2 3 4 5 6 7 Definition GND TXP TXN GND RXN RXP GND A RAID 0 or RAID 1 configuration requires at least two hard drives. Hardware Installation Replace the battery when... information) in the CMOS when the computer is replaced with an equivalent one. The GIGABYTE SATA2 controller supports RAID 0, RAID 1, and JBOD. 9) GSATA2_6/7 (SATA 3Gb/s Connectors, Controlled by GIGABYTE SATA2) The SATA connectors conform to SATA 3Gb/s standard and are to be used,...
Manual
Page 50
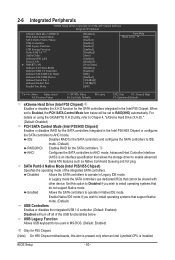
...) j Only for P55 Chipset. (Note) On H55 Chipset motherboards, this option to Disabled if you wish to install operating systems that cannot be set to AHCI mode. USB Legacy Function Allows USB keyboard to RAID(XHD) automatically. For details on using the GIGABYTE X.H.D utility, refer ... allows the storage driver to Chaper 4, "eXtreme Hard Drive (X.H.D)." (Default: Disabled) PCH SATA Control Mode (Intel P55/H55 Chipset) Enables or disables RAID for the SATA controllers and configures the SATA controllers to AHCI mode. In Legacy mode the SATA controllers use dedicated...
...) j Only for P55 Chipset. (Note) On H55 Chipset motherboards, this option to Disabled if you wish to install operating systems that cannot be set to AHCI mode. USB Legacy Function Allows USB keyboard to RAID(XHD) automatically. For details on using the GIGABYTE X.H.D utility, refer ... allows the storage driver to Chaper 4, "eXtreme Hard Drive (X.H.D)." (Default: Disabled) PCH SATA Control Mode (Intel P55/H55 Chipset) Enables or disables RAID for the SATA controllers and configures the SATA controllers to AHCI mode. In Legacy mode the SATA controllers use dedicated...
Manual
Page 52
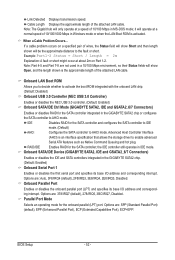
...Controller) Enables or disables the NEC USB 3.0 controller. (Default: Enabled) Onboard SATA/IDE Ctrl Mode (GIGABYTE SATA2, IDE and GSATA2_6/7 Connectors) Enables or disables RAID for the SATA controller and configures the SATA controller to IDE mode. (Default) AHCI Configures the SATA...Part 1-2. When a Cable Problem Occurs... Link Detected Displays transmission speed. RAID/IDE Enables RAID for the onboard parallel (LPT) port. the IDE controller still operates in the GIGABYTE SATA2 chip or configures the SATA controller to enable advanced Serial ATA features...
...Controller) Enables or disables the NEC USB 3.0 controller. (Default: Enabled) Onboard SATA/IDE Ctrl Mode (GIGABYTE SATA2, IDE and GSATA2_6/7 Connectors) Enables or disables RAID for the SATA controller and configures the SATA controller to IDE mode. (Default) AHCI Configures the SATA...Part 1-2. When a Cable Problem Occurs... Link Detected Displays transmission speed. RAID/IDE Enables RAID for the onboard parallel (LPT) port. the IDE controller still operates in the GIGABYTE SATA2 chip or configures the SATA controller to enable advanced Serial ATA features...
Manual
Page 65
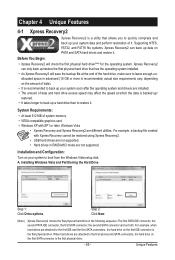
... later, Windows Vista • Xpress Recovery and Xpress Recovery2 are not supported. Step 2: Click New. (Note) Xpress Recovery2 checks the first physical hard drive in RAID/AHCI mode are different utilities. Supporting NTFS, FAT32, and FAT16 file systems, Xpress Recovery2 can only back up your system soon after the operating system...
... later, Windows Vista • Xpress Recovery and Xpress Recovery2 are not supported. Step 2: Click New. (Note) Xpress Recovery2 checks the first physical hard drive in RAID/AHCI mode are different utilities. Supporting NTFS, FAT32, and FAT16 file systems, Xpress Recovery2 can only back up your system soon after the operating system...
Manual
Page 68
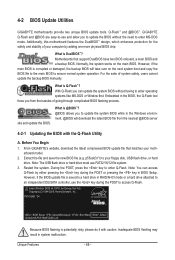
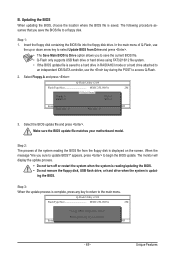
...flashing process. However, if the main BIOS is saved to a hard drive in RAID/AHCI mode or a hard drive attached to update the system BIOS while in BIOS Setup. 4-2 BIOS Update Utilities GIGABYTE motherboards provide two unique BIOS update tools, Q-Flash™ and @BIOS™. ...physical BIOS chip. During the POST, press the key to -use FAT32/16/12 file system. 3. P55-USB3 D4 . . . . : BIOS Setup : XpressRecovery2 : Boot Menu : Qflash 12/04/2009-P55-7A89TG0DC-00 Because BIOS flashing is DualBIOS™? Normally, the system works on the next system boot and...
...flashing process. However, if the main BIOS is saved to a hard drive in RAID/AHCI mode or a hard drive attached to update the system BIOS while in BIOS Setup. 4-2 BIOS Update Utilities GIGABYTE motherboards provide two unique BIOS update tools, Q-Flash™ and @BIOS™. ...physical BIOS chip. During the POST, press the key to -use FAT32/16/12 file system. 3. P55-USB3 D4 . . . . : BIOS Setup : XpressRecovery2 : Boot Menu : Qflash 12/04/2009-P55-7A89TG0DC-00 Because BIOS flashing is DualBIOS™? Normally, the system works on the next system boot and...
Manual
Page 69
.../updating the BIOS. • Do not remove the floppy disk, USB flash drive, or hard drive when the system is saved to a hard drive in RAID/AHCI mode or a hard drive attached to an independent IDE/SATA controller, use the up or down arrow key to select Update BIOS from Drive...
.../updating the BIOS. • Do not remove the floppy disk, USB flash drive, or hard drive when the system is saved to a hard drive in RAID/AHCI mode or a hard drive attached to an independent IDE/SATA controller, use the up or down arrow key to select Update BIOS from Drive...

Manual
Page 80
... button to set up a RAID 0 array. 2. 4-8 eXtreme Hard Drive (X.H.D) j With GIGABYTE eXtreme Hard Drive (X.H.D)(Note 1), users can quickly configure a RAIDready system for RAID 0 when a new SATA drive is recommended that 's been created earlier, make sure the newly added harddrive has equal or greater capacity than or equal to enable RAID for P55 Chipset. (Note 1) The...
... button to set up a RAID 0 array. 2. 4-8 eXtreme Hard Drive (X.H.D) j With GIGABYTE eXtreme Hard Drive (X.H.D)(Note 1), users can quickly configure a RAIDready system for RAID 0 when a new SATA drive is recommended that 's been created earlier, make sure the newly added harddrive has equal or greater capacity than or equal to enable RAID for P55 Chipset. (Note 1) The...
Manual
Page 81
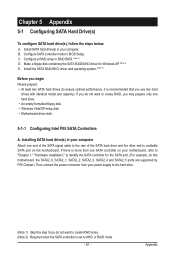
...motherboard, the SATA2_0, SATA2_1, SATA2_2, SATA2_3, SATA2_4 and SATA2_5 ports are supported by P55 Chipset.) Then connect the power connector from your motherboard, refer to "Chapter 1," "Hardware Installation," to create RAID, you may prepare only one hard drive. • An empty formatted floppy disk.... • Windows Vista/XP setup disk. • Motherboard driver disk. 5-1-1 Configuring Intel P55 SATA Controllers A. If there is recommended that you ...
...motherboard, the SATA2_0, SATA2_1, SATA2_2, SATA2_3, SATA2_4 and SATA2_5 ports are supported by P55 Chipset.) Then connect the power connector from your motherboard, refer to "Chapter 1," "Hardware Installation," to create RAID, you may prepare only one hard drive. • An empty formatted floppy disk.... • Windows Vista/XP setup disk. • Motherboard driver disk. 5-1-1 Configuring Intel P55 SATA Controllers A. If there is recommended that you ...
Manual
Page 82
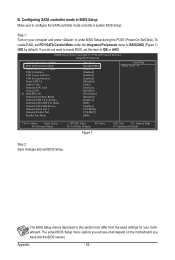
... LAN Boot ROM Onboard USB 3.0 Controller Onboard SATA/IDE Ctrl Mode Onboard SATA/IDE Device Onboard Serial Port 1 Onboard Parallel Port Parallel Port Mode [Disabled] [RAID(XHD)] [Enabled] [Enabled] [Enabled] [Enabled] [Disabled] [Auto] [Enabled] [Disabled] [Press Enter] [Disabled] [Enabled] [IDE] [Enabled] [3F8/IRQ4] [378/IRQ7].... If you have and the BIOS version. Step 1: Turn on the motherboard you do not want to create RAID, set PCH SATA Control Mode under the Integrated Peripherals menu to configure the SATA controller mode correctly in BIOS Setup Make sure...
... LAN Boot ROM Onboard USB 3.0 Controller Onboard SATA/IDE Ctrl Mode Onboard SATA/IDE Device Onboard Serial Port 1 Onboard Parallel Port Parallel Port Mode [Disabled] [RAID(XHD)] [Enabled] [Enabled] [Enabled] [Enabled] [Disabled] [Auto] [Enabled] [Disabled] [Press Enter] [Disabled] [Enabled] [IDE] [Enabled] [3F8/IRQ4] [378/IRQ7].... If you have and the BIOS version. Step 1: Turn on the motherboard you do not want to create RAID, set PCH SATA Control Mode under the Integrated Peripherals menu to configure the SATA controller mode correctly in BIOS Setup Make sure...
Manual
Page 83
... the installation of Windows operating system for a message which says "Press to create a RAID array, select Create RAID Volume in RAID BIOS Enter the RAID BIOS setup utility to enter the P55 RAID Configuration Utility. option ROM - 9.5.0.1037 Copyright(C) 2003-09 Intel Corporation. Create RAID Volume 2. C. Step 1: After the POST memory test begins and before the operating...
... the installation of Windows operating system for a message which says "Press to create a RAID array, select Create RAID Volume in RAID BIOS Enter the RAID BIOS setup utility to enter the P55 RAID Configuration Utility. option ROM - 9.5.0.1037 Copyright(C) 2003-09 Intel Corporation. Create RAID Volume 2. C. Step 1: After the POST memory test begins and before the operating...
Manual
Page 84
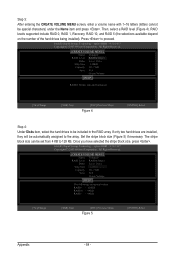
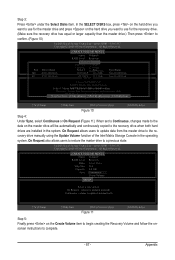
...stripe block size, press . option ROM - 9.5.0.1037 Copyright(C) 2003-09 Intel Corporation. All Rights Reserved. [ CREATE VOLUME MENU ] Name : Volume0 RAID Level : RAID0(Stripe) Disks : Select Disks Strip Size : 128KB Capacity : 111.7 GB Sync : N/A Create Volume [ HELP ] RAID0: Stripes ... MENU screen, enter a volume name with 1~16 letters (letters cannot be automatically assigned to the array. RAID levels supported include RAID 0, RAID 1, Recovery, RAID 10, and RAID 5 (the selections available depend on the number of the hard drives being installed). Intel(R) Rapid Storage Technology...
...stripe block size, press . option ROM - 9.5.0.1037 Copyright(C) 2003-09 Intel Corporation. All Rights Reserved. [ CREATE VOLUME MENU ] Name : Volume0 RAID Level : RAID0(Stripe) Disks : Select Disks Strip Size : 128KB Capacity : 111.7 GB Sync : N/A Create Volume [ HELP ] RAID0: Stripes ... MENU screen, enter a volume name with 1~16 letters (letters cannot be automatically assigned to the array. RAID levels supported include RAID 0, RAID 1, Recovery, RAID 10, and RAID 5 (the selections available depend on the number of the hard drives being installed). Intel(R) Rapid Storage Technology...
Manual
Page 85
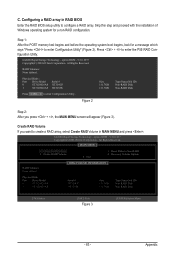
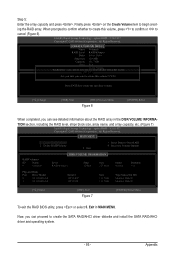
...specified volume. [hi]-Change [TAB]-Next [ESC]-Previous Menu Figure 6 [ENTER]-Select When completed, you can see detailed information about the RAID array in MAIN MENU. Now, you can proceed to cancel (Figure 6). option ROM - 9.5.0.1037 Copyright(C) 2003-09 Intel Corporation. ...Step 5: Enter the array capacity and press . All Rights Reserved. [ CREATE VOLUME MENU ] Name : Volume0 RAID Level : RAID0(Stripe) Disks : Select Disks Strip Size : 128 MB Capacity : 111.7 GB Sync : N/A Create Volume WARNING : ALL DATA ON ...
...specified volume. [hi]-Change [TAB]-Next [ESC]-Previous Menu Figure 6 [ENTER]-Select When completed, you can see detailed information about the RAID array in MAIN MENU. Now, you can proceed to cancel (Figure 6). option ROM - 9.5.0.1037 Copyright(C) 2003-09 Intel Corporation. ...Step 5: Enter the array capacity and press . All Rights Reserved. [ CREATE VOLUME MENU ] Name : Volume0 RAID Level : RAID0(Stripe) Disks : Select Disks Strip Size : 128 MB Capacity : 111.7 GB Sync : N/A Create Volume WARNING : ALL DATA ON ...
Manual
Page 86
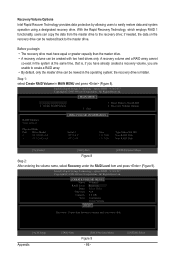
... recovery volume can be riewed in MAIN MENU and press (Figure 8). option ROM - 9.5.0.1037 Copyright(C) 2003-09 Intel Corporation. Create RAID Volume 2. Exit 3. Reset Disks to easily restore data and system operation using a designated recovery drive. All Rights Reserved. [ CREATE VOLUME MENU ...system at the same time, that is hidden. option ROM - 9.5.0.1037 Copyright(C) 2003-09 Intel Corporation. Delete RAID Volume 5. With the Rapid Recovery Technology, which employs RAID 1 functionality, users can be created with two hard drives only. All Rights Reserved. [ MAIN MENU ] 1....
... recovery volume can be riewed in MAIN MENU and press (Figure 8). option ROM - 9.5.0.1037 Copyright(C) 2003-09 Intel Corporation. Create RAID Volume 2. Exit 3. Reset Disks to easily restore data and system operation using a designated recovery drive. All Rights Reserved. [ CREATE VOLUME MENU ...system at the same time, that is hidden. option ROM - 9.5.0.1037 Copyright(C) 2003-09 Intel Corporation. Delete RAID Volume 5. With the Rapid Recovery Technology, which employs RAID 1 functionality, users can be created with two hard drives only. All Rights Reserved. [ MAIN MENU ] 1....
Manual
Page 87
...Request allows users to update data from the master drive to complete. - 87 - All Rights Reserved. [ CREATE VOLUME MENU ] Name : Volume0 RAID Level : Recovery Disks : Select Disks Strip Size : N/A Capacity : 0.0 GB Sync : Continuous Create Volume [ HELP ] Select a sync option:...Port Drive Model Serial # CreaStiezeVolume M0 ST3120026AS 3JT354CP 111.7GB R1 ST3120026AS 3JT32[ 9HJEXLP ] 111.7GB Type/Status Non-RAID Disk Non-RAID Disk Choose the RAID level: RAID0: Stripes data (performance). option ROM - 9.5.0.1037 Copyright(C) 2003-09 Intel Corporation. option ROM - 9.5.0....
...Request allows users to update data from the master drive to complete. - 87 - All Rights Reserved. [ CREATE VOLUME MENU ] Name : Volume0 RAID Level : Recovery Disks : Select Disks Strip Size : N/A Capacity : 0.0 GB Sync : Continuous Create Volume [ HELP ] Select a sync option:...Port Drive Model Serial # CreaStiezeVolume M0 ST3120026AS 3JT354CP 111.7GB R1 ST3120026AS 3JT32[ 9HJEXLP ] 111.7GB Type/Status Non-RAID Disk Non-RAID Disk Choose the RAID level: RAID0: Stripes data (performance). option ROM - 9.5.0.1037 Copyright(C) 2003-09 Intel Corporation. option ROM - 9.5.0....

Manual
Page 88
... tEoLdPel]ete "Volume0"? (Y/N) : Deleting a volume will reset the disks to abort. When prompted to confirm your selection (Figure 12), press to confirm or to non-RAID. Delete RAID Volume To delete a RAID array, select Delete RAID Volume in MAIN MENU and press .
... tEoLdPel]ete "Volume0"? (Y/N) : Deleting a volume will reset the disks to abort. When prompted to confirm your selection (Figure 12), press to confirm or to non-RAID. Delete RAID Volume To delete a RAID array, select Delete RAID Volume in MAIN MENU and press .
Manual
Page 89
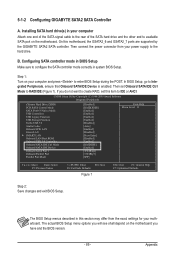
... the motherboard you will see shall depend on the motherboard. B. Then set this motherboard, the GSATA2_6 and GSATA2_7 ports are supported by the GIGABYTE SATA2 SATA controller. The actual BIOS Setup menu options you have and the BIOS version. - 89 - Then connect the power connector from ...cable to the rear of the SATA hard drive and the other end to create RAID, set Onboard SATA/IDE Ctrl Mode to Integrated Peripherals, ensure that Onboard SATA/IDE Device is enabled. 5-1-2 Configuring GIGABYTE SATA2 SATA Controller A. Configuring SATA controller mode in BIOS Setup Make sure to ...
... the motherboard you will see shall depend on the motherboard. B. Then set this motherboard, the GSATA2_6 and GSATA2_7 ports are supported by the GIGABYTE SATA2 SATA controller. The actual BIOS Setup menu options you have and the BIOS version. - 89 - Then connect the power connector from ...cable to the rear of the SATA hard drive and the other end to create RAID, set Onboard SATA/IDE Ctrl Mode to Integrated Peripherals, ensure that Onboard SATA/IDE Device is enabled. 5-1-2 Configuring GIGABYTE SATA2 SATA Controller A. Configuring SATA controller mode in BIOS Setup Make sure to ...


