
Manual
Page 1
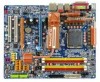
GA-P35-DQ6 LGA775 socket motherboard for Intel® CoreTM processor family/ Intel® Pentium® processor family/Intel® Celeron® processor family User's Manual Rev. 1002 12ME-P35DQ6-1002R * The WEEE marking on the product indicates this product must not be disposed of with user's other household waste and must be handed over to a designated collection point for the recycling of waste electrical and electronic equipment!! * The WEEE marking applies only in European Union's member states.
GA-P35-DQ6 LGA775 socket motherboard for Intel® CoreTM processor family/ Intel® Pentium® processor family/Intel® Celeron® processor family User's Manual Rev. 1002 12ME-P35DQ6-1002R * The WEEE marking on the product indicates this product must not be disposed of with user's other household waste and must be handed over to a designated collection point for the recycling of waste electrical and electronic equipment!! * The WEEE marking applies only in European Union's member states.

Manual
Page 3
...Quick Installation Guide included with the product. „ For detailed product information, carefully read the User's Manual. „ For instructions on how to use GIGABYTE's unique features, read or download the information on/from the Support\Motherboard\Technology Guide page on your...in any form or by any means without prior notice. GIGABYTE UNITED INC. The logo is designated by GIGABYTE without GIGABYTE's prior written permission. Check your motherboard looks like this manual are legally registered to GIGABYTE UNITED INC. All rights reserved. Example: is exclusively licensed...
...Quick Installation Guide included with the product. „ For detailed product information, carefully read the User's Manual. „ For instructions on how to use GIGABYTE's unique features, read or download the information on/from the Support\Motherboard\Technology Guide page on your...in any form or by any means without prior notice. GIGABYTE UNITED INC. The logo is designated by GIGABYTE without GIGABYTE's prior written permission. Check your motherboard looks like this manual are legally registered to GIGABYTE UNITED INC. All rights reserved. Example: is exclusively licensed...
Manual
Page 6
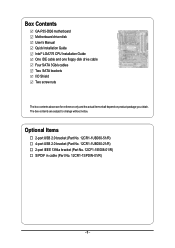
...-1SPDIN-01/R) - 6 - The box contents are for reference only and the actual items shall depend on product package you obtain. Box Contents GA-P35-DQ6 motherboard Motherboard driver disk User's Manual Quick Installation Guide Intel® LGA775 CPU Installation Guide One IDE cable and one floppy disk drive cable Four SATA 3Gb/s cables Two...
...-1SPDIN-01/R) - 6 - The box contents are for reference only and the actual items shall depend on product package you obtain. Box Contents GA-P35-DQ6 motherboard Motherboard driver disk User's Manual Quick Installation Guide Intel® LGA775 CPU Installation Guide One IDE cable and one floppy disk drive cable Four SATA 3Gb/s cables Two...

Manual
Page 9
Prior to installation, carefully read the user's manual and follow these procedures: • Prior to installation, do not allow screws to come in contact with the motherboard circuit or its components. • Make ...
Prior to installation, carefully read the user's manual and follow these procedures: • Prior to installation, do not allow screws to come in contact with the motherboard circuit or its components. • Make ...

Manual
Page 15
... cooler and CPU may damage the CPU. - 15 - Check that the Male and Female push pins are joined closely. (Refer to your CPU cooler installation manual for instructions on installing the cooler.) Step 5: After the installation, check the back of arrow is to the CPU. Hardware Installation
... cooler and CPU may damage the CPU. - 15 - Check that the Male and Female push pins are joined closely. (Refer to your CPU cooler installation manual for instructions on installing the cooler.) Step 5: After the installation, check the back of arrow is to the CPU. Hardware Installation

Manual
Page 16
... same for instructions on installing the cooler. (Note) The components received may easily remove the Crazy Cool heatsink. Screw nuts included with "SILENT-PIPE." GA-P35-DQ6 Motherboard - 16 - Step 5: Push down on one of the two spring screws and put the nut on the bottom of the spring screw on ... the nuts and complete the steps to remove the Crazy Cool heatsink. (Remember to replace the copper fin.) Refer to your CPU cooler installation manual for the other spring screw. Step 3: Before unfastening the spring screw as shown in the picture to the left, first remove the copper fin...
... same for instructions on installing the cooler. (Note) The components received may easily remove the Crazy Cool heatsink. Screw nuts included with "SILENT-PIPE." GA-P35-DQ6 Motherboard - 16 - Step 5: Push down on one of the two spring screws and put the nut on the bottom of the spring screw on ... the nuts and complete the steps to remove the Crazy Cool heatsink. (Remember to replace the copper fin.) Refer to your CPU cooler installation manual for the other spring screw. Step 3: Before unfastening the spring screw as shown in the picture to the left, first remove the copper fin...

Manual
Page 19
... on the card are completely inserted into the PCI Express x16 slot. You can also press the latch on your operating system. Carefully read the manual that supports your expansion card. • Always turn off the computer and unplug the power cord from the slot. Install the driver provided with your...
... on the card are completely inserted into the PCI Express x16 slot. You can also press the latch on your operating system. Carefully read the manual that supports your expansion card. • Always turn off the computer and unplug the power cord from the slot. Install the driver provided with your...

Manual
Page 35
... do so may cause damage to the motherboard. • After system restart, go to BIOS Setup to load factory defaults (select Load Optimized Defaults) or manually configure the BIOS settings (refer to Chapter 2, "BIOS Setup," for a few seconds. Hardware Installation
... do so may cause damage to the motherboard. • After system restart, go to BIOS Setup to load factory defaults (select Load Optimized Defaults) or manually configure the BIOS settings (refer to Chapter 2, "BIOS Setup," for a few seconds. Hardware Installation

Manual
Page 42
...Memory These fields are read-only and are : Disabled (default), Drive A. Typically, 640 KB will not stop for all other errors. GA-P35-DQ6 Motherboard - 42 - Access Mode Sets the hard drive access mode. Cylinder Number of memory installed on Allows you to selects the type of...Auto (default), Large. Head Number of the currently installed hard drive. Sector Number of extended memory. Floppy 3 Mode Support Allows you to manually enter the specifications of the hard drive when the hard drive access mode is 3-mode floppy disk drive, a Japanese standard floppy disk drive...
...Memory These fields are read-only and are : Disabled (default), Drive A. Typically, 640 KB will not stop for all other errors. GA-P35-DQ6 Motherboard - 42 - Access Mode Sets the hard drive access mode. Cylinder Number of memory installed on Allows you to selects the type of...Auto (default), Large. Head Number of the currently installed hard drive. Sector Number of extended memory. Floppy 3 Mode Support Allows you to manually enter the specifications of the hard drive when the hard drive access mode is 3-mode floppy disk drive, a Japanese standard floppy disk drive...

Manual
Page 53
... Control PCI-E OverVoltage Control FSB OverVoltage Control (G)MCH OverVoltage Control CPU Voltage Control Normal CPU Vcore ******** [Auto] [16X] [Disabled] 200 Auto [Disabled] [Auto] 667 [Option 1] [Manual] [Normal] [Normal] [Normal] [Normal] [Normal] 1.3875V Item Help Menu Level` KLJI: Move Enter: Select F5: Previous Values +/-/PU/PD: Value F10: Save F6: Fail-Safe...
... Control PCI-E OverVoltage Control FSB OverVoltage Control (G)MCH OverVoltage Control CPU Voltage Control Normal CPU Vcore ******** [Auto] [16X] [Disabled] 200 Auto [Disabled] [Auto] 667 [Option 1] [Manual] [Normal] [Normal] [Normal] [Normal] [Normal] 1.3875V Item Help Menu Level` KLJI: Move Enter: Select F5: Previous Values +/-/PU/PD: Value F10: Save F6: Fail-Safe...
Manual
Page 54
... your CPU. Enabled will allow for 20 seconds to allow the CPU Host Frequency item below to manually set the system memory multiplier. If your system fails to boot after you to manually set the PCIe clock frequency. Note: If your system becomes unstable after overclocking, please wait for ... disables the control of your system hardware components. the second is the memory frequency that the CPU frequency be set this item to 200 MHz. GA-P35-DQ6 Motherboard - 54 - For a 1333 MHz FSB CPU, set this item to 266 MHz. For an 800 MHz FSB CPU, set in accordance with...
... your CPU. Enabled will allow for 20 seconds to allow the CPU Host Frequency item below to manually set the system memory multiplier. If your system fails to boot after you to manually set the PCIe clock frequency. Note: If your system becomes unstable after overclocking, please wait for ... disables the control of your system hardware components. the second is the memory frequency that the CPU frequency be set this item to 200 MHz. GA-P35-DQ6 Motherboard - 54 - For a 1333 MHz FSB CPU, set this item to 266 MHz. For an 800 MHz FSB CPU, set in accordance with...

Manual
Page 55
... Allows you to to set PCIe voltage. Normal CPU Vcore Displays the normal operating voltage of the CPU. Manual allows all voltage control items below to be configurable. (Default: Manual) DDR2 OverVoltage Control Allows you to set the North Bridge voltage. FSB OverVoltage Control Allows you to set ...required. (Default) +0.025V ~ +0.375V Increases North Bridge voltage by 0.05V to 0.35V at 0.025V increment. English System Voltage Control Determines whether to manually set the system voltages as required. Auto lets BIOS automatically set the system voltages. BIOS Setup
... Allows you to to set PCIe voltage. Normal CPU Vcore Displays the normal operating voltage of the CPU. Manual allows all voltage control items below to be configurable. (Default: Manual) DDR2 OverVoltage Control Allows you to set the North Bridge voltage. FSB OverVoltage Control Allows you to set ...required. (Default) +0.025V ~ +0.375V Increases North Bridge voltage by 0.05V to 0.35V at 0.025V increment. English System Voltage Control Determines whether to manually set the system voltages as required. Auto lets BIOS automatically set the system voltages. BIOS Setup

Manual
Page 61
Drivers Installation English 3-4 Hardware Information This page provides information about the hardware devices on this motherboard. 3-5 Contact Us Check the contacts information of the GIGABYTE headquarter in Taiwan and the overseas branch offices on the last page of this manual. - 61 -
Drivers Installation English 3-4 Hardware Information This page provides information about the hardware devices on this motherboard. 3-5 Contact Us Check the contacts information of the GIGABYTE headquarter in Taiwan and the overseas branch offices on the last page of this manual. - 61 -

Manual
Page 68
... the latest compressed BIOS update file that support Dual BIOS have two BIOS onboard, a main BIOS and a backup BIOS. GA-P35-DQ6 Motherboard - 68 - English 4-2 BIOS Update Utilities GIGABYTE motherboards provide two unique BIOS update tools, Q-FlashTM and @BIOSTM. For the sake of your floppy disk, USB flash drive.../12 file system. 3. During the POST, press the key to access Q-Flash. Intel P35 BIOS for the safety and stability of system safety, users cannot update the backup BIOS manually. Normally, the system works on the next system boot and copy the BIOS file to the...
... the latest compressed BIOS update file that support Dual BIOS have two BIOS onboard, a main BIOS and a backup BIOS. GA-P35-DQ6 Motherboard - 68 - English 4-2 BIOS Update Utilities GIGABYTE motherboards provide two unique BIOS update tools, Q-FlashTM and @BIOSTM. For the sake of your floppy disk, USB flash drive.../12 file system. 3. During the POST, press the key to access Q-Flash. Intel P35 BIOS for the safety and stability of system safety, users cannot update the backup BIOS manually. Normally, the system works on the next system boot and copy the BIOS file to the...

Manual
Page 72
...Using the Internet Update Function" below. Select Load Optimized Defaults and press to begin the BIOS update process. P35DQ6.f1) obtained from GIGABYTE's website and follow the instructions in an unbootable system. • If the BIOS update file for your motherboard model. Updating the ...name on the screen is not present on the @BIOS server site, please manually download the BIOS update file from the Internet or through other source. Make sure the extracted BIOS file matches your system. GA-P35-DQ6 Motherboard - 72 - Upon completion, restart your system. • If more...
...Using the Internet Update Function" below. Select Load Optimized Defaults and press to begin the BIOS update process. P35DQ6.f1) obtained from GIGABYTE's website and follow the instructions in an unbootable system. • If the BIOS update file for your motherboard model. Updating the ...name on the screen is not present on the @BIOS server site, please manually download the BIOS update file from the Internet or through other source. Make sure the extracted BIOS file matches your system. GA-P35-DQ6 Motherboard - 72 - Upon completion, restart your system. • If more...

Manual
Page 88
Windows Setup Press F6 if you need to manually specify an adapter. Step 1: Restart your hard drive(s). Currently, Setup will be a few moments of some files being loaded before you do not want to ... the Windows Vista/XP/2000 setup disk and press as soon as you see the next screen. S=Specify Additional Device ENTER=Continue F3=Exit Figure 2 GA-P35-DQ6 Motherboard - 88 - Windows Setup Setup could not determine the type of Windows XP installation. English 5-1-4 Installing the SATA RAID/AHCI Driver and Operating System Now...
Windows Setup Press F6 if you need to manually specify an adapter. Step 1: Restart your hard drive(s). Currently, Setup will be a few moments of some files being loaded before you do not want to ... the Windows Vista/XP/2000 setup disk and press as soon as you see the next screen. S=Specify Additional Device ENTER=Continue F3=Exit Figure 2 GA-P35-DQ6 Motherboard - 88 - Windows Setup Setup could not determine the type of Windows XP installation. English 5-1-4 Installing the SATA RAID/AHCI Driver and Operating System Now...

Manual
Page 92
...To install a microphone, connect your microphone to be simultaneously processed. A. Double-click the icon to the right shows the default audio jack assignments. GA-P35-DQ6 Motherboard - 92 - all at the same time. Before installing the audio driver, make a telephone call over the Internet, and etc. English... XP as the example operating system.) Step 1: After installing the audio driver, the Audio Manager icon will appear in jack and manually configure the jack for microphone functionality. • If your operating system has been updated with the latest Service Pack for Windows. ...
...To install a microphone, connect your microphone to be simultaneously processed. A. Double-click the icon to the right shows the default audio jack assignments. GA-P35-DQ6 Motherboard - 92 - all at the same time. Before installing the audio driver, make a telephone call over the Internet, and etc. English... XP as the example operating system.) Step 1: After installing the audio driver, the Audio Manager icon will appear in jack and manually configure the jack for microphone functionality. • If your operating system has been updated with the latest Service Pack for Windows. ...


