Manual
Page 5
... 59 3-1 Installing Chipset Drivers 59 3-2 Application Software 60 3-3 Technical Manuals 60 3-4 Contact ...61 3-5 System ...61 3-6 Download Center 62 Chapter 4 Unique Features 63 4-1 Xpress Recovery2...Appendix ...75 5-1 Configuring SATA Hard Drive(s 75 5-1-1 Configuring AMD SB750 SATA Controllers 75 5-1-2 Configuring GIGABYTE SATA2 SATA Controller 81 5-1-3 Making a SATA RAID/AHCI Driver Diskette for Windows XP 87 5-1-4 Installing the SATA RAID/AHCI Driver and Operating System 88 5-2 ConfiguringAudio Input and Output 97 5-2-1 Configuring 2/4/5.1/7.1-Channel Audio 97 5-2-2 Configuring ...
... 59 3-1 Installing Chipset Drivers 59 3-2 Application Software 60 3-3 Technical Manuals 60 3-4 Contact ...61 3-5 System ...61 3-6 Download Center 62 Chapter 4 Unique Features 63 4-1 Xpress Recovery2...Appendix ...75 5-1 Configuring SATA Hard Drive(s 75 5-1-1 Configuring AMD SB750 SATA Controllers 75 5-1-2 Configuring GIGABYTE SATA2 SATA Controller 81 5-1-3 Making a SATA RAID/AHCI Driver Diskette for Windows XP 87 5-1-4 Installing the SATA RAID/AHCI Driver and Operating System 88 5-2 ConfiguringAudio Input and Output 97 5-2-1 Configuring 2/4/5.1/7.1-Channel Audio 97 5-2-2 Configuring ...
Manual
Page 19
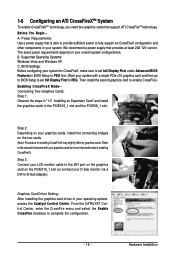
Supported Operating Systems: Windows Vista and Windows XP. Step 2: Depending on your graphics cards, install the connecting bridges on the PCIEX16_1 slot (or connect your operating system, access the Catalyst Control Center. Hardware Installation Graphics Card Driver Setting: After installing the graphics card driver in BIOS Setup to PEG first. (Start your system with your...
Supported Operating Systems: Windows Vista and Windows XP. Step 2: Depending on your graphics cards, install the connecting bridges on the PCIEX16_1 slot (or connect your operating system, access the Catalyst Control Center. Hardware Installation Graphics Card Driver Setting: After installing the graphics card driver in BIOS Setup to PEG first. (Start your system with your...
Manual
Page 59
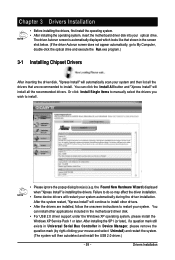
... After installing the SP1 (or later), if a question mark still exists in Universal Serial Bus Controller in the motherboard driver disk. • For USB 2.0 driver support under the Windows XP operating system, please install the Windows XP Service Pack 1 or later. After the system restart, "Xpress Install" will continue to My Computer, double-click...
... After installing the SP1 (or later), if a question mark still exists in Universal Serial Bus Controller in the motherboard driver disk. • For USB 2.0 driver support under the Windows XP operating system, please install the Windows XP Service Pack 1 or later. After the system restart, "Xpress Install" will continue to My Computer, double-click...
Manual
Page 63
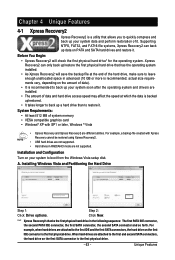
... the hard drive on the first IDE connector is the first physical drive. A. Unique Features For example, a backup file created with SP1 or later, Windows ® Vista • Xpress Recovery and Xpress Recovery2 are not supported. When hard drives are attached to the first IDE and the first SATA connectors... • It is recommended to back up your system to quickly compress and back up data on your system soon after the operating system and drivers are installed. • The amount of data and hard drive access speed may affect the speed at the end of system memory • VESA...
... the hard drive on the first IDE connector is the first physical drive. A. Unique Features For example, a backup file created with SP1 or later, Windows ® Vista • Xpress Recovery and Xpress Recovery2 are not supported. When hard drives are attached to the first IDE and the first SATA connectors... • It is recommended to back up your system to quickly compress and back up data on your system soon after the operating system and drivers are installed. • The amount of data and hard drive access speed may affect the speed at the end of system memory • VESA...
Manual
Page 75
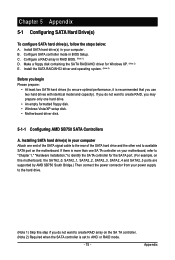
...capacity). Installing SATA hard drive(s) in your computer Attach one hard drive. • An empty formatted floppy disk. • Windows Vista/XP setup disk. • Motherboard driver disk. 5-1-1 Configuring AMD SB750 SATA Controllers A. Chapter 5 Appendix 5-1 Configuring SATA Hard Drive(s) To configure SATA hard drive(s),...RAID BIOS. (Note 1) D. Install SATA hard drive(s) in your computer . B. Make a floppy disk containing the SA TA RAID/AHCI driver for the SATA port. (For example, on this motherboard, the SA TA2_0, SATA2_1, SATA2_2, SATA2_3, SATA2_4 and SA TA2_5 ports are ...
...capacity). Installing SATA hard drive(s) in your computer Attach one hard drive. • An empty formatted floppy disk. • Windows Vista/XP setup disk. • Motherboard driver disk. 5-1-1 Configuring AMD SB750 SATA Controllers A. Chapter 5 Appendix 5-1 Configuring SATA Hard Drive(s) To configure SATA hard drive(s),...RAID BIOS. (Note 1) D. Install SATA hard drive(s) in your computer . B. Make a floppy disk containing the SA TA RAID/AHCI driver for the SATA port. (For example, on this motherboard, the SA TA2_0, SATA2_1, SATA2_2, SATA2_3, SATA2_4 and SA TA2_5 ports are ...
Manual
Page 86
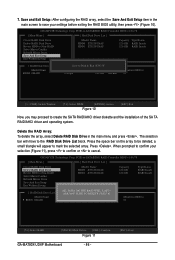
...and the installation of the SA TA RAID/AHCI driver and operating system. GIGABYTE Technology Corp. N RAID Level Capacity Status 0-Stripe 240 GB Normal Members(HDDx) 01 []-Select RAID [SPACE]-Mark Delete [DEL]-Confirm Figure 11 GA-MA790X-UD4P Motherboard - 86 - [ESC]-Abort ARE YOU ...GRAID Save to Disk & Exit (Y/N)?Y RAID Level 0-Stripe Capacity Status 240 GB Normal Members(HDDx) 01 [TAB]-Switch Window []-Select ITEM [ENTER]-Action Figure 10 [ESC]-Exit Now, you may proceed to confirm your settings before exiting the RAID...
...and the installation of the SA TA RAID/AHCI driver and operating system. GIGABYTE Technology Corp. N RAID Level Capacity Status 0-Stripe 240 GB Normal Members(HDDx) 01 []-Select RAID [SPACE]-Mark Delete [DEL]-Confirm Figure 11 GA-MA790X-UD4P Motherboard - 86 - [ESC]-Abort ARE YOU ...GRAID Save to Disk & Exit (Y/N)?Y RAID Level 0-Stripe Capacity Status 240 GB Normal Members(HDDx) 01 [TAB]-Switch Window []-Select ITEM [ENTER]-Action Figure 10 [ESC]-Exit Now, you may proceed to confirm your settings before exiting the RAID...
Manual
Page 87
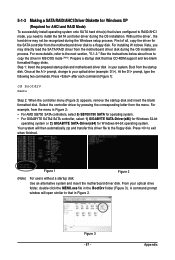
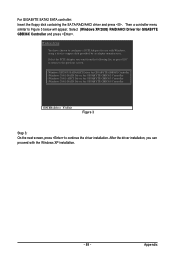
..., change to your system. Press to the next section, "5-1-3." Figure 3 - 87 - 5-1-3 Making a SATA RAID/AHCI Driver Diskette for Windows XP (Required for AHCI and RAID Mode) To successfully install operating system onto SA TA hard drive(s) that has CD-ROM ...controllers, select 5) SB700/750 SATA for operating system . • For GIGABYTE SATA2 SATA controller, select 1) GIGABYTE SATA-Driver(x86) for Windows 32-bit operating system or 2) GIGABYTE SATA-Driver(x64) for the SATA controller from the motherboard driver disk during the OS installation process. For installing W indows Vista, you ...
..., change to your system. Press to the next section, "5-1-3." Figure 3 - 87 - 5-1-3 Making a SATA RAID/AHCI Driver Diskette for Windows XP (Required for AHCI and RAID Mode) To successfully install operating system onto SA TA hard drive(s) that has CD-ROM ...controllers, select 5) SB700/750 SATA for operating system . • For GIGABYTE SATA2 SATA controller, select 1) GIGABYTE SATA-Driver(x86) for Windows 32-bit operating system or 2) GIGABYTE SATA-Driver(x64) for the SATA controller from the motherboard driver disk during the OS installation process. For installing W indows Vista, you ...
Manual
Page 88
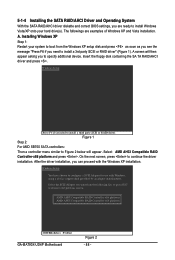
... similar to specify additional device. After the driver installation, you can proceed with Windows, using a device support disk provided by an adapter manufacturer. AMD AHCI Compatible RAID Controller-x86 platform AMD AHCI Compatible RAID Controller-x64 platform ENTER=Select F3=Exit GA-MA790X-UD4P Motherboard Figure 2 - 88 - Windows Setup You have chosen to the previous screen...
... similar to specify additional device. After the driver installation, you can proceed with Windows, using a device support disk provided by an adapter manufacturer. AMD AHCI Compatible RAID Controller-x86 platform AMD AHCI Compatible RAID Controller-x64 platform ENTER=Select F3=Exit GA-MA790X-UD4P Motherboard Figure 2 - 88 - Windows Setup You have chosen to the previous screen...
Manual
Page 89
..., you want from the following list, or press ESC to return to the previous screen. (Windows XP/2003) RAID/AHCI Driver for GIGABYTE GBB36X Controller (Windows 2000) RAID Driver for GIGABYTE GBB363 Controller (Windows 2000) AHCI Driver for GIGABYTE GBB363 Controller (Windows 2000) RAID Driver for GIGABYTE GBB360 Controller ENTER=Select F3=Exit Figure 3 Step 3: On the next screen, press to Figure...
..., you want from the following list, or press ESC to return to the previous screen. (Windows XP/2003) RAID/AHCI Driver for GIGABYTE GBB36X Controller (Windows 2000) RAID Driver for GIGABYTE GBB363 Controller (Windows 2000) AHCI Driver for GIGABYTE GBB363 Controller (Windows 2000) RAID Driver for GIGABYTE GBB360 Controller ENTER=Select F3=Exit Figure 3 Step 3: On the next screen, press to Figure...
Manual
Page 90
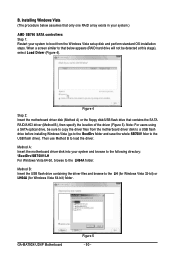
... (go to the BootDrv folder and save the whole SB750V foler to copy the driver files from the Windows Vista setup disk and perform standard OS installation steps. Installing Windows Vista (The procedure below appears (RAID hard drive will not be sure to the USB flash drive... Restart your system and browse to the following directory: \BootDrv\SB750V\LH For Windows Vista 64-bit, browse to that below assumes that contains the SA TA RAID/AHCI driver (Method B), then specify the location of the driver (Figure 5). GA-MA790X-UD4P Motherboard Figure 5 - 90 - B. Then use Method B to the LH...
... (go to the BootDrv folder and save the whole SB750V foler to copy the driver files from the Windows Vista setup disk and perform standard OS installation steps. Installing Windows Vista (The procedure below appears (RAID hard drive will not be sure to the USB flash drive... Restart your system and browse to the following directory: \BootDrv\SB750V\LH For Windows Vista 64-bit, browse to that below assumes that contains the SA TA RAID/AHCI driver (Method B), then specify the location of the driver (Figure 5). GA-MA790X-UD4P Motherboard Figure 5 - 90 - B. Then use Method B to the LH...
Manual
Page 92
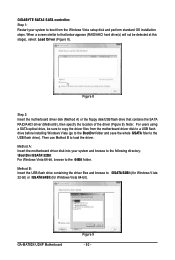
...AHCI hard drive(s) will not be sure to copy the driver files from the Windows Vista setup disk and perform standard OS installation steps. Method B: Insert the USB flash drive containing the driver files and browse to the USB flash drive). GA-MA790X-UD4P Motherboard Figure 9 - 92 - Note: For users ...similar to boot from the motherboard driver disk to a USB flash drive before installing Windows Vista (go to the BootDrv folder and save the whole GSATA foler to \GSATA\32Bit (for Windows V ista 32-bit) or \GSATA\64Bit (for Windows Vista 64-bit). GIGABYTE SATA2 SATA controller: Step 1: ...
...AHCI hard drive(s) will not be sure to copy the driver files from the Windows Vista setup disk and perform standard OS installation steps. Method B: Insert the USB flash drive containing the driver files and browse to the USB flash drive). GA-MA790X-UD4P Motherboard Figure 9 - 92 - Note: For users ...similar to boot from the motherboard driver disk to a USB flash drive before installing Windows Vista (go to the BootDrv folder and save the whole GSATA foler to \GSATA\32Bit (for Windows V ista 32-bit) or \GSATA\64Bit (for Windows Vista 64-bit). GIGABYTE SATA2 SATA controller: Step 1: ...
Manual
Page 97
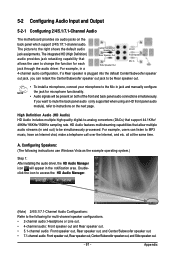
...have an Internet chat, make a telephone call over the Internet, and etc. Configuring Speakers: (The following for each jack through the audio driver. If you can listen to instructions on both of the front and back panel audio connections simultaneously. For example, in and out) to... the following instructions use Windows Vista as the example operating system.) Step 1: After installing the audio driver, the HD Audio Manager icon will be Rear speaker out. • To install a microphone, connect ...
...have an Internet chat, make a telephone call over the Internet, and etc. Configuring Speakers: (The following for each jack through the audio driver. If you can listen to instructions on both of the front and back panel audio connections simultaneously. For example, in and out) to... the following instructions use Windows Vista as the example operating system.) Step 1: After installing the audio driver, the HD Audio Manager icon will be Rear speaker out. • To install a microphone, connect ...


