Manual
Page 1
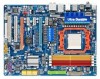
GA-MA790X-UD4P AM2+/AM2 socket motherboard for AMD PhenomTM II X3 processor/AMD PhenomTM II X4 processor/ AMD PhenomTM FX processor/AMD PhenomTM X4 processor/ AMD PhenomTM X3 processor/AMD AthlonTM X2 processor/ AMD AthlonTM processor/AMD SempronTM X2 processor/ AMD SempronTM processor User's Manual Rev. 1003 12ME-MA79U4P-1003R
GA-MA790X-UD4P AM2+/AM2 socket motherboard for AMD PhenomTM II X3 processor/AMD PhenomTM II X4 processor/ AMD PhenomTM FX processor/AMD PhenomTM X4 processor/ AMD PhenomTM X3 processor/AMD AthlonTM X2 processor/ AMD AthlonTM processor/AMD SempronTM X2 processor/ AMD SempronTM processor User's Manual Rev. 1003 12ME-MA79U4P-1003R
Manual
Page 3
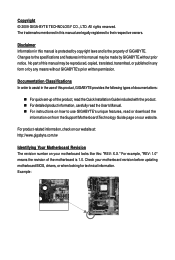
...drivers, or when looking for technical information. Check your motherboard looks like this manual is protected by any means without prior notice. No part of GIGABYTE. Disclaimer Information in this product, GIGABYTE provides the following types of documentations: For quick set-up of... this manual are legally registered to their respective owners. All rights reserved. For product-related information, check on our website at: http://www.gigabyte.com.tw Identifying Your Motherboard Revision The revision number on our...
...drivers, or when looking for technical information. Check your motherboard looks like this manual is protected by any means without prior notice. No part of GIGABYTE. Disclaimer Information in this product, GIGABYTE provides the following types of documentations: For quick set-up of... this manual are legally registered to their respective owners. All rights reserved. For product-related information, check on our website at: http://www.gigabyte.com.tw Identifying Your Motherboard Revision The revision number on our...
Manual
Page 5
Chapter 3 Drivers Installation 59 3-1 Installing Chipset Drivers 59 3-2 Application Software 60 3-3 Technical Manuals 60 3-4 Contact ...61 3-5 System ...61 3-6 Download Center 62 Chapter 4 Unique Features 63 4-1 Xpress Recovery2 63 4-2 BIOS Update ...4-5 Q-Share ...73 4-6 Time Repair ...74 Chapter 5 Appendix ...75 5-1 Configuring SATA Hard Drive(s 75 5-1-1 Configuring AMD SB750 SATA Controllers 75 5-1-2 Configuring GIGABYTE SATA2 SATA Controller 81 5-1-3 Making a SATA RAID/AHCI Driver Diskette for Windows XP 87 5-1-4 Installing the SATA RAID/AHCI Driver and Operating System 88 5-2...
Chapter 3 Drivers Installation 59 3-1 Installing Chipset Drivers 59 3-2 Application Software 60 3-3 Technical Manuals 60 3-4 Contact ...61 3-5 System ...61 3-6 Download Center 62 Chapter 4 Unique Features 63 4-1 Xpress Recovery2 63 4-2 BIOS Update ...4-5 Q-Share ...73 4-6 Time Repair ...74 Chapter 5 Appendix ...75 5-1 Configuring SATA Hard Drive(s 75 5-1-1 Configuring AMD SB750 SATA Controllers 75 5-1-2 Configuring GIGABYTE SATA2 SATA Controller 81 5-1-3 Making a SATA RAID/AHCI Driver Diskette for Windows XP 87 5-1-4 Installing the SATA RAID/AHCI Driver and Operating System 88 5-2...

Manual
Page 6
... power cable (Part No. 12CF1-2SERPW-0*R) COM port cable (Part No. 12CF1-1CM001-3*R) S/PDIF in cable (Part No. 12CR1-1SPDIN-0*R) - 6 - Box Contents GA-MA790X-UD4P motherboard Motherboard driver disk User's Manual Quick Installation Guide One IDE cable Four SATA 3Gb/s cables One SATA bracket I/O Shield • The box contents above are subject to change...
... power cable (Part No. 12CF1-2SERPW-0*R) COM port cable (Part No. 12CF1-1CM001-3*R) S/PDIF in cable (Part No. 12CR1-1SPDIN-0*R) - 6 - Box Contents GA-MA790X-UD4P motherboard Motherboard driver disk User's Manual Quick Installation Guide One IDE cable Four SATA 3Gb/s cables One SATA bracket I/O Shield • The box contents above are subject to change...
Manual
Page 9
... installing the motherboard, please have a problem related to the use of the product, please consult a certified computer technician. - 9 - Prior to installation, carefully read the user's manual and follow these procedures: • Prior to installation, do not allow screws to come in a high-temperature environment. • Turning on the motherboard, make sure...
... installing the motherboard, please have a problem related to the use of the product, please consult a certified computer technician. - 9 - Prior to installation, carefully read the user's manual and follow these procedures: • Prior to installation, do not allow screws to come in a high-temperature environment. • Turning on the motherboard, make sure...

Manual
Page 15
... the steps below to correctly install the CPU cooler on the CPU. (The following procedure uses the GIGABYTE cooler as the picture above shows) to lock into place. (Refer to your CPU cooler installation manual for instructions on installing the cooler.) Step 5: Finally, attach the power connector of the CPU cooler to...
... the steps below to correctly install the CPU cooler on the CPU. (The following procedure uses the GIGABYTE cooler as the picture above shows) to lock into place. (Refer to your CPU cooler installation manual for instructions on installing the cooler.) Step 5: Finally, attach the power connector of the CPU cooler to...
Manual
Page 18
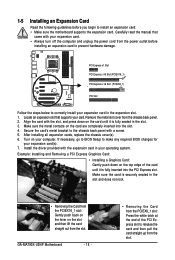
Align the card with your operating system. GA-MA790X-UD4P Motherboard - 18 - • Removing the Card from the PCIEX8_1 slot: Press the white latch at the end of the card until it is fully seated ... a PCI Express Graphics Card: • Installing a Graphics Card: Gently push down on the card are completely inserted into the PCI Express slot. Carefully read the manual that supports your expansion card(s). 7. Make sure the card is securely seated in the expansion slot. 1. If necessary, go to BIOS Setup to make any...
Align the card with your operating system. GA-MA790X-UD4P Motherboard - 18 - • Removing the Card from the PCIEX8_1 slot: Press the white latch at the end of the card until it is fully seated ... a PCI Express Graphics Card: • Installing a Graphics Card: Gently push down on the card are completely inserted into the PCI Express slot. Carefully read the manual that supports your expansion card(s). 7. Make sure the card is securely seated in the expansion slot. 1. If necessary, go to BIOS Setup to make any...
Manual
Page 19
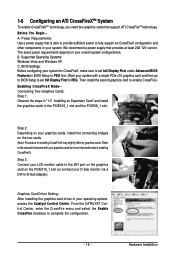
... overall system configurations. Step 2: Depending on the two cards. (Note: Procedure for CrossFireX, make sure to set Init Display First to PEG. Refer to the manual that provides at least 20A 12V current. BIOS Settings: Before configuring your system for enabling CrossFireX may slightly differ by graphics cards. Power Requirements: Use...
... overall system configurations. Step 2: Depending on the two cards. (Note: Procedure for CrossFireX, make sure to set Init Display First to PEG. Refer to the manual that provides at least 20A 12V current. BIOS Settings: Before configuring your system for enabling CrossFireX may slightly differ by graphics cards. Power Requirements: Use...
Manual
Page 30
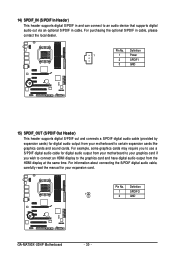
... to connect an HDMI display to certain expansion cards like graphics cards and sound cards. Definition 1 SPDIFO 1 2 GND GA-MA790X-UD4P Motherboard - 30 - For information about connecting the S/PDIF digital audio cable, carefully read the manual for digital audio output from the HDMI display at the same time. Pin No. 14) SPDIF_IN (S/PDIF In...
... to connect an HDMI display to certain expansion cards like graphics cards and sound cards. Definition 1 SPDIFO 1 2 GND GA-MA790X-UD4P Motherboard - 30 - For information about connecting the S/PDIF digital audio cable, carefully read the manual for digital audio output from the HDMI display at the same time. Pin No. 14) SPDIF_IN (S/PDIF In...
Manual
Page 33
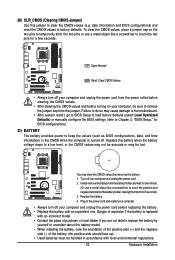
... do so may cause damage to the motherboard. • After system restart, go to BIOS Setup to load factory defaults (select Load Optimized Defaults) or manually configure the BIOS settings (refer to Chapter 2, "BIOS Setup," for BIOS configurations). 21) BATTERY The battery provides power to keep the values (such as BIOS...
... do so may cause damage to the motherboard. • After system restart, go to BIOS Setup to load factory defaults (select Load Optimized Defaults) or manually configure the BIOS settings (refer to Chapter 2, "BIOS Setup," for BIOS configurations). 21) BATTERY The battery provides power to keep the values (such as BIOS...
Manual
Page 39
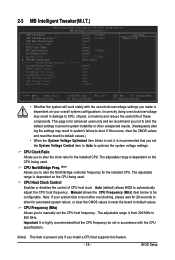
... components. CPU Frequency (Mhz) Allows you to 500 MHz. Incorrectly doing overclock/overvoltage may result in accordance with the overclock/overvoltage settings you to boot. Manual allows the CPU Frequency (Mhz) item below to CPU, chipset, or memory and reduce the useful life of CPU host clock. 2-3 MB Intelligent Tweaker(M.I.T.) CMOS...
... components. CPU Frequency (Mhz) Allows you to 500 MHz. Incorrectly doing overclock/overvoltage may result in accordance with the overclock/overvoltage settings you to boot. Manual allows the CPU Frequency (Mhz) item below to CPU, chipset, or memory and reduce the useful life of CPU host clock. 2-3 MB Intelligent Tweaker(M.I.T.) CMOS...
Manual
Page 40
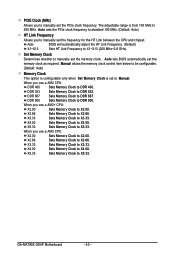
... Sets Memory Clock to DDR 533. GA-MA790X-UD4P Motherboard - 40 - The adjustable range is set the memory clock. X3.33 Sets Memory Clock to X2.66. When you use a AM3 CPU: X2.00 Sets Memory Clock to X2.00. Set Memory Clock Determines whether to manually set to Manual. X2.66 Sets Memory Clock...
... Sets Memory Clock to DDR 533. GA-MA790X-UD4P Motherboard - 40 - The adjustable range is set the memory clock. X3.33 Sets Memory Clock to X2.66. When you use a AM3 CPU: X2.00 Sets Memory Clock to X2.00. Set Memory Clock Determines whether to manually set to Manual. X2.66 Sets Memory Clock...
Manual
Page 41
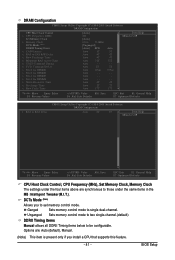
Ganged Sets memory control mode to be configurable. Unganged Sets memory control mode to two single-channel.(default) DDRII Timing Items Manual allows all DDRII Timing items below to single dual-channel. DRAM Configuration CMOS Setup Utility-Copyright (C) 1984-2009 Award Software DRAM ...: Optimized Defaults CPU Host Clock Control, CPU Frequency (MHz), Set Memory Clock, Memory Clock The settings under the four items above are : Auto (default), Manual. (Note) This item is present only if you to CAS R/W Delay x Row Precharge Time x Minimum RAS Active Time x 1T/2T Command Timing x ...
Ganged Sets memory control mode to be configurable. Unganged Sets memory control mode to two single-channel.(default) DDRII Timing Items Manual allows all DDRII Timing items below to single dual-channel. DRAM Configuration CMOS Setup Utility-Copyright (C) 1984-2009 Award Software DRAM ...: Optimized Defaults CPU Host Clock Control, CPU Frequency (MHz), Set Memory Clock, Memory Clock The settings under the four items above are : Auto (default), Manual. (Note) This item is present only if you to CAS R/W Delay x Row Precharge Time x Minimum RAS Active Time x 1T/2T Command Timing x ...
Manual
Page 42
...2T~5T. ******** System Voltage Optimized ******** System Voltage Control Determines whether to RAS Delay Options are : Auto (default), 3T~6T. RAS to manually set the system voltages. Trfc2 for DIMM3 Options are : Auto (default), 2T, 3T. Row Cycle Time Options are : 75ns, 105ns,...Normal Supplies the memory voltage as required. (Default) +0.100V ~ +0.600V Increases memory voltage by 0.100V to set the system voltages as required. GA-MA790X-UD4P Motherboard - 42 - Trfc1 for DIMM2 Options are : Auto (default), 11T~26T. CAS# latency Options are : Auto (default), 3T~6T...
...2T~5T. ******** System Voltage Optimized ******** System Voltage Control Determines whether to RAS Delay Options are : Auto (default), 3T~6T. RAS to manually set the system voltages. Trfc2 for DIMM3 Options are : Auto (default), 2T, 3T. Row Cycle Time Options are : 75ns, 105ns,...Normal Supplies the memory voltage as required. (Default) +0.100V ~ +0.600V Increases memory voltage by 0.100V to set the system voltages as required. GA-MA790X-UD4P Motherboard - 42 - Trfc1 for DIMM2 Options are : Auto (default), 11T~26T. CAS# latency Options are : Auto (default), 3T~6T...
Manual
Page 45
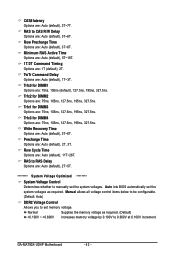
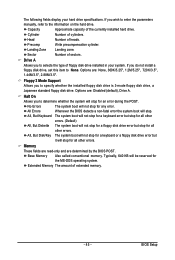
... the POST. Precomp Write precompensation cylinder. Options are : Disabled (default), Drive A. Capacity Approximate capacity of heads. Halt On Allows you wish to enter the parameters manually, refer to selects the type of extended memory. - 45 - No Errors The system boot will not stop for a floppy disk drive error but stop for...
... the POST. Precomp Write precompensation cylinder. Options are : Disabled (default), Drive A. Capacity Approximate capacity of heads. Halt On Allows you wish to enter the parameters manually, refer to selects the type of extended memory. - 45 - No Errors The system boot will not stop for a floppy disk drive error but stop for...
Manual
Page 59
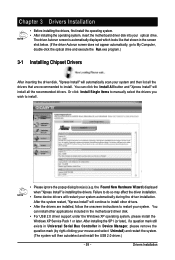
Or click Install Single Items to manually select the drivers you wish to My Computer, double-click the optical drive and execute the Run.exe program.) 3-1 Installing Chipset Drivers After inserting the ...
Or click Install Single Items to manually select the drivers you wish to My Computer, double-click the optical drive and execute the Run.exe program.) 3-1 Installing Chipset Drivers After inserting the ...
Manual
Page 60
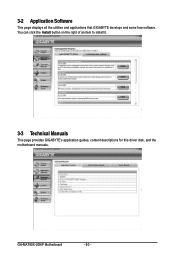
GA-MA790X-UD4P Motherboard - 60 - You can click the Install button on the right of an item to install it. 3-3 Technical Manuals This page provides GIGABYTE's application guides, content descriptions for this driver disk, and the motherboard manuals. 3-2 Application Software This page displays all the utilities and applications that GIGABYTE develops and some free software.
GA-MA790X-UD4P Motherboard - 60 - You can click the Install button on the right of an item to install it. 3-3 Technical Manuals This page provides GIGABYTE's application guides, content descriptions for this driver disk, and the motherboard manuals. 3-2 Application Software This page displays all the utilities and applications that GIGABYTE develops and some free software.
Manual
Page 66
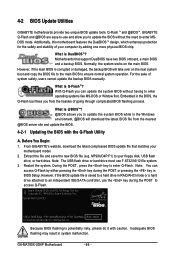
...caution. During the POST , press the key to enter MSDOS mode. GA-MA790X-UD4P E3 . . . . : BIOS Setup : XpressRecovery2 : Boot Menu : Qflash 01/23/2009-RD780-SB750-7A66AG08C-00 Because BIOS flashing is DualBIOSTM? GA-MA790X-UD4P Motherboard - 66 - Additionally, this motherboard features the DualBIOS TM design, ... will take over on the main BIOS. For the sake of system safety, users cannot update the backup BIOS manually. Before You Begin: 1. From GIGABYTE's website, download the latest compressed BIOS update file that support DualBIOS have two BIOS onboard, a main BIOS and...
...caution. During the POST , press the key to enter MSDOS mode. GA-MA790X-UD4P E3 . . . . : BIOS Setup : XpressRecovery2 : Boot Menu : Qflash 01/23/2009-RD780-SB750-7A66AG08C-00 Because BIOS flashing is DualBIOSTM? GA-MA790X-UD4P Motherboard - 66 - Additionally, this motherboard features the DualBIOS TM design, ... will take over on the main BIOS. For the sake of system safety, users cannot update the backup BIOS manually. Before You Begin: 1. From GIGABYTE's website, download the latest compressed BIOS update file that support DualBIOS have two BIOS onboard, a main BIOS and...
Manual
Page 69
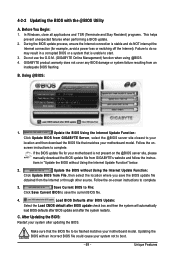
...do NOT interrupt the Internet connection (for your motherboard is not present on the @BIOS server site, please manually download the BIOS update file from GIGABYTE Server, select the @BIOS server site closest to save the BIOS update file obtained from an inadequate BIOS flashing...the BIOS with the @BIOS Utility A. During the BIOS update process, ensure the Internet connection is unable to complete. Do not use the G.O.M. (GIGABYTE Online Management) function when using @BIOS. 4. screen instructions to start. 3. C. In Windows, close all applications and TSR (Terminate and Stay Resident...
...do NOT interrupt the Internet connection (for your motherboard is not present on the @BIOS server site, please manually download the BIOS update file from GIGABYTE Server, select the @BIOS server site closest to save the BIOS update file obtained from an inadequate BIOS flashing...the BIOS with the @BIOS Utility A. During the BIOS update process, ensure the Internet connection is unable to complete. Do not use the G.O.M. (GIGABYTE Online Management) function when using @BIOS. 4. screen instructions to start. 3. C. In Windows, close all applications and TSR (Terminate and Stay Resident...
Manual
Page 78
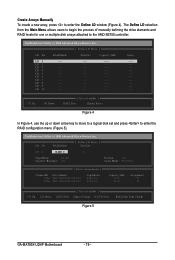
.... LD No RAID Mode [ Define LD Menu ] Total Drv LD 1 RAID 0 0 Stripe Block: 64 KB Gigabyte Boundary: ON Fast Init: ON Cache Mode: WriteThru [ Drives Assignments ] Channel:ID Drive Model 1:Mas WDC WD800JD-22LSA0...[] Up [] Down [ESC] Exit [ Keys Available ] [Space] Change [Ctrl-Y] Save [PgUp/Dn] Page Change Figure 5 GA-MA790X-UD4P Motherboard - 78 - LD 2 ---- LD 5 ---- Create Arrays Manually To create a new array, press to enter the Define LD window (Figure 4). LD 10 ---- ---- ----- ---- ----- ---- ----- ---- ----- ---- ----- ---- ----- ---- ...
.... LD No RAID Mode [ Define LD Menu ] Total Drv LD 1 RAID 0 0 Stripe Block: 64 KB Gigabyte Boundary: ON Fast Init: ON Cache Mode: WriteThru [ Drives Assignments ] Channel:ID Drive Model 1:Mas WDC WD800JD-22LSA0...[] Up [] Down [ESC] Exit [ Keys Available ] [Space] Change [Ctrl-Y] Save [PgUp/Dn] Page Change Figure 5 GA-MA790X-UD4P Motherboard - 78 - LD 2 ---- LD 5 ---- Create Arrays Manually To create a new array, press to enter the Define LD window (Figure 4). LD 10 ---- ---- ----- ---- ----- ---- ----- ---- ----- ---- ----- ---- ----- ---- ...


