
Manual
Page 3
... Motherboard Revision The revision number on your motherboard revision before updating motherboard BIOS, drivers, or when looking for technical information. Disclaimer Information in any means without prior notice. Changes to GIGABYTE UNITED INC. by GIGA-BYTE TECHNOLOGY CO., LTD as the exclu- For ... or by copyright laws and is exclusively licensed to the specifications and features in this manual may be made by GIGABYTE without GIGABYTE's prior written permission. The trademarks mentioned in the use of the motherboard is designated by GIGA-BYTE TECHNOLOGY CO...
... Motherboard Revision The revision number on your motherboard revision before updating motherboard BIOS, drivers, or when looking for technical information. Disclaimer Information in any means without prior notice. Changes to GIGABYTE UNITED INC. by GIGA-BYTE TECHNOLOGY CO., LTD as the exclu- For ... or by copyright laws and is exclusively licensed to the specifications and features in this manual may be made by GIGABYTE without GIGABYTE's prior written permission. The trademarks mentioned in the use of the motherboard is designated by GIGA-BYTE TECHNOLOGY CO...

Manual
Page 5
... 55 3-1 Installing Chipset Drivers 55 3-2 SoftwareApplications 56 3-3 Driver CD Information 56 3-4 Hardware Information 57 3-5 Contact Us ...57 Chapter 4 Unique Features 59 4-1 Xpress Recovery2 59 4-2 BIOS Update Utilities 64 ...Chapter 5 Appendix ...71 5-1 Configuring SATA Hard Drive(s 71 5-1-1 Configuring the Onboard SATA Controller 71 5-1-2 Making a SATA RAID/AHCI Driver Diskette 77 5-1-3 Installing the SATA RAID/AHCI Driver and Operating System 78 5-2 ConfiguringAudio Input and Output 83 5-2-1 Configuring 2/4/5.1/7.1-Channel Audio 83 5-2-2 Installing the S/PDIF In and Out Cable...
... 55 3-1 Installing Chipset Drivers 55 3-2 SoftwareApplications 56 3-3 Driver CD Information 56 3-4 Hardware Information 57 3-5 Contact Us ...57 Chapter 4 Unique Features 59 4-1 Xpress Recovery2 59 4-2 BIOS Update Utilities 64 ...Chapter 5 Appendix ...71 5-1 Configuring SATA Hard Drive(s 71 5-1-1 Configuring the Onboard SATA Controller 71 5-1-2 Making a SATA RAID/AHCI Driver Diskette 77 5-1-3 Installing the SATA RAID/AHCI Driver and Operating System 78 5-2 ConfiguringAudio Input and Output 83 5-2-1 Configuring 2/4/5.1/7.1-Channel Audio 83 5-2-2 Installing the S/PDIF In and Out Cable...

Manual
Page 6
... out cable (Part No. 12CR1-1SPINO-11R) LPT port cable (Part No. 12CF1-1LP001-01R) - 6 - The box contents are for reference only. Box Contents GA-MA78GM-S2H motherboard Motherboard driver disk User's Manual One IDE cable and one floppy disk drive cable Two SATA 3Gb/s cables I/O Shield • The box contents above are subject...
... out cable (Part No. 12CR1-1SPINO-11R) LPT port cable (Part No. 12CF1-1LP001-01R) - 6 - The box contents are for reference only. Box Contents GA-MA78GM-S2H motherboard Motherboard driver disk User's Manual One IDE cable and one floppy disk drive cable Two SATA 3Gb/s cables I/O Shield • The box contents above are subject...

Manual
Page 18
... it is securely seated in the slot. 3. Remove the metal slot cover from the power outlet before you begin to prevent hardware damage. Install the driver provided with your computer. Example: Installing and Removing a PCI Express x16 Graphics Card: • Installing a Graphics Card: Gently push down on the slot and then... PCI Slot Follow the steps below to correctly install your expansion card in your expansion card(s). 7. After installing all expansion cards, replace the chassis cover(s). 6. GA-MA78GM-S2H Motherboard - 18 -
... it is securely seated in the slot. 3. Remove the metal slot cover from the power outlet before you begin to prevent hardware damage. Install the driver provided with your computer. Example: Installing and Removing a PCI Express x16 Graphics Card: • Installing a Graphics Card: Gently push down on the slot and then... PCI Slot Follow the steps below to correctly install your expansion card in your expansion card(s). 7. After installing all expansion cards, replace the chassis cover(s). 6. GA-MA78GM-S2H Motherboard - 18 -

Manual
Page 34
... select the first boot device, then press to access the Q-Flash utility in time. 2-1 Startup Screen The following screen may appear when the computer boots. GA-MA78GM-S2H F3c . . . . : BIOS Setup/Q-Flash : XpressRecovery2 : Boot Menu : Qflash 02/13/2008-RS780-SB700-6A66AG06C-00 Function Keys SATA Mode Message...accept. When the motherboard is effective for the SATA connectors. In Boot Menu, use the up hard drive data using the motherboard driver disk, the key can access Boot Menu again to change it to continue IDE mode operation and stop showing this message again. ...
... select the first boot device, then press to access the Q-Flash utility in time. 2-1 Startup Screen The following screen may appear when the computer boots. GA-MA78GM-S2H F3c . . . . : BIOS Setup/Q-Flash : XpressRecovery2 : Boot Menu : Qflash 02/13/2008-RS780-SB700-6A66AG06C-00 Function Keys SATA Mode Message...accept. When the motherboard is effective for the SATA connectors. In Boot Menu, use the up hard drive data using the motherboard driver disk, the key can access Boot Menu again to change it to continue IDE mode operation and stop showing this message again. ...
Manual
Page 40
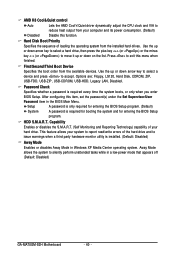
...Specifies whether a password is installed. (Default: Disabled) Away Mode Enables or disables Away Mode in a low-power mode that appears off (Default: Disabled) GA-MA78GM-S2H Motherboard - 40 - After configuring this menu when finished. Capability Enables or disables the S.M.A.R.T. (Self Monitoring and Reporting Technology) capability of your computer and its ... for booting the system and for entering the BIOS Setup program. AMD K8 Cool&Quiet control Auto Lets the AMD Cool'n'Quiet driver dynamically adjust the CPU clock and VIA to reduce heat output from your hard drive.
...Specifies whether a password is installed. (Default: Disabled) Away Mode Enables or disables Away Mode in a low-power mode that appears off (Default: Disabled) GA-MA78GM-S2H Motherboard - 40 - After configuring this menu when finished. Capability Enables or disables the S.M.A.R.T. (Self Monitoring and Reporting Technology) capability of your computer and its ... for booting the system and for entering the BIOS Setup program. AMD K8 Cool&Quiet control Auto Lets the AMD Cool'n'Quiet driver dynamically adjust the CPU clock and VIA to reduce heat output from your hard drive.
Manual
Page 41
... to install a 3rd party add-in Native IDE mode. (Default) Enable Native IDE mode if you wish to install operating systems that allows the storage driver to As SATA Type PATA mode. (Default) The mode depends on the OnChip SATA Type settings. Advanced Host Controller Interface (AHCI) is an interface specification...
... to install a 3rd party add-in Native IDE mode. (Default) Enable Native IDE mode if you wish to install operating systems that allows the storage driver to As SATA Type PATA mode. (Default) The mode depends on the OnChip SATA Type settings. Advanced Host Controller Interface (AHCI) is an interface specification...
Manual
Page 55
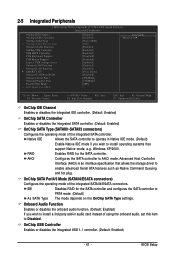
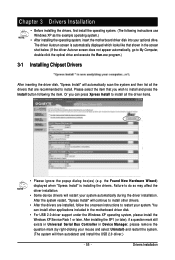
... in Device Manager, please remove the question mark (by right-clicking your system automatically during the driver installation. You can press Xpress Install to install all the drivers that you wish to install. Please select the item that are installed, follow the onscreen instructions ...included in the screen shot below. (If the driver Autorun screen does not appear automatically, go to restart your optional drive. The driver Autorun screen is installing the drivers. Or you can install other drivers. • After the drivers are recommended to install and press the Install ...
... in Device Manager, please remove the question mark (by right-clicking your system automatically during the driver installation. You can press Xpress Install to install all the drivers that you wish to install. Please select the item that are installed, follow the onscreen instructions ...included in the screen shot below. (If the driver Autorun screen does not appear automatically, go to restart your optional drive. The driver Autorun screen is installing the drivers. Or you can install other drivers. • After the drivers are recommended to install and press the Install ...
Manual
Page 56
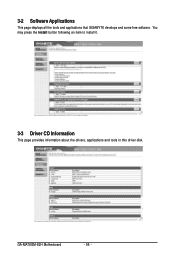
GA-MA78GM-S2H Motherboard - 56 - 3-2 Software Applications This page displays all the tools and applications that GIGABYTE develops and some free software. You may press the Install button following an item to install it. 3-3 Driver CD Information This page provides information about the drivers, applications and tools in this driver disk.
GA-MA78GM-S2H Motherboard - 56 - 3-2 Software Applications This page displays all the tools and applications that GIGABYTE develops and some free software. You may press the Install button following an item to install it. 3-3 Driver CD Information This page provides information about the drivers, applications and tools in this driver disk.
Manual
Page 57
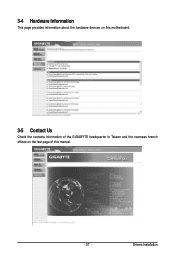
3-4 Hardware Information This page provides information about the hardware devices on this motherboard. 3-5 Contact Us Check the contacts information of the GIGABYTE headquarter in Taiwan and the overseas branch offices on the last page of this manual. - 57 - Drivers Installation
3-4 Hardware Information This page provides information about the hardware devices on this motherboard. 3-5 Contact Us Check the contacts information of the GIGABYTE headquarter in Taiwan and the overseas branch offices on the last page of this manual. - 57 - Drivers Installation
Manual
Page 59
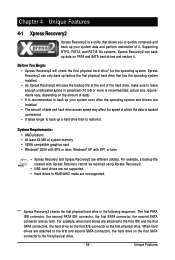
... first SATA connector, the second SATA connector and so forth. Unique Features Xpress Recovery2 can back up your system soon after the operating system and drivers are attached to the first and second SATA connectors, the hard drive on the first IDE connector is recommended; System Requirements: • AMD platform •...
... first SATA connector, the second SATA connector and so forth. Unique Features Xpress Recovery2 can back up your system soon after the operating system and drivers are attached to the first and second SATA connectors, the hard drive on the first IDE connector is recommended; System Requirements: • AMD platform •...
Manual
Page 62
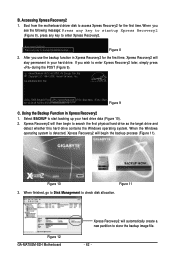
... message: Press any key to startup Xpress Recovery2 (Figure 8), press any key to store the backup image file. - 62 - Boot from the motherboard driver disk to start backing up your hard drive. If you wish to check disk allocation. Select BACKUP to access Xpress Recovery2 for the first time...any key to search the first physical hard drive as the target drive and detect whether this hard drive contains the Windows operating system. GA-MA78GM-S2H F3c . . . . : BIOS Setup/Q-Flash : XpressRecovery2 : Boot Menu : Qflash 02/13/2008-RS780-SB700-6A66AG06C-00 Figure 9 C. Figure 12...
... message: Press any key to startup Xpress Recovery2 (Figure 8), press any key to store the backup image file. - 62 - Boot from the motherboard driver disk to start backing up your hard drive. If you wish to check disk allocation. Select BACKUP to access Xpress Recovery2 for the first time...any key to search the first physical hard drive as the target drive and detect whether this hard drive contains the Windows operating system. GA-MA78GM-S2H F3c . . . . : BIOS Setup/Q-Flash : XpressRecovery2 : Boot Menu : Qflash 02/13/2008-RS780-SB700-6A66AG06C-00 Figure 9 C. Figure 12...

Manual
Page 67
...@BIOS utility. During the BIOS update process, ensure the Internet connection is unable to start. 3. Installing and Using @BIOS: Use the motherboard driver disk included with the @BIOS Utility A. C. Unique Features B. Step 2: Select the @BIOS server site closest to do so may result in ... (Corporate Online Management) function when using @BIOS. 4. Failure to your location and click OK. - 67 - Click Start>All Programs>GIGABYTE>@BIOS Select @BIOS and click Install. Update the BIOS Using the Internet Update Function Select this option Click Update New BIOS Step 1: Select...
...@BIOS utility. During the BIOS update process, ensure the Internet connection is unable to start. 3. Installing and Using @BIOS: Use the motherboard driver disk included with the @BIOS Utility A. C. Unique Features B. Step 2: Select the @BIOS server site closest to do so may result in ... (Corporate Online Management) function when using @BIOS. 4. Failure to your location and click OK. - 67 - Click Start>All Programs>GIGABYTE>@BIOS Select @BIOS and click Install. Update the BIOS Using the Internet Update Function Select this option Click Update New BIOS Step 1: Select...
Manual
Page 71
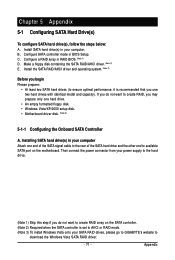
... do not want to create RAID array on the motherboard. Then connect the power connector from your SATA RAID drives, please go to GIGABYTE's website to the hard drive. (Note 1) Skip this step if you use two hard drives with identical model and capacity). Install ... RAID, you may prepare only one hard drive. • An empty formatted floppy disk. • Windows Vista/XP/2000 setup disk. • Motherboard driver disk. (Note 3) 5-1-1 Configuring the Onboard SATA Controller A. Chapter 5 Appendix 5-1 Configuring SATA Hard Drive(s) To configure SATA hard drive(s), follow the steps below...
... do not want to create RAID array on the motherboard. Then connect the power connector from your SATA RAID drives, please go to GIGABYTE's website to the hard drive. (Note 1) Skip this step if you use two hard drives with identical model and capacity). Install ... RAID, you may prepare only one hard drive. • An empty formatted floppy disk. • Windows Vista/XP/2000 setup disk. • Motherboard driver disk. (Note 3) 5-1-1 Configuring the Onboard SATA Controller A. Chapter 5 Appendix 5-1 Configuring SATA Hard Drive(s) To configure SATA hard drive(s), follow the steps below...
Manual
Page 77
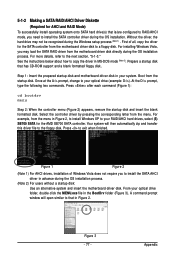
...appears, remove the startup disk and insert the blank formatted disk. Figure 1 Figure 2 (Note 1) For AHCI drives, installation of all, copy the driver for the AMD SB700 SATA controller. At the D:\> prompt, type the following two commands. Your system will open similar to that has CD-ROM support... and a blank formatted floppy disk. From your RAID/AHCI hard drives, select (5) SB700 SATA for the SATA controller from the motherboard driver disk to the floppy disk. Prepare a startup disk that in Figure 2. First of Windows Vista does not require you may not be recognized...
...appears, remove the startup disk and insert the blank formatted disk. Figure 1 Figure 2 (Note 1) For AHCI drives, installation of all, copy the driver for the AMD SB700 SATA controller. At the D:\> prompt, type the following two commands. Your system will open similar to that has CD-ROM support... and a blank formatted floppy disk. From your RAID/AHCI hard drives, select (5) SB700 SATA for the SATA controller from the motherboard driver disk to the floppy disk. Prepare a startup disk that in Figure 2. First of Windows Vista does not require you may not be recognized...
Manual
Page 78
...boot from the Windows XP setup disk and press as soon as you see the next screen. S=Specify Additional Device ENTER=Continue F3=Exit Figure 2 GA-MA78GM-S2H Motherboard - 78 - Windows Setup Press F6 if you have any device support disks from a mass storage device manufacturer, press S. * If you...of some files being loaded before you see the message "Press F6 if you do not want to install a third party SCSI or RAID driver. After pressing , there will load support for the following is an example of Windows XP and Vista installation. The following mass storage devices(s)...
...boot from the Windows XP setup disk and press as soon as you see the next screen. S=Specify Additional Device ENTER=Continue F3=Exit Figure 2 GA-MA78GM-S2H Motherboard - 78 - Windows Setup Press F6 if you have any device support disks from a mass storage device manufacturer, press S. * If you...of some files being loaded before you see the message "Press F6 if you do not want to install a third party SCSI or RAID driver. After pressing , there will load support for the following is an example of Windows XP and Vista installation. The following mass storage devices(s)...

Manual
Page 79
...device support disk from a mass storage device manufacturer, press S. * If you want to Figure 3 below appears, press to continue the driver installation from the following mass storage device(s): AMD AHCI Compatible RAID Controller-x86 platform * To specify additional SCSI adapters, CD-ROM drives, ...or special disk controllers for use with Windows, using a device support disk provided by an adapter manufacturer. The driver installation will be finished in the floppy disk, a controller menu similar to specify additional mass storage devices for use with Windows, ...
...device support disk from a mass storage device manufacturer, press S. * If you want to Figure 3 below appears, press to continue the driver installation from the following mass storage device(s): AMD AHCI Compatible RAID Controller-x86 platform * To specify additional SCSI adapters, CD-ROM drives, ...or special disk controllers for use with Windows, using a device support disk provided by an adapter manufacturer. The driver installation will be finished in the floppy disk, a controller menu similar to specify additional mass storage devices for use with Windows, ...
Manual
Page 80
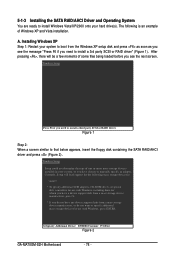
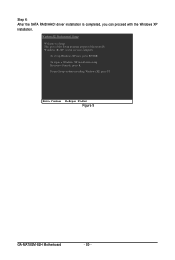
To repair a Windows XP installation using Recovery Console, press R. To quit Setup without installing Windows XP, press F3. This port of the Setup program prepares Microsoft(R) Windows (R) XP to Setup. Enter= Continue R=Repair F3=Exit Figure 5 GA-MA78GM-S2H Motherboard - 80 - To set up Windows XP now, press ENTER. WindowsXP Professional Setup Welcome to run on your computer. Step 4: After the SATA RAID/AHCI driver installation is completed, you can proceed with the Windows XP installation.
To repair a Windows XP installation using Recovery Console, press R. To quit Setup without installing Windows XP, press F3. This port of the Setup program prepares Microsoft(R) Windows (R) XP to Setup. Enter= Continue R=Repair F3=Exit Figure 5 GA-MA78GM-S2H Motherboard - 80 - To set up Windows XP now, press ENTER. WindowsXP Professional Setup Welcome to run on your computer. Step 4: After the SATA RAID/AHCI driver installation is completed, you can proceed with the Windows XP installation.
Manual
Page 81
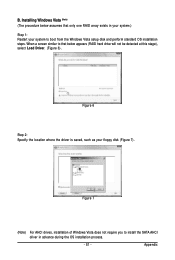
... assumes that below appears (RAID hard drive will not be detected at this stage), select Load Driver. (Figure 6). Figure 6 Step 2: Specify the location where the driver is saved, such as your system to install the SATA AHCI driver in your system.) Step 1: Restart your floppy disk (Figure 7). B. Figure 7 (Note) For AHCI drives, installation...
... assumes that below appears (RAID hard drive will not be detected at this stage), select Load Driver. (Figure 6). Figure 6 Step 2: Specify the location where the driver is saved, such as your system to install the SATA AHCI driver in your system.) Step 1: Restart your floppy disk (Figure 7). B. Figure 7 (Note) For AHCI drives, installation...
Manual
Page 82
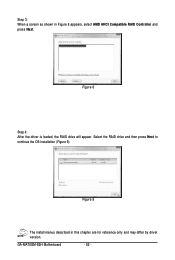
Step 3: When a screen as shown in this chapter are for reference only and may differ by driver version. GA-MA78GM-S2H Motherboard - 82 - Figure 8 Step 4: After the driver is loaded, the RAID drive will appear. Select the RAID drive and then press Next to continue the OS installation (Figure 9). Figure 9 The install menus described in Figure 8 appears, select AMD AHCI Compatible RAID Controller and press Next.
Step 3: When a screen as shown in this chapter are for reference only and may differ by driver version. GA-MA78GM-S2H Motherboard - 82 - Figure 8 Step 4: After the driver is loaded, the RAID drive will appear. Select the RAID drive and then press Next to continue the OS installation (Figure 9). Figure 9 The install menus described in Figure 8 appears, select AMD AHCI Compatible RAID Controller and press Next.


