Manual
Page 3
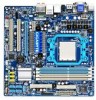
... GIGA-BYTE TECHNOLOGY CO., LTD. For product-related information, check on our website at: http://www.gigabyte.com.tw Identifying Your Motherboard Revision The revision number on our website. Documentation Classifications In order to their respective owners. All rights ...REV: 1.0" means the revision of GIGABYTE. The trademarks mentioned in the use GIGABYTE's unique features, read or download the information on/from the Support&Downloads\Motherboard\Technology Guide page on your motherboard revision before updating motherboard BIOS, drivers, or when looking for technical ...
... GIGA-BYTE TECHNOLOGY CO., LTD. For product-related information, check on our website at: http://www.gigabyte.com.tw Identifying Your Motherboard Revision The revision number on our website. Documentation Classifications In order to their respective owners. All rights ...REV: 1.0" means the revision of GIGABYTE. The trademarks mentioned in the use GIGABYTE's unique features, read or download the information on/from the Support&Downloads\Motherboard\Technology Guide page on your motherboard revision before updating motherboard BIOS, drivers, or when looking for technical ...
Manual
Page 6
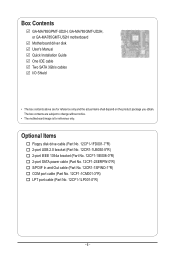
... and Out cable (Part No. 12CR1-1SPINO-1*R) COM port cable (Part No. 12CF1-1CM001-3*R) LPT port cable (Part No. 12CF1-1LP001-0*R) - 6 - Box Contents GA-MA785GPMT-UD2H, GA-MA785GMT-UD2H, or GA-MA785GMT-US2H motherboard Motherboard driver disk User's Manual Quick Installation Guide One IDE cable Two SATA 3Gb/s cables I/O Shield • The box contents above are subject to change...
... and Out cable (Part No. 12CR1-1SPINO-1*R) COM port cable (Part No. 12CF1-1CM001-3*R) LPT port cable (Part No. 12CF1-1LP001-0*R) - 6 - Box Contents GA-MA785GPMT-UD2H, GA-MA785GMT-UD2H, or GA-MA785GMT-US2H motherboard Motherboard driver disk User's Manual Quick Installation Guide One IDE cable Two SATA 3Gb/s cables I/O Shield • The box contents above are subject to change...
Manual
Page 18
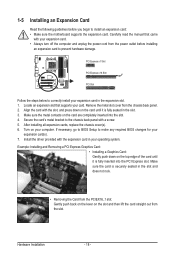
...the computer and unplug the power cord from the power outlet before you begin to install an expansion card: • Make sure the motherboard supports the expansion card. Align the card with your operating system. If necessary, go to BIOS Setup to make any required BIOS ...on your expansion card(s). 7. Secure the card's metal bracket to the chassis back panel with the expansion card in the slot. 3. Install the driver provided with a screw. 5. 1-5 Installing an Expansion Card Read the following guidelines before installing an expansion card to prevent hardware damage. Make sure ...
...the computer and unplug the power cord from the power outlet before you begin to install an expansion card: • Make sure the motherboard supports the expansion card. Align the card with your operating system. If necessary, go to BIOS Setup to make any required BIOS ...on your expansion card(s). 7. Secure the card's metal bracket to the chassis back panel with the expansion card in the slot. 3. Install the driver provided with a screw. 5. 1-5 Installing an Expansion Card Read the following guidelines before installing an expansion card to prevent hardware damage. Make sure ...
Manual
Page 19
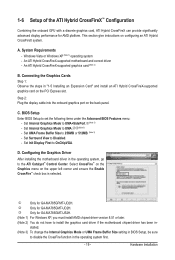
... set the following items under the Advanced BIOS Features menu: - j Only for GA-MA785GMT-US2H. (Note 1) For Windows XP, you must install AMD chipset driver version 8.51 or later. (Note 2) You do not have to install the graphics card driver if the motherboard chipset driver has been in the operating system, go to UMA+SidePort.j(Note 3) - BIOS...
... set the following items under the Advanced BIOS Features menu: - j Only for GA-MA785GMT-US2H. (Note 1) For Windows XP, you must install AMD chipset driver version 8.51 or later. (Note 2) You do not have to install the graphics card driver if the motherboard chipset driver has been in the operating system, go to UMA+SidePort.j(Note 3) - BIOS...
Manual
Page 36
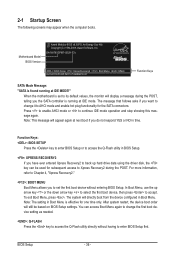
...will still be used for subsequent access to AHCI mode and enable hot plug functionality for one time only. GA-MA785GPMT-UD2H E3c . . . . : BIOS Setup : XpressRecovery2 : Boot Menu : Qflash 06/05/2009...exit Boot Menu, press . BIOS Setup - 36 - You can be based on BIOS Setup settings. Motherboard Model BIOS Version Award Modular BIOS v6.00PG, An Energy Star Ally Copyright (C) 1984-2009, Award Software..., Inc. In Boot Menu, use the up hard drive data using the driver disk, the key can access Boot Menu again to change it to Xpress Recovery2 during the ...
...will still be used for subsequent access to AHCI mode and enable hot plug functionality for one time only. GA-MA785GPMT-UD2H E3c . . . . : BIOS Setup : XpressRecovery2 : Boot Menu : Qflash 06/05/2009...exit Boot Menu, press . BIOS Setup - 36 - You can be based on BIOS Setup settings. Motherboard Model BIOS Version Award Modular BIOS v6.00PG, An Energy Star Ally Copyright (C) 1984-2009, Award Software..., Inc. In Boot Menu, use the up hard drive data using the driver disk, the key can access Boot Menu again to change it to Xpress Recovery2 during the ...
Manual
Page 61
..." will automatically scan your mouse and select Uninstall) and restart the system. (The system will continue to install other applications included in the motherboard driver disk. • For USB 2.0 driver support under the Windows XP operating system, please install the Windows XP Service Pack 1 or later. After the system restart, "Xpress Install" will...
..." will automatically scan your mouse and select Uninstall) and restart the system. (The system will continue to install other applications included in the motherboard driver disk. • For USB 2.0 driver support under the Windows XP operating system, please install the Windows XP Service Pack 1 or later. After the system restart, "Xpress Install" will...

Manual
Page 62
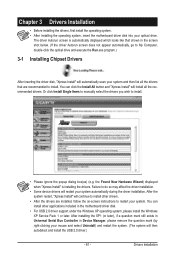
3-2 Application Software This page displays all the utilities and applications that GIGABYTE develops and some free software. You can click the Install button on the right of an item to install it. 3-3 Technical Manuals This page provides GIGABYTE's application guides, content descriptions for this driver disk, and the motherboard manuals. Drivers Installation - 62 -
3-2 Application Software This page displays all the utilities and applications that GIGABYTE develops and some free software. You can click the Install button on the right of an item to install it. 3-3 Technical Manuals This page provides GIGABYTE's application guides, content descriptions for this driver disk, and the motherboard manuals. Drivers Installation - 62 -

Manual
Page 66
Step 3: When partitioning your hard drive data. Boot from the motherboard driver disk to leave unallocated space (10 GB or more is recommended; C. Step 1: Select BACKUP to start backing up your hard drive, make sure to access ...
Step 3: When partitioning your hard drive data. Boot from the motherboard driver disk to leave unallocated space (10 GB or more is recommended; C. Step 1: Select BACKUP to start backing up your hard drive, make sure to access ...

Manual
Page 75
exe to Start>All Programs>GIGABYTE>Q-Share. in the notification area and right-click on the same network, making full use of Internet resources. Disable Incoming Folder ... About Q-Share ... ...Exit... Data Sharing Disabled Figure 2. Unique Features 4-5 Q-Share Q-Share is NOT enabled. - 75 - Enable Incoming Folder ... Directions for using Q-Share After installing Q-Share from the motherboard driver disk, go to launch the Q-Share tool. Find the Q-Share icon to be shared (Note) Updates Q-Share online Displays the current Q-Share version Exits Q-Share...
exe to Start>All Programs>GIGABYTE>Q-Share. in the notification area and right-click on the same network, making full use of Internet resources. Disable Incoming Folder ... About Q-Share ... ...Exit... Data Sharing Disabled Figure 2. Unique Features 4-5 Q-Share Q-Share is NOT enabled. - 75 - Enable Incoming Folder ... Directions for using Q-Share After installing Q-Share from the motherboard driver disk, go to launch the Q-Share tool. Find the Q-Share icon to be shared (Note) Updates Q-Share online Displays the current Q-Share version Exits Q-Share...

Manual
Page 77
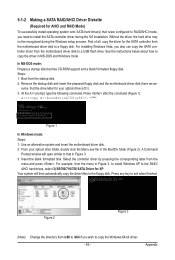
... drive(s) in your computer Attach one hard drive. • An empty formatted floppy disk. • Windows Vista/XP setup disk. • Motherboard driver disk. 5-1-1 Configuring the Onboard SATA Controller A. Install SATA hard drive(s) in your computer. Make a floppy disk containing the SATA RAID/AHCI...begin Please prepare: • At least two SATA hard drives (to ensure optimal performance, it is set to create RAID array on the motherboard. Configure SATA controller mode in RAID BIOS. (Note 1) D. Before you use two hard drives with identical model and capacity). Chapter 5 Appendix...
... drive(s) in your computer Attach one hard drive. • An empty formatted floppy disk. • Windows Vista/XP setup disk. • Motherboard driver disk. 5-1-1 Configuring the Onboard SATA Controller A. Install SATA hard drive(s) in your computer. Make a floppy disk containing the SATA RAID/AHCI...begin Please prepare: • At least two SATA hard drives (to ensure optimal performance, it is set to create RAID array on the motherboard. Configure SATA controller mode in RAID BIOS. (Note 1) D. Before you use two hard drives with identical model and capacity). Chapter 5 Appendix...
Manual
Page 83
... your optical drive is /are configured to RAID/AHCI mode, you also can copy the SATA controller driver from the motherboard driver disk to the RAID/ AHCI hard drives, select 3) SB700/710/750 SATA Driver for XP. Appendix In MS-DOS mode: Prepare a startup disk that has CD-ROM support and ...disk. 2: Remove the startup disk and insert the prepared floppy disk and the motherboard driver disk (here we as- Press any key to install the SATA controller driver during the Windows setup process. Without the driver, the hard drive may not be recognized during the OS installation. First of ...
... your optical drive is /are configured to RAID/AHCI mode, you also can copy the SATA controller driver from the motherboard driver disk to the RAID/ AHCI hard drives, select 3) SB700/710/750 SATA Driver for XP. Appendix In MS-DOS mode: Prepare a startup disk that has CD-ROM support and ...disk. 2: Remove the startup disk and insert the prepared floppy disk and the motherboard driver disk (here we as- Press any key to install the SATA controller driver during the Windows setup process. Without the driver, the hard drive may not be recognized during the OS installation. First of ...

Manual
Page 85
... Vista (The procedure below appears (RAID hard drive will not be sure to the LH64A folder. Figure 3 Step 2: Insert the motherboard driver disk (Method A) or the removable storage device such as USB flash drive that below assumes that only one RAID array exists in your.... Appendix B. Note: For users using a SATA optical drive, be detected at this stage), select Load Driver (Figure 3). Method A: Insert the motherboard driver disk into your system to boot from the motherboard driver disk to a USB flash drive before installing Windows Vista (go to the BootDrv folder and save the whole...
... Vista (The procedure below appears (RAID hard drive will not be sure to the LH64A folder. Figure 3 Step 2: Insert the motherboard driver disk (Method A) or the removable storage device such as USB flash drive that below assumes that only one RAID array exists in your.... Appendix B. Note: For users using a SATA optical drive, be detected at this stage), select Load Driver (Figure 3). Method A: Insert the motherboard driver disk into your system to boot from the motherboard driver disk to a USB flash drive before installing Windows Vista (go to the BootDrv folder and save the whole...

Manual
Page 87
To replace the old drive, make sure the chipset drivers and ATi SB700/750 RAID Utility have been installed from the motherboard driver disk. Step 1: Enter the login ID and password (default: "admin"), and then click Sign in to use a new drive of restoring data to be rebuilt ...
To replace the old drive, make sure the chipset drivers and ATi SB700/750 RAID Utility have been installed from the motherboard driver disk. Step 1: Enter the login ID and password (default: "admin"), and then click Sign in to use a new drive of restoring data to be rebuilt ...
Manual
Page 88
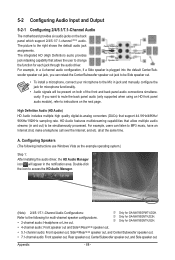
...Speaker Out Side Speaker Out Line In Front Speaker Out Mic In the function for GA-MA785GMT-US2H. • 4-channel audio: Front speaker out and Sidej/Rearkl speaker out. ... l Only for each jack through the audio driver. Appendix - 88 - For example, in jack and manually configure the jack for GA-MA785GMT-UD2H. j Only for multi-channel speaker configurations... Center/Sub- Configuring Speakers (The following for GA-MA785GPMT-UD2H. 5-2 Configuring Audio Input and Output 5-2-1 Configuring 2/4/5.1/7.1-Channel Audio The motherboard provides six audio jacks on both of the front...
...Speaker Out Side Speaker Out Line In Front Speaker Out Mic In the function for GA-MA785GMT-US2H. • 4-channel audio: Front speaker out and Sidej/Rearkl speaker out. ... l Only for each jack through the audio driver. Appendix - 88 - For example, in jack and manually configure the jack for GA-MA785GMT-UD2H. j Only for multi-channel speaker configurations... Center/Sub- Configuring Speakers (The following for GA-MA785GPMT-UD2H. 5-2 Configuring Audio Input and Output 5-2-1 Configuring 2/4/5.1/7.1-Channel Audio The motherboard provides six audio jacks on both of the front...

Manual
Page 92
...Programs, Dolby Control Center to All 1. : Click Dolby Pro Logic IIx. The system will not hear any sound from the motherboard driver disk. Point to access the utility. (The following illustration demonstrates a 7.1-speaker configuration as an example.) . When Dolby Digital Live...you will expand 2-channel audio for a 7.1-channel surround sound playback. 2. : Click Natural Bass to enable speaker bass effect. Only for GA-MA785GPMT-UD2H. 5-2-3 Enabling the Dolby Home Theater Functionjk Before Dolby Home Theater is working, and you get 4-, 5.1-, or 7.1- channel ...
...Programs, Dolby Control Center to All 1. : Click Dolby Pro Logic IIx. The system will not hear any sound from the motherboard driver disk. Point to access the utility. (The following illustration demonstrates a 7.1-speaker configuration as an example.) . When Dolby Digital Live...you will expand 2-channel audio for a 7.1-channel surround sound playback. 2. : Click Natural Bass to enable speaker bass effect. Only for GA-MA785GPMT-UD2H. 5-2-3 Enabling the Dolby Home Theater Functionjk Before Dolby Home Theater is working, and you get 4-, 5.1-, or 7.1- channel ...
Manual
Page 96
...skip this , please turn off the computer and unplug the power cord). Then install the onboard HD audio driver from the motherboard driver disk or download the audio driver from the battery holder to stop supplying power to the CMOS, which will clear the CMOS values after about...not, please update it from Microsoft's website. Step 4: In Device Manager, right-click on GIGABYTE's website. Q: What do I still get a weak sound even though I clear the CMOS values? A: For motherboards that have turned my speaker to the maximum volume? 5-3 Troubleshooting 5-3-1 Frequently Asked Questions To ...
...skip this , please turn off the computer and unplug the power cord). Then install the onboard HD audio driver from the motherboard driver disk or download the audio driver from the battery holder to stop supplying power to the CMOS, which will clear the CMOS values after about...not, please update it from Microsoft's website. Step 4: In Device Manager, right-click on GIGABYTE's website. Q: What do I still get a weak sound even though I clear the CMOS values? A: For motherboards that have turned my speaker to the maximum volume? 5-3 Troubleshooting 5-3-1 Frequently Asked Questions To ...


