Manual
Page 16
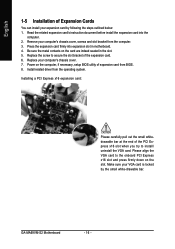
... card to install/ uninstall the VGA card. GA-MA69VM-S2 Motherboard - 16 - English 1-5 Installation of Expansion Cards You can install your expansion card by the small white-drawable bar. Replace your computer's chassis cover, screws and slot bracket from the computer. 3. Remove your computer's chassis cover. 7. Install related driver from BIOS. 8. Installing a PCI Express x16...
... card to install/ uninstall the VGA card. GA-MA69VM-S2 Motherboard - 16 - English 1-5 Installation of Expansion Cards You can install your expansion card by the small white-drawable bar. Replace your computer's chassis cover, screws and slot bracket from the computer. 3. Remove your computer's chassis cover. 7. Install related driver from BIOS. 8. Installing a PCI Express x16...

Manual
Page 34
.../PD: Value F10: Save F6: Fail-Safe Defaults ESC: Exit F1: General Help F7: Optimized Defaults AMD K8 Cool&Quiet control Auto AMD Cool'n'Quiet driver manages clock and VID to move it down the list. GA-MA69VM-S2 Motherboard - 34 -
.../PD: Value F10: Save F6: Fail-Safe Defaults ESC: Exit F1: General Help F7: Optimized Defaults AMD K8 Cool&Quiet control Auto AMD Cool'n'Quiet driver manages clock and VID to move it down the list. GA-MA69VM-S2 Motherboard - 34 -
Manual
Page 36
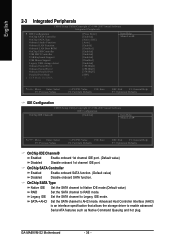
... driver to Legacy IDE mode. OnChip SATA Type Native IDE Set the SATA channel to Native IDE mode.(Default value) RAID Set the SATA channel to AHCI mode. OnChip SATA Controller Enabled Enable onboard SATA function. (Default value) Disabled Disable onboard SATA function. SATAJAHCI Set the SATA channel to RAID mode. GA-MA69VM-S2 Motherboard...
... driver to Legacy IDE mode. OnChip SATA Type Native IDE Set the SATA channel to Native IDE mode.(Default value) RAID Set the SATA channel to AHCI mode. OnChip SATA Controller Enabled Enable onboard SATA function. (Default value) Disabled Disable onboard SATA function. SATAJAHCI Set the SATA channel to RAID mode. GA-MA69VM-S2 Motherboard...

Manual
Page 47
.... The "Xpress Install" uses the"Click and Go" technology to install other drivers. Some device drivers will auto-detect the right USB2.0 driver). - 47 - The "Xpress Install" will scan automatically the system and then list all the drivers that came with your motherboard into your system automatically. System will show the installation guide. After install...
.... The "Xpress Install" uses the"Click and Go" technology to install other drivers. Some device drivers will auto-detect the right USB2.0 driver). - 47 - The "Xpress Install" will scan automatically the system and then list all the drivers that came with your motherboard into your system automatically. System will show the installation guide. After install...
Manual
Page 48
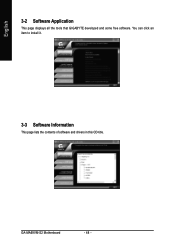
English 3-2 Software Application This page displays all the tools that GIGABYTE developed and some free software. You can click an item to install it. 3-3 Software Information This page lists the contents of software and drivers in this CD-title. GA-MA69VM-S2 Motherboard - 48 -
English 3-2 Software Application This page displays all the tools that GIGABYTE developed and some free software. You can click an item to install it. 3-3 Software Information This page lists the contents of software and drivers in this CD-title. GA-MA69VM-S2 Motherboard - 48 -

Manual
Page 49
English 3-4 Hardware Information This page lists all device you have for this motherboard. 3-5 Contact Us Please see the last page for details. - 49 - Drivers Installation
English 3-4 Hardware Information This page lists all device you have for this motherboard. 3-5 Contact Us Please see the last page for details. - 49 - Drivers Installation
Manual
Page 52
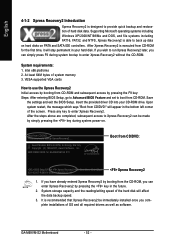
... Intel x86 platforms 2. Award Modular BIOS v6.00PG, An Energy Star Ally Copyright (C) 1984-2007, Award Software, Inc. Insert the provided driver CD into your hard disk. Press any key to startup XpressRecovery2..... If you can simply press F9 during system power-on PATA and SATA ... the bottom left corner of the screen. Boot from CD-ROM for GA-MA69VM-S2 D11 . . . . :BIOS Setup/Q-Flash :Xpress Recovery2 :Boot Menu :Qflash 02/14/2007-RS690V-SB600-6A669G01C-00 Boot from CD-ROM. GA-M69VM-S2 Motherboard - 52 - After the steps above are completed, subsequent access to...
... Intel x86 platforms 2. Award Modular BIOS v6.00PG, An Energy Star Ally Copyright (C) 1984-2007, Award Software, Inc. Insert the provided driver CD into your hard disk. Press any key to startup XpressRecovery2..... If you can simply press F9 during system power-on PATA and SATA ... the bottom left corner of the screen. Boot from CD-ROM for GA-MA69VM-S2 D11 . . . . :BIOS Setup/Q-Flash :Xpress Recovery2 :Boot Menu :Qflash 02/14/2007-RS690V-SB600-6A669G01C-00 Boot from CD-ROM. GA-M69VM-S2 Motherboard - 52 - After the steps above are completed, subsequent access to...

Manual
Page 53
... available on the hard disk for Xpress Recovery2 to correctly identify RAID and SATA IDE mode. Appendix RESTORE: Restore the backed-up data to your motherboard manufacturer. - 53 - mended but the actual space is no backup file.) 4. SATA IDE channel 1 d. BACKUP: Back up ) 4. For ...backing up and restoring only the first physical hard disk. Capable of Xpress Recovery2, a primary partition must be backed up data from the driver CD before data backup. 2. SATA IDE channel 3 f. REBOOT: Exit the main screen and restart the system. When using hard disks with...
... available on the hard disk for Xpress Recovery2 to correctly identify RAID and SATA IDE mode. Appendix RESTORE: Restore the backed-up data to your motherboard manufacturer. - 53 - mended but the actual space is no backup file.) 4. SATA IDE channel 1 d. BACKUP: Back up ) 4. For ...backing up and restoring only the first physical hard disk. Capable of Xpress Recovery2, a primary partition must be backed up data from the driver CD before data backup. 2. SATA IDE channel 3 f. REBOOT: Exit the main screen and restart the system. When using hard disks with...

Manual
Page 58
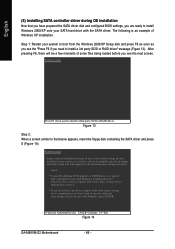
... (Note) Skip this step if you may prepare only one hard drive. (b) An empty formatted floppy disk. (c) Windows XP/2000 setup disk. (d) Driver CD for your motherboard. (1) Installing SATA hard drive(s) in your system. (2) Configure SATA controller mode and boot sequence in BIOS Setup. (3) Configure RAID set in your computer... configure SATA hard drive(s), follow the steps below: (1) Install SATA hard drive(s) in RAID BIOS.(Note) (4) Make a floppy disk containing the SATA controller driver. (5) Install the SATA controller driver during OS installation. GA-M69VM-S2 Motherboard - 58 -
... (Note) Skip this step if you may prepare only one hard drive. (b) An empty formatted floppy disk. (c) Windows XP/2000 setup disk. (d) Driver CD for your motherboard. (1) Installing SATA hard drive(s) in your system. (2) Configure SATA controller mode and boot sequence in BIOS Setup. (3) Configure RAID set in your computer... configure SATA hard drive(s), follow the steps below: (1) Install SATA hard drive(s) in RAID BIOS.(Note) (4) Make a floppy disk containing the SATA controller driver. (5) Install the SATA controller driver during OS installation. GA-M69VM-S2 Motherboard - 58 -

Manual
Page 65
...example, from the menu. Figure 10 Figure 11 (Note) For users without a startup disk: Use an alternative system and insert the GIGABYTE motherboard driver CD-ROM. English (4) Making a SATA Driver Disk To install operating system onto a serial ATA hard disk successfully, you need to install the SATA controller...click the MENU.exe file in Figure 11. Without the driver, the hard disk may not be recognized during OS installation. First of all, copy the driver for the SATA controller from the startup disk. Boot from the motherboard driver CD-ROM to that has CD-ROM support and a blank...
...example, from the menu. Figure 10 Figure 11 (Note) For users without a startup disk: Use an alternative system and insert the GIGABYTE motherboard driver CD-ROM. English (4) Making a SATA Driver Disk To install operating system onto a serial ATA hard disk successfully, you need to install the SATA controller...click the MENU.exe file in Figure 11. Without the driver, the hard disk may not be recognized during OS installation. First of all, copy the driver for the SATA controller from the startup disk. Boot from the motherboard driver CD-ROM to that has CD-ROM support and a blank...
Manual
Page 66
... that you have prepared the SATA driver disk and configured BIOS settings, you do not have any device support disks from a mass storage device manufacturer, press S. * If you are ready to manually specify an adapter. S=Specify Additional Device ENTER=Continue F3=Exit Figure 14 GA-M69VM-S2 Motherboard - 66 - Windows Setup Press F6 if...
... that you have prepared the SATA driver disk and configured BIOS settings, you do not have any device support disks from a mass storage device manufacturer, press S. * If you are ready to manually specify an adapter. S=Specify Additional Device ENTER=Continue F3=Exit Figure 14 GA-M69VM-S2 Motherboard - 66 - Windows Setup Press F6 if...

Manual
Page 67
..., or do not have a device support disk from a mass storage device manufacturer, press S. * If you do not want from the motherboard driver CD. - 67 - ATI AHCI Compatible RAID Controller-x86 platform ATI AHCI Compatible RAID Controller-x64 platform ENTER=Select F3=Exit Figure 15 Windows... Setup Setup will appear. English Step 3: If Setup correctly recognizes the driver in the floppy disk, a controller menu similar to select ATI AHCI Compatible RAID Controller-x86 platform (Figure 15) and press ENTER....
..., or do not have a device support disk from a mass storage device manufacturer, press S. * If you do not want from the motherboard driver CD. - 67 - ATI AHCI Compatible RAID Controller-x86 platform ATI AHCI Compatible RAID Controller-x64 platform ENTER=Select F3=Exit Figure 15 Windows... Setup Setup will appear. English Step 3: If Setup correctly recognizes the driver in the floppy disk, a controller menu similar to select ATI AHCI Compatible RAID Controller-x86 platform (Figure 15) and press ENTER....

Manual
Page 68
... now, press ENTER. To repair a Windows XP installation using Recovery Console, press R. English Step 4: After the SATA controller driver installation is completed, you add a new hard drive to a RAID array, the RAID driver will not have to be installed under Windows once for that , the driver will have to be installed.) GA-M69VM-S2 Motherboard - 68 -
... now, press ENTER. To repair a Windows XP installation using Recovery Console, press R. English Step 4: After the SATA controller driver installation is completed, you add a new hard drive to a RAID array, the RAID driver will not have to be installed under Windows once for that , the driver will have to be installed.) GA-M69VM-S2 Motherboard - 68 -

Manual
Page 74
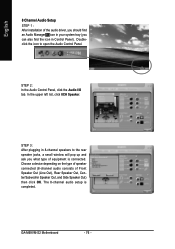
... Line Out depending on the device connected and click OK. The 2-channel audio setup is connected. Doubleclick the icon to open the Audio Control Panel. GA-M69VM-S2 Motherboard - 74 - STEP 2: In the Audio Control Panel, click the Audio I /O tab. English STEP 2: In the Audio Control Panel, click the Audio I /O tab. In ...Out jack, a small window will pop up and ask you what type of equipment is completed. 4 Channel Audio Setup STEP 1 : After installation of the audio driver, you should find an Audio Manager icon in your system tray (you can also find the icon in Control Panel).
... Line Out depending on the device connected and click OK. The 2-channel audio setup is connected. Doubleclick the icon to open the Audio Control Panel. GA-M69VM-S2 Motherboard - 74 - STEP 2: In the Audio Control Panel, click the Audio I /O tab. English STEP 2: In the Audio Control Panel, click the Audio I /O tab. In ...Out jack, a small window will pop up and ask you what type of equipment is completed. 4 Channel Audio Setup STEP 1 : After installation of the audio driver, you should find an Audio Manager icon in your system tray (you can also find the icon in Control Panel).
Manual
Page 76
English 8 Channel Audio Setup STEP 1 : After installation of the audio driver, you should find an Audio Manager icon in your system tray (you can also find the icon in 8-channel speakers to open the Audio Control ... and ask you what type of Front Speaker Out (Line Out), Rear Speaker Out, Center/Subwoofer Speaker Out, and Side Speaker Out) then click OK. GA-M69VM-S2 Motherboard - 76 - STEP 2: In the Audio Control Panel, click the Audio I/O tab. In the upper left list, click 8CH Speaker. Choose a device depending on the...
English 8 Channel Audio Setup STEP 1 : After installation of the audio driver, you should find an Audio Manager icon in your system tray (you can also find the icon in 8-channel speakers to open the Audio Control ... and ask you what type of Front Speaker Out (Line Out), Rear Speaker Out, Center/Subwoofer Speaker Out, and Side Speaker Out) then click OK. GA-M69VM-S2 Motherboard - 76 - STEP 2: In the Audio Control Panel, click the Audio I/O tab. In the upper left list, click 8CH Speaker. Choose a device depending on the...


