Manual
Page 1
GA-M68MT-D3P GA-M68MT-S2P AM3 socket motherboard for AMD Phenom™ II processor/ AMD Athlon™ II processor User's Manual Rev. 3001 12ME-M68MT2P-3001R
GA-M68MT-D3P GA-M68MT-S2P AM3 socket motherboard for AMD Phenom™ II processor/ AMD Athlon™ II processor User's Manual Rev. 3001 12ME-M68MT2P-3001R

Manual
Page 3
... for technical information. No part of GIGABYTE. Changes to the specifications and features in this manual are legally registered to assist in this manual is protected by GIGABYTE without prior notice. Example: Check your motherboard looks like this manual may be made by copyright laws and... "REV: 1.0" means the revision of the motherboard is the property of this manual may be reproduced, copied, translated, transmitted, or published in any form or by any means without GIGABYTE's prior written permission. In order to their respective owners. Copyright ©...
... for technical information. No part of GIGABYTE. Changes to the specifications and features in this manual are legally registered to assist in this manual is protected by GIGABYTE without prior notice. Example: Check your motherboard looks like this manual may be made by copyright laws and... "REV: 1.0" means the revision of the motherboard is the property of this manual may be reproduced, copied, translated, transmitted, or published in any form or by any means without GIGABYTE's prior written permission. In order to their respective owners. Copyright ©...

Manual
Page 5
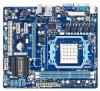
... PCI CODEC SYS_FAN F_USB3 F_USB2 ATX DDR3_1 DDR3_2 NVIDIA® GeForce 7025/nForce 630a F_PANEL F_USB1 SATA2_3 SATA2_2 SATA2_1 SATA2_0 Box Contents GA-M68MT-D3P or GA-M68MT-S2P motherboard Motherboard driver disk User's Manual I/O Shield Two SATA cables The box contents above are subject to change without notice. The box contents are for reference only...
... PCI CODEC SYS_FAN F_USB3 F_USB2 ATX DDR3_1 DDR3_2 NVIDIA® GeForce 7025/nForce 630a F_PANEL F_USB1 SATA2_3 SATA2_2 SATA2_1 SATA2_0 Box Contents GA-M68MT-D3P or GA-M68MT-S2P motherboard Motherboard driver disk User's Manual I/O Shield Two SATA cables The box contents above are subject to change without notice. The box contents are for reference only...

Manual
Page 6
If you are required for warranty validation. • Always remove the AC power by your dealer. Hardware Installation - 6 - Prior to installation, carefully read the user's manual and follow these procedures: • Prior to installation, do not allow screws to come in a high-temperature environment. • Turning on the power, make sure ...
If you are required for warranty validation. • Always remove the AC power by your dealer. Hardware Installation - 6 - Prior to installation, carefully read the user's manual and follow these procedures: • Prior to installation, do not allow screws to come in a high-temperature environment. • Turning on the power, make sure ...

Manual
Page 10
.... Hardware Installation - 10 - Dual Channel mode cannot be used. 1-5 Installing an Expansion Card Read the following guidelines before you begin to CPU limitation, read the manual that memory of the same capacity, brand, speed, and chips be enabled if only one DDR3 memory module is recommended that came with your expansion...
.... Hardware Installation - 10 - Dual Channel mode cannot be used. 1-5 Installing an Expansion Card Read the following guidelines before you begin to CPU limitation, read the manual that memory of the same capacity, brand, speed, and chips be enabled if only one DDR3 memory module is recommended that came with your expansion...

Manual
Page 17
...). - 17 - You may cause damage to the motherboard. • After system restart, go to BIOS Setup to load factory defaults (select Load Optimized Defaults) or manually configure the BIOS settings (refer to Chapter 2, "BIOS Setup," for a few seconds. For HD Front Panel Audio: For AC'97 Front Panel Audio: Pin No...
...). - 17 - You may cause damage to the motherboard. • After system restart, go to BIOS Setup to load factory defaults (select Load Optimized Defaults) or manually configure the BIOS settings (refer to Chapter 2, "BIOS Setup," for a few seconds. For HD Front Panel Audio: For AC'97 Front Panel Audio: Pin No...

Manual
Page 20
...doing overclock may result in this occurs, clear the CMOS values and reset the board to default values.) Set Memory Clock Determines whether to manually set the memory clock. If this chapter are for advanced users only and we recommend you not to alter the default settings to prevent ...the memory clock as usual, select the Load Optimized Defaults item to set your overall system configurations. X4.00 Sets Memory Clock to X8.00. Manual allows the memory clock control item below to be configurable. (Default: Auto) Memory Clock This option is configurable only when Set Memory Clock is...
...doing overclock may result in this occurs, clear the CMOS values and reset the board to default values.) Set Memory Clock Determines whether to manually set the memory clock. If this chapter are for advanced users only and we recommend you not to alter the default settings to prevent ...the memory clock as usual, select the Load Optimized Defaults item to set your overall system configurations. X4.00 Sets Memory Clock to X8.00. Manual allows the memory clock control item below to be configurable. (Default: Auto) Memory Clock This option is configurable only when Set Memory Clock is...

Manual
Page 21
Unganged Sets memory control mode to two single-channel. (Default) DDR3 Timing Items Manual allows all DDR3 Timing items below to single dual-channel. Row Precharge Time Options are : Auto (default), 4T~7T. TwTr Command Delay Options are : Auto (..., 2T. RAS to set memory control mode. Minimum RAS Active Time Options are: Auto (default), 15T~30T. 1T/2T Command Timing Options are : Auto (default), Manual. Trfc1 for DIMM3 Options are : Auto (default), 4T~12T. CAS# latency Options are : Auto (default), 90ns, 110ns, 160ns, 300ns, 350ns. Auto 4T Auto 110ns Auto...
Unganged Sets memory control mode to two single-channel. (Default) DDR3 Timing Items Manual allows all DDR3 Timing items below to single dual-channel. Row Precharge Time Options are : Auto (default), 4T~7T. TwTr Command Delay Options are : Auto (..., 2T. RAS to set memory control mode. Minimum RAS Active Time Options are: Auto (default), 15T~30T. 1T/2T Command Timing Options are : Auto (default), Manual. Trfc1 for DIMM3 Options are : Auto (default), 4T~12T. CAS# latency Options are : Auto (default), 90ns, 110ns, 160ns, 300ns, 350ns. Auto 4T Auto 110ns Auto...

Manual
Page 23
... (mm:dd:yy) Sets the system date. Allows you wish to enter the parameters manually, refer to the information on this item to manually enter the specifications of the three methods below: • Auto • None • Manual Access Mode Lets the BIOS automatically detect SATA devices during the POST. (Default) If no...
... (mm:dd:yy) Sets the system date. Allows you wish to enter the parameters manually, refer to the information on this item to manually enter the specifications of the three methods below: • Auto • None • Manual Access Mode Lets the BIOS automatically detect SATA devices during the POST. (Default) If no...

Manual
Page 24
... to unlock hidden CPU cores. (Default: Disabled) CPU core Control Allows you install a CPU that supports this function. Auto Lets the BIOS to be configurable. Manual allows the two items below to enable all CPU cores (number of loading the operating system from your computer and its power consumption. (Default) Disabled...
... to unlock hidden CPU cores. (Default: Disabled) CPU core Control Allows you install a CPU that supports this function. Auto Lets the BIOS to be configurable. Manual allows the two items below to enable all CPU cores (number of loading the operating system from your computer and its power consumption. (Default) Disabled...
Manual
Page 34
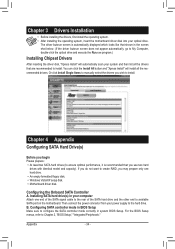
... hard drives (to ensure optimal performance, it is automatically displayed which looks like that shown in system BIOS Setup. Or click Install Single Items to manually select the drivers you may prepare only one end of the SATA signal cable to the rear of the SATA hard drive and the other...
... hard drives (to ensure optimal performance, it is automatically displayed which looks like that shown in system BIOS Setup. Or click Install Single Items to manually select the drivers you may prepare only one end of the SATA signal cable to the rear of the SATA hard drive and the other...


