Manual
Page 5
Chapter 3 Drivers Installation 51 3-1 Install Chipset Drivers 51 3-2 SoftwareApplications 52 3-3 Driver CD Information 52 3-4 Hardware Information 53 3-5 Contact Us ...53 Chapter 4 Appendix 55 4-1 Unique Software Utilities 55 4-1-1 EasyTune 5 Introduction 55 4-1-2 Xpress Recovery2 Introduction 56 4-1-3 Flash BIOS Method Introduction 58 4-1-4 Configuring SATA Hard Drive(s 62 4-1-5 2- / 4- / 6- / 8- Channel Audio Function Introduction 72 4-2 Troubleshooting 77 - 5 -
Chapter 3 Drivers Installation 51 3-1 Install Chipset Drivers 51 3-2 SoftwareApplications 52 3-3 Driver CD Information 52 3-4 Hardware Information 53 3-5 Contact Us ...53 Chapter 4 Appendix 55 4-1 Unique Software Utilities 55 4-1-1 EasyTune 5 Introduction 55 4-1-2 Xpress Recovery2 Introduction 56 4-1-3 Flash BIOS Method Introduction 58 4-1-4 Configuring SATA Hard Drive(s 62 4-1-5 2- / 4- / 6- / 8- Channel Audio Function Introduction 72 4-2 Troubleshooting 77 - 5 -
Manual
Page 16
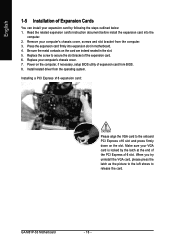
... into expansion slot in the slot. 5. Replace the screw to release the card. Replace your computer's chassis cover, screws and slot bracket from the computer. 3. GA-M61P-S3 Motherboard - 16 - Remove your computer's chassis cover. 7. Press the expansion card firmly into the computer. 2. Be sure the metal contacts on the card are indeed... of the expansion card. 6. English 1-5 Installation of Expansion Cards You can install your VGA card is locked by following the steps outlined below: 1. Install related driver from BIOS. 8.
... into expansion slot in the slot. 5. Replace the screw to release the card. Replace your computer's chassis cover, screws and slot bracket from the computer. 3. GA-M61P-S3 Motherboard - 16 - Remove your computer's chassis cover. 7. Press the expansion card firmly into the computer. 2. Be sure the metal contacts on the card are indeed... of the expansion card. 6. English 1-5 Installation of Expansion Cards You can install your VGA card is locked by following the steps outlined below: 1. Install related driver from BIOS. 8.

Manual
Page 17
... to Line In jack. - 17 - For more information please contact your OS does not support USB controller, please contact OS vendor for possible patch or driver upgrade. Surround Speaker Out (Rear Speaker Out) The default Surround Speaker Out (Rear Speaker Out) jack. can be connected to the lower port (purple). Also...
... to Line In jack. - 17 - For more information please contact your OS does not support USB controller, please contact OS vendor for possible patch or driver upgrade. Surround Speaker Out (Rear Speaker Out) The default Surround Speaker Out (Rear Speaker Out) jack. can be connected to the lower port (purple). Also...

Manual
Page 21
Please refer to the BIOS setting for the SATA 3Gb/s and install the proper driver in the FDD connector. 33 1 34 2 7) SATAII0 / 1 / 2 / 3 (SATA 3Gb/s Connectors) SATA 3Gb/s can provide up to 300 MB/s transfer rate. Hardware Installation Before attaching the ...
Please refer to the BIOS setting for the SATA 3Gb/s and install the proper driver in the FDD connector. 33 1 34 2 7) SATAII0 / 1 / 2 / 3 (SATA 3Gb/s Connectors) SATA 3Gb/s can provide up to 300 MB/s transfer rate. Hardware Installation Before attaching the ...
Manual
Page 23
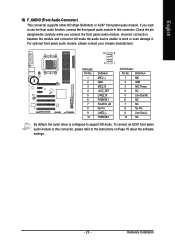
... about the software settings. - 23 - Definition 1 MIC 2 GND 3 MIC Power 4 NC 5 Line Out (R) 6 NC 7 NC 8 No Pin 9 Line Out (L) 10 NC By default, the audio driver is configured to work or even damage it. English 10) F_AUDIO (Front Audio Connector) This connector supports either HD (High Definition) or AC97 front panel...
... about the software settings. - 23 - Definition 1 MIC 2 GND 3 MIC Power 4 NC 5 Line Out (R) 6 NC 7 NC 8 No Pin 9 Line Out (L) 10 NC By default, the audio driver is configured to work or even damage it. English 10) F_AUDIO (Front Audio Connector) This connector supports either HD (High Definition) or AC97 front panel...

Manual
Page 34
...Value F10: Save F6: Fail-Safe Defaults ESC: Exit F1: General Help F7: Optimized Defaults AMD K8 Cool&Quiet control Auto AMD Cool&Quiet driver manages clock and VID to exit this menu. Press to best serve the thermal, performance and power requirements. (Default value) Disabled Disable this ..., but access to move it up, or to Setup will be denied if the correct password is not entered at the prompt. (Default value) GA-M61P-S3 Motherboard - 34 - USB-HDD Select your boot device priority by USB-HDD. First / Second / Third Boot Device Floppy Select your boot device ...
...Value F10: Save F6: Fail-Safe Defaults ESC: Exit F1: General Help F7: Optimized Defaults AMD K8 Cool&Quiet control Auto AMD Cool&Quiet driver manages clock and VID to exit this menu. Press to best serve the thermal, performance and power requirements. (Default value) Disabled Disable this ..., but access to move it up, or to Setup will be denied if the correct password is not entered at the prompt. (Default value) GA-M61P-S3 Motherboard - 34 - USB-HDD Select your boot device priority by USB-HDD. First / Second / Third Boot Device Floppy Select your boot device ...
Manual
Page 51
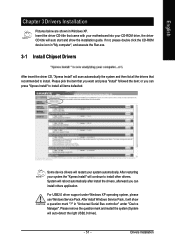
... system the "Xpress Install" will scan automatically the system and then list all items defaulted. Some device drivers will show the installation guide. English Chapter 3 Drivers Installation Pictures below are shown in "Universal Serial Bus controller" under Windows XP operating system, please use Windows... device icon in "My computer", and execute the Run.exe. 3-1 Install Chipset Drivers After insert the driver CD, "Xpress Install" will continue to install. After restarting your CD-ROM drive, the driver CD-title will auto start and show a question mark "?" in Windows XP. ...
... system the "Xpress Install" will scan automatically the system and then list all items defaulted. Some device drivers will show the installation guide. English Chapter 3 Drivers Installation Pictures below are shown in "Universal Serial Bus controller" under Windows XP operating system, please use Windows... device icon in "My computer", and execute the Run.exe. 3-1 Install Chipset Drivers After insert the driver CD, "Xpress Install" will continue to install. After restarting your CD-ROM drive, the driver CD-title will auto start and show a question mark "?" in Windows XP. ...
Manual
Page 52
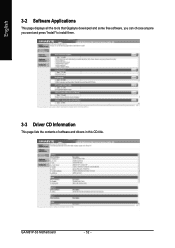
English 3-2 Software Applications This page displays all the tools that Gigabyte developed and some free software, you can choose anyone you want and press "install" to install them. 3-3 Driver CD Information This page lists the contents of software and drivers in this CD-title. GA-M61P-S3 Motherboard - 52 -
English 3-2 Software Applications This page displays all the tools that Gigabyte developed and some free software, you can choose anyone you want and press "install" to install them. 3-3 Driver CD Information This page lists the contents of software and drivers in this CD-title. GA-M61P-S3 Motherboard - 52 -

Manual
Page 53
English 3-4 Hardware Information This page lists all device you have for this motherboard. 3-5 Contact Us Please see the last page for details. - 53 - Drivers Installation
English 3-4 Hardware Information This page lists all device you have for this motherboard. 3-5 Contact Us Please see the last page for details. - 53 - Drivers Installation

Manual
Page 56
... by simply pressing the key during system bootup to startup XpressRecovery2..... At least 64M bytes of the hard disk will affect the data backup speed. 3. M61P-S3 D8 . . . . :BIOS Setup/Q-Flash, : Xpress Recovery2, : Boot Menu 11/23/2006-NV-MCP61-6A61KG04C-00 Boot from CD/DVD:" will ... once you can simply press F9 during system power-on PATA and SATA IDE controllers. GA-M61P-S3 Motherboard - 56 - Press any key to enter Xpress Recovery2 without the CD-ROM. Insert the provided driver CD into your hard disk. After the steps above are completed, subsequent access to enter...
... by simply pressing the key during system bootup to startup XpressRecovery2..... At least 64M bytes of the hard disk will affect the data backup speed. 3. M61P-S3 D8 . . . . :BIOS Setup/Q-Flash, : Xpress Recovery2, : Boot Menu 11/23/2006-NV-MCP61-6A61KG04C-00 Boot from CD/DVD:" will ... once you can simply press F9 during system power-on PATA and SATA IDE controllers. GA-M61P-S3 Motherboard - 56 - Press any key to enter Xpress Recovery2 without the CD-ROM. Insert the provided driver CD into your hard disk. After the steps above are completed, subsequent access to enter...

Manual
Page 57
... the size of the hard disk, so free space available on Nvidia chipsets, BIOS update is as follows: a. Appendix BACKUP: Back up data from the driver CD before data backup. 2. REMOVE: Remove previously-created backup files to correctly identify RAID and SATA IDE mode. Xpress Recovery2 will not appear if there...
... the size of the hard disk, so free space available on Nvidia chipsets, BIOS update is as follows: a. Appendix BACKUP: Back up data from the driver CD before data backup. 2. REMOVE: Remove previously-created backup files to correctly identify RAID and SATA IDE mode. Xpress Recovery2 will not appear if there...
Manual
Page 62
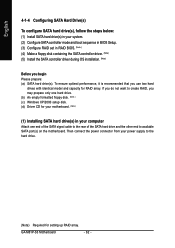
.... GA-M61P-S3 Motherboard - 62 - To ensure optimal performance, it is recommended that you use two hard drives with identical model and capacity for your motherboard. (Note ) (1) Installing SATA hard drive(s) in RAID BIOS. (Note ) (4) Make a floppy disk containing the SATA controller driver. ...(Note ) (5) Install the SATA controller driver during OS installation. (Note ) Before you begin Please prepare: (a) SATA hard drive(s). Then connect the power connector from ...
.... GA-M61P-S3 Motherboard - 62 - To ensure optimal performance, it is recommended that you use two hard drives with identical model and capacity for your motherboard. (Note ) (1) Installing SATA hard drive(s) in RAID BIOS. (Note ) (4) Make a floppy disk containing the SATA controller driver. ...(Note ) (5) Install the SATA controller driver during OS installation. (Note ) Before you begin Please prepare: (a) SATA hard drive(s). Then connect the power connector from ...
Manual
Page 67
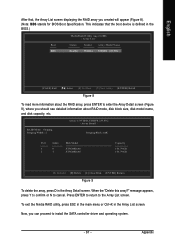
... see detailed information about the RAID array, press ENTER to enter the Array Detail screen (Figure 9), where you can proceed to install the SATA controller driver and operating system. - 67 - This indicates that , the Array List screen displaying the RAID array you created will appear (Figure 8). (Note: BBS stands for BIOS...
... see detailed information about the RAID array, press ENTER to enter the Array Detail screen (Figure 9), where you can proceed to install the SATA controller driver and operating system. - 67 - This indicates that , the Array List screen displaying the RAID array you created will appear (Figure 8). (Note: BBS stands for BIOS...

Manual
Page 68
...the floppy disk. See the instructions below about how to the CD-ROM drive (example: D:\>). Select the controller driver by pressing the corresponding letter from the startup disk. GA-M61P-S3 Motherboard Figure 12 - 68 - Boot from the menu. Press ENTER after each command (Figure 10): cd bootdrv... of all, copy the driver for the SATA controller from the menu in MS-DOS mode(Note). For example, from the motherboard driver CD-ROM to exit when finished. (Note) For users without a startup disk: Use an alternative system and insert the GIGABYTE motherboard driver CD-ROM. Press 0 ...
...the floppy disk. See the instructions below about how to the CD-ROM drive (example: D:\>). Select the controller driver by pressing the corresponding letter from the startup disk. GA-M61P-S3 Motherboard Figure 12 - 68 - Boot from the menu. Press ENTER after each command (Figure 10): cd bootdrv... of all, copy the driver for the SATA controller from the menu in MS-DOS mode(Note). For example, from the motherboard driver CD-ROM to exit when finished. (Note) For users without a startup disk: Use an alternative system and insert the GIGABYTE motherboard driver CD-ROM. Press 0 ...

Manual
Page 69
... the "Press F6 if you need to install a 3rd party SCSI or RAID driver" message (Figure 13). English (5) Installing SATA controller driver during OS installation Now that below appears, insert the floppy disk containing the SATA driver and press S (Figure 14). The following mass storage devices(s) * To specify... system to boot from a mass storage device manufacturer, press S. * If you do not have chosen to that you have prepared the SATA driver disk and configured BIOS settings, you are ready to install Windows 2000/XP onto your system, or you have any device support disks from a...
... the "Press F6 if you need to install a 3rd party SCSI or RAID driver" message (Figure 13). English (5) Installing SATA controller driver during OS installation Now that below appears, insert the floppy disk containing the SATA driver and press S (Figure 14). The following mass storage devices(s) * To specify... system to boot from a mass storage device manufacturer, press S. * If you do not have chosen to that you have prepared the SATA driver disk and configured BIOS settings, you are ready to install Windows 2000/XP onto your system, or you have any device support disks from a...

Manual
Page 70
Use the ARROW keys to Figure 15 below will load support for the following list, or press ESC to return to select additional driver. GA-M61P-S3 Motherboard - 70 - Later, when a screen similar to Figure 16 appears, you want to configure a SCSI Adapter for use with Windows... storage devices for use with Windows, press ENTER. Select the SCSI Adapter you must press S to the previous screen. NVIDIA RAID CLASS DRIVER (required) NVIDIA nForce Storage Controller (required) ENTER=Select F3=Exit Figure 15 Windows Setup Setup will appear. Select NVIDIA nForce Storage Controller...
Use the ARROW keys to Figure 15 below will load support for the following list, or press ESC to return to select additional driver. GA-M61P-S3 Motherboard - 70 - Later, when a screen similar to Figure 16 appears, you want to configure a SCSI Adapter for use with Windows... storage devices for use with Windows, press ENTER. Select the SCSI Adapter you must press S to the previous screen. NVIDIA RAID CLASS DRIVER (required) NVIDIA nForce Storage Controller (required) ENTER=Select F3=Exit Figure 15 Windows Setup Setup will appear. Select NVIDIA nForce Storage Controller...
Manual
Page 71
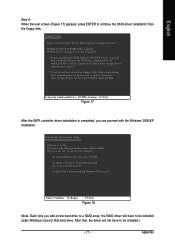
...to Setup. Enter= Continue R=Repair F3=Exit Figure 18 (Note: Each time you add a new hard drive to a RAID array, the RAID driver will not have to be installed under Windows once for use with Windows, press ENTER. To repair a Windows XP installation using Recovery Console, press ...installed.) - 71 - After that hard drive. English Step 4: When the next screen (Figure 17) appears, press ENTER to continue the SATA driver installation from a mass storage device manufacturer, press S. * If you do not want to specify additional mass storage devices for use with Windows, ...
...to Setup. Enter= Continue R=Repair F3=Exit Figure 18 (Note: Each time you add a new hard drive to a RAID array, the RAID driver will not have to be installed under Windows once for use with Windows, press ENTER. To repair a Windows XP installation using Recovery Console, press ...installed.) - 71 - After that hard drive. English Step 4: When the next screen (Figure 17) appears, press ENTER to continue the SATA driver installation from a mass storage device manufacturer, press S. * If you do not want to specify additional mass storage devices for use with Windows, ...
Manual
Page 72
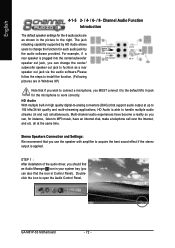
.... Doubleclick the icon to acquire the best sound effect if the stereo output is applied. STEP 1 : After installation of the audio driver, you should find an Audio Manager icon in your system tray (you can change the function for the microphone to -analog converters (... center/subwoofer speaker out jack, you can , for instance, listen to the default Mic In jack for each audio jack by the audio software provided. GA-M61P-S3 Motherboard - 72 - English 4-1-5 2- / 4- / 6- / 8- Channel Audio Function Introduction The default speaker settings for the 6 audio jacks are in Windows...
.... Doubleclick the icon to acquire the best sound effect if the stereo output is applied. STEP 1 : After installation of the audio driver, you should find an Audio Manager icon in your system tray (you can change the function for the microphone to -analog converters (... center/subwoofer speaker out jack, you can , for instance, listen to the default Mic In jack for each audio jack by the audio software provided. GA-M61P-S3 Motherboard - 72 - English 4-1-5 2- / 4- / 6- / 8- Channel Audio Function Introduction The default speaker settings for the 6 audio jacks are in Windows...
Manual
Page 73
..., a small window will pop up and ask you can also find an Audio Manager icon in your system tray (you what type of the audio driver, you should find the icon in Control Panel). In the upper left list, click 4CH Speaker. - 73 - In the upper left list, click 2CH Speaker...
..., a small window will pop up and ask you can also find an Audio Manager icon in your system tray (you what type of the audio driver, you should find the icon in Control Panel). In the upper left list, click 4CH Speaker. - 73 - In the upper left list, click 2CH Speaker...

Manual
Page 74
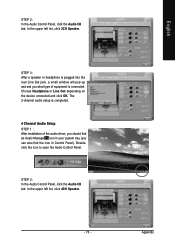
... also find an Audio Manager icon in your system tray (you what type of equipment is completed. GA-M61P-S3 Motherboard - 74 - The 4-channel audio setup is completed. 6 Channel Audio Setup STEP 1 : After installation of the audio driver, you should find the icon in Control Panel). Doubleclick the icon to open the Audio Control...
... also find an Audio Manager icon in your system tray (you what type of equipment is completed. GA-M61P-S3 Motherboard - 74 - The 4-channel audio setup is completed. 6 Channel Audio Setup STEP 1 : After installation of the audio driver, you should find the icon in Control Panel). Doubleclick the icon to open the Audio Control...


