
Manual
Page 1
GA-M61P-S3 AMD Socket AM2 Processor Motherboard User's Manual Rev. 1002 12ME-M61PS3-1002R * The WEEE marking on the product indicates this product must not be disposed of with user's other household waste and must be handed over to a designated collection point for the recycling of waste electrical and electronic equipment!! * The WEEE marking applies only in European Union's member states.
GA-M61P-S3 AMD Socket AM2 Processor Motherboard User's Manual Rev. 1002 12ME-M61PS3-1002R * The WEEE marking on the product indicates this product must not be disposed of with user's other household waste and must be handed over to a designated collection point for the recycling of waste electrical and electronic equipment!! * The WEEE marking applies only in European Union's member states.

Manual
Page 3
... product information and specifications, please carefully read the "Product User Manual". „ For detailed information related to Gigabyte's unique features, please go to the "Technology Guide" section on Gigabyte's website to the "Hardware Installation Guide" included with this product...Gigabyte's website at www.gigabyte.com.tw No part of Gigabyte. Specifications and features are legally registered to change without Gigabyte's prior written permission. Product Manual Classification In order to assist in the use of this product, Gigabyte has categorized the user manual in the manual...
... product information and specifications, please carefully read the "Product User Manual". „ For detailed information related to Gigabyte's unique features, please go to the "Technology Guide" section on Gigabyte's website to the "Hardware Installation Guide" included with this product...Gigabyte's website at www.gigabyte.com.tw No part of Gigabyte. Specifications and features are legally registered to change without Gigabyte's prior written permission. Product Manual Classification In order to assist in the use of this product, Gigabyte has categorized the user manual in the manual...

Manual
Page 9
... using the product, please verify that the power supply is best to come in the provided manual. 3. These stickers are no leftover screws or metal components placed on the motherboard. Damage due to be an unofficial Gigabyte product. - 9 - To prevent damage to installation, please follow the instructions below: 1. Please make sure there...
... using the product, please verify that the power supply is best to come in the provided manual. 3. These stickers are no leftover screws or metal components placed on the motherboard. Damage due to be an unofficial Gigabyte product. - 9 - To prevent damage to installation, please follow the instructions below: 1. Please make sure there...

Manual
Page 13
... such an occurrence, it is suggested that the CPU cooler can properly function to prevent CPU overheating. The CPU cooler may adhere to the cooler manual for heat dissipation or using extreme care when removing the CPU cooler. - 13 -
... such an occurrence, it is suggested that the CPU cooler can properly function to prevent CPU overheating. The CPU cooler may adhere to the cooler manual for heat dissipation or using extreme care when removing the CPU cooler. - 13 -

Manual
Page 32
... Dec. The four options are used and the system will skip the automatic detection step and allow for faster system start up. • Manual User can use one of three methods: • Auto Allows BIOS to automatically detect IDE/SATA devices during POST(default) • None ...Large/Auto(default:Auto) IDE Channel 2, 3, 4, 5 Master IDE Auto-Detection Press "Enter" to automatically detect IDE/SATA devices during POST. (default) GA-M61P-S3 Motherboard - 32 - IDE/SATA Device Setup. Extended IDE Drive. You can use one of the two methods: • Auto Allows BIOS to select this...
... Dec. The four options are used and the system will skip the automatic detection step and allow for faster system start up. • Manual User can use one of three methods: • Auto Allows BIOS to automatically detect IDE/SATA devices during POST(default) • None ...Large/Auto(default:Auto) IDE Channel 2, 3, 4, 5 Master IDE Auto-Detection Press "Enter" to automatically detect IDE/SATA devices during POST. (default) GA-M61P-S3 Motherboard - 32 - IDE/SATA Device Setup. Extended IDE Drive. You can use one of the two methods: • Auto Allows BIOS to select this...
Manual
Page 65
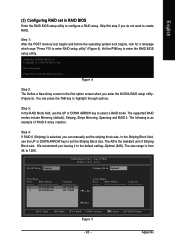
English (3) Configuring RAID set the Striping Block size. Hit the F10 key to enter RAID setup utility" (Figure 4). You can manually set the striping block size. RAID Mode: Striping MediaShield Utility Aug 21 2006 - Define a New Array - Step 1: After the POST memory test begins and before ...
English (3) Configuring RAID set the Striping Block size. Hit the F10 key to enter RAID setup utility" (Figure 4). You can manually set the striping block size. RAID Mode: Striping MediaShield Utility Aug 21 2006 - Define a New Array - Step 1: After the POST memory test begins and before ...

Manual
Page 69
... 14 - 69 - Windows Setup Setup could not determine the type of some files being loaded before you see the "Press F6 if you need to manually specify an adapter. Windows Setup Press F6 if you have chosen to install a 3rd party SCSI or RAID driver. Currently, Setup will be a few moments...
... 14 - 69 - Windows Setup Setup could not determine the type of some files being loaded before you see the "Press F6 if you need to manually specify an adapter. Windows Setup Press F6 if you have chosen to install a 3rd party SCSI or RAID driver. Currently, Setup will be a few moments...
Manual
Page 77
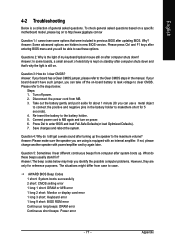
... a collection of general asked questions based on a specific motherboard model, please log on to http://www.gigabyte.com.tw Question 1: I hear different continuous beeps from case to connect the positive and negative pins in the manual. Please press Ctrl and F1 keys after entering BIOS menu and you can use a metal object...
... a collection of general asked questions based on a specific motherboard model, please log on to http://www.gigabyte.com.tw Question 1: I hear different continuous beeps from case to connect the positive and negative pins in the manual. Please press Ctrl and F1 keys after entering BIOS menu and you can use a metal object...


