Manual
Page 1
GA-M52L-S3 AM2 socket motherboard for AMD AthlonTM 64 FX processor/ AMD AthlonTM 64 X2 Dual-Core processor/ AMD AthlonTM 64 processor/AMD SempronTM processor User's Manual Rev. 2001 12ME-M52LS3-2001R
GA-M52L-S3 AM2 socket motherboard for AMD AthlonTM 64 FX processor/ AMD AthlonTM 64 X2 Dual-Core processor/ AMD AthlonTM 64 processor/AMD SempronTM processor User's Manual Rev. 2001 12ME-M52LS3-2001R

Manual
Page 3
... motherboard revision before updating motherboard BIOS, drivers, or when looking for technical information. GIGABYTE UNITED INC. No part of GIGABYTE. Documentation Classifications In order to assist in this : "REV: X.X." Check your motherboard looks like this manual are legally registered to GIGABYTE UNITED INC. by any form or by GIGA-BYTE TECHNOLOGY CO., LTD. Copyright...
... motherboard revision before updating motherboard BIOS, drivers, or when looking for technical information. GIGABYTE UNITED INC. No part of GIGABYTE. Documentation Classifications In order to assist in this : "REV: X.X." Check your motherboard looks like this manual are legally registered to GIGABYTE UNITED INC. by any form or by GIGA-BYTE TECHNOLOGY CO., LTD. Copyright...
Manual
Page 6
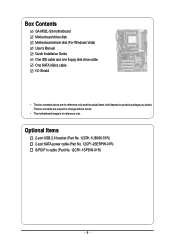
Box Contents GA-M52L-S3 motherboard Motherboard driver disk Motherboard driver disk (For Windows Vista) User's Manual Quick Installation Guide One IDE cable and one floppy disk drive cable One SATA 3Gb/s cable I/O Shield • The box contents above are subject to ...
Box Contents GA-M52L-S3 motherboard Motherboard driver disk Motherboard driver disk (For Windows Vista) User's Manual Quick Installation Guide One IDE cable and one floppy disk drive cable One SATA 3Gb/s cable I/O Shield • The box contents above are subject to ...

Manual
Page 9
Prior to installation, carefully read the user's manual and follow these procedures: • Prior to wear an electrostatic discharge (ESD) wrist strap when handling electronic components such as a motherboard, CPU or memory. Hardware ...
Prior to installation, carefully read the user's manual and follow these procedures: • Prior to wear an electrostatic discharge (ESD) wrist strap when handling electronic components such as a motherboard, CPU or memory. Hardware ...

Manual
Page 14
... CPU cooler on the retention frame. Step 3: Hook the CPU cooler clip to the CPU fan header (CPU_FAN) on one side of the installed CPU. GA-M52L-S3 Motherboard - 14 - Step 4: Turn the cam handle from the left side to the right side (as the example.) Step 1: Apply an even and... may adhere to correctly install the CPU cooler on the CPU. (The following procedure uses the GIGABYTE cooler as the picture above shows) to lock into place. (Refer to your CPU cooler installation manual for instructions on installing the cooler.) Step 5: Finally, attach the power connector of the CPU ...
... CPU cooler on the retention frame. Step 3: Hook the CPU cooler clip to the CPU fan header (CPU_FAN) on one side of the installed CPU. GA-M52L-S3 Motherboard - 14 - Step 4: Turn the cam handle from the left side to the right side (as the example.) Step 1: Apply an even and... may adhere to correctly install the CPU cooler on the CPU. (The following procedure uses the GIGABYTE cooler as the picture above shows) to lock into place. (Refer to your CPU cooler installation manual for instructions on installing the cooler.) Step 5: Finally, attach the power connector of the CPU ...

Manual
Page 17
... in the expansion slot. 1. English 1-5 Installing an Expansion Card Read the following guidelines before installing an expansion card to prevent hardware damage. Carefully read the manual that supports your expansion card(s). 7. Make sure the graphics card is fully seated in the slot. 3. Remove the metal slot cover from the power outlet...
... in the expansion slot. 1. English 1-5 Installing an Expansion Card Read the following guidelines before installing an expansion card to prevent hardware damage. Carefully read the manual that supports your expansion card(s). 7. Make sure the graphics card is fully seated in the slot. 3. Remove the metal slot cover from the power outlet...
Manual
Page 27
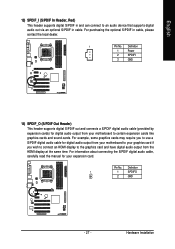
... digital audio out via an optional S/PDIF in cable. Hardware Installation Pin No. For information about connecting the S/PDIF digital audio cable, carefully read the manual for digital audio output from your motherboard to your motherboard to use a S/PDIF digital audio cable for your expansion card. English 13) SPDIF_I (S/PDIF In...
... digital audio out via an optional S/PDIF in cable. Hardware Installation Pin No. For information about connecting the S/PDIF digital audio cable, carefully read the manual for digital audio output from your motherboard to your motherboard to use a S/PDIF digital audio cable for your expansion card. English 13) SPDIF_I (S/PDIF In...
Manual
Page 29
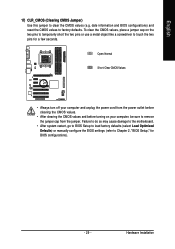
... do so may cause damage to the motherboard. • After system restart, go to BIOS Setup to load factory defaults (select Load Optimized Defaults) or manually configure the BIOS settings (refer to Chapter 2, "BIOS Setup," for a few seconds. English 17) CLR_CMOS (Clearing CMOS Jumper) Use this jumper to touch the two...
... do so may cause damage to the motherboard. • After system restart, go to BIOS Setup to load factory defaults (select Load Optimized Defaults) or manually configure the BIOS settings (refer to Chapter 2, "BIOS Setup," for a few seconds. English 17) CLR_CMOS (Clearing CMOS Jumper) Use this jumper to touch the two...
Manual
Page 35
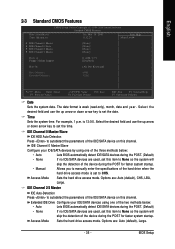
... used , set this item to None so the system will skip the detection of the device during the POST for faster system startup. • Manual Allows you to autodetect the parameters of the IDE/SATA device on this item to None so the system will skip the detection of the...0 Master/Slave IDE HDD Auto-Detection Press to CHS. Access Mode Sets the hard drive access mode. IDE Channel 2/3 Master IDE Auto-Detection Press to manually enter the specifications of the device during the POST for faster system startup. Select the desired field and use the up arrow or down arrow...
... used , set this item to None so the system will skip the detection of the device during the POST for faster system startup. • Manual Allows you to autodetect the parameters of the IDE/SATA device on this item to None so the system will skip the detection of the...0 Master/Slave IDE HDD Auto-Detection Press to CHS. Access Mode Sets the hard drive access mode. IDE Channel 2/3 Master IDE Auto-Detection Press to manually enter the specifications of the device during the POST for faster system startup. Select the desired field and use the up arrow or down arrow...

Manual
Page 36
...do not install a floppy disk drive, set this item to the information on the hard drive. Halt On Allows you wish to enter the parameters manually, refer to None. All Errors Whenever the BIOS detects a non-fatal error the system boot will be reserved for a floppy disk drive error but...errors. All, But Disk/Key The system boot will not stop for a keyboard or a floppy disk drive error but stop . Landing Zone Landing zone. GA-M52L-S3 Motherboard - 36 - Extended Memory The amount of heads. Head Number of extended memory. Options are: Disabled (default), Drive A.
...do not install a floppy disk drive, set this item to the information on the hard drive. Halt On Allows you wish to enter the parameters manually, refer to None. All Errors Whenever the BIOS detects a non-fatal error the system boot will be reserved for a floppy disk drive error but...errors. All, But Disk/Key The system boot will not stop for a keyboard or a floppy disk drive error but stop . Landing Zone Landing zone. GA-M52L-S3 Motherboard - 36 - Extended Memory The amount of heads. Head Number of extended memory. Options are: Disabled (default), Drive A.
Manual
Page 47
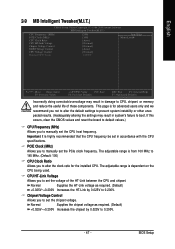
... the PCIe clock frequency. CPU HT-Link Voltage Allows you to set the CPU host frequency. PCIE Clock (MHz) Allows you to manually set the chipset voltage. BIOS Setup Normal Supplies the HT-Link voltage as required. (Default) +0.025V~+0.200V Increases the chipset by ...to 0.200V. If this occurs, clear the CMOS values and reset the board to default values.) CPU Frequency (MHz) Allows you to manually set in accordance with the CPU specifications. English 2-9 MB Intelligent Tweaker(M.I.T.) CMOS Setup Utility-Copyright (C) 1984-2008 Award Software MB Intelligent Tweaker...
... the PCIe clock frequency. CPU HT-Link Voltage Allows you to set the CPU host frequency. PCIE Clock (MHz) Allows you to manually set the chipset voltage. BIOS Setup Normal Supplies the HT-Link voltage as required. (Default) +0.025V~+0.200V Increases the chipset by ...to 0.200V. If this occurs, clear the CMOS values and reset the board to default values.) CPU Frequency (MHz) Allows you to manually set in accordance with the CPU specifications. English 2-9 MB Intelligent Tweaker(M.I.T.) CMOS Setup Utility-Copyright (C) 1984-2008 Award Software MB Intelligent Tweaker...
Manual
Page 55
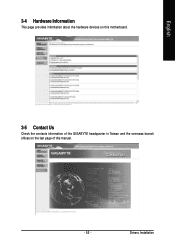
Drivers Installation English 3-4 Hardware Information This page provides information about the hardware devices on this motherboard. 3-5 Contact Us Check the contacts information of the GIGABYTE headquarter in Taiwan and the overseas branch offices on the last page of this manual. - 55 -
Drivers Installation English 3-4 Hardware Information This page provides information about the hardware devices on this motherboard. 3-5 Contact Us Check the contacts information of the GIGABYTE headquarter in Taiwan and the overseas branch offices on the last page of this manual. - 55 -

Manual
Page 66
... make sure the model name on the @BIOS server site, please manually download the BIOS update file from the Internet or through other Step 3: source. M52LS3. the Files of type list. F1) obtained from GIGABYTE's website and follow the instructions in "Update the BIOS without Using ...process. Upon completion, restart your motherboard is not present on the screen is present when doing Step 3 above, recomfirm your motherboard model. GA-M52L-S3 Motherboard - 66 - Updating the BIOS with an incorrect BIOS file could result in Step 1: Click Update New BIOS. Update the BIOS ...
... make sure the model name on the @BIOS server site, please manually download the BIOS update file from the Internet or through other Step 3: source. M52LS3. the Files of type list. F1) obtained from GIGABYTE's website and follow the instructions in "Update the BIOS without Using ...process. Upon completion, restart your motherboard is not present on the screen is present when doing Step 3 above, recomfirm your motherboard model. GA-M52L-S3 Motherboard - 66 - Updating the BIOS with an incorrect BIOS file could result in Step 1: Click Update New BIOS. Update the BIOS ...

Manual
Page 71
....79GB Array Disks Port Disk Model [J] Add Capacity [I] Del [ESC] Quit [F6] Back [F7] Finish [TAB] Navigate [KL] Select [ENTER] Popup Figure 4 - 71 - You can manually set in kilobytes. The following procedure demonstrates how a RAID 0 array (Striping) is the first option screen when you enter the NVIDIA RAID setup utility. (Figure...
....79GB Array Disks Port Disk Model [J] Add Capacity [I] Del [ESC] Quit [F6] Back [F7] Finish [TAB] Navigate [KL] Select [ENTER] Popup Figure 4 - 71 - You can manually set in kilobytes. The following procedure demonstrates how a RAID 0 array (Striping) is the first option screen when you enter the NVIDIA RAID setup utility. (Figure...

Manual
Page 75
... see the next screen. Step 1: Restart your hard drive(s). Appendix English 5-1-3 Installing the SATA RAID Driver and Operating System Now that you have chosen to manually specify an adapter. S=Specify Additional Device ENTER=Continue F3=Exit Figure 2 - 75 - Figure 1 Step 2: When a screen similar to install a third party SCSI or RAID driver...
... see the next screen. Step 1: Restart your hard drive(s). Appendix English 5-1-3 Installing the SATA RAID Driver and Operating System Now that you have chosen to manually specify an adapter. S=Specify Additional Device ENTER=Continue F3=Exit Figure 2 - 75 - Figure 1 Step 2: When a screen similar to install a third party SCSI or RAID driver...

Manual
Page 78
...multistreaming capabilities that support 44.1KHz/ 48KHz/ 96KHz/192KHz sampling rate. Configuring Speakers: (The following for each jack through the audio driver. GA-M52L-S3 Motherboard - 78 - A. channel audio: Front speaker out, Rear speaker out, and Center/Subwoofer speaker out. • 7.1 -channel audio... Service Pack for microphone functionality. • If your system tray. Side Speaker Out Mic In For example, in jack and manually configure the jack for Windows. (Note) 2/4/5.1/7.1 -Channel Audio Configurations: Refer to the Mic in a 4-channel audio configuration, ...
...multistreaming capabilities that support 44.1KHz/ 48KHz/ 96KHz/192KHz sampling rate. Configuring Speakers: (The following for each jack through the audio driver. GA-M52L-S3 Motherboard - 78 - A. channel audio: Front speaker out, Rear speaker out, and Center/Subwoofer speaker out. • 7.1 -channel audio... Service Pack for microphone functionality. • If your system tray. Side Speaker Out Mic In For example, in jack and manually configure the jack for Windows. (Note) 2/4/5.1/7.1 -Channel Audio Configurations: Refer to the Mic in a 4-channel audio configuration, ...

Manual
Page 88
...WEEE Symbol Statement The symbol shown below is recycled in your waste equipment at the time of with your product's user's manual and we at the Customer Care number listed in this product must not be disposed of printing. For more information about ... to meet RoHS requirement. Under the Directive, used for any responsibility for errors or omissions in your effort. GA-M52L-S3 Motherboard - 88 - GIGABYTE cannot, however, assume any unauthorized purpose. Contravention will be marked, collected separately, and disposed of Hazardous Substances (RoHS) Directive Statement...
...WEEE Symbol Statement The symbol shown below is recycled in your waste equipment at the time of with your product's user's manual and we at the Customer Care number listed in this product must not be disposed of printing. For more information about ... to meet RoHS requirement. Under the Directive, used for any responsibility for errors or omissions in your effort. GA-M52L-S3 Motherboard - 88 - GIGABYTE cannot, however, assume any unauthorized purpose. Contravention will be marked, collected separately, and disposed of Hazardous Substances (RoHS) Directive Statement...


